Ideas That Power Digital Growth
Stay ahead with actionable insights, expert opinions, and practical guides covering ecommerce trends, platform updates, automation, AI, and real-world solutions to help businesses grow and scale digitally.
Boost Sales with AI-Powered Product Recommendations
Personalize every shopper's experience with smart recommendations that learn from real behavior and drive more conversions automatically.
Get Started
Ecartify: AI Recommender – Smart Product Suggestions Powered by Real Shopper Behavior
Boost your store revenue by intelligently recommending relevant products to customers during their purchase journey. The AI Recommender addon uses vector-based AI technology to learn what your customers search, view, add to cart, and buy — then shows them the most relevant products at the right time. Powered by Qdrant (vector database) and Cohere (AI embeddings), this addon delivers truly personalized recommendations that increase average order value, reduce bounce rate, and keep customers coming back for more.
Key Features of AI Recommender
Behavior-Based AI: Learns from search, views, cart adds, and orders to build a personalized profile for each customer.
Vector Search (Qdrant): Uses lightning-fast vector similarity search to find the most relevant products in milliseconds.
Cohere AI Embeddings: Converts product and behavior data into smart embeddings that understand context and meaning.
Weighted Activity Scoring: Configure how much each action matters — views, cart adds, searches, and orders each carry adjustable weights.
Automated Product Sync: Background cron job automatically syncs your entire product catalog into the AI vector database.
Filter by Activity Type: Show recommendations based only on Search, View, Cart, Order activity — or mix all together.
Flexible Block Display: Add a Recommendation block anywhere on your storefront using CS-Cart's layout manager.
Responsive on All Devices: Recommendations display beautifully on Phone, Tablet, and Desktop with the Scroller template.
Optional Add-to-Cart Button: Show or hide the Add to Cart button on recommendation cards to match your store's design.
Step-by-Step Setup Guide
Step 1: Install the Addon
Get the AI Recommender running on your CS-Cart store in just a few minutes:
Download from the CS-Cart marketplace or the Ecartify website
Go to Add-ons → Manage Add-ons in your admin panel
Click the + button and upload the "Ecartify: AI Recommender" package
Click Install and then set the Status to ON
Once activated, go to Add-ons → Ecartify: AI Recommender to open the settings panel.
Step 2: Connect Your AI Services (Qdrant + Cohere)
The AI Recommender needs two external services to work. Both have free tiers to get you started:
Qdrant URL:
Your Qdrant cloud cluster URL (e.g. https://xxxxxxxx-xxxx-xxxx-xxxx-xxxxxxxxxxxx.us-east4-0.gcp.cloud.qdrant.io). Sign up free at cloud.qdrant.io
Qdrant API Key:
Generated from your Qdrant cloud dashboard. Used to authenticate requests to the vector database.
Cohere API Key:
Get your free API key from cohere.com. Cohere converts product data into AI "embeddings" (smart numeric representations) for similarity matching.
Step 3: Set Activity Weights
Tell the AI how much each customer action matters when calculating recommendations. Higher weight = more influence on the results:
Weight of View Product (default: 1):
How much a customer simply viewing a product page influences their recommendations. Low weight since browsing doesn't always mean strong interest.
Weight of Add to Cart (default: 2):
Adding a product to cart shows strong buying intent. Higher weight means cart actions influence recommendations more.
Weight of Search Product (default: 1):
When a customer searches for something, the AI learns what they're looking for. Searching shows active interest.
Weight of Create Order (default: 3):
Completing a purchase is the strongest signal. A high weight means past purchases heavily shape future recommendations.
Step 4: Set Up Product Sync (Cron Job)
The AI needs to know about all your products. A background cron job syncs your product catalog to Qdrant automatically — every minute in the background:
Set a Cron Password: Enter a secure password (e.g. MYPASS). This protects the cron endpoint from unauthorized access.
Copy the Cron Command: The addon shows the exact command to add to your server's cron scheduler.
Step 5: Add the Recommendation Block to Your Storefront
Now display personalized recommendations to your customers by adding the Recommendation block to any page layout:
Go to Design → Layouts:
Open the CS-Cart layout manager and select the page where you want recommendations to appear (homepage, product page, etc.)
Add a New Block:
Click the +Icon in your chosen grid position and search for and check products and found in checkbox "Recommendation" in the check list
Configure General Tab:
Set the block Name (e.g. "Recommendation"), choose Template as Scroller, set Wrapper to Main block (H1 heading), and select which devices to show on (Phone, Tablet, Desktop)
Configure Content Tab:
Set Filling to Recommended Products, set Limit (e.g. 10 products), set Page to 1, and choose which activity types to base recommendations on: All, Search, View, Cart, or Order
Step 6: Configure Block Settings
Fine-tune how the recommendation block behaves on your storefront:
Hide Add to Cart Button:
Check this box if you want a cleaner look — customers click the product to view it before buying. Uncheck to show "Add to Cart" directly on recommendation cards.
Limit:
Control how many products appear (default: 10). The Scroller template lets customers scroll through all recommendations smoothly.
Save the Block:
Click Save and then publish your layout changes. Visit your storefront to see the recommendation block live
Step 7: See It Live on Your Storefront
Once everything is set up, your storefront will show a beautiful "Recommendation" scroller section to every customer. Here's what happens automatically:
Customer Visits Store:
As soon as a customer views products, searches, or adds to cart — the AI starts tracking their preferences in real-time.
AI Calculates Best Matches:
Qdrant searches through all product vectors to find items most similar to the customer's behavior profile, weighted by your activity settings.
Scroller Displays Products:
A horizontal product scroller appears on the page showing personalized recommendations — each customer sees different products based on their own behavior.
Gets Smarter Over Time:
The more a customer interacts with your store, the more accurate and personalized their recommendations become.
Real-World Benefits & Results
Increase Average Order Value
Relevant Cross-Sells: Customers discover products that genuinely match their interests — increasing basket size naturally without aggressive selling.
Behavior-Driven: Unlike manual "related products," AI recommendations adapt to each customer — so every shopper sees what's most relevant to them.
Purchase History Learning: Repeat customers get recommendations based on past orders — encouraging add-ons, upgrades, and complementary items.
Boost Conversion Rates
Right Product, Right Time: Showing customers what they're actually interested in dramatically reduces bounce rate and increases time on site.
Search Intent Captured: If a customer searches "blue shoes" and doesn't find exactly what they want, recommendations surface similar options automatically.
Reduces Decision Fatigue: Instead of overwhelming customers with your full catalog, the AI curates a small set of highly relevant products.
Better Customer Experience
Personalized for Every Visitor: No two customers see the same recommendations — each experience feels tailored and unique.
Discovers Hidden Catalog Gems: Products that don't appear in top search results or categories get surfaced to the right customers through AI matching.
Builds Customer Loyalty: A store that "gets" what you like keeps customers coming back — personalization creates stickiness.
Zero Manual Work
Fully Automated: Once the cron job is set, product sync and customer tracking happen automatically — no ongoing manual work needed.
Self-Improving: As more customers use your store, recommendation quality improves organically with more data.
No ML Expertise Required: The addon handles all the AI complexity — you just configure weights and place the block.
Transform Your Store Into a Personalization Engine
Your AI Recommender addon is ready to make every customer's shopping experience feel like it was designed just for them. Say goodbye to generic "You might also like" lists that show the same products to everyone.
Pro Tip: Start with the default weights (View=1, Cart=2, Search=1, Order=3) and let the system collect data for 1-2 weeks. Then analyze which activity type drives the most conversions in your store and increase that weight. Set the recommendation block limit to 10 and place it just below your main homepage banner for maximum visibility.
HubSpot Vendor Management with Seamless CS-Cart Integration
Sync vendor profiles, performance metrics, products, and communications automatically to optimize vendor relationships and marketplace operations.
HubSpot Vendor Connector - For Marketplace Vendors
As a vendor on our marketplace, the HubSpot Vendor Connector empowers you to connect your personal HubSpot account and automatically sync your products, customers, and orders. Take control of your vendor business by maintaining a unified view of all your marketplace data in HubSpot. Grow your business faster with automated data synchronization, powerful marketing automation, and real-time customer insights - all while keeping your data secure with industry-standard OAuth 2.0 authentication.
Key Features for Vendors
Personal HubSpot Account Connection: Connect your own HubSpot account securely and keep your business data completely private and under your control.
Automatic Product Sync: Your marketplace products automatically sync to HubSpot with pricing, inventory, and complete product details in real-time.
Customer Data Synchronization: All your customers from the marketplace sync to HubSpot contacts, giving you a complete customer database.
Order Management: Every order appears as a deal in your HubSpot pipeline, with status updates that automatically reflect marketplace changes.
Marketing Automation: Create targeted email campaigns in HubSpot based on customer behavior, purchase history, and engagement patterns.
Secure OAuth 2.0 Authentication: Industry-standard secure connection ensures your HubSpot data and marketplace information are protected.
How to Connect Your HubSpot Account
Step 1: Access Your Vendor Dashboard
Log in to your vendor account and find the HubSpot Connector option:
Log in to your marketplace vendor account
Navigate to Integrations or Settings
Look for "HubSpot Vendor Connector"
Click to open the connector setup
The connector interface is simple and designed specifically for vendors like you!
Step 2: Create a HubSpot Private App
You'll need to create a Private App in your HubSpot account to allow the marketplace to sync your data:
Go to HubSpot: Visit app.hubspot.com and log in to your account
Navigate to Settings: Click your account name → Settings
Find Integrations: Go to Integrations → Private Apps
Create New App: Click "Create app" and give it a name like "Marketplace Sync"
Set Permissions: Select permissions for contacts, companies, deals, products, and custom objects
Create Token: Click "Create" and copy your app ID and secret
Step 3: Enter Your HubSpot Credentials
Paste your HubSpot credentials into the vendor connector:
Paste App ID: Copy the Client ID from your HubSpot Private App
Paste Secret Key: Copy the Client Secret from HubSpot (keep this secure!)
Click Save: Your credentials are encrypted and stored securely
Confirmation: You'll see "Credentials saved successfully" message
Your HubSpot credentials are encrypted using enterprise-grade security.
Step 4: Authorize the Connection
Complete the secure OAuth connection to your HubSpot account:
1. Copy the Callback URL and paste in the app that you created.(You can find in connection page)
2. Copy the Auth URL in HubSpot App
3. Open it in Same browser where your vendor login.
4. Grant Permissions: Review and approve the requested permissions
5.Return & Confirm: You'll be redirected back showing "Connected to HubSpot"
Step 5: Configure Order Status Mapping
Map your marketplace order statuses to HubSpot deal stages so your pipeline reflects your real business:
Pending Orders: Choose which HubSpot stage represents new orders
Processing Orders: Select the stage for orders being prepared
Shipped Orders: Define stage for orders that have shipped
Delivered Orders: Set stage for completed deliveries
Cancelled Orders: Choose stage for cancelled orders
Click "Save Configuration" to apply your status mapping.
Step 6: Sync Your Products
Start synchronizing your marketplace products to HubSpot:
Go to Products Section: Click "Products" in the connector
Sync All Products: Click "Sync All Products" to sync your entire catalog
Monitor Progress: Watch the sync status as your products are added to HubSpot
View in HubSpot: Log into HubSpot and see your products in the Products tab
Your products stay synchronized, allowing you to manage inventory and create targeted marketing campaigns.
Step 7: AutoSync Your Customers
Bring all your marketplace customers into HubSpot for better relationship management:
Step 8: Sync Your Orders
Get your complete order history into HubSpot as deals in your sales pipeline:
Go to Orders: Click "Orders" in the connector
Sync Order History: Click "Sync All Orders" to import all past orders
See Pipeline: Orders appear as deals in your HubSpot sales pipeline
Real-time Updates: New marketplace orders automatically appear in HubSpot
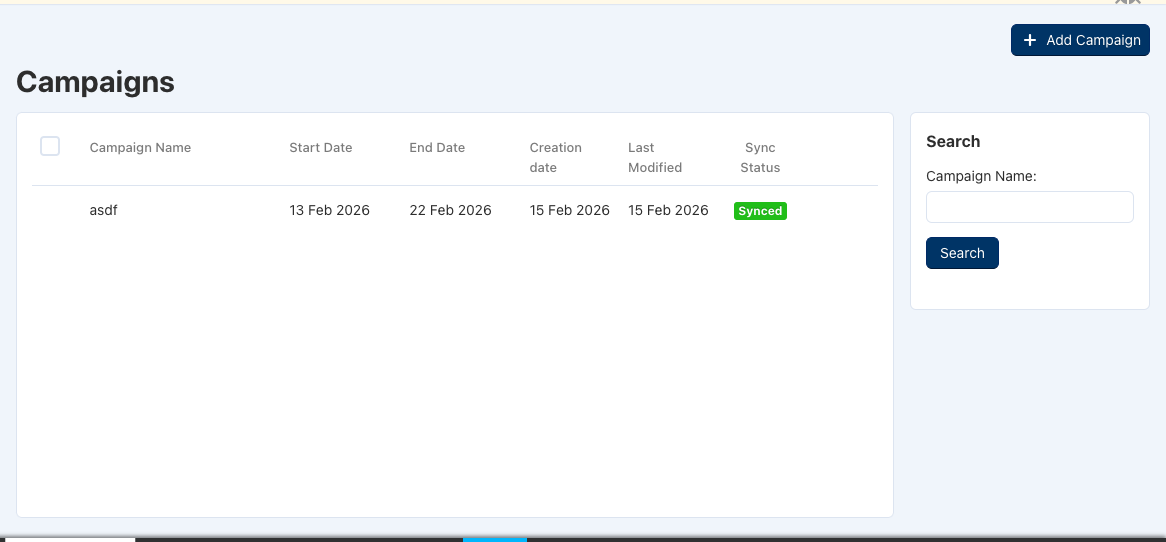
Step 9: Create Marketing Campaigns
Use HubSpot's powerful marketing tools to grow your vendor business:
In HubSpot, Create Campaigns: Use your synced customer list
Segment Customers: Target by purchase history, location, or product interest
Send Email Campaigns: Promote new products and special offers
Track Results: See open rates, click rates, and sales impact
Your customers and products are now synchronized - you can leverage HubSpot's full marketing power!
What Gets Synchronized?
When you connect HubSpot, these marketplace items automatically sync to your HubSpot account:
Your Products → HubSpot Products
Product names, descriptions, and images
Pricing and inventory information
Product categories and attributes
Your Customers → HubSpot Contacts
Customer names and email addresses
Contact information and addresses
Complete purchase history
Your Orders → HubSpot Deals
Order details and order totals
Products ordered and quantities
Order status and shipping information
Marketing Campaigns → HubSpot
Create and manage email campaigns
Send targeted messages to your customers
Track campaign performance and results
How This Helps Your Vendor Business
Grow Your Business
Marketing Automation: Send targeted emails to customers based on purchase history
Customer Insights: Understand what your customers buy and when
Sales Pipeline: See all your orders organized in a sales pipeline view
Save Time
Automatic Syncing: No manual data entry needed
Real-time Updates: Your HubSpot data is always current
Focus on Selling: Spend time on growing your business, not managing data
Better Customer Relationships
Complete Customer View: See all interactions and purchases in one place
Personalized Communication: Send messages tailored to each customer
Track Engagement: Know which customers are most active
Professional Business Tool
Industry Standard CRM: HubSpot is used by thousands of businesses
Powerful Features: Email marketing, sales pipeline, analytics, and more
Grow with Confidence: Professional tools to help scale your vendor business
Your Data is Secure
Private HubSpot Account: Only you can access your data
Full Control: Disconnect anytime - your data is yours
Common Questions
Do I need a HubSpot account?
Yes, you'll need to create a HubSpot account (free tier available). HubSpot offers a free CRM with email marketing, contact management, and deal tracking - perfect for growing your vendor business.
Is my data secure?
Absolutely. We use industry-standard OAuth 2.0 authentication. Your HubSpot account is private and only you can access it. You can disconnect anytime.
How often does data sync?
New orders, customers, and products sync automatically in real-time. Your HubSpot account always has the latest data from the marketplace.
Can I disconnect later?
Yes, anytime. If you disconnect, the sync stops but your HubSpot data remains in your account. You maintain full control.
Do I have to sync everything?
You can choose what to sync. You can sync products without orders, or customers without campaigns - it's completely flexible based on your needs.
Ready to Take Your Vendor Business to the Next Level?
The HubSpot Vendor Connector is designed to help you grow your marketplace business. By connecting your personal HubSpot account, you get access to powerful marketing, sales, and customer management tools - all synchronized with your marketplace data in real-time.
What you gain:
✓ A complete view of your customers and orders
✓ Powerful email marketing tools
✓ Sales pipeline to track your growth
✓ Customer insights to drive business decisions
✓ Professional business management tools
✓ Full control over your data
Ready to connect? Click the button above to get started. The setup takes just minutes, and you'll immediately start seeing the benefits. If you have any questions, our support team is here to help!
Start growing your vendor business today with HubSpot!
Checkout.com Payment: Fast, Secure & Modern Checkout
Transform your payment experience with lightning-fast transactions, Apple Pay, Google Pay, and enterprise-grade security.
Ecartify: Checkout.com Payment Gateway
In today's competitive e-commerce landscape, customers expect a seamless, fast, and secure payment experience. A complicated checkout process leads to abandoned carts, lost sales, and frustrated customers who never return.
Traditional payment gateways often create friction with slow loading times, complex forms, outdated interfaces, and limited payment options—especially for mobile shoppers who want quick, one-tap payment methods like Apple Pay and Google Pay.
That's exactly why we built Ecartify: Checkout.com Payment Gateway — a modern, enterprise-grade payment solution designed to maximize conversions, reduce cart abandonment, and provide your customers with the smooth, professional checkout experience they expect.
Key Features of Checkout.com Payment Gateway
Lightning-Fast Payment Processing:
Speed matters at checkout. Every extra second customers spend waiting increases the chance they'll abandon their purchase. Our Checkout.com integration is optimized for maximum speed and minimal friction.
Performance Benefits:
Instant payment form loading with no delays
Optimized code for minimal resource usage
Quick transaction processing and confirmation
Smooth checkout flow without page reloads
Mobile-optimized for fast thumb-friendly payments
A faster checkout means happier customers and higher conversion rates.
Apple Pay & Google Pay Integration:
Modern customers want the convenience of one-tap payments. Our addon fully supports both Apple Pay and Google Pay, providing the seamless experience mobile shoppers demand.
Digital Wallet Benefits:
Apple Pay: Customers checkout with Face ID or Touch ID in seconds
Google Pay: One-tap checkout for Android users
No Form Filling: Payment and shipping details auto-filled instantly
Mobile-First: Perfect for smartphone shoppers on the go
Digital wallets can increase mobile conversion rates by up to 30% compared to traditional card entry.
Enterprise-Grade Security & Compliance:
Checkout.com is a globally trusted payment processor used by major enterprises worldwide. Our integration brings that same level of security to your CS-Cart store.
Security Features:
PCI DSS Level 1 compliant payment processing
Tokenization of sensitive card data
3D Secure authentication support
Advanced fraud detection and prevention
Encrypted transactions end-to-end
No sensitive data stored on your server
Your customers' payment information is protected by the same technology used by global Fortune 500 companies.
Simple & Clean Checkout Interface:
We've designed the payment interface to be clean, intuitive, and distraction-free—removing every unnecessary element that could cause hesitation or confusion.
Interface Highlights:
Clean, modern design that matches your store branding
Minimal form fields to reduce friction
Clear error messages with helpful guidance
Real-time card validation as customers type
Mobile-responsive with large tap targets
Progress indicators showing checkout steps
A simplified checkout process means fewer abandoned carts and more completed purchases.
Multi-Currency & Global Payment Support:
Checkout.com supports payments in 150+ currencies and accepts cards from customers worldwide, making it perfect for international stores.
Global Capabilities:
Accept payments in local currencies automatically
Support for all major credit and debit cards
Dynamic currency conversion
Region-specific payment methods
Automatic fraud screening by geography
Settlement in your preferred currency
Expand your business globally without worrying about payment complexities.
Advanced Payment Features:
Beyond basic payment processing, our integration includes powerful features that give you complete control over transactions.
Advanced Capabilities:
Automatic payment capture or manual authorization
Partial and full refund processing
Recurring payment support for subscriptions
Detailed transaction logs and reporting
Webhook notifications for payment events
Test mode for safe development and testing
Professional payment management tools built right into your CS-Cart admin panel.
Step-by-Step Setup Guide
Step 1: Install the Addon
Getting started with Checkout.com payment gateway is quick and straightforward:
Download the addon from CS-Cart marketplace or Ecartify website
Login to your CS-Cart admin panel and navigate to Add-ons
Upload and install "Ecartify: Checkout.com Payment Gateway"
Activate the addon from the add-ons list
Navigate to Administration → Settings → Payment methods
Add "Checkout.com" as a new payment method
The installation process is fully automated and requires no coding knowledge!
Step 2: Configure Checkout.com API Credentials
Before you can accept payments, you need to connect your Checkout.com account:
Sign up for a Checkout.com merchant account at checkout.com
Login to your Checkout.com dashboard
Navigate to Settings → Channels to get your API keys
Copy your Public Key and Secret Key
Return to CS-Cart and paste these credentials in the payment method settings
Enable Test Mode for initial testing before going live
Security Note: Never share your Secret Key publicly. It should only be entered in your CS-Cart admin panel.
Step 3: Enable Apple Pay & Google Pay
Activate digital wallet payments to provide the fastest checkout experience:
Enable Apple Pay:
Toggle the Apple Pay option in payment settings. Ensure your domain is verified in Checkout.com dashboard under Apple Pay settings.
Enable Google Pay:
Toggle the Google Pay option in payment settings. Configure your merchant details in Checkout.com dashboard.
Test Digital Wallets:
Use test mode to verify Apple Pay and Google Pay work correctly on both desktop and mobile devices.
SSL Requirement:
Ensure your store has a valid SSL certificate (HTTPS) as this is required for digital wallet payments.
Digital wallets will automatically appear for customers on supported devices and browsers.
Step 4: How It Works for Customers
Here's the seamless payment experience your customers will enjoy:
1. Customer adds products to cart and proceeds to checkout
2. On the payment page, customer sees Checkout.com payment option with Apple Pay/Google Pay buttons
3. Customer can either use digital wallet (one-tap) or enter card details manually
4. Payment is processed securely through Checkout.com with instant verification
5. Customer receives instant confirmation and order details via email
6. Admin can view transaction details, process refunds, and track payments in CS-Cart backend
The entire process takes less than 30 seconds with digital wallets—dramatically reducing cart abandonment.
Step 5: Testing Before Going Live
Always test your payment integration thoroughly before accepting real payments:
Enable Test Mode in the payment method settings
Use Checkout.com test card numbers for testing transactions
Test successful payments, failed payments, and refund scenarios
Verify Apple Pay and Google Pay on actual mobile devices
Check email notifications are being sent correctly
Once satisfied, disable Test Mode and start accepting real payments
Pro Tip: Keep Test Mode enabled on a staging site for ongoing development and testing.
Who Should Use This Payment Gateway?
Checkout.com payment gateway is perfect for:
High-Growth E-commerce Stores:
Businesses that need enterprise-grade payment processing with room to scale.
Mobile-First Retailers:
Stores with significant mobile traffic who need Apple Pay and Google Pay support.
International Sellers:
Businesses selling globally who need multi-currency payment support.
Subscription Services:
Companies offering recurring billing or subscription products.
Security-Conscious Merchants:
Stores that prioritize customer data protection and PCI compliance.
Conversion Optimizers:
Merchants focused on reducing cart abandonment and maximizing checkout completion.
If fast, secure, and modern payment processing is important to your business success, Checkout.com is the ideal solution.
Ecartify: Checkout.com Payment Gateway transforms your CS-Cart checkout into a fast, secure, and modern payment experience that customers love.
With support for Apple Pay, Google Pay, multi-currency processing, and enterprise-grade security, you get everything needed to compete with the biggest e-commerce platforms—all integrated seamlessly into CS-Cart.
If you're serious about reducing cart abandonment, increasing mobile conversions, and providing a world-class checkout experience, this payment gateway is absolutely essential for your store's success.
Ready to Upgrade Your Checkout Experience?
Stop losing sales to slow, complicated checkout processes. Upgrade to Ecartify: Checkout.com Payment Gateway today and give your customers the fast, secure, one-tap payment experience they expect.
Accept one-time payments and recurring subscriptions with flexible plans — daily, weekly, monthly, quarterly, and yearly.
Ecartify: Flutterwave Payment Gateway
Modern e-commerce isn't just about selling products once—it's about building recurring revenue streams through subscriptions, memberships, and repeat purchases. Businesses need payment solutions that handle both simple one-time transactions and complex recurring billing with ease.
Traditional payment gateways force you to choose between basic payments or expensive third-party subscription management tools, creating complexity, higher costs, and poor customer experiences.
That's exactly why we built Ecartify: Flutterwave Payment Gateway — a comprehensive payment solution that combines simple product payments with powerful subscription management, all integrated seamlessly into CS-Cart with flexible billing cycles from daily to yearly.
Key Features of Flutterwave Payment Gateway
Dual Payment Modes: One-Time & Subscriptions:
Unlike traditional payment gateways that only handle basic transactions, our Flutterwave integration gives you complete flexibility to sell products as either one-time purchases or recurring subscriptions.
Payment Flexibility:
Process standard one-time product purchases
Enable subscription-based recurring payments per product
Let customers choose between purchase or subscribe
Mix regular and subscription products in the same store
Toggle subscription mode on/off per product easily
This dual-mode approach gives you ultimate control over your revenue model without needing multiple payment systems.
5 Flexible Subscription Plan Types:
Create subscription plans that match your business model perfectly. Our addon supports five different billing frequencies to accommodate any subscription strategy.
Available Subscription Plans:
Daily: Perfect for consumables, services, or daily access products
Weekly: Ideal for meal kits, fresh produce, or weekly content
Monthly: Most popular for SaaS, memberships, and regular deliveries
Quarterly: Great for seasonal products or business subscriptions
Yearly: Best for annual memberships with discounted pricing
Each plan can have custom pricing, iteration limits, and individual activation status—giving you complete control.
Comprehensive Subscription Plan Management:
For each product, create and manage multiple subscription plans with detailed control over pricing, duration, and billing cycles.
Plan Configuration Options:
Plan Name: Create custom names like "Premium Monthly" or "Basic Weekly"
Plan Type: Select from daily, weekly, monthly, quarterly, or yearly
Subscription Amount: Set the recurring price per billing cycle
Number of Iterations: Define how many billing cycles (e.g., 12 months, unlimited)
Status: Activate or deactivate plans individually
All plan details are managed through an intuitive subscription plan table directly in the product editor.
Smart Frontend Subscription Selection:
When subscriptions are enabled for a product, customers see clear subscription options on the product detail page, making it easy to choose their preferred plan.
Customer Experience:
Subscription plans displayed clearly on product page
"No Subscription" option available for one-time purchase
All active plans shown with pricing and frequency
Selected plan pricing automatically applied to cart
Clear indication of billing frequency and total iterations
Seamless checkout process with Flutterwave
Customers can easily understand and select the subscription that fits their needs without any confusion.
Automated Subscription Billing & Tracking:
Once a customer subscribes, the system automatically handles recurring billing according to the selected plan schedule.
Automation Features:
Automatic recurring charges based on plan frequency
Iteration counter tracks completed billing cycles
Subscription automatically ends after set iterations
Failed payment retry logic built-in
Email notifications for successful charges
Complete payment history for each subscription
Set it and forget it—the system handles all recurring billing automatically.
Dedicated Subscription Order Management:
Admins get a specialized backend interface to monitor and manage all subscription-based orders separately from regular orders.
Admin Dashboard Features:
Access via Orders → Flutterwave Subscription Orders
View all active and completed subscriptions
Track completed iterations for each subscription
Monitor subscription status and payment history
See customer subscription details at a glance
Export subscription data for reporting
Complete visibility into your recurring revenue stream with professional subscription management tools.
Step-by-Step Setup Guide
Step 1: Install & Configure the Addon
Setting up Flutterwave payment gateway with subscription support is straightforward:
Download the addon from CS-Cart marketplace or Ecartify website
Login to your CS-Cart admin panel and navigate to Add-ons
Upload and install "Ecartify: Flutterwave Payment Gateway"
Activate the addon from the add-ons list
Enter your Flutterwave API credentials (Public Key & Secret Key)
Navigate to Administration → Settings → Payment methods
Add "Flutterwave" as a new payment method
Get your API keys from your Flutterwave dashboard at flutterwave.com
Step 2: Enable Subscriptions for Products
To make a product available as a subscription, you need to enable the subscription feature:
Navigate to Products → Products and edit any product
Find the "Enable Subscription" checkbox in product addons tab
Check the box to activate subscription functionality for this product
The subscription plan table will now appear below
Save the product to confirm subscription activation
Note: You can enable subscriptions on some products while keeping others as regular one-time purchases.
Step 3: Configure Subscription Plans for a Product
Subscription plans are configured directly inside each product's edit page. Here's how to set them up:
1. Navigate to Products → Products and open any product to edit it
2. Click on the Add-ons tab inside the product edit page
3. Find the "Enable Subscription" checkbox and check it to activate subscription plans for this product
4. Once enabled, a subscription plan table will appear with 5 pre-defined plan types: Yearly, Quarterly, Monthly, Weekly, and Daily
5. For each plan type, fill in the following fields:
Ecartify: Flutterwave Payment Gateway is more than just a payment processor—it's a complete subscription management system integrated seamlessly into CS-Cart.
With support for both one-time purchases and five different subscription frequencies (daily, weekly, monthly, quarterly, yearly), you get the flexibility to build any business model from simple e-commerce to complex subscription services.
If you're looking to unlock recurring revenue streams, reduce payment friction, and provide customers with flexible subscription options—all while maintaining full control through your CS-Cart admin panel—this payment gateway is absolutely essential.
Ready to Build Recurring Revenue?
Stop leaving money on the table with one-time sales only. Upgrade to Ecartify: Flutterwave Payment Gateway today and transform your CS-Cart store into a subscription-powered revenue machine with flexible billing and automated recurring payments.
Transform any product into an exciting auction with countdown timers, live bidding, automatic winner selection, and instant notifications.
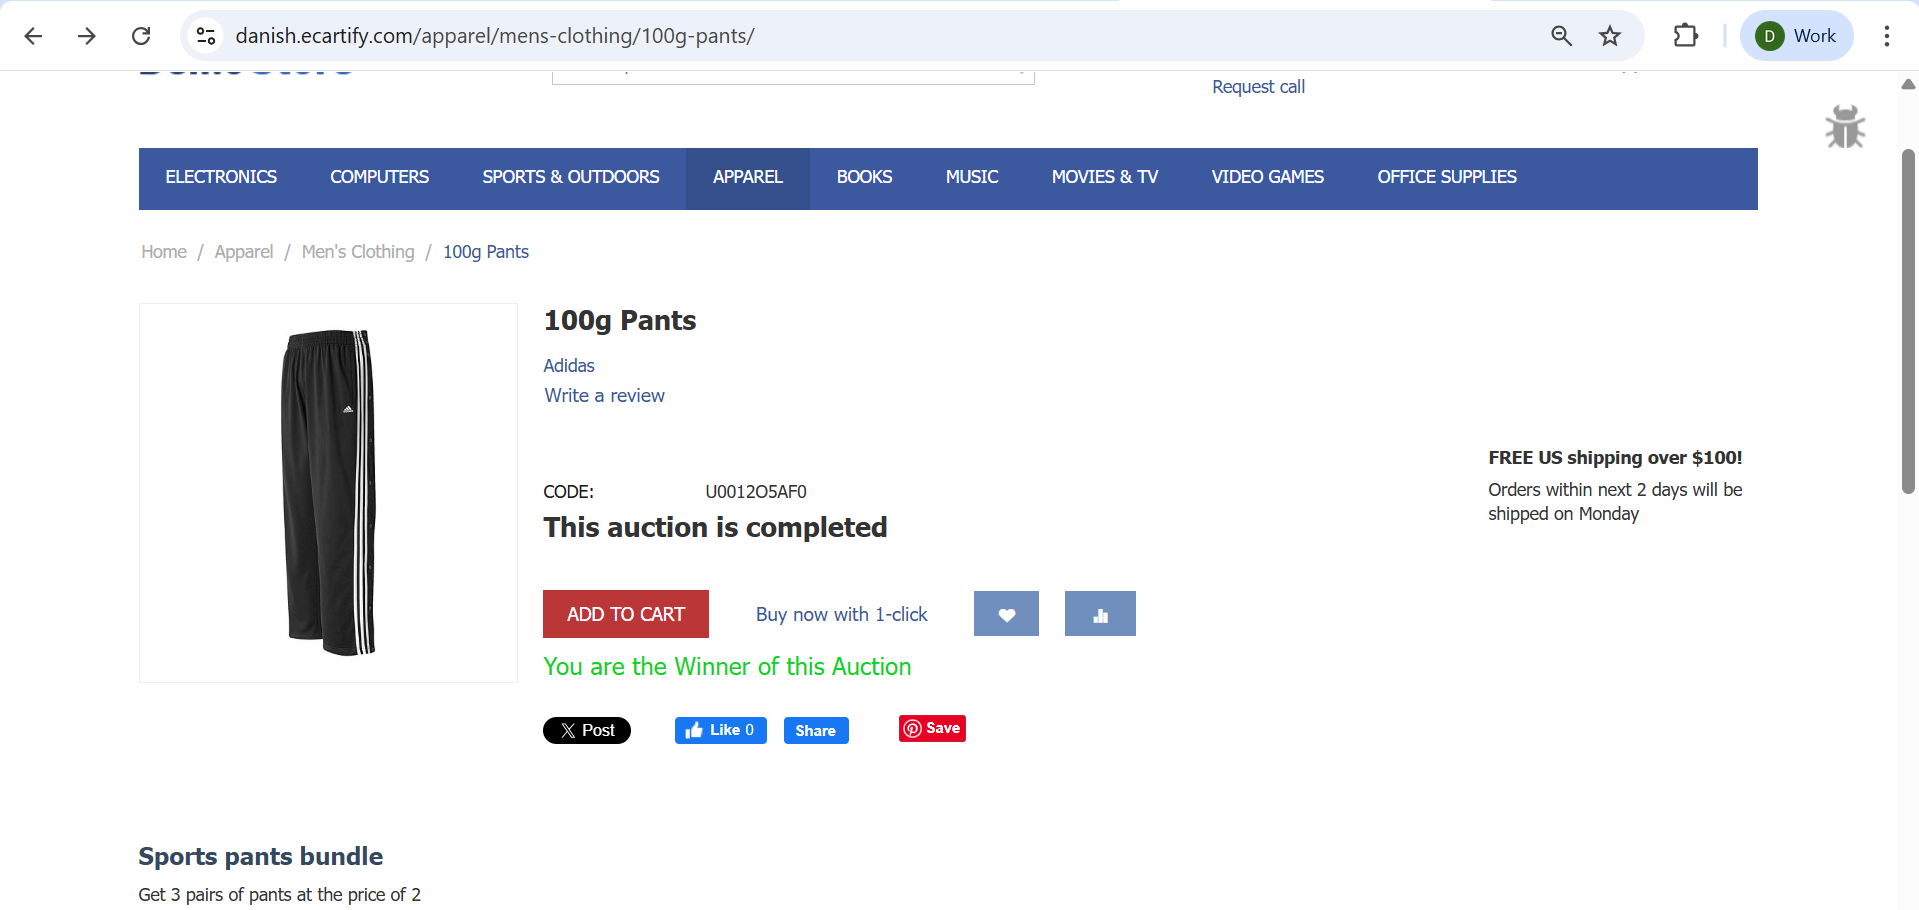
Ecartify: LiveAuction Pro Addon
Transform your CS-Cart store into a dynamic auction platform with the LiveAuction Pro Addon. This powerful extension lets you convert any product into an auction item with real-time bidding, countdown timers, automatic winner determination, and seamless order processing. Create excitement and urgency that drives customer engagement and increases sales with competitive bidding on your products.
Key Features of LiveAuction Pro Addon
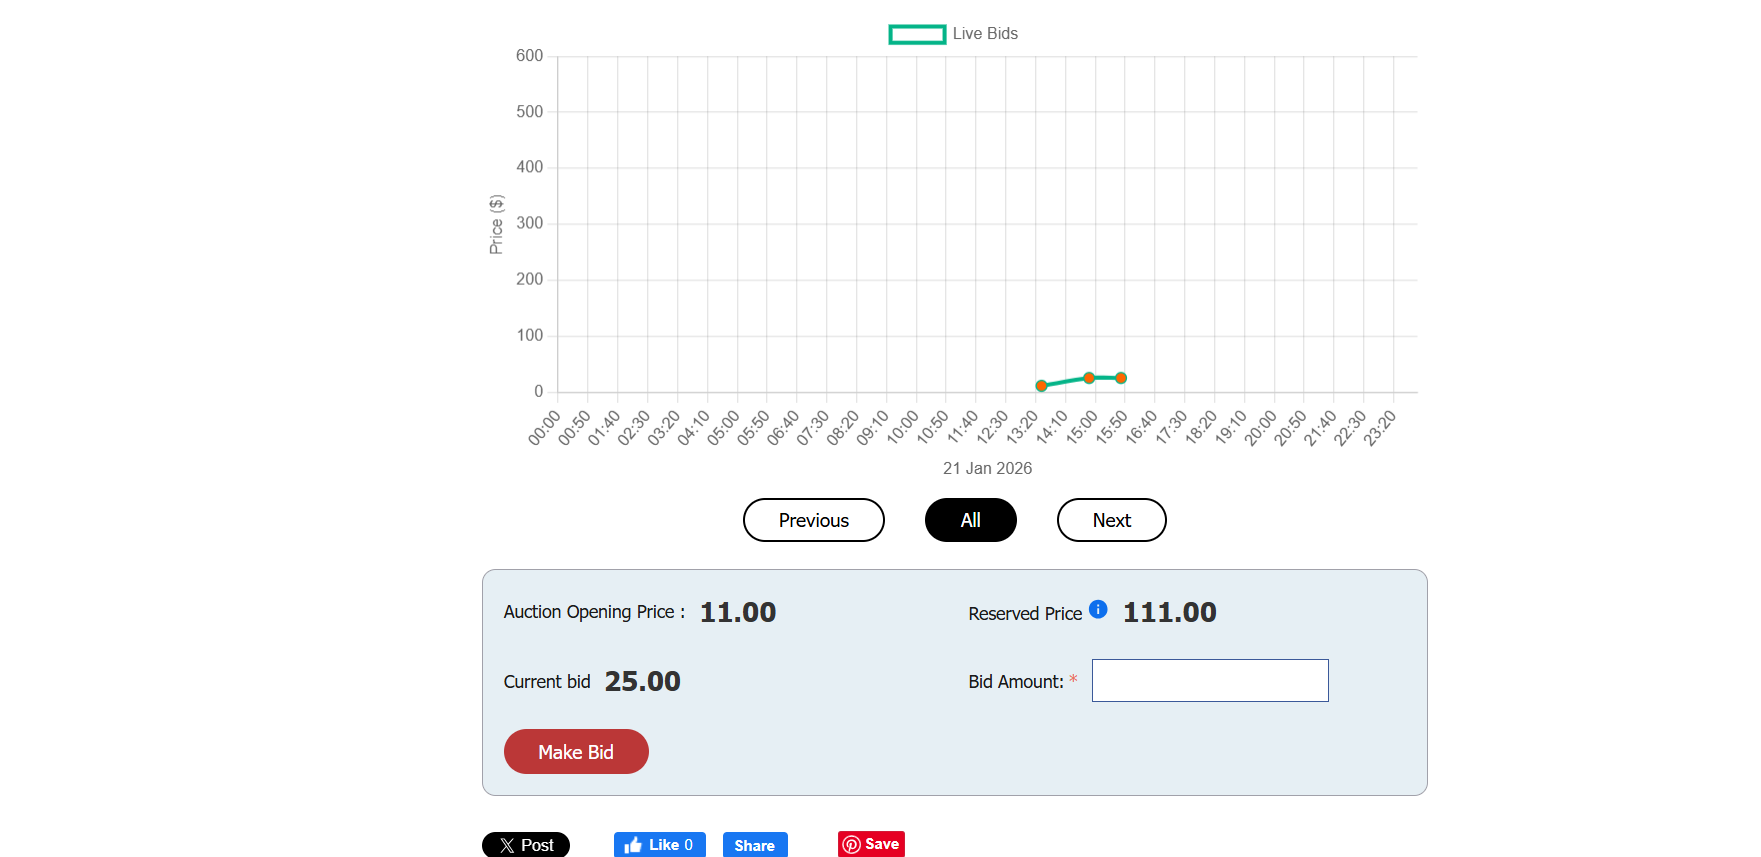
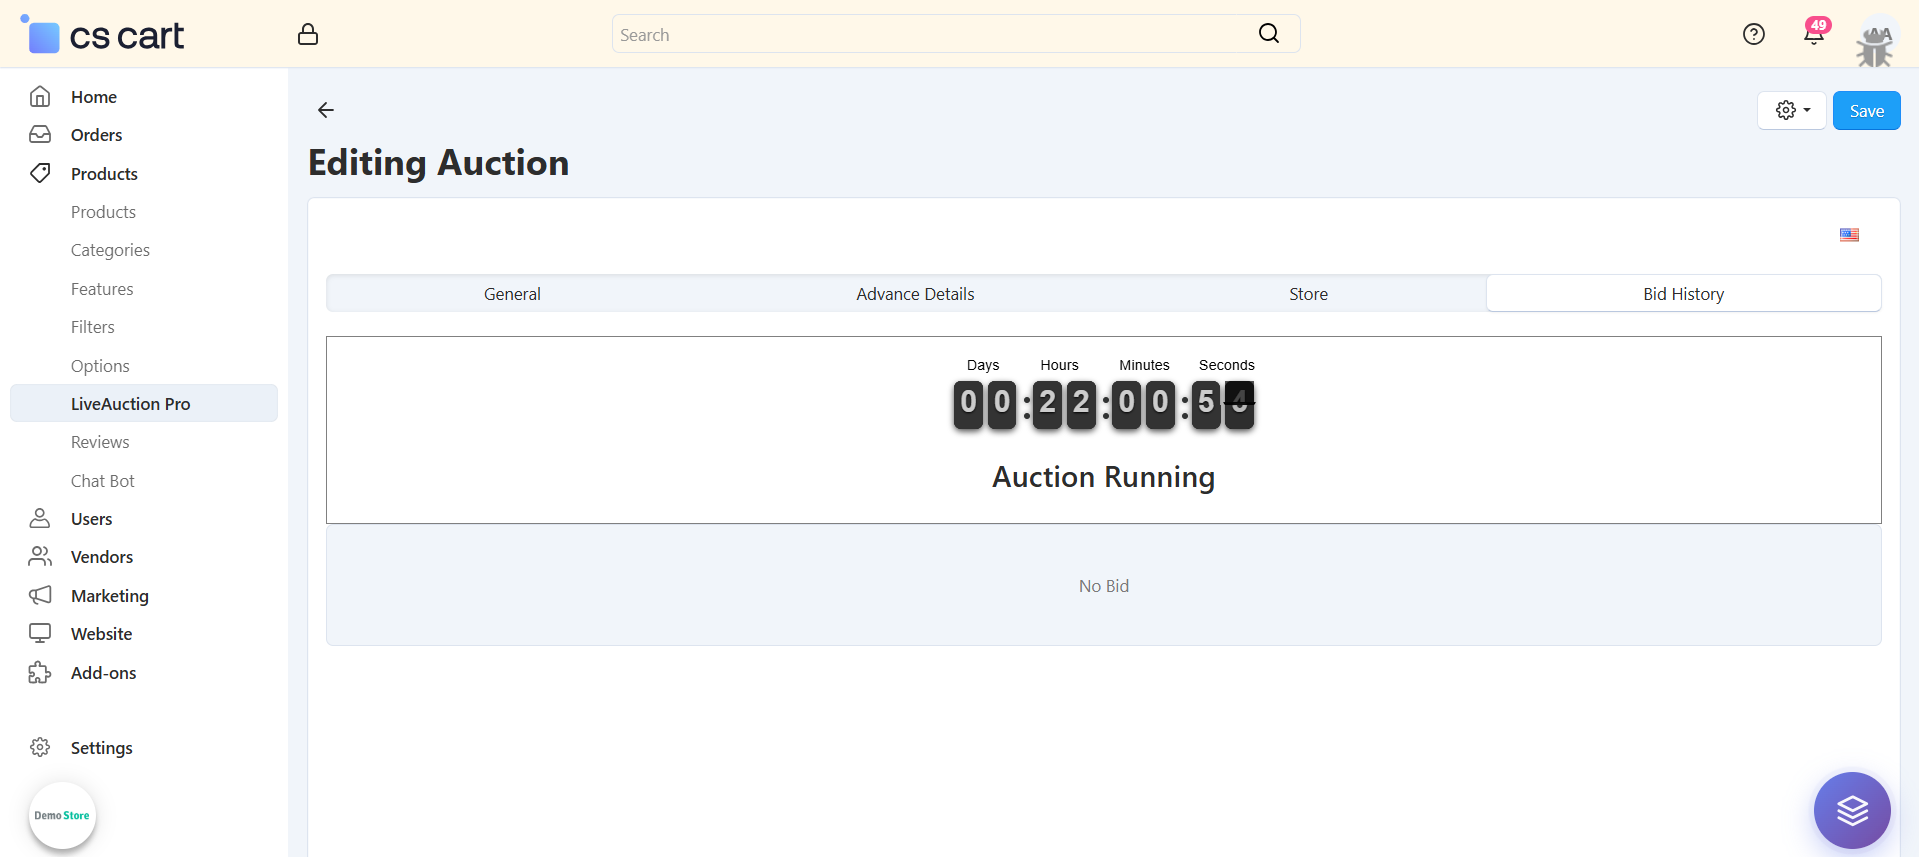
Real-Time Countdown Timer: Display dynamic countdown showing days, hours, minutes, and seconds until auction ends.
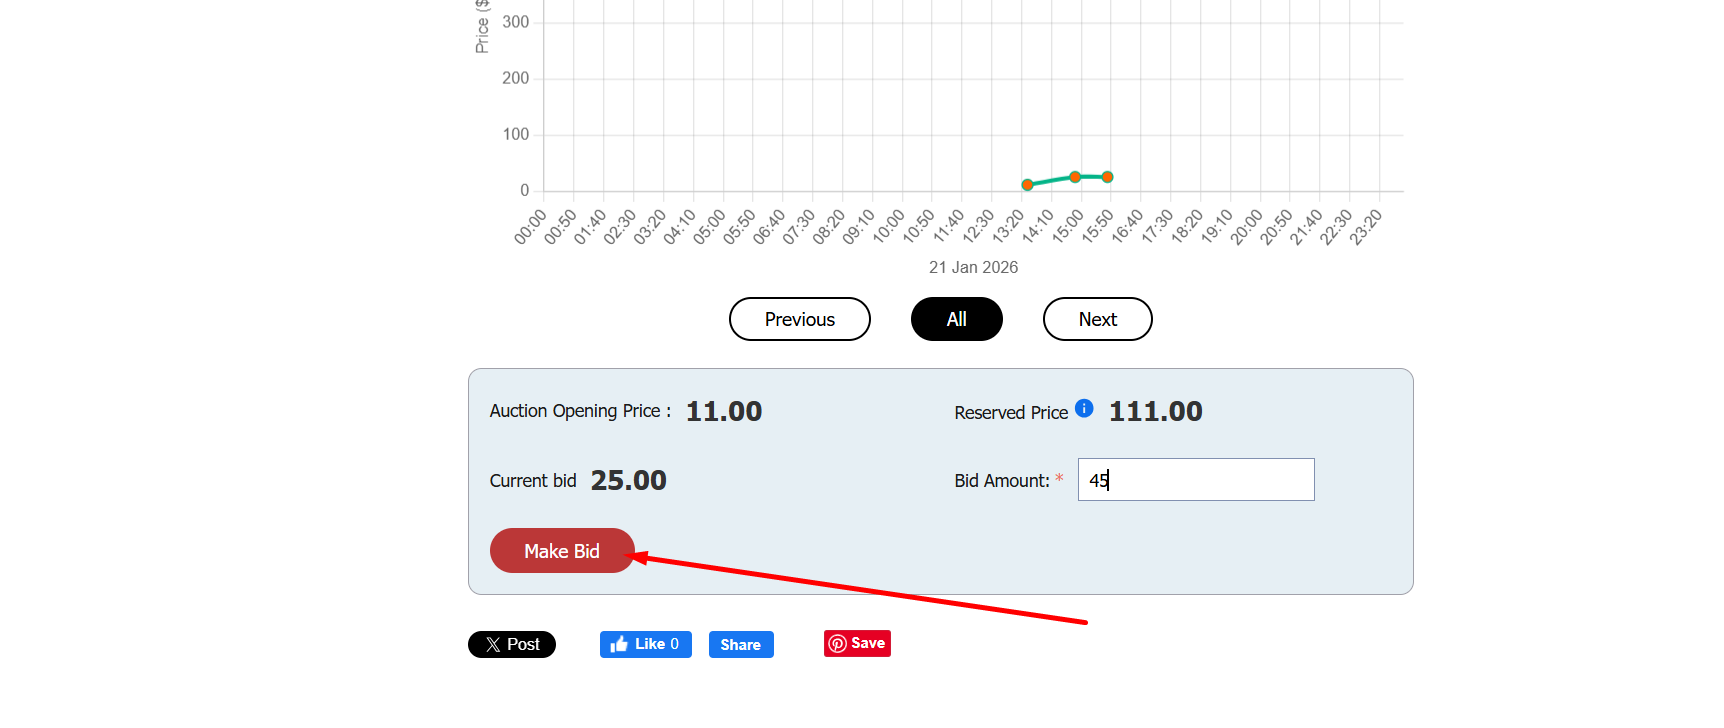
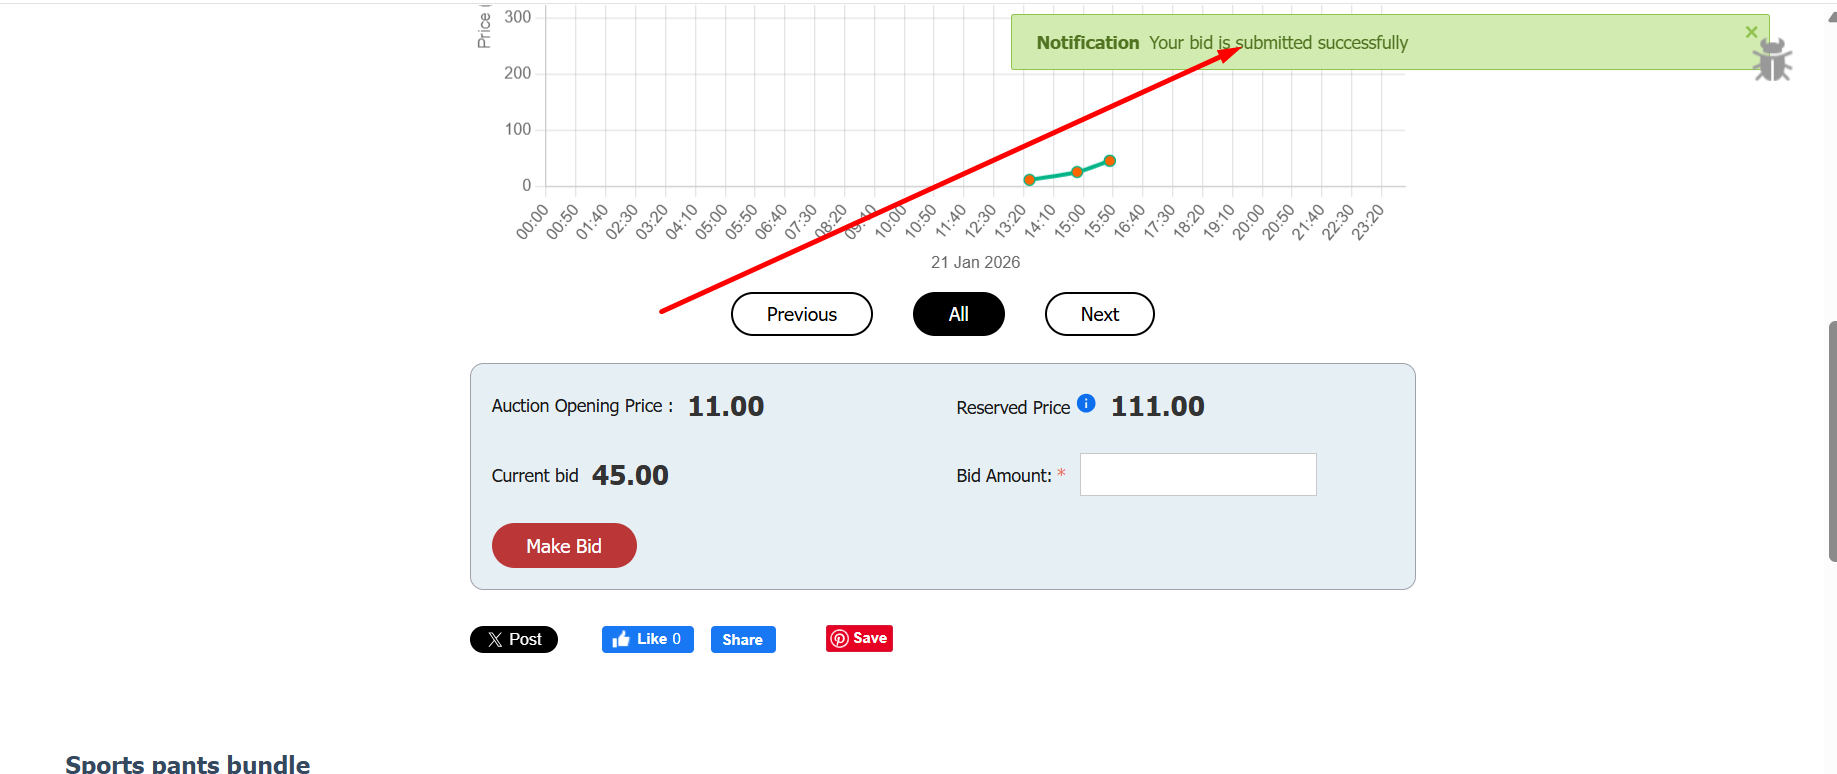
Live Bidding System: Customers place bids in real-time with instant validation and confirmation notifications.
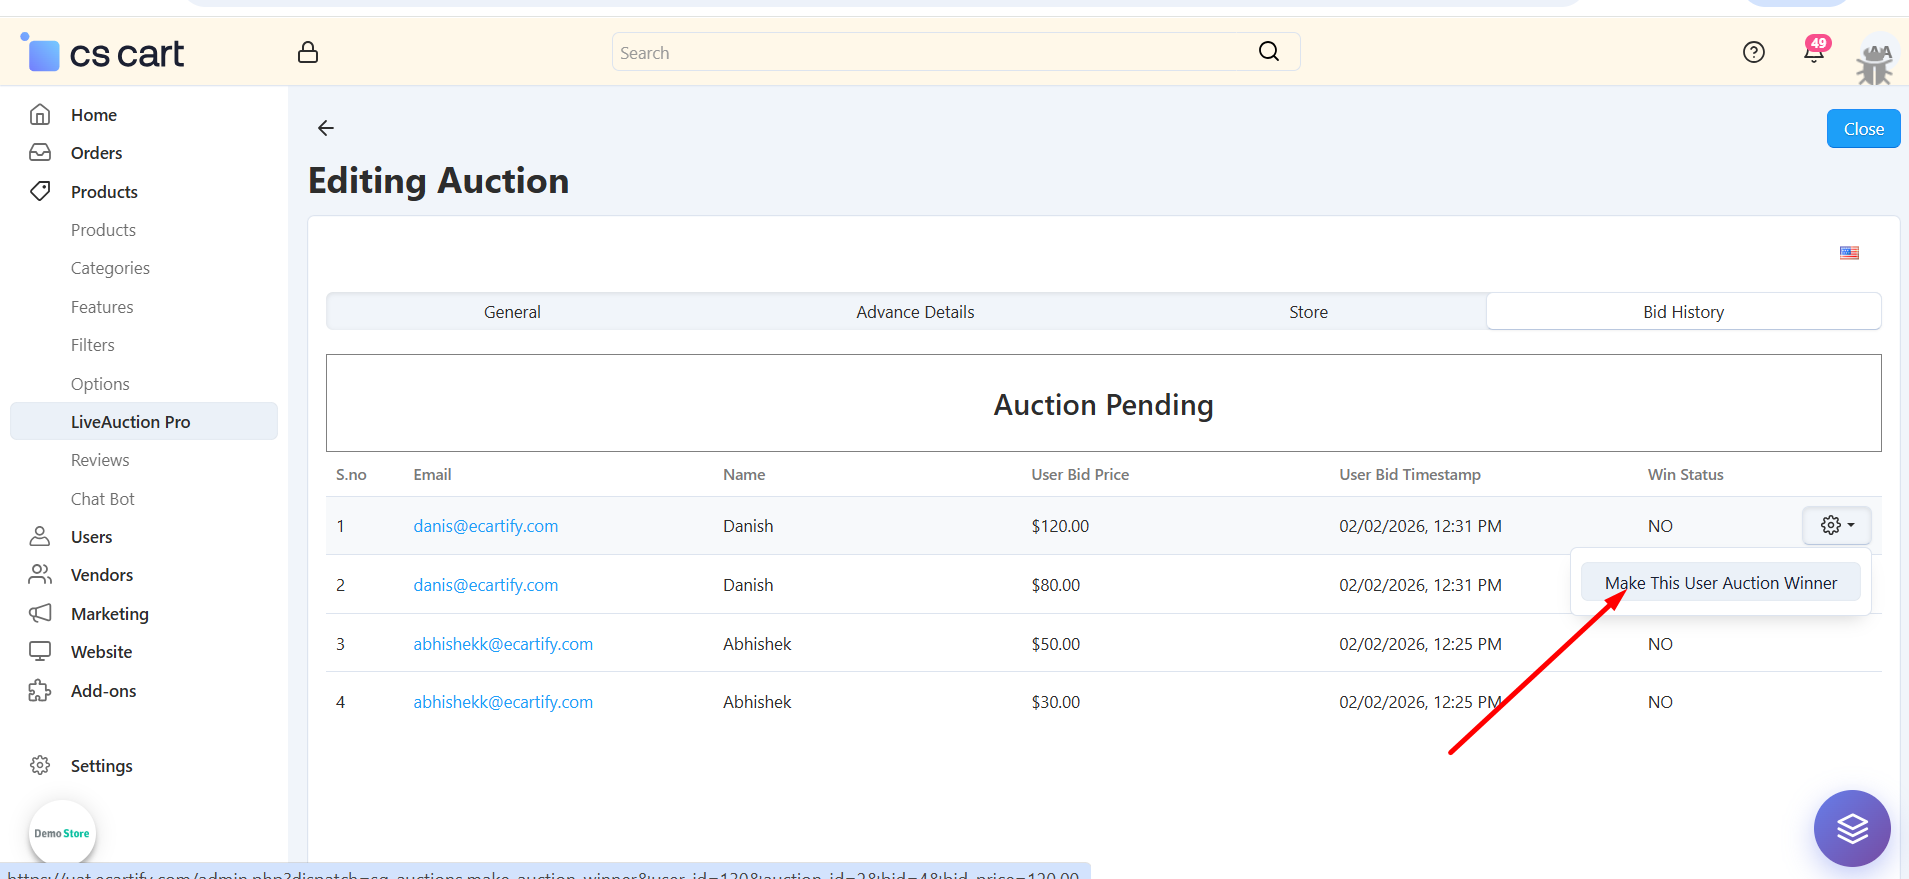
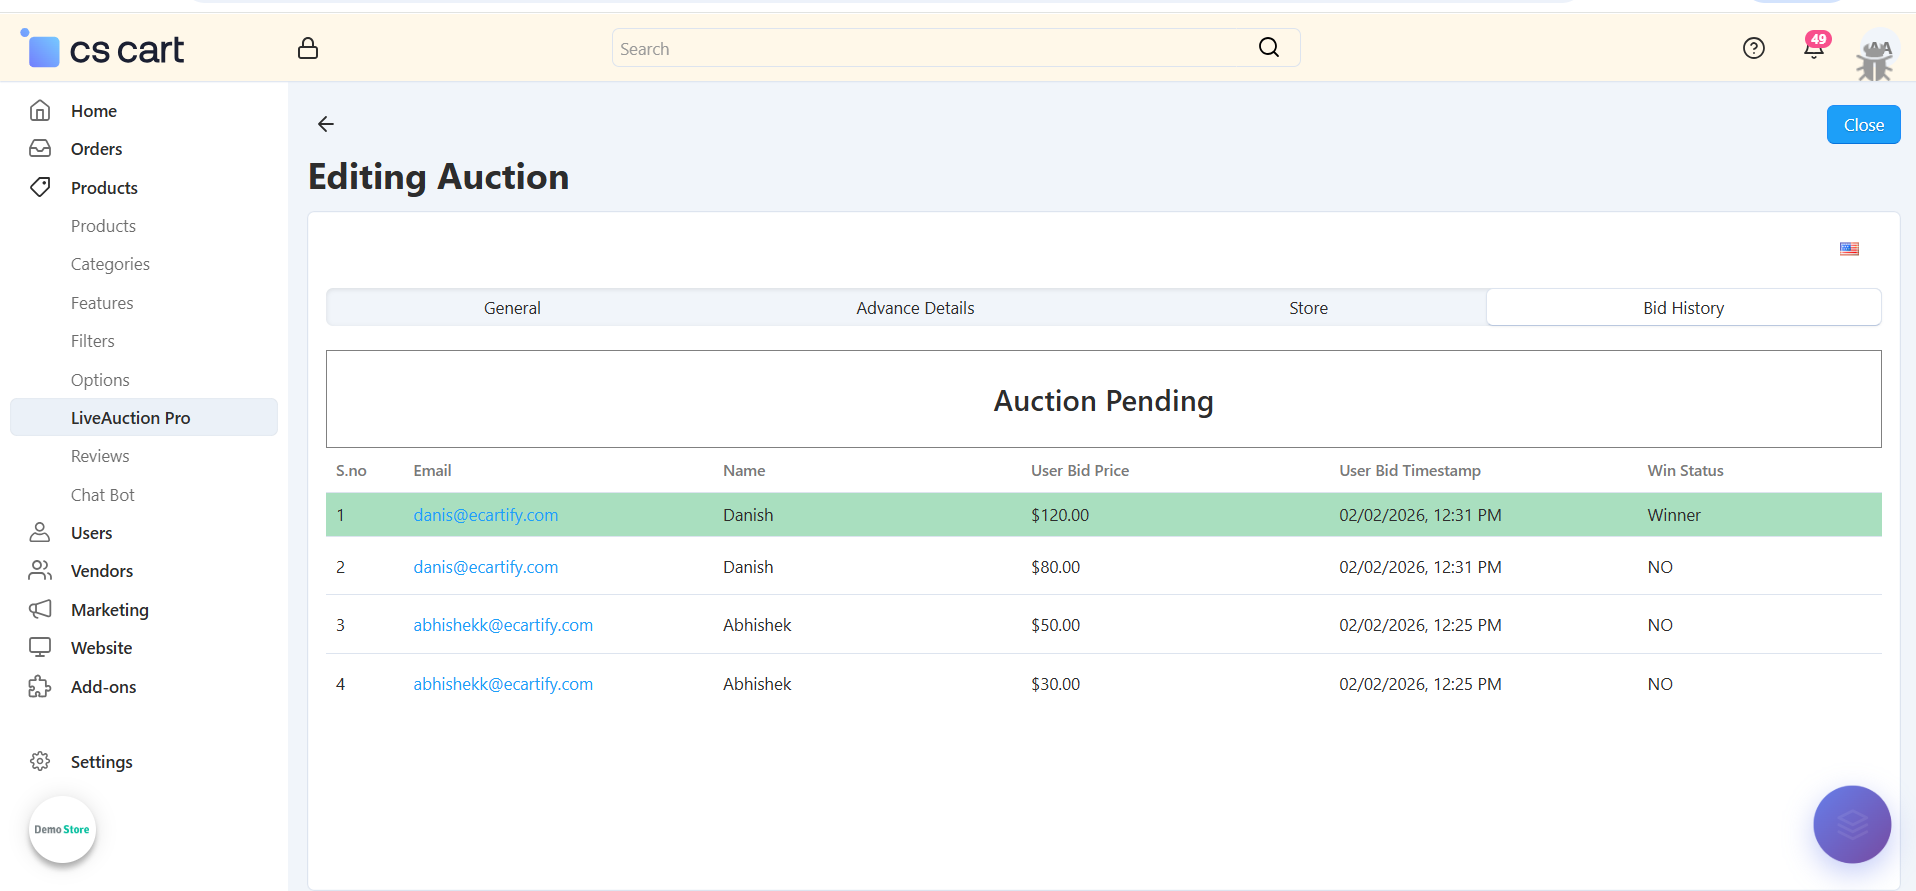
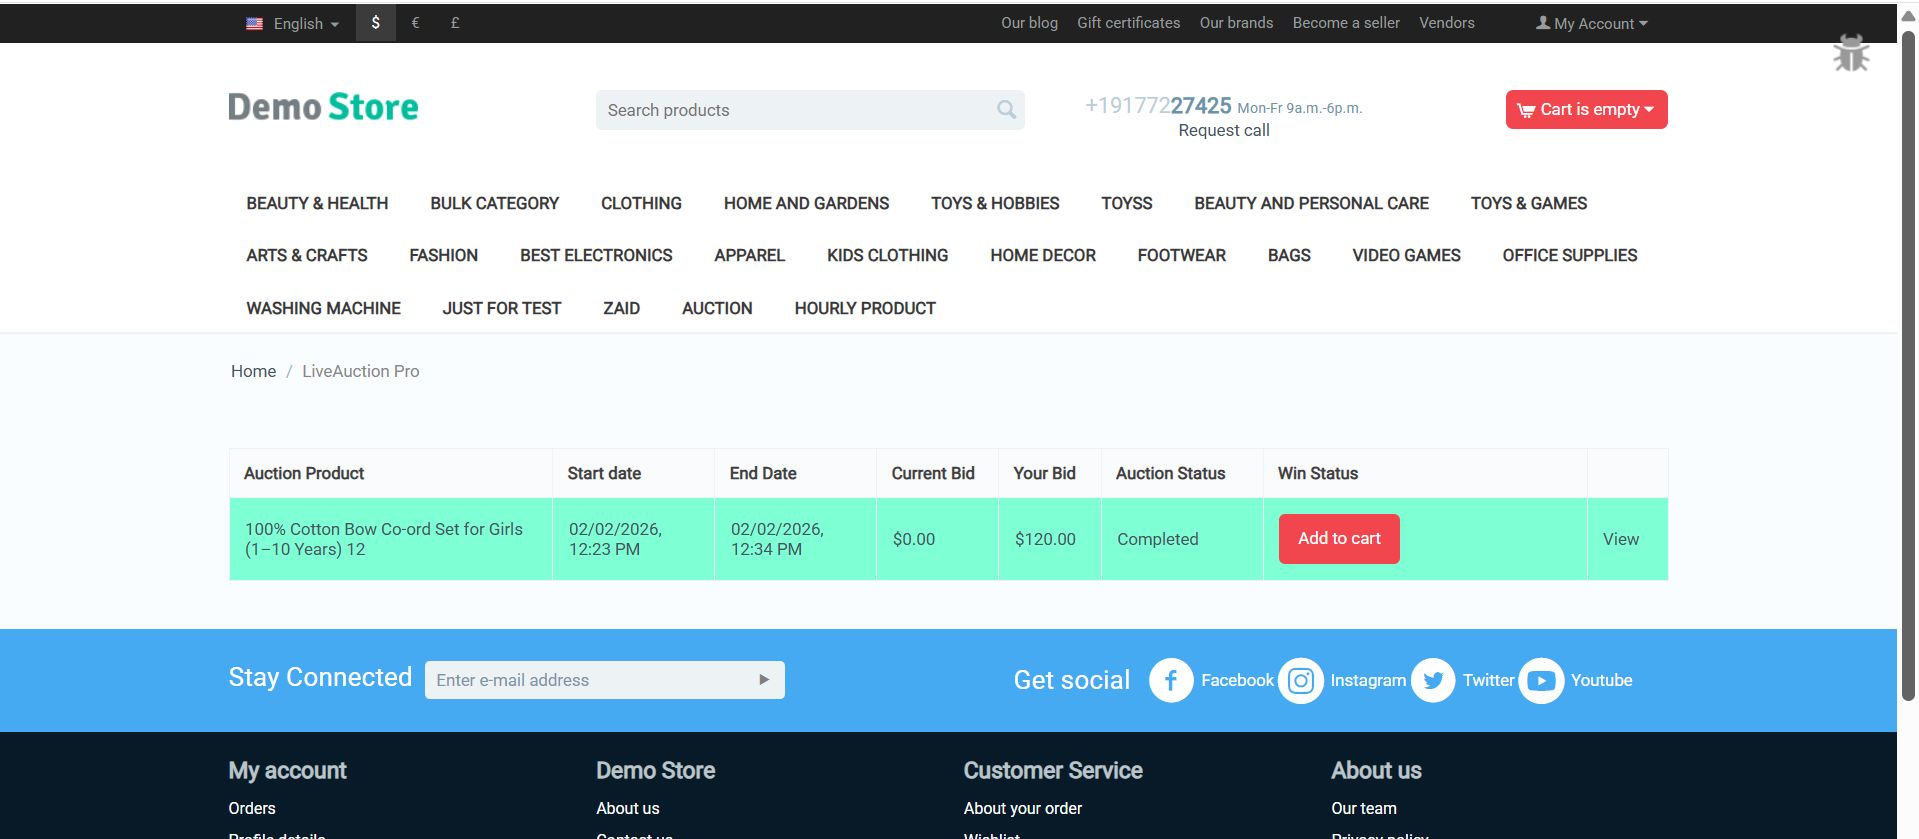
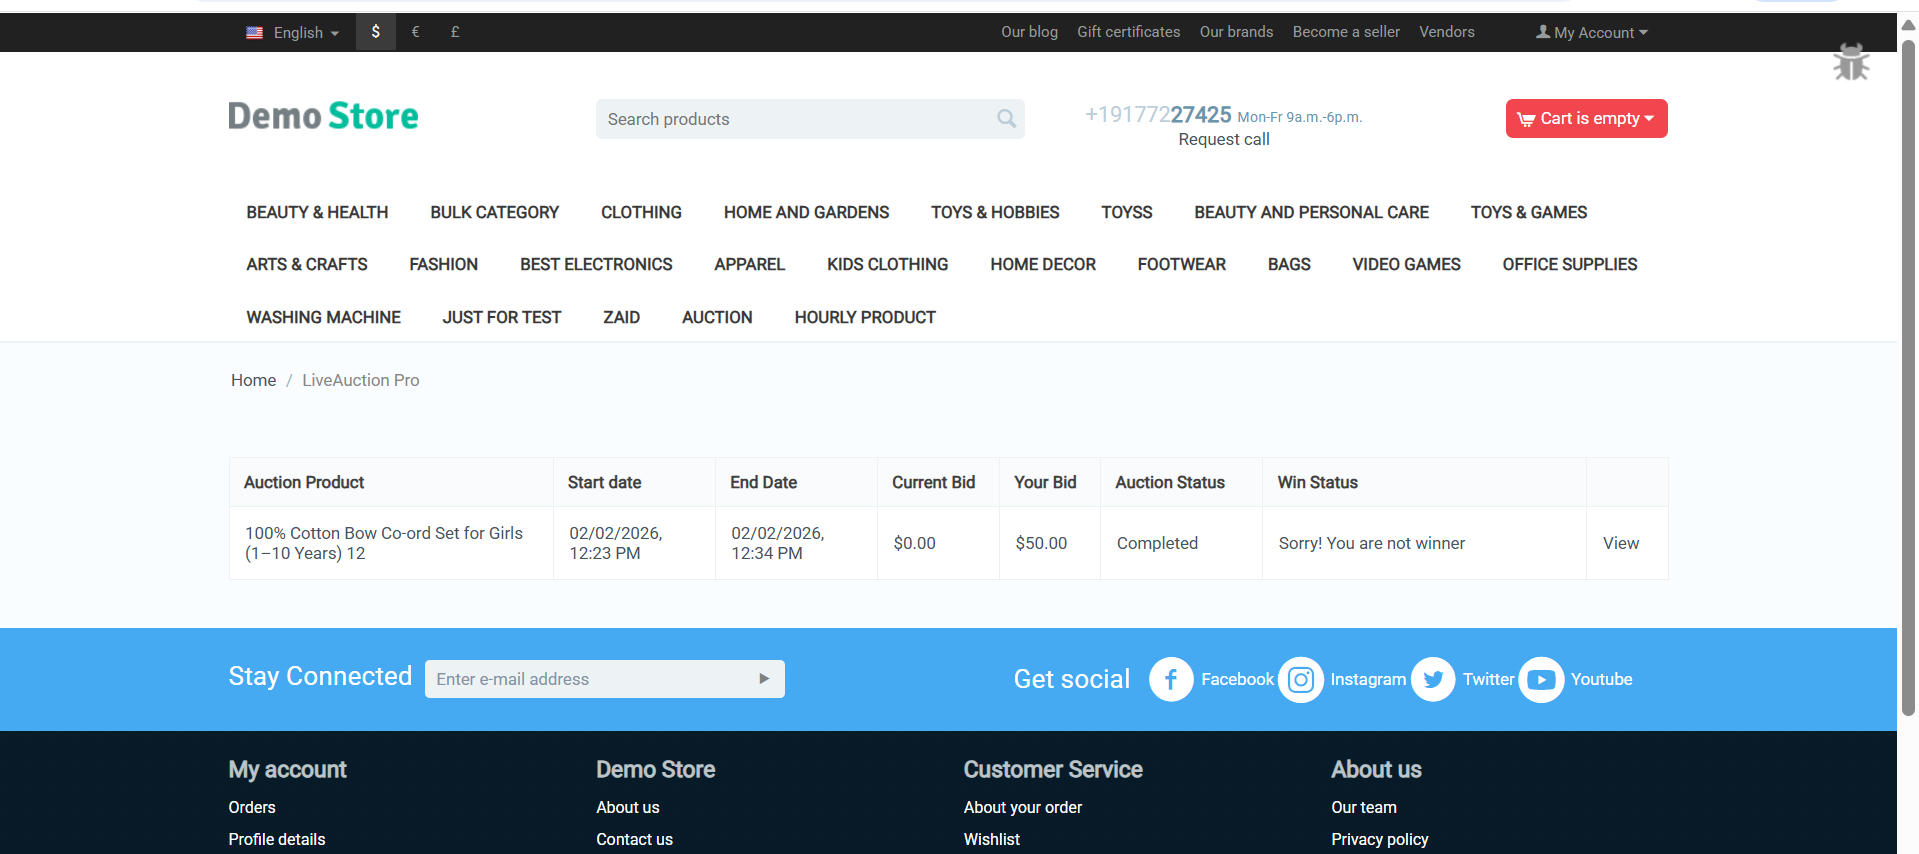
Automatic Winner Selection: System automatically determines and notifies the highest bidder when auction closes.
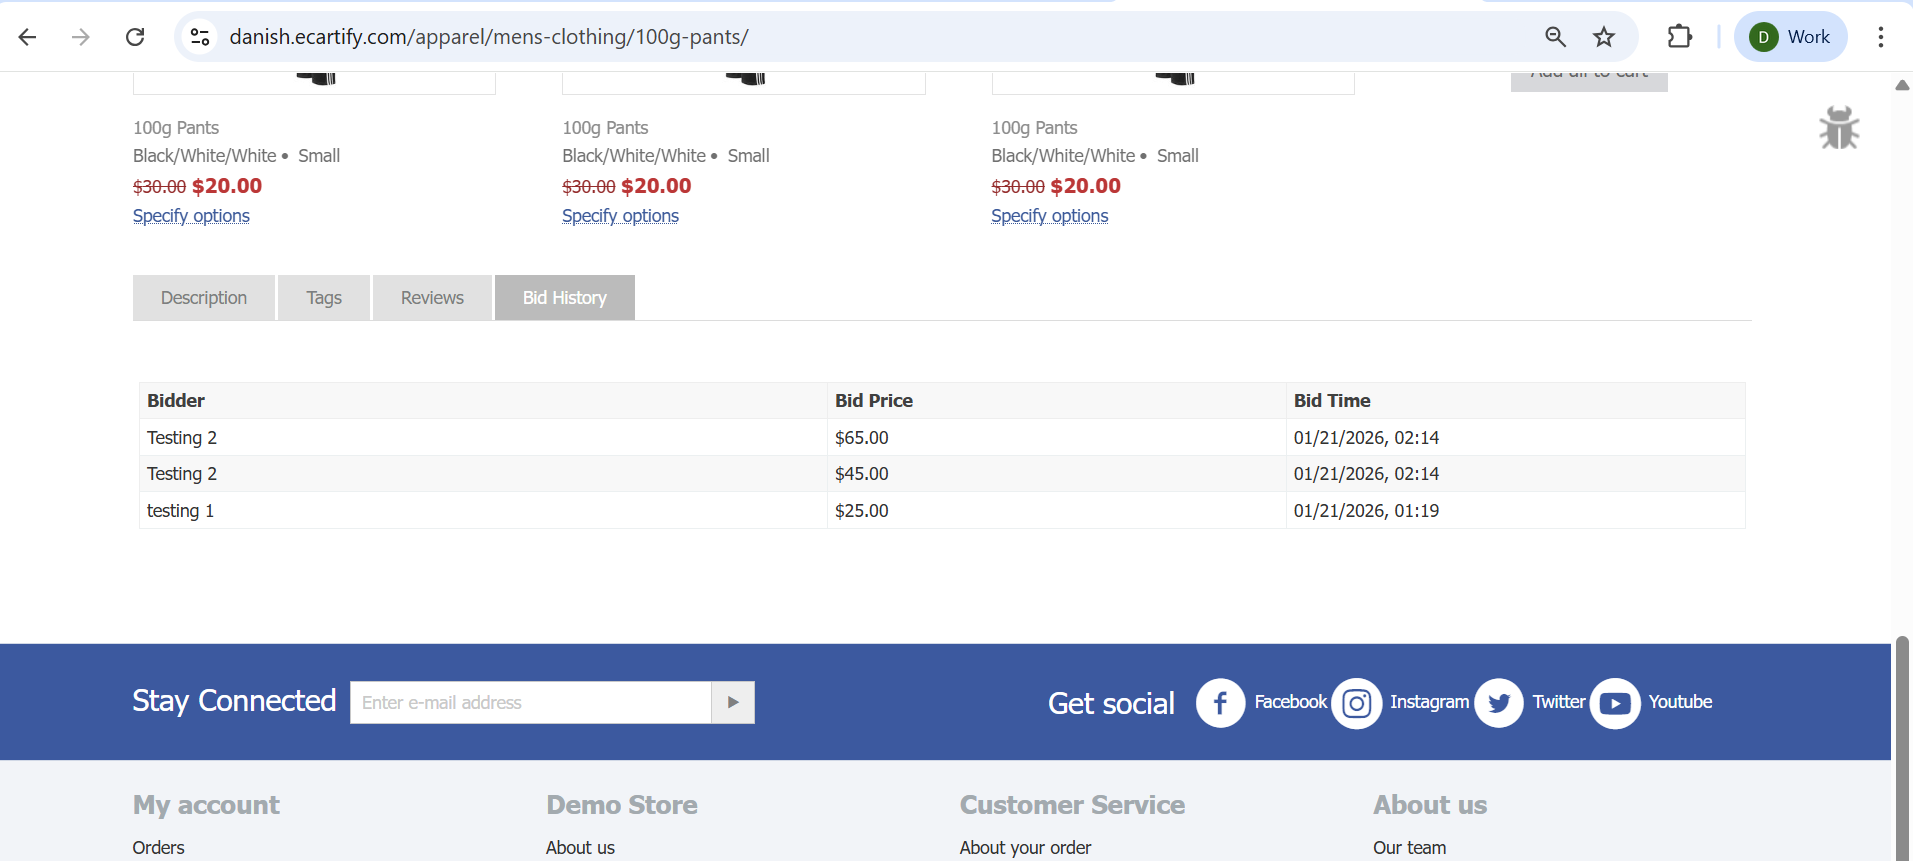
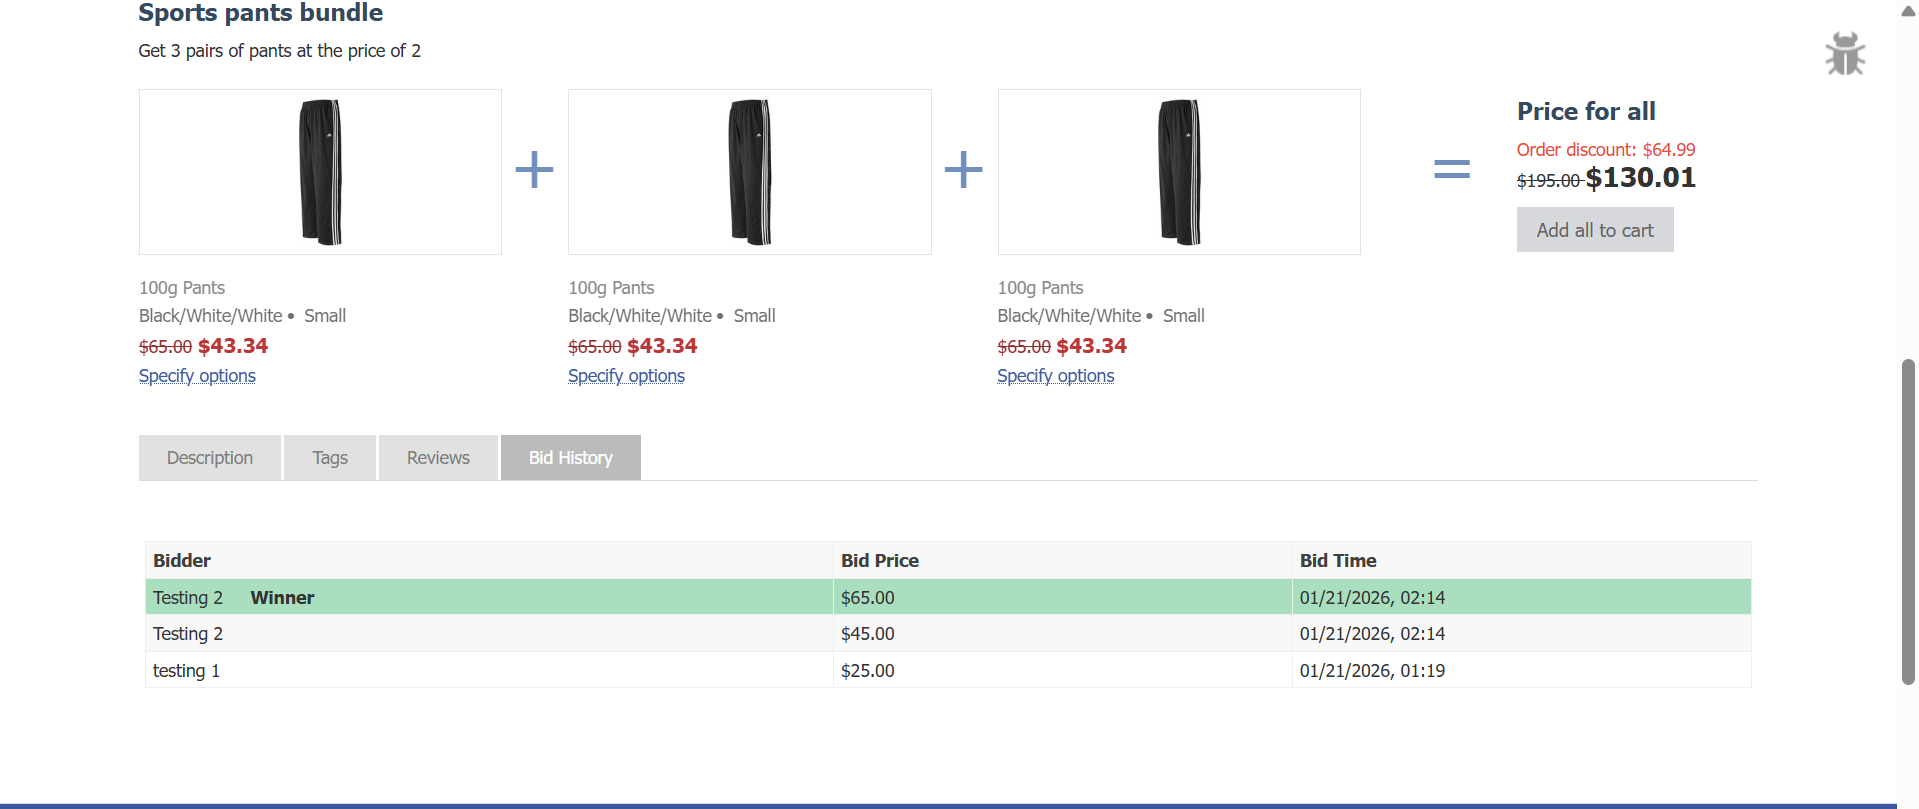
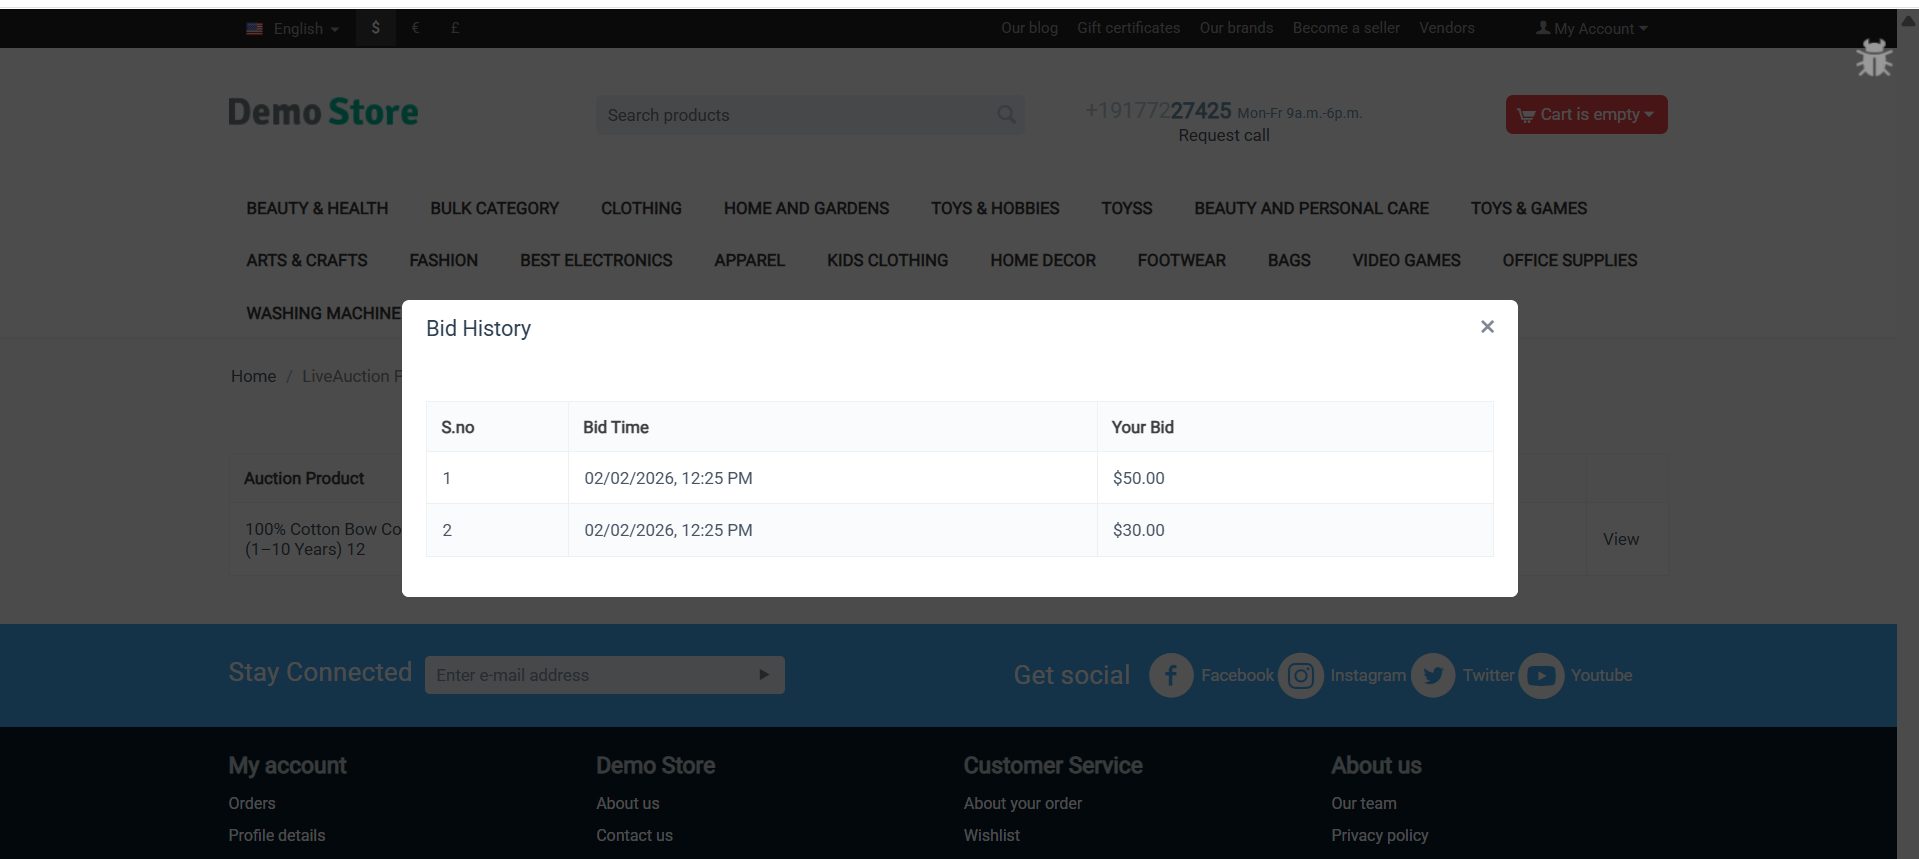
Bid History Tracking: Complete audit trail showing all bids, bidders, timestamps, and bid amounts.
Reserved Price Protection: Set minimum reserve prices to protect your inventory value and profitability.
Opening Bid Configuration: Define starting bid amounts to control auction starting points.
Flexible Auction Scheduling: Set precise start and end dates/times for each auction campaign.
Multi-Auction Management: Run multiple concurrent auctions across your product catalog simultaneously.
Auction Status Tracking: Monitor auction states: Pending, Running, or Completed with visual indicators.
Bid Subscription System: Customers subscribe to receive notifications about auction progress and results.
Admin Winner Override: Manually select auction winners when needed for special circumstances.
Step-by-Step Setup Guide
Step 1: Install the LiveAuction Pro Addon
Installing the Ecartify: LiveAuction Pro addon takes just minutes:
Download the addon from CS-Cart marketplace or Ecartify website
Login to your CS-Cart admin panel and navigate to Add-ons
Upload and install "Ecartify: LiveAuction Pro"
Activate the addon from the add-ons list
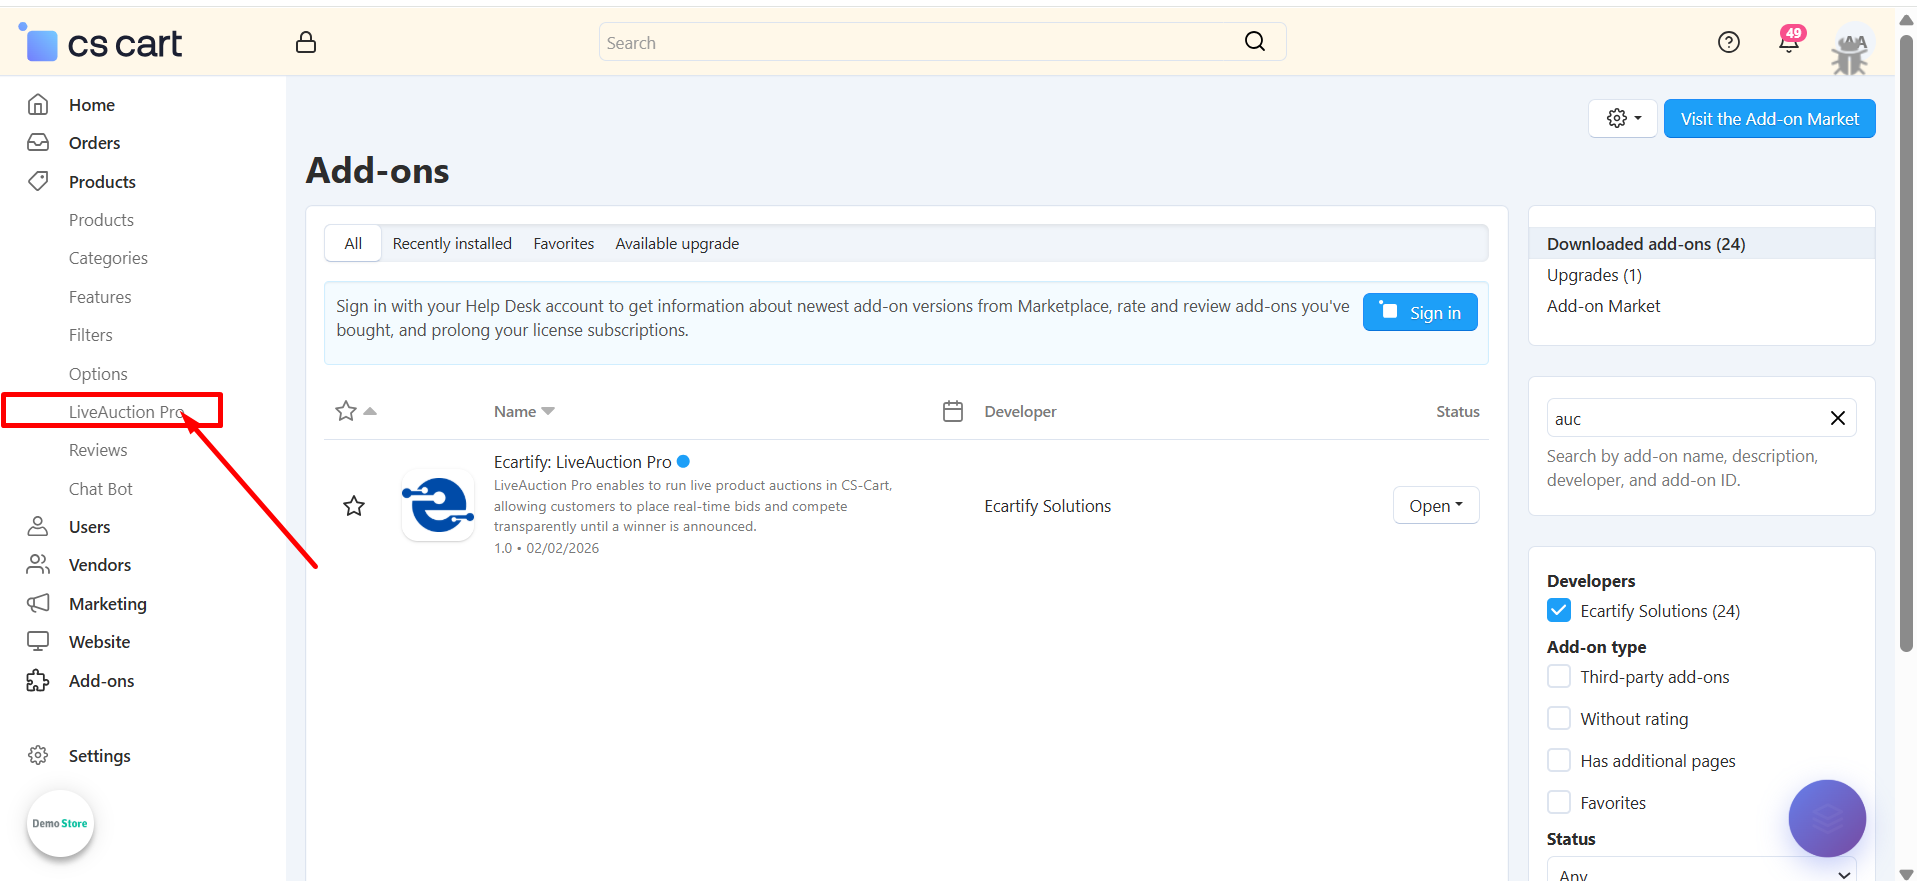
Once activated, you'll see a new "LiveAuction Pro" menu in your admin sidebar!
Step 2: Configure the Settings
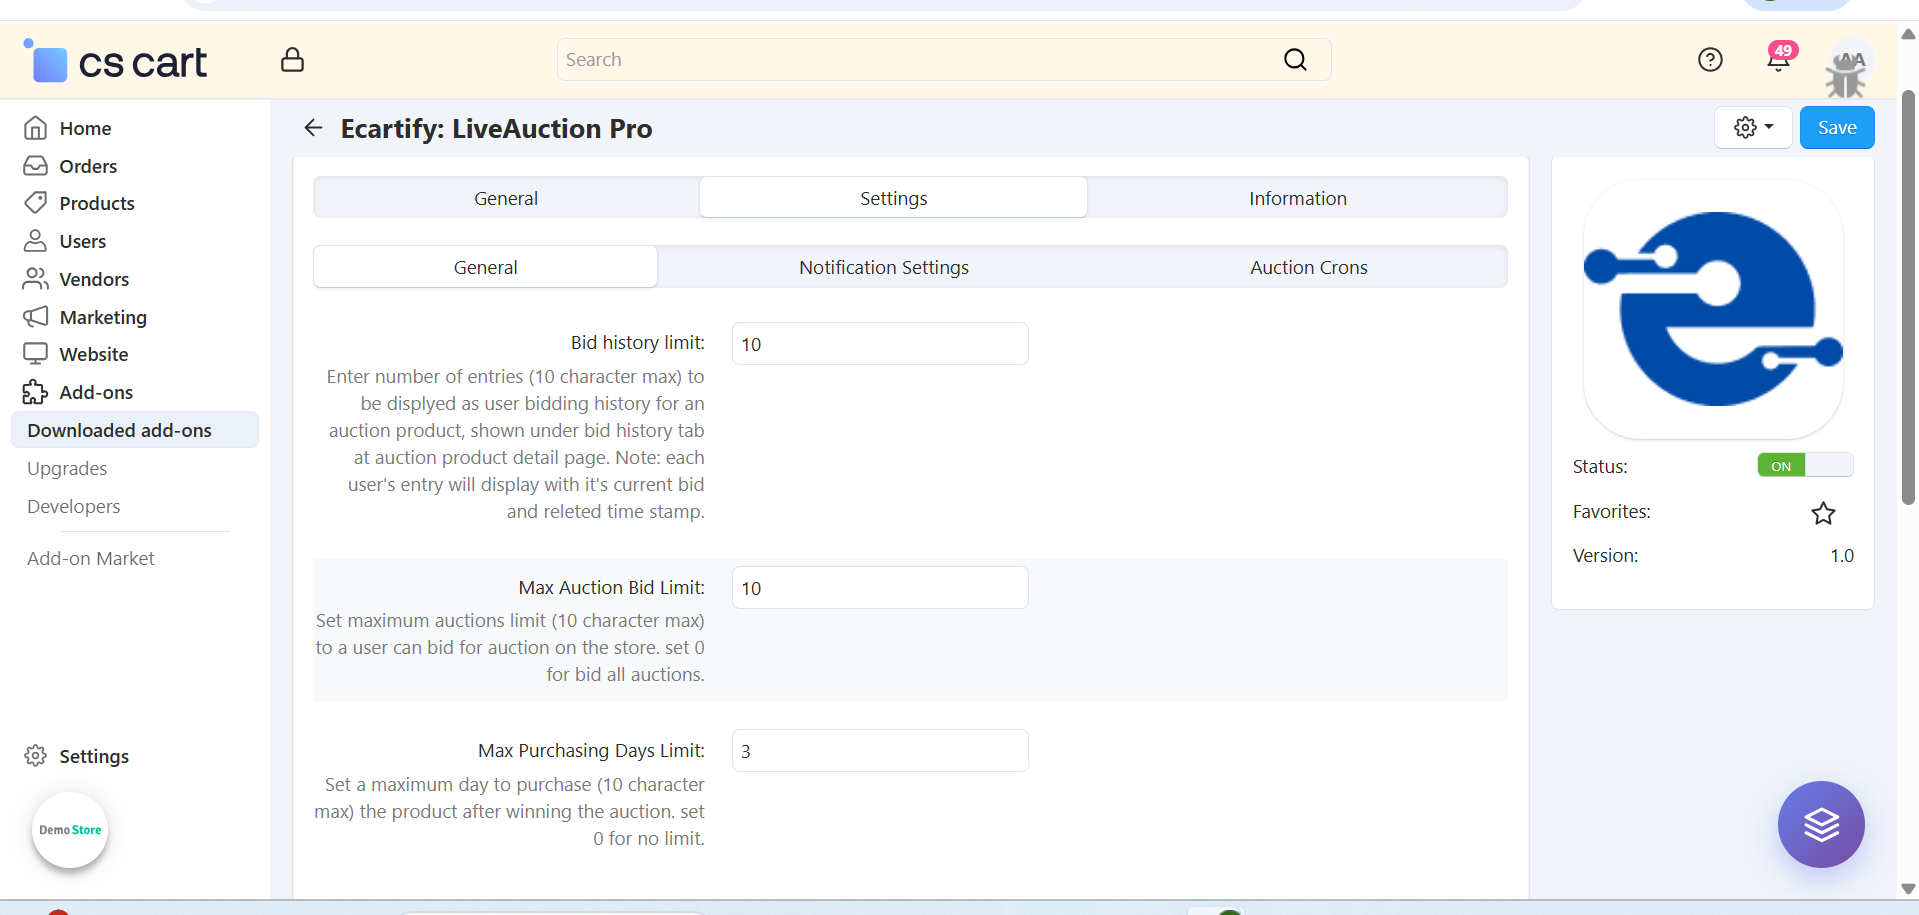
After installing the add-on, navigate to the Add-ons → Manage addons section and open the LiveAuction Pro add-on settings page. Here, you can configure the general options that control how the Auction works across your store.:
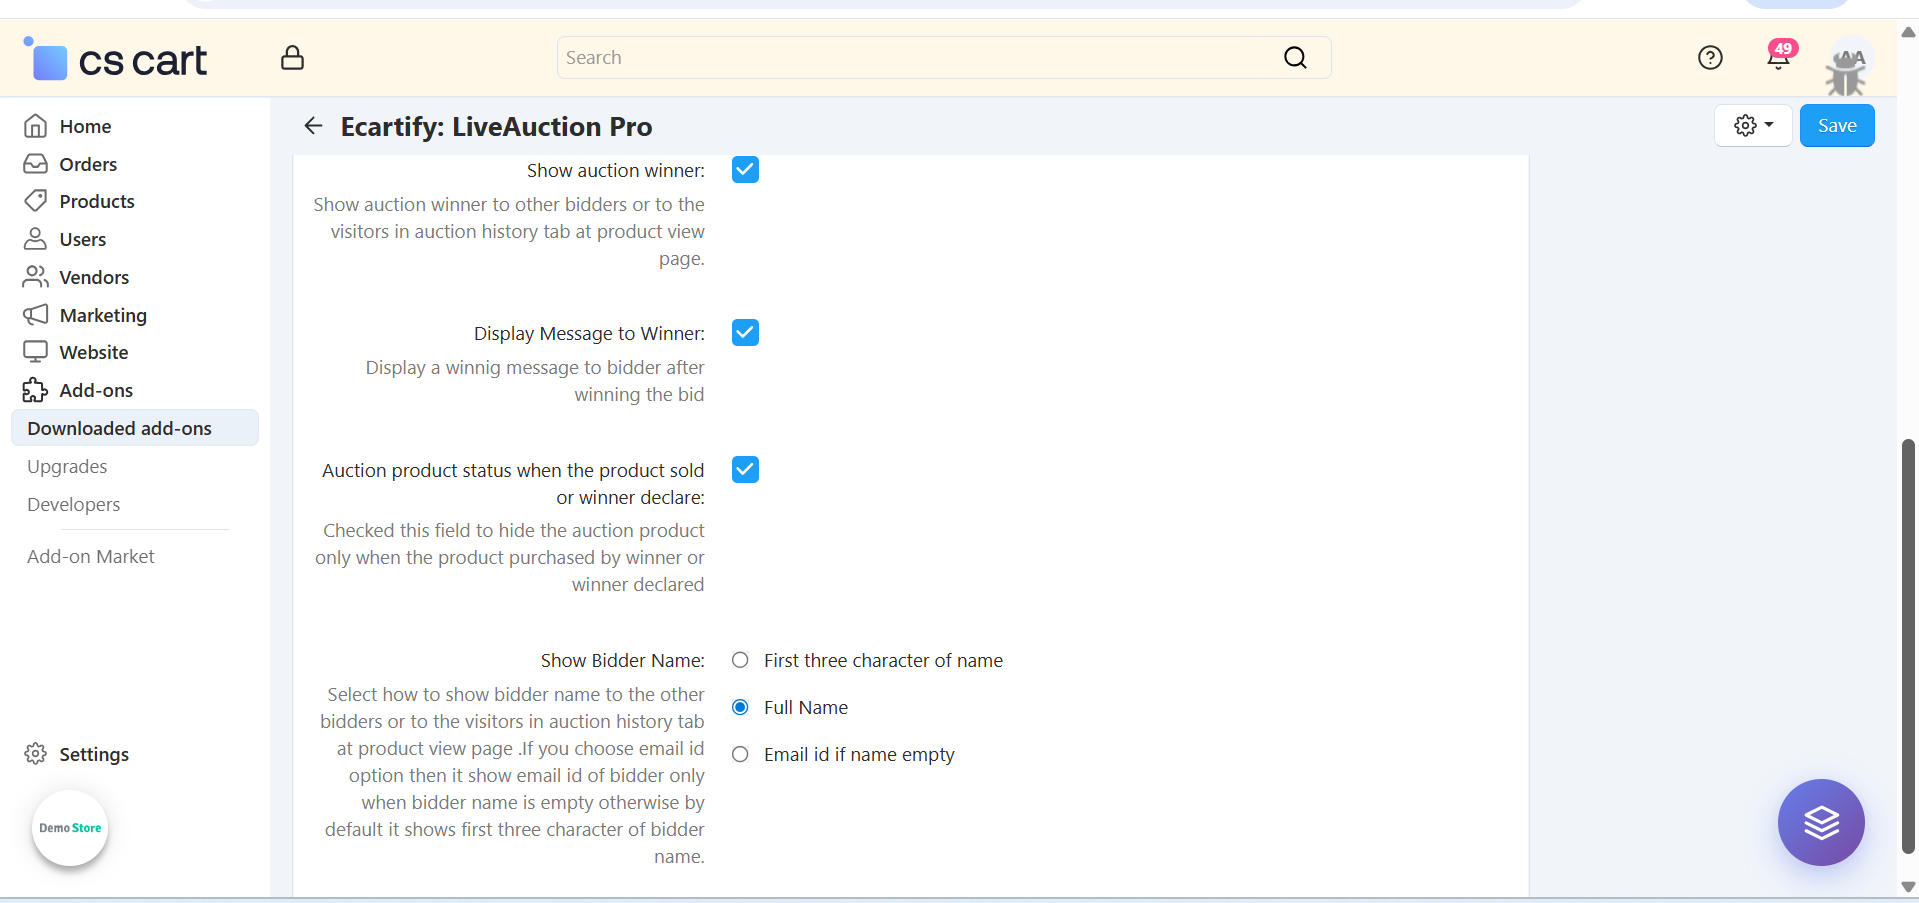
i) Input and select general setting:
The General Settings section allows the admin to control core auction behavior and limits for customers. These options help manage bidding activity, ensure fairness, and keep the auction process smooth and organized.
Each setting includes a tooltip that provides a clear explanation of its purpose and how it works. Hover over the tooltip icon next to any setting to view detailed guidance and usage information.
Each setting includes a tooltip that provides a clear explanation of its purpose and how it works. Hover over the tooltip icon next to any setting to view detailed guidance and usage information..
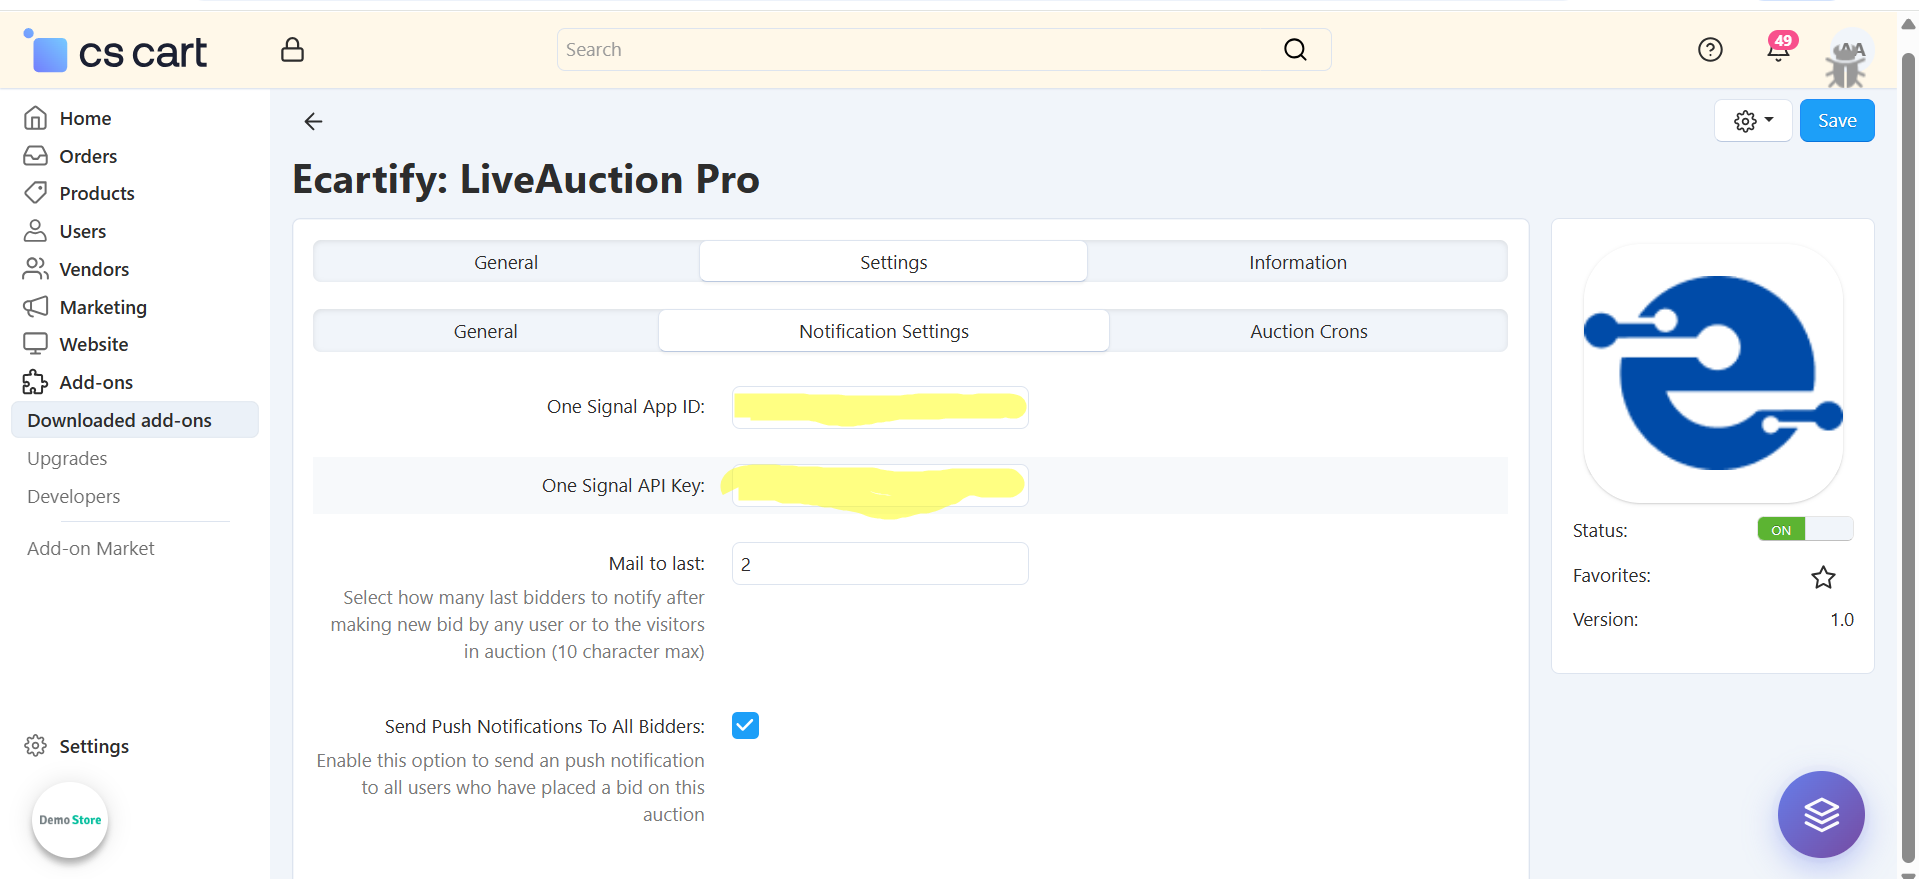
ii) Notifications settings :
-Enter your OneSignal App ID to enable push notifications for auction events. This allows real-time alerts to be sent to bidders when new bids are placed or auction status changes.
-Enable the options Send Email and Send Push Notifications to all users who have placed a bid on the auction. This helps re-engage bidders whenever a new bid is placed or important auction updates occur.
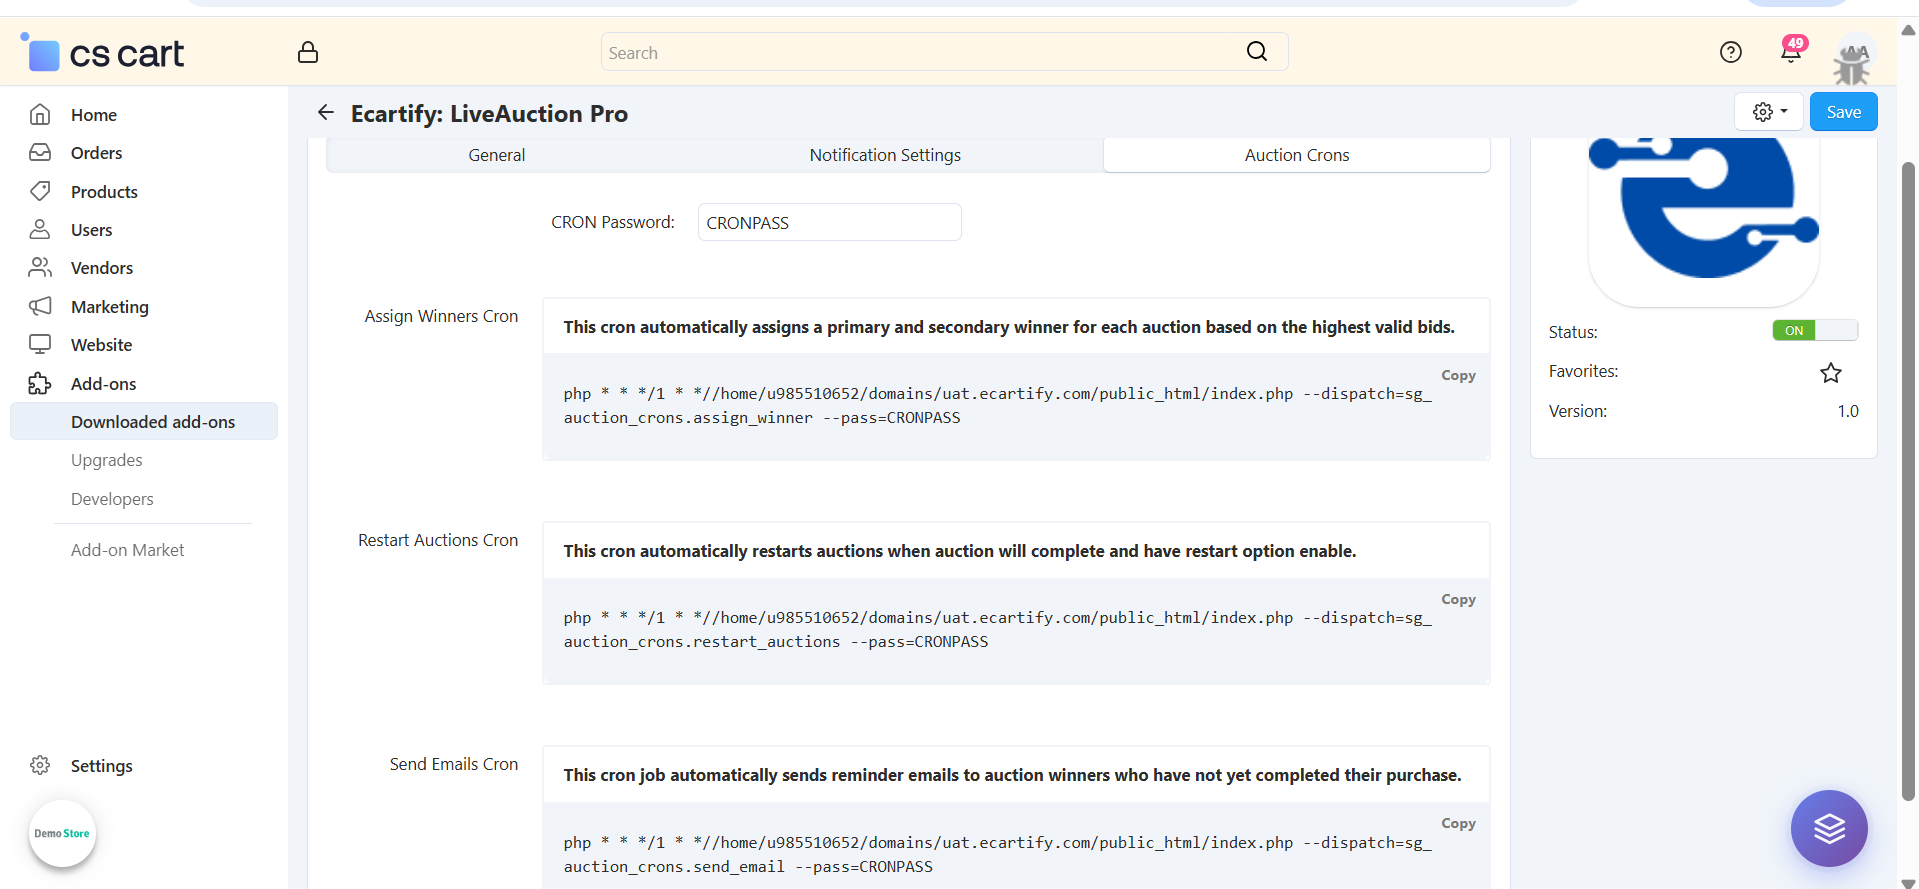
iii) Auction Cron job setting:
The Auction Crons section allows you to automate important auction processes using server cron jobs. These crons ensure that auctions run smoothly without manual intervention and that winners, restarts, and reminders are handled on time.
-Assign Winners Cron:
This cron job automatically assigns primary and secondary winners for each completed auction based on the highest valid bids.It ensures that winners are selected accurately and without manual effort.
-Restart Auctions Cron:
This cron automatically restarts auctions that have ended and have the restart option enabled.It is useful for recurring auctions or products that need continuous bidding.
-Send Emails Cron:
This cron job sends automatic reminder emails to auction winners who have not completed their purchase within the allowed time.It helps reduce abandoned wins and increases conversion rates.
All settings are now configured.
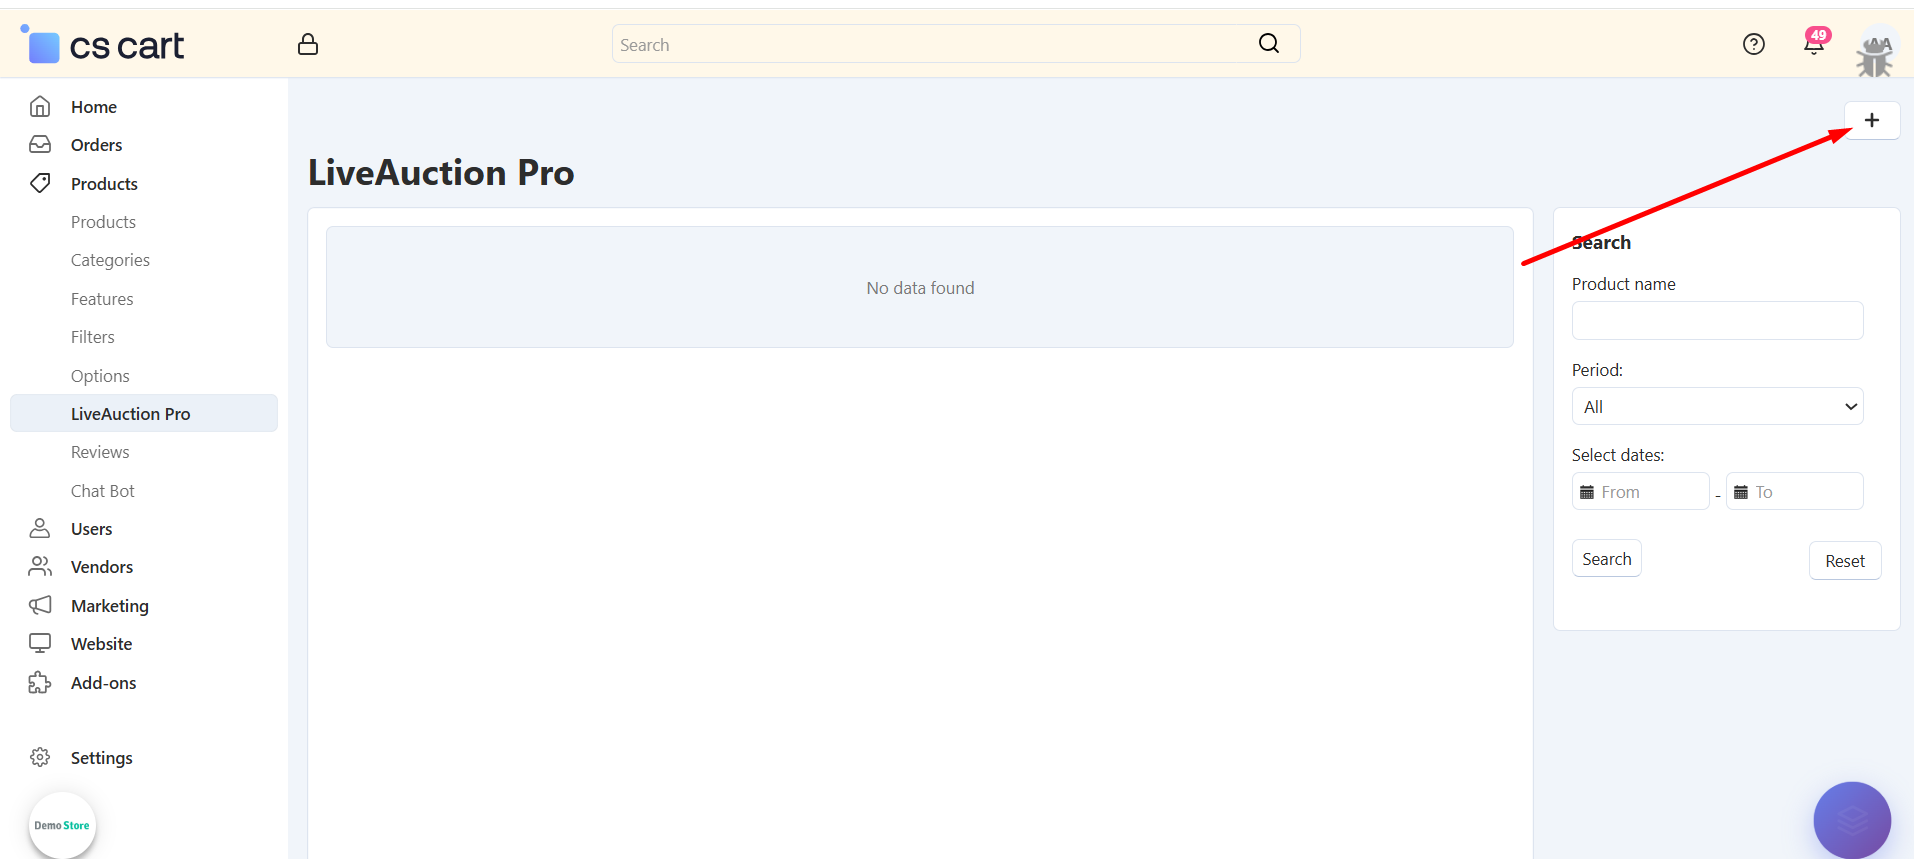
Step 3: Access LiveAuction Pro Management
Navigate to the LiveAuction Pro management interface from your admin panel:
Find LiveAuction Pro Menu: Look for "LiveAuction pro" in the left sidebar navigation menu
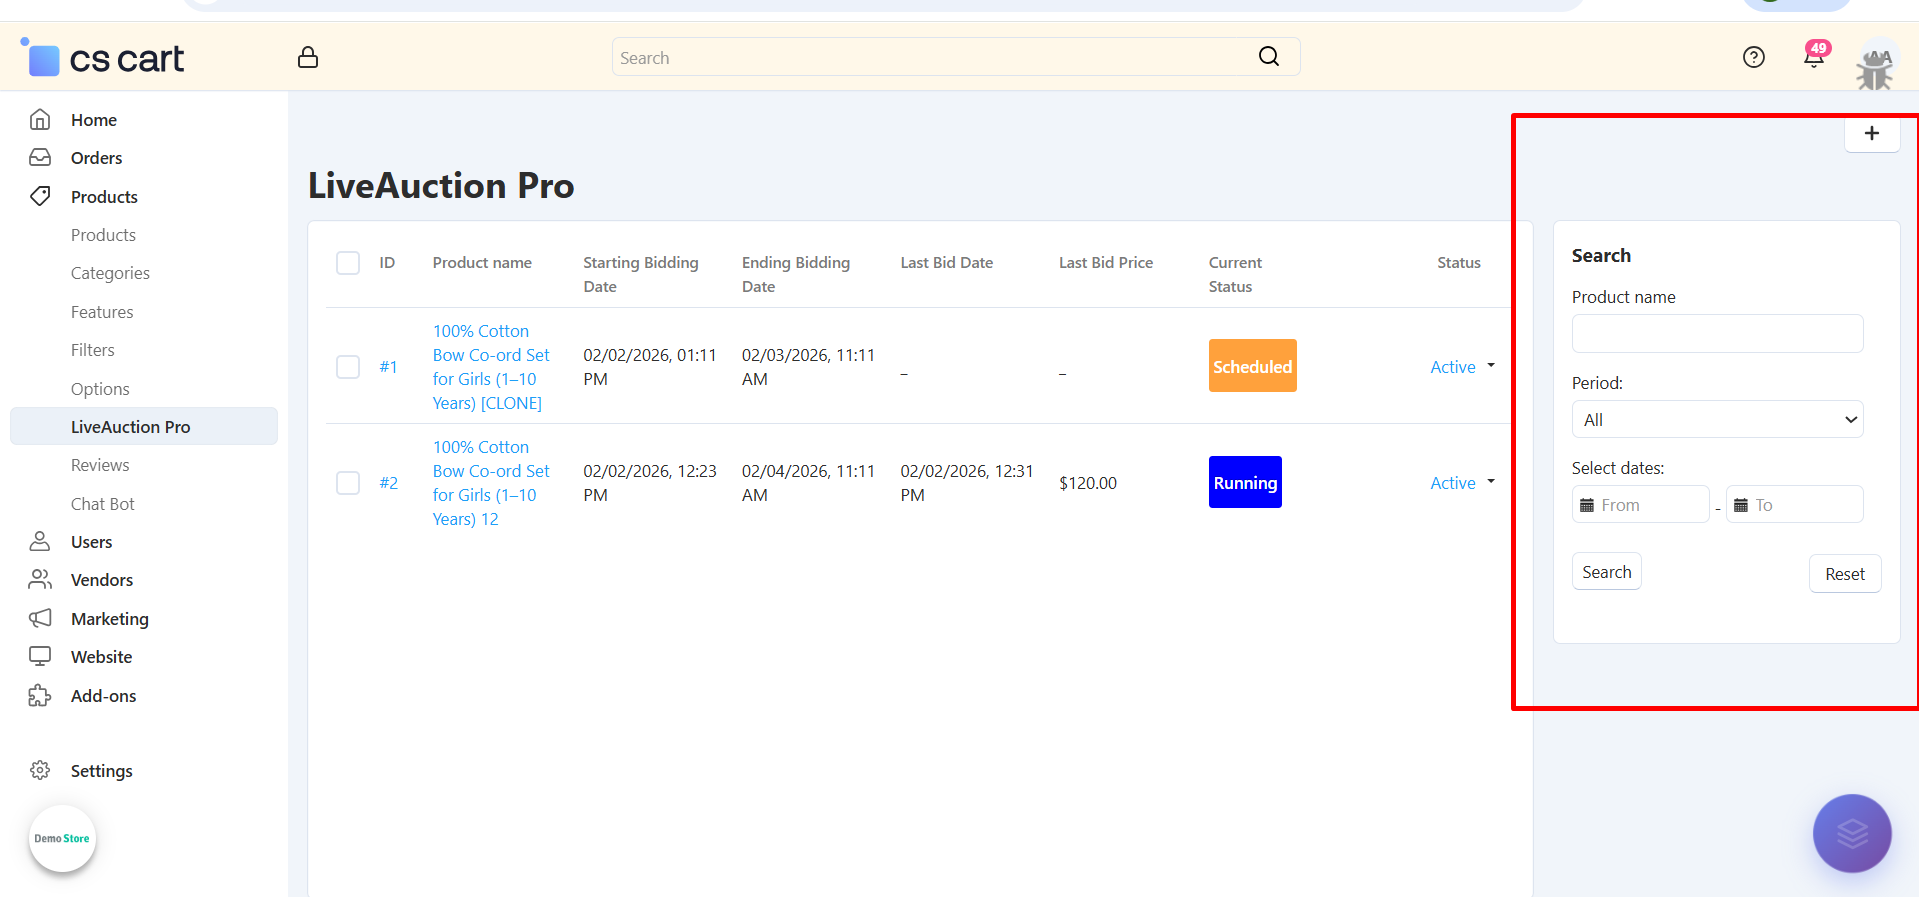
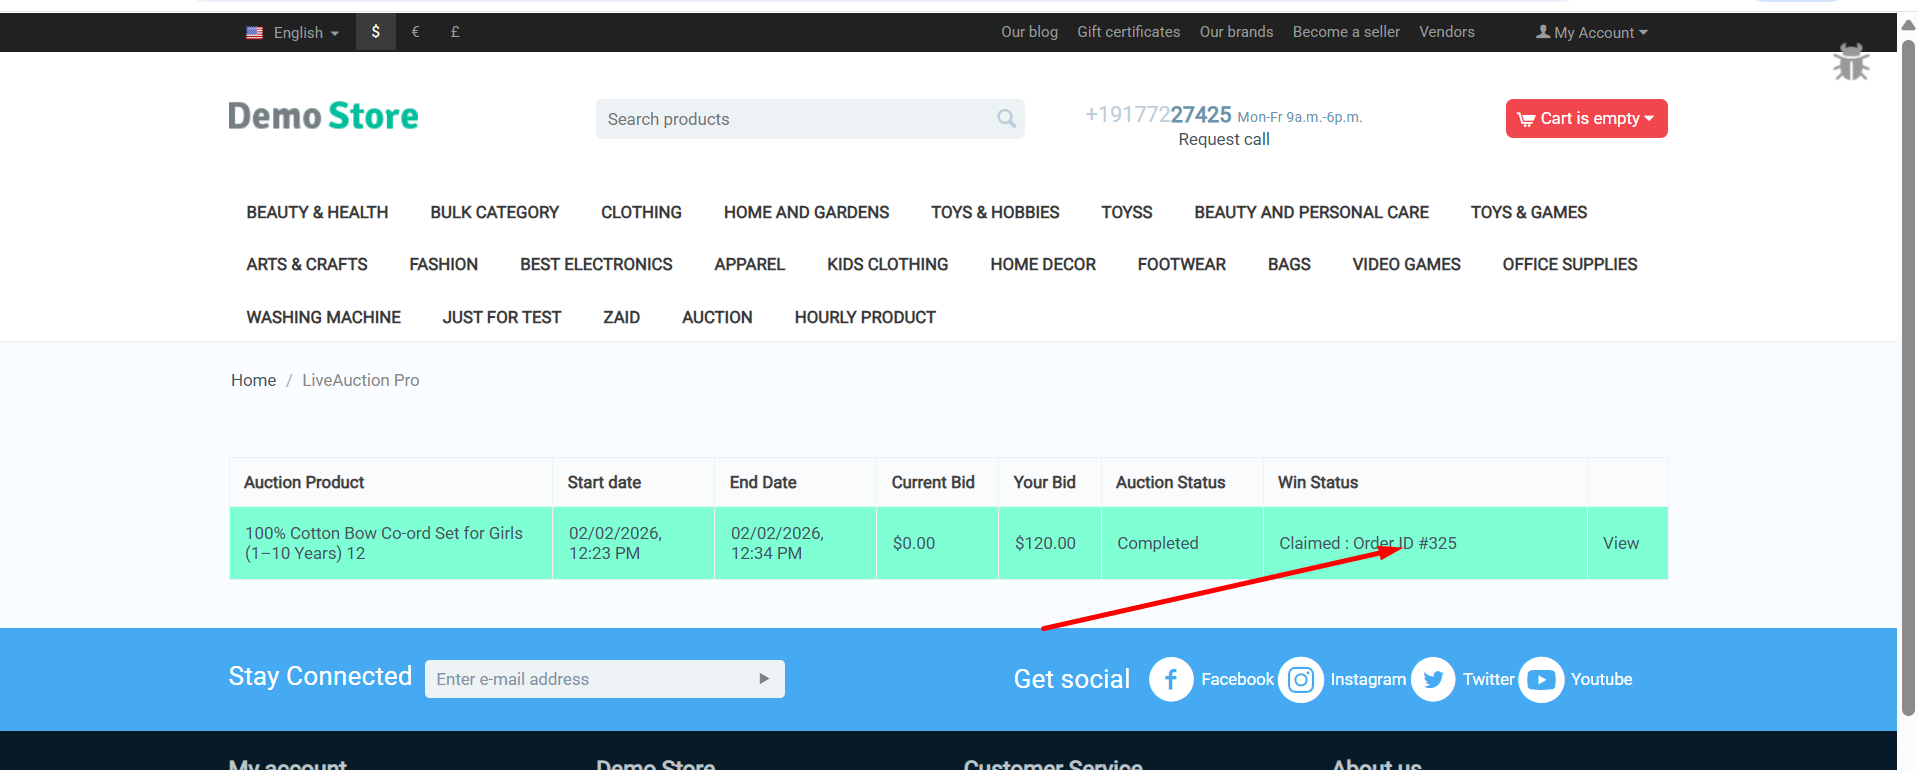
View All Auctions: See list of all created auctions with status, dates, and current bids
Filter & Search: Use search filters to find specific auctions by product name or date range
Status Overview: Quickly identify Running, Completed, and Pending auctions with color-coded badges
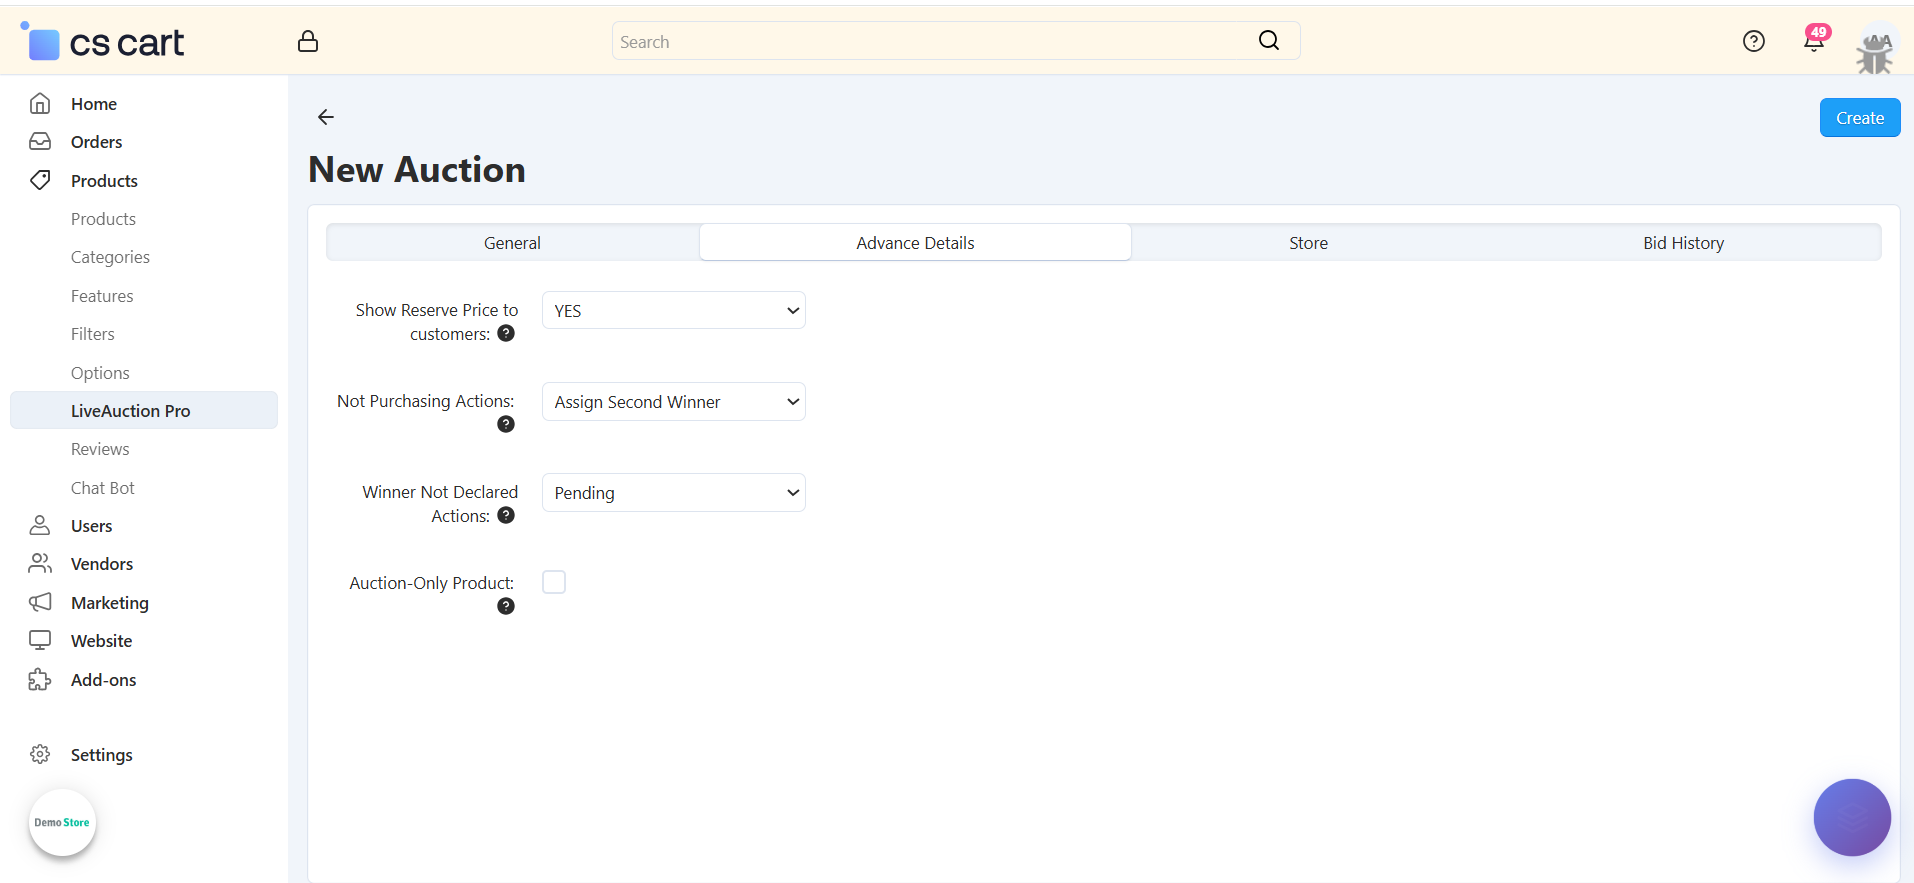
Step 3: Create Your First Auction
Set up a new auction for any product in your catalog:
Select Product: Choose any existing product from your catalog to convert into an auction
Set Start Date/Time: Define when the auction will begin accepting bids (e.g., 01/21/2026, 00:00)
Set End Date/Time: Specify when bidding closes and winner is determined (e.g., 01/23/2026, 11:11)
Configure Opening Bid: Set the starting bid amount (e.g., $11.00)
Your auction is now ready to accept bids when the start time arrives!
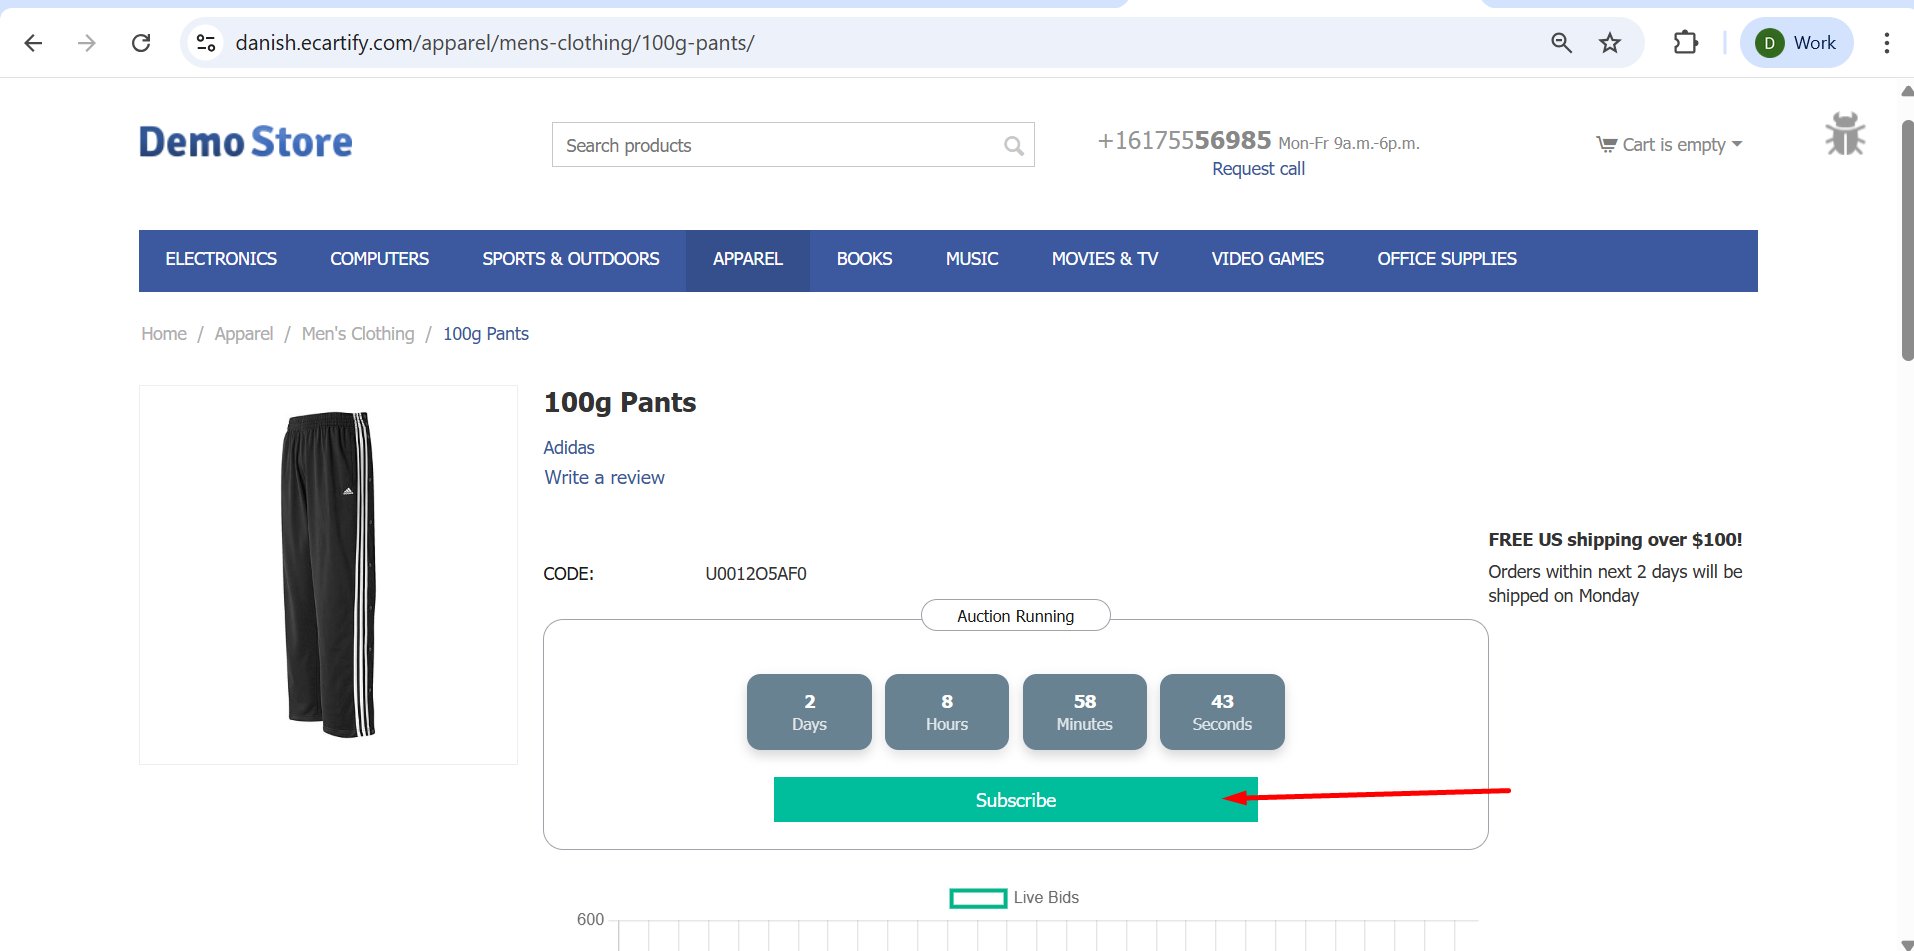
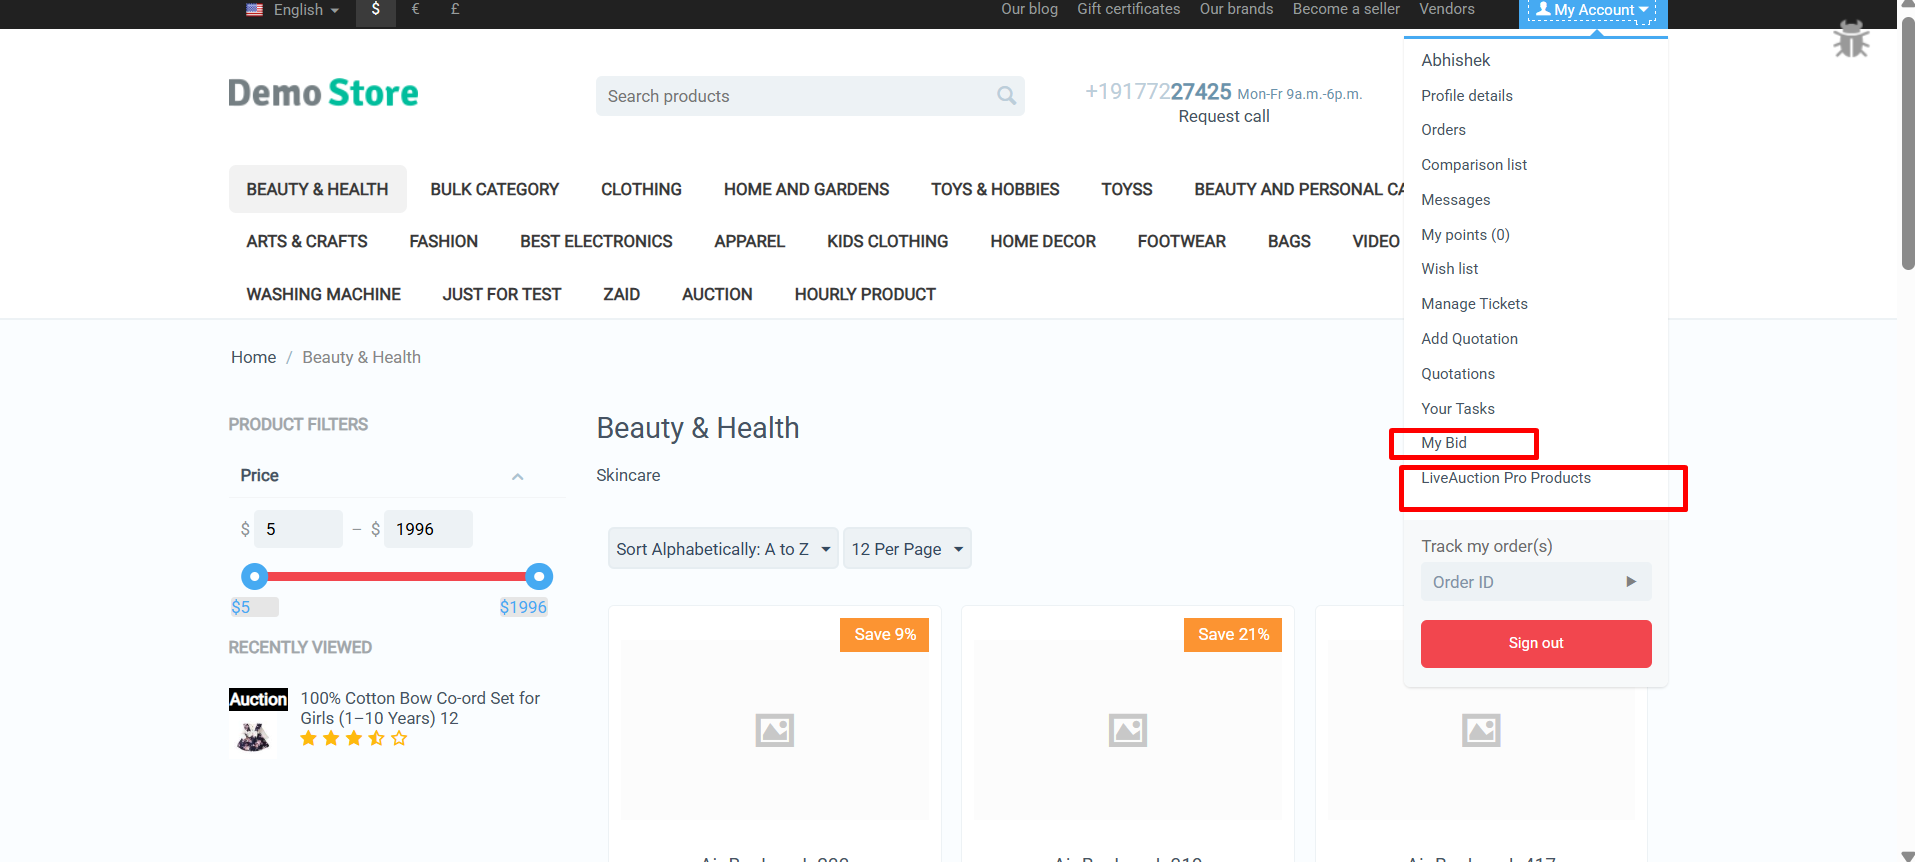
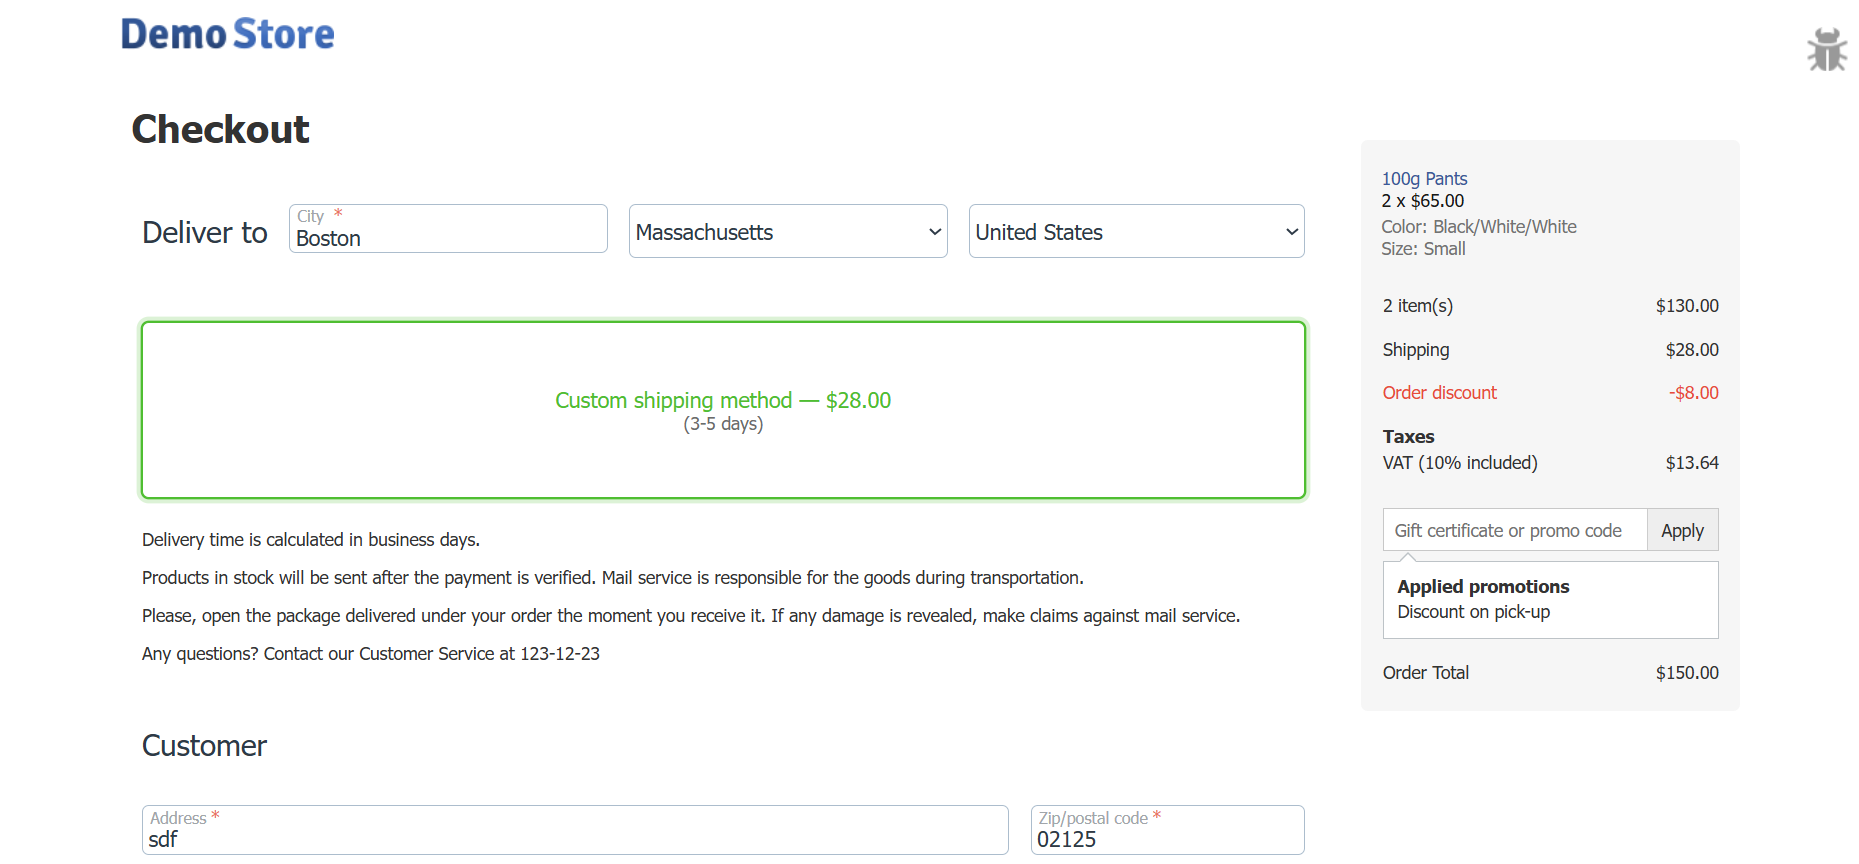
Step 4: Customer Auction Experience
Your customers get an engaging, intuitive bidding interface:
Transform Your Store with LiveAuction Pro Excitement
The CS-Cart LiveAuction Pro Addon is ready to revolutionize how you sell products and engage customers. Create competitive excitement, drive higher prices through bidding wars, and build a loyal customer base that keeps coming back for your auction events.
Pro Tip: Start with high-value or limited-edition products to generate maximum buzz. Promote upcoming auctions through email and social media to build anticipation. Use reserve prices to protect your margins while letting the market determine final values. Monitor bid patterns to understand customer demand and optimize future auction strategies!
Ready to launch your first auction? Install the LiveAuction Pro addon today and watch customer engagement soar as they compete for your products in real-time!
Leverage AI-driven analytics to identify SEO gaps, improve page performance, and outperform competitors. Ecartify Page Ranker turns complex CS-Cart SEO into clear, actionable strategies.
Page Ranker
Running a successful e-commerce store requires more than just great products. You need to be visible on search engines, track your performance metrics, and continuously optimize your content for better rankings.
But CS-Cart's default capabilities don't provide integrated Google Search Console data, AI-powered SEO suggestions, or comprehensive page-level optimization tools.
Introducing Ecartify: Page Ranker — an advanced SEO analytics and optimization extension that brings Google Search Console insights, AI-powered content suggestions, and comprehensive SEO analysis directly into your CS-Cart admin panel.
What is Ecartify: Page Ranker?
Ecartify: Page Ranker is a comprehensive SEO management tool that enhances your CS-Cart store with powerful features designed to improve your search engine visibility and optimize your content:
Direct Google Search Console integration for real-time performance data
AI-powered SEO suggestions using Gemini and OpenAI
Comprehensive SEO analysis for products, categories, and pages
Visual dashboards showing impressions, clicks, and performance metrics
Intelligent meta title, description, and URL optimization
Multi-dimensional data analysis by pages, queries, countries, and devices
This addon is built for store owners who want to leverage data-driven insights and cutting-edge AI to dominate search engine rankings.
Key Features of Ecartify: Page Ranker
Google Search Console Integration:
Connect your CS-Cart store directly to Google Search Console for comprehensive search performance insights:
One-click authorization with Google Search Console
Secure OAuth integration using Client ID and Secret
Real-time synchronization of search performance data
Track impressions, clicks, CTR, and average positions
No manual data exports or third-party tools needed
All your search console data is accessible directly within CS-Cart's familiar admin interface.
Comprehensive Analytics Dashboard:
View your store's search performance through multiple analytical lenses with beautiful visual representations:
Pages Analysis
Track performance of individual URLs and landing pages
Query Analysis
Discover which search terms drive traffic to your store
Country Analysis
Understand geographic distribution of your search traffic
Device Analysis
Compare desktop, mobile, and tablet search performance
Each analysis type features both interactive graphs and detailed data tables for comprehensive insights.
AI-Powered SEO Optimization:
Leverage cutting-edge AI technology to improve your content with intelligent suggestions:
Integration with Google Gemini AI for advanced content analysis
OpenAI integration for alternative optimization approaches
AI-generated meta title suggestions optimized for click-through rates
Intelligent meta description recommendations
SEO-friendly URL slug suggestions
Comparative analysis showing improvements over existing content
Example AI Optimizations:
Current: "Blue Shoes" → AI Suggests: "Premium Blue Running Shoes for Men - Comfortable & Durable"
Current: "shoes" → AI Suggests: "premium-blue-running-shoes-men"
AI analyzes keyword density, length optimization, and engagement potential
Page-Level SEO Analysis:
Get detailed SEO health reports for every product, category, and page in your store:
Dedicated "Page Ranker" tab in product, category, and page editors
Real-time SEO score and improvement points
Meta title analysis with length and keyword optimization
Meta description quality assessment
URL structure evaluation and recommendations
Actionable improvement suggestions for each element
No more guessing what needs improvement—get specific, actionable recommendations for every page.
Visual Data Representation:
Transform raw Google Search Console data into meaningful insights with professional visualizations:
Interactive line charts showing trends over time
Bar graphs for comparative analysis
Color-coded performance indicators
Sortable data tables with filtering options
Export capabilities for external reporting
Mobile-responsive dashboard design
Intelligent Suggestion System:
One-click optimization that compares AI suggestions against your current content:
Current vs. Suggested
Side-by-side comparison of existing and AI-optimized content
Improvement Metrics
Quantified predictions for potential ranking improvements
One-Click Apply
Instantly update your content with AI suggestions
The "Suggest to Improve" button revolutionizes content optimization by bringing enterprise-level SEO intelligence to CS-Cart.
Step-by-Step Setup Guide
Step 1: Install and Configure the Addon
Setting up Page Ranker requires a few configuration steps to connect your external services:
Download and install the addon from CS-Cart marketplace or Ecartify website
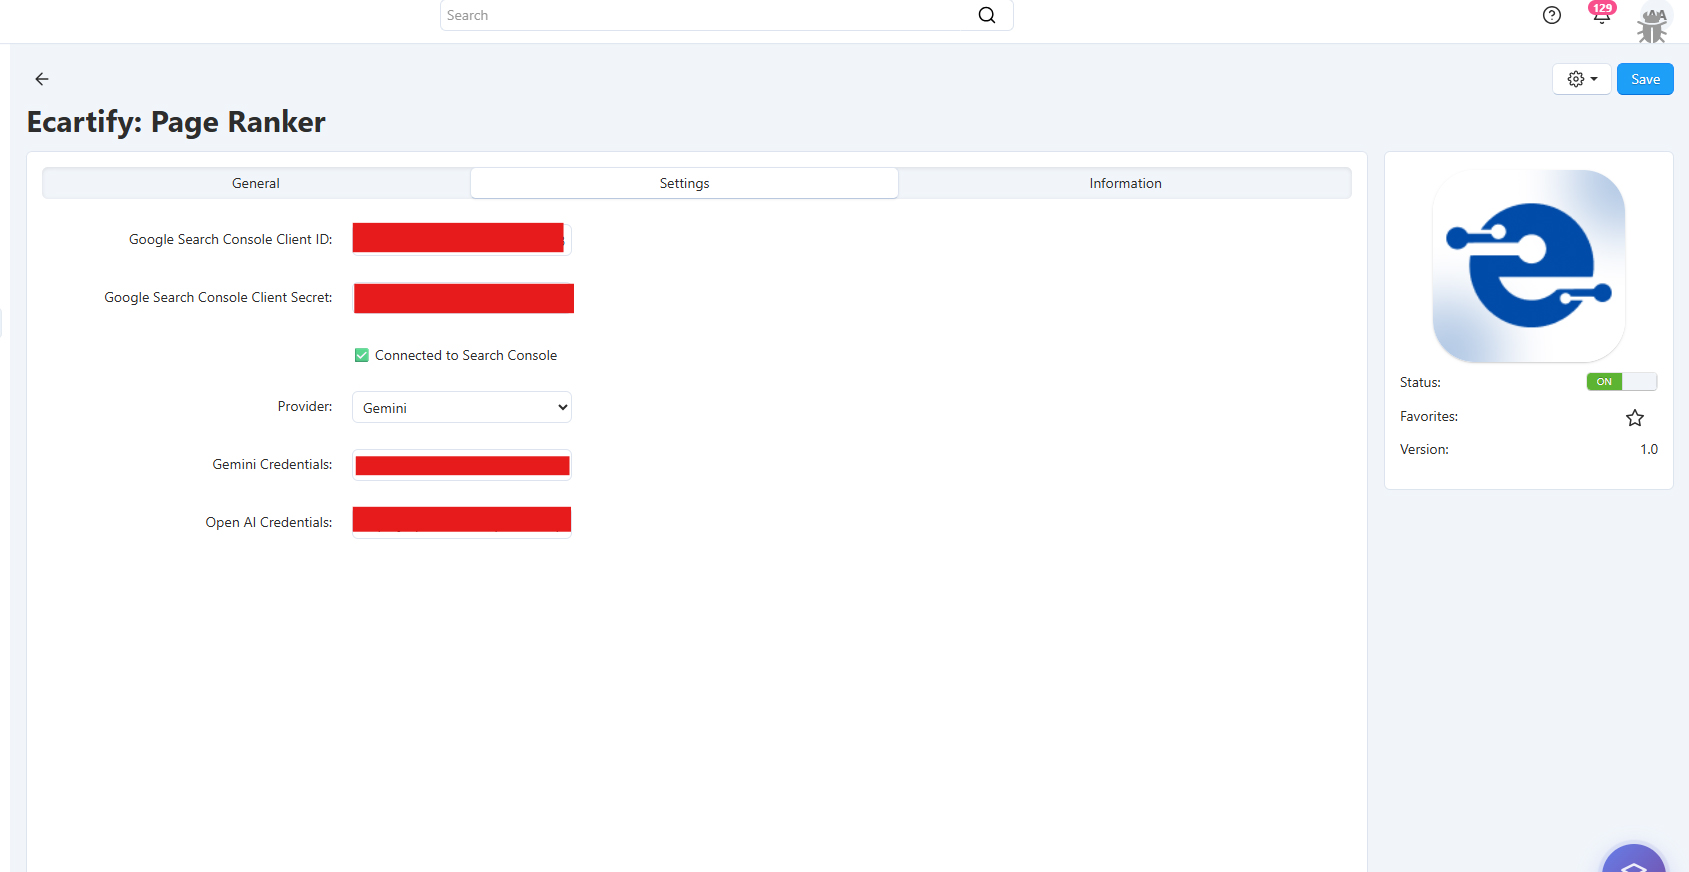
Navigate to Add-ons → Page Ranker → Settings
Enter your Google Search Console Client ID
Enter your Google Search Console Client Secret
Configure Gemini AI Credentials for AI-powered suggestions
Optionally add OpenAI Credentials for alternative AI suggestions
Note: You'll need to create a Google Cloud project and obtain OAuth credentials. The addon includes detailed documentation for this process.
Step 2: Connect to Google Search Console
Authorize your CS-Cart store to access Google Search Console data:
Add "YOURADMINPANELURL?dispatch=sg_page_ranker.returnauthorization" to your Auth2.0 Authorised redirect URIs.
Click the "Authenticate" button in addon settings
Sign in with your Google account that has Search Console access
Grant the necessary permissions for data access.
Verify the connection status shows "Connected"
Once connected, data synchronization begins automatically and updates regularly.
Step 3: Explore the Analytics Dashboard
Access comprehensive search performance data through the Page Ranker dashboard:
Pages Tab:
View impressions and clicks for individual pages. Identify top-performing URLs and pages needing optimization.
Queries Tab:
Discover which search terms bring traffic. Find opportunities for content expansion and keyword targeting.
Countries Tab:
Analyze geographic performance. Understand where your search traffic originates and optimize accordingly.
Devices Tab:
Compare desktop vs. mobile vs. tablet performance. Optimize for device-specific user experiences.
Each tab includes both visual graphs and sortable data tables for comprehensive analysis.
Step 4: Use Page-Level SEO Analysis
Optimize individual products, categories, and pages with integrated SEO analysis:
Navigate to any product, category, or page edit screen
Click on the new "Page Ranker" tab
Review the SEO Analysis Report showing current optimization status
Check improvement points for meta title, description, and URL
Review title and description analysis with specific recommendations
Step 5: Get AI-Powered Optimization Suggestions
Use artificial intelligence to improve your SEO content with one click:
In the Page Ranker tab, click "Suggest to Improve"
The AI analyzes your current meta title, description, and URL slug
Review AI-generated suggestions with improvement explanations
Compare suggested content against your existing content
Apply suggestions with one click or manually refine them
Save changes and monitor performance improvements
Pro Tip: Test AI suggestions on lower-performing pages first to measure impact before rolling out across your entire store.
Perfect for Every E-Commerce Store
Whether you're a small boutique or large marketplace, Page Ranker helps you:
Improve Search Rankings:
Data-driven optimization based on actual Google Search Console metrics.
Save Time:
AI-powered suggestions eliminate hours of manual SEO research and writing.
Increase Click-Through Rates:
Optimized meta titles and descriptions attract more clicks from search results.
Monitor Performance:
Track the impact of your SEO efforts with comprehensive analytics.
Make Informed Decisions:
Use real data from Google to prioritize optimization efforts.
Stay Competitive:
Leverage enterprise-level SEO tools typically only available to large corporations.
The addon ensures every page in your store can be optimized using the same professional-grade tools used by Fortune 500 companies.
Ecartify: Page Ranker is the ultimate SEO solution for CS-Cart stores that want to dominate search engine results with data-driven insights and AI-powered optimization.
It transforms CS-Cart into a comprehensive SEO command center—combining Google Search Console integration, artificial intelligence, and actionable analytics in one seamless package.
If you want to increase organic traffic, improve search rankings, and leverage cutting-edge AI for content optimization, this addon will completely revolutionize how you approach SEO in CS-Cart.
Ready to Dominate Search Rankings?
Stop guessing and start optimizing with real data and AI intelligence. Upgrade to Ecartify: Page Ranker and transform your CS-Cart store into an SEO powerhouse that attracts more organic traffic and drives sustainable growth.
Automate vendor invoices, purchase orders, and bill payments with seamless Xero integration for multi-vendor marketplaces.
Ecartify: Xero Accounting Integration for Vendors
Streamline your multi-vendor marketplace accounting with the Xero Vendor Integration. This specialized addon automatically synchronizes vendor bills, purchase orders, commission payouts, and vendor settlements between your CS-Cart marketplace and Xero accounting software. Manage vendor finances effortlessly, track commissions accurately, and maintain complete financial transparency with automated vendor accounting.
Key Features for Vendor Management
Vendor Bill Creation: Vendor orders automatically generate bills in Xero with complete details and commission deductions.
Vendor Contact Sync: Vendors sync as Xero suppliers with complete business details.
Commission Account Mapping: Map vendor commissions to appropriate revenue accounts in Xero.
Vendor Payout Tracking: Monitor pending and completed vendor payments with detailed transaction history.
OAuth 2.0 Security: Enterprise-grade security with encrypted vendor financial data transmission.
Step-by-Step Vendor Setup Guide
Step 1: Install the Vendor Addon
Installing the Xero Vendor Accounting Integration takes just minutes:
Download the vendor edition from CS-Cart marketplace or Ecartify
Navigate to Add-ons in your CS-Cart admin panel
Upload and install "Ecartify: Xero Vendor Connector"
Activate the addon for marketplace-wide vendor accounting
Step 2: Configure Xero Developer Credentials
Set up your Xero API connection for vendor data synchronization:
Your Xero Vendor Integration is ready to revolutionize multi-vendor marketplace accounting. Eliminate manual vendor reconciliation, automate commission tracking, and provide complete financial transparency to your vendors. With automated synchronization, you can:
Pro Tip: Start by syncing existing vendor data to populate Xero with historical commission and settlement records, then enable real-time synchronization for all new vendor transactions. Use vendor-specific reports to analyze performance and optimize your commission structure!
Ready to automate vendor accounting? Install the Xero Vendor Integration today and experience seamless multi-vendor financial management!
AI-powered addon that analyzes all product reviews, detects fake feedback, and generates transparent review reports for admins and customers.
AI Review Analyzer – Smart Reviews Analyzer
AI Review Analyzer uses advanced AI models powered by OpenAI or Google Gemini to analyze product reviews across the store and generate detailed review intelligence reports. The addon evaluates sentiment, language patterns, and behavioral signals to detect fake, spam, or misleading reviews. These insights are available to administrators for effective moderation and decision-making, while fake review detection results are transparently displayed to customers to improve trust, authenticity, and confidence in product reviews.
Key Features of AI Review Analyzer
Dual AI Engine: Gemini + ChatGPT:
Use Google Gemini or OpenAI (ChatGPT) to generate full product reviews analysis report and detection of fake reviews.
Choose what fits your needs and budget
Full Multilingual Support: Generate content in any language your store supports: English, Hindi, Arabic, French, German, Spanish — or any custom language used in CS-Cart.
Works on All CS-Cart Setups:
CS-Cart, Multi-Vendor, Ultimate, Any theme, Any hosting, Any custom modifications
Fake review detection: Automatically analyze every new review with AI to detect fake or suspicious content
Easy Installation: No technical expertise required—get started in just a few minutes.
Step-by-Step Setup Guide
Step 1: Install the Addon
Installing the AI Review Analyzer Addon is simple:
Login to your CS-Cart admin panel.
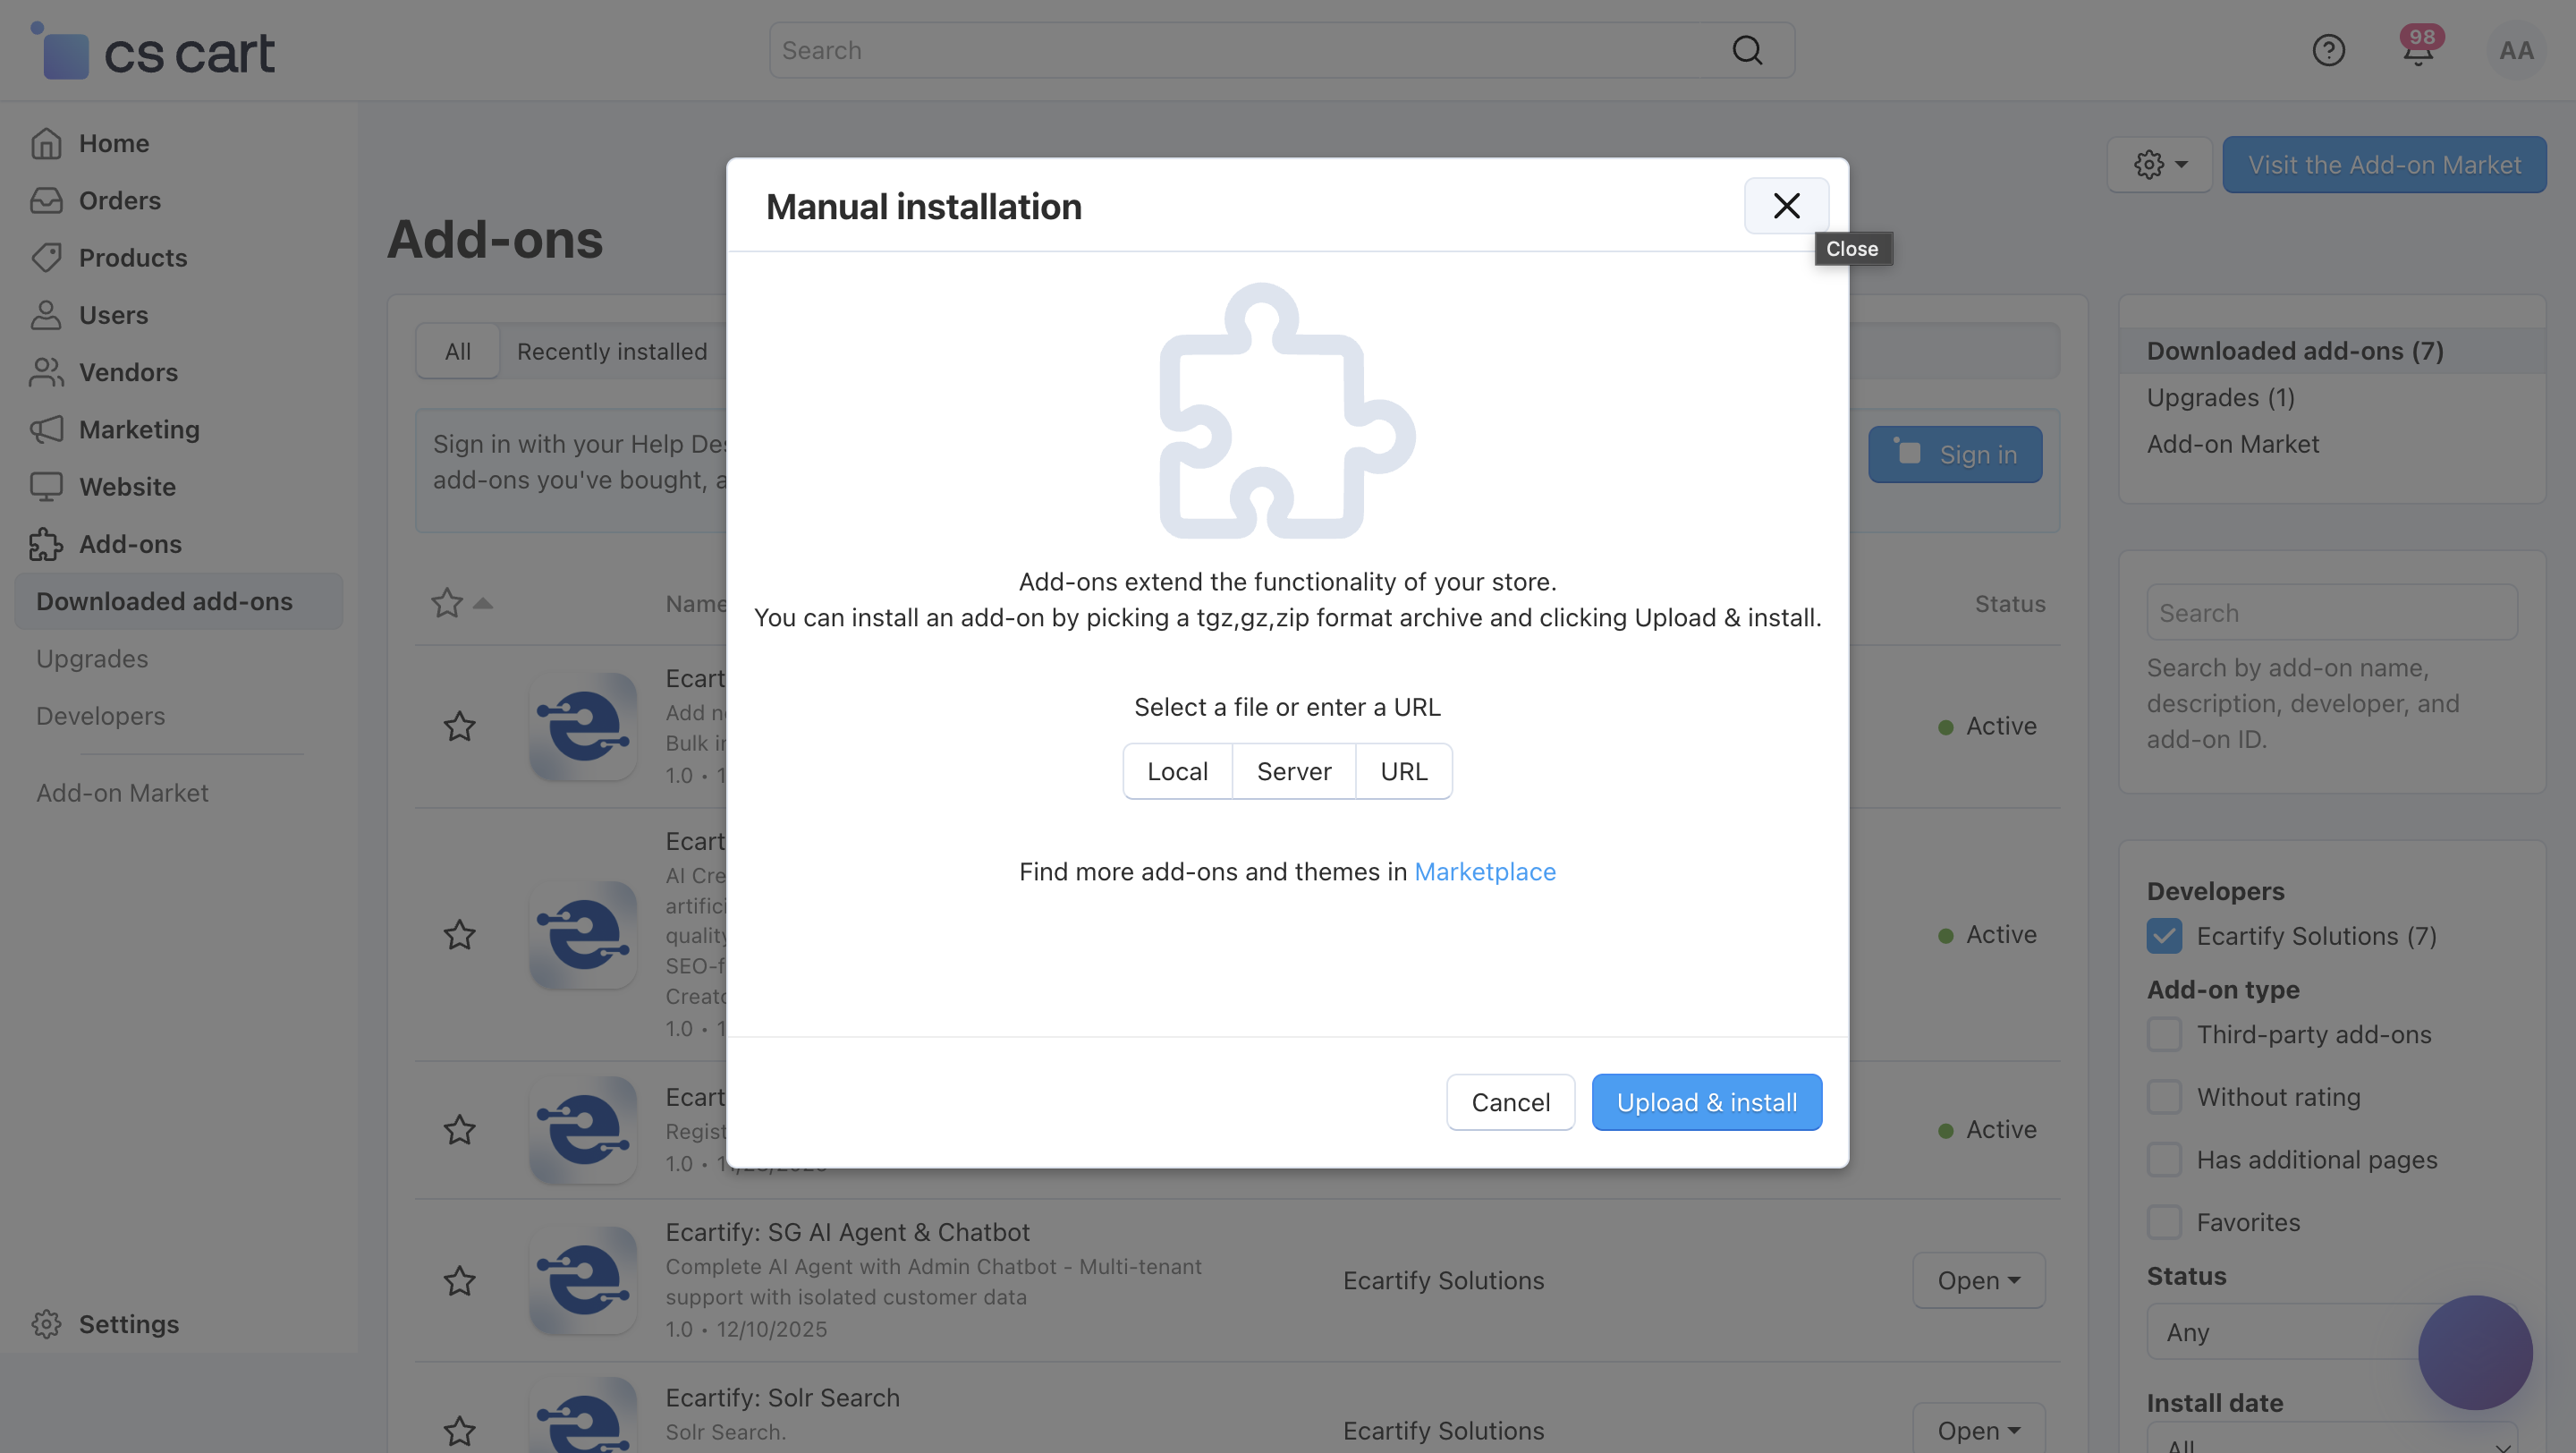
Go To Add-ons → Manage add-ons→ Click on ⚙️ gear icon→ Manual installation
Upload the provided ZIP file of the addon.
Once uploaded, the addon will appear under CS-Cart - Add-ons.
Now click on the AI Review Analyzer add-on and add the required settings.
This process takes only a few minutes and requires no coding knowledge.
Step 2: Configure the Settings
After installing the add-on, navigate to the Add-ons → Manage add-ons section and open the AI Review Analyzer add-on settings page. Here, you can configure the general options that control how the AI review Analyzer works across your store, including content generation, translations, and vendor access:
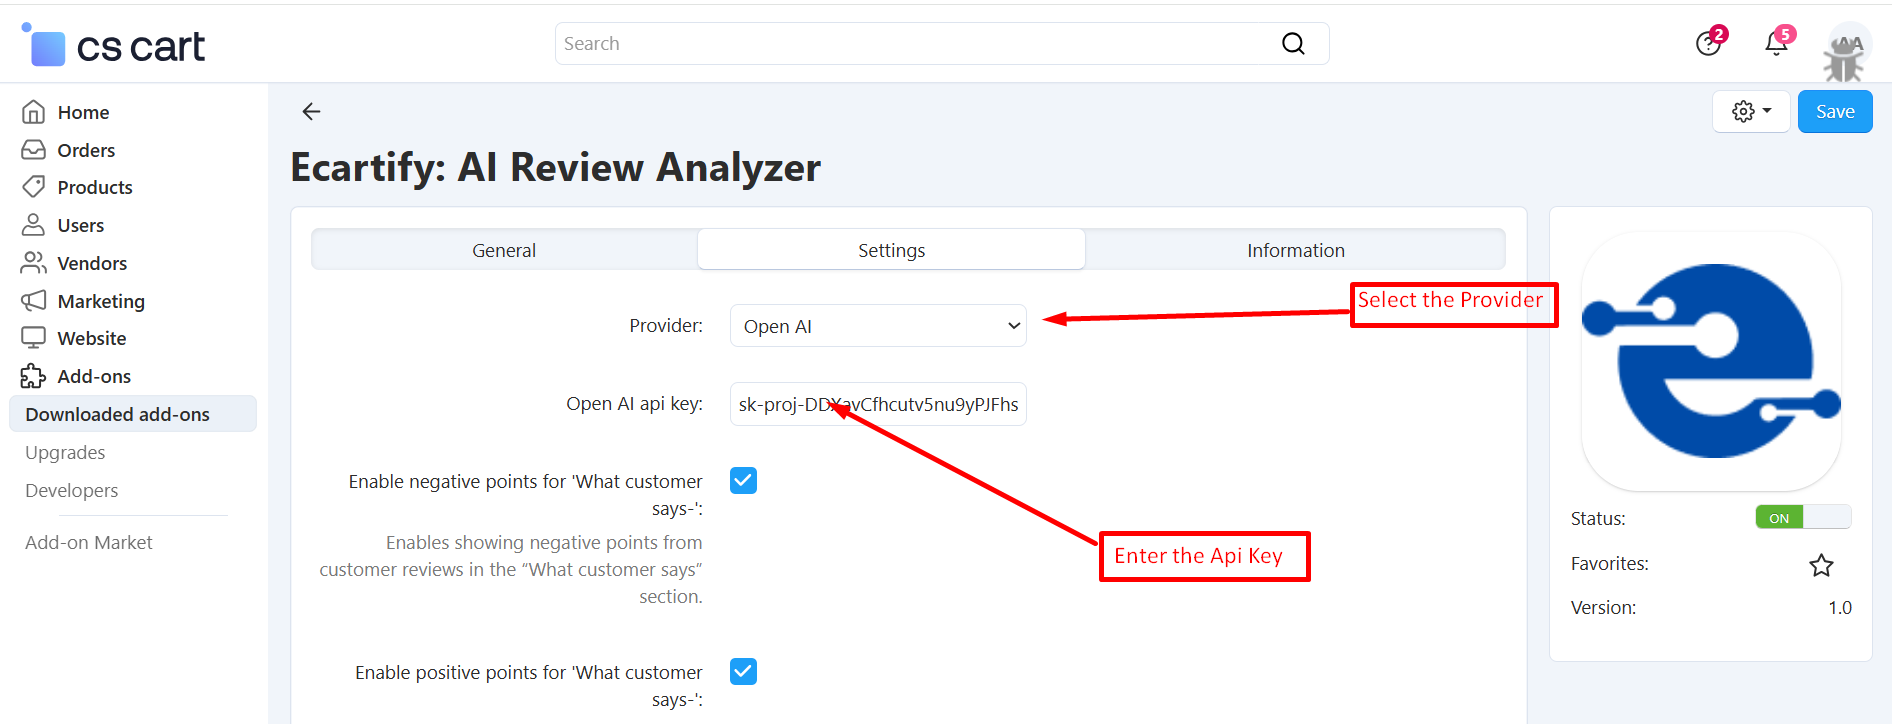
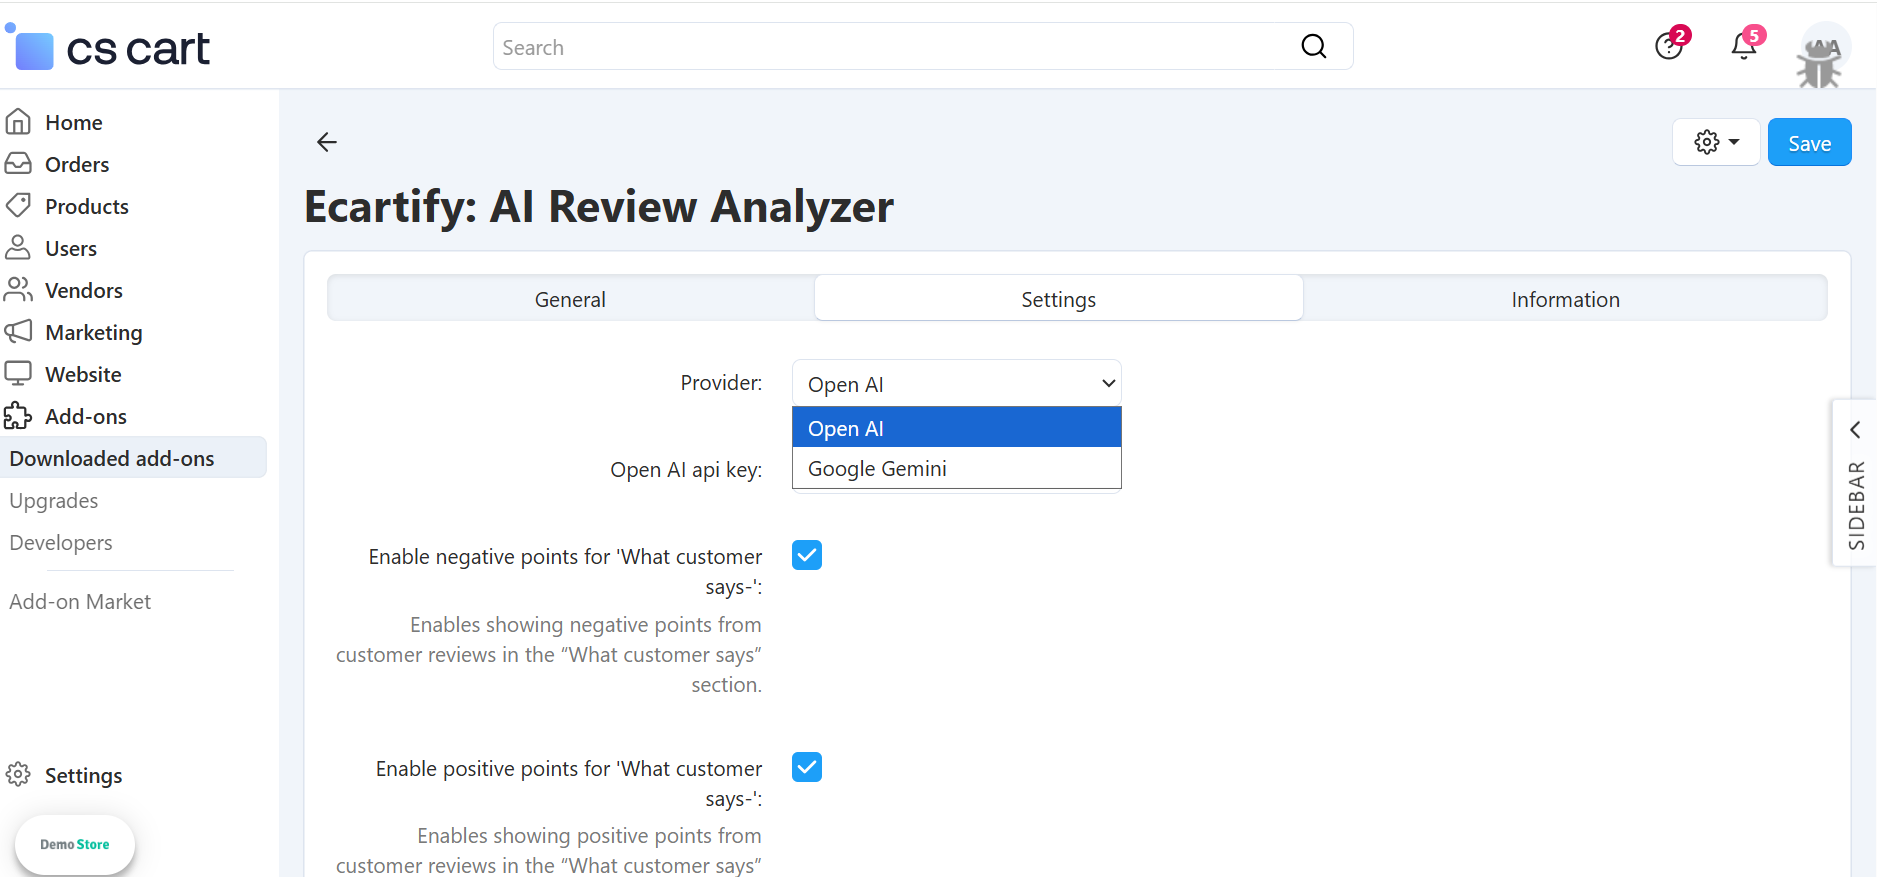
i) Switch between two AI engines:
Use Google Gemini for creative, detailed, and natural-sounding content, or OpenAI (ChatGPT) for structured, precise, and SEO-optimized writing.
You can change the AI anytime based on your content goals, accuracy needs, or budget — giving you full control and flexibility.
Select the preferred AI provider to generate content and translations. This provider will be used for all AI-powered features enabled in the add-on. Choose the provider that best fits your content style, performance needs, or cost preferences.
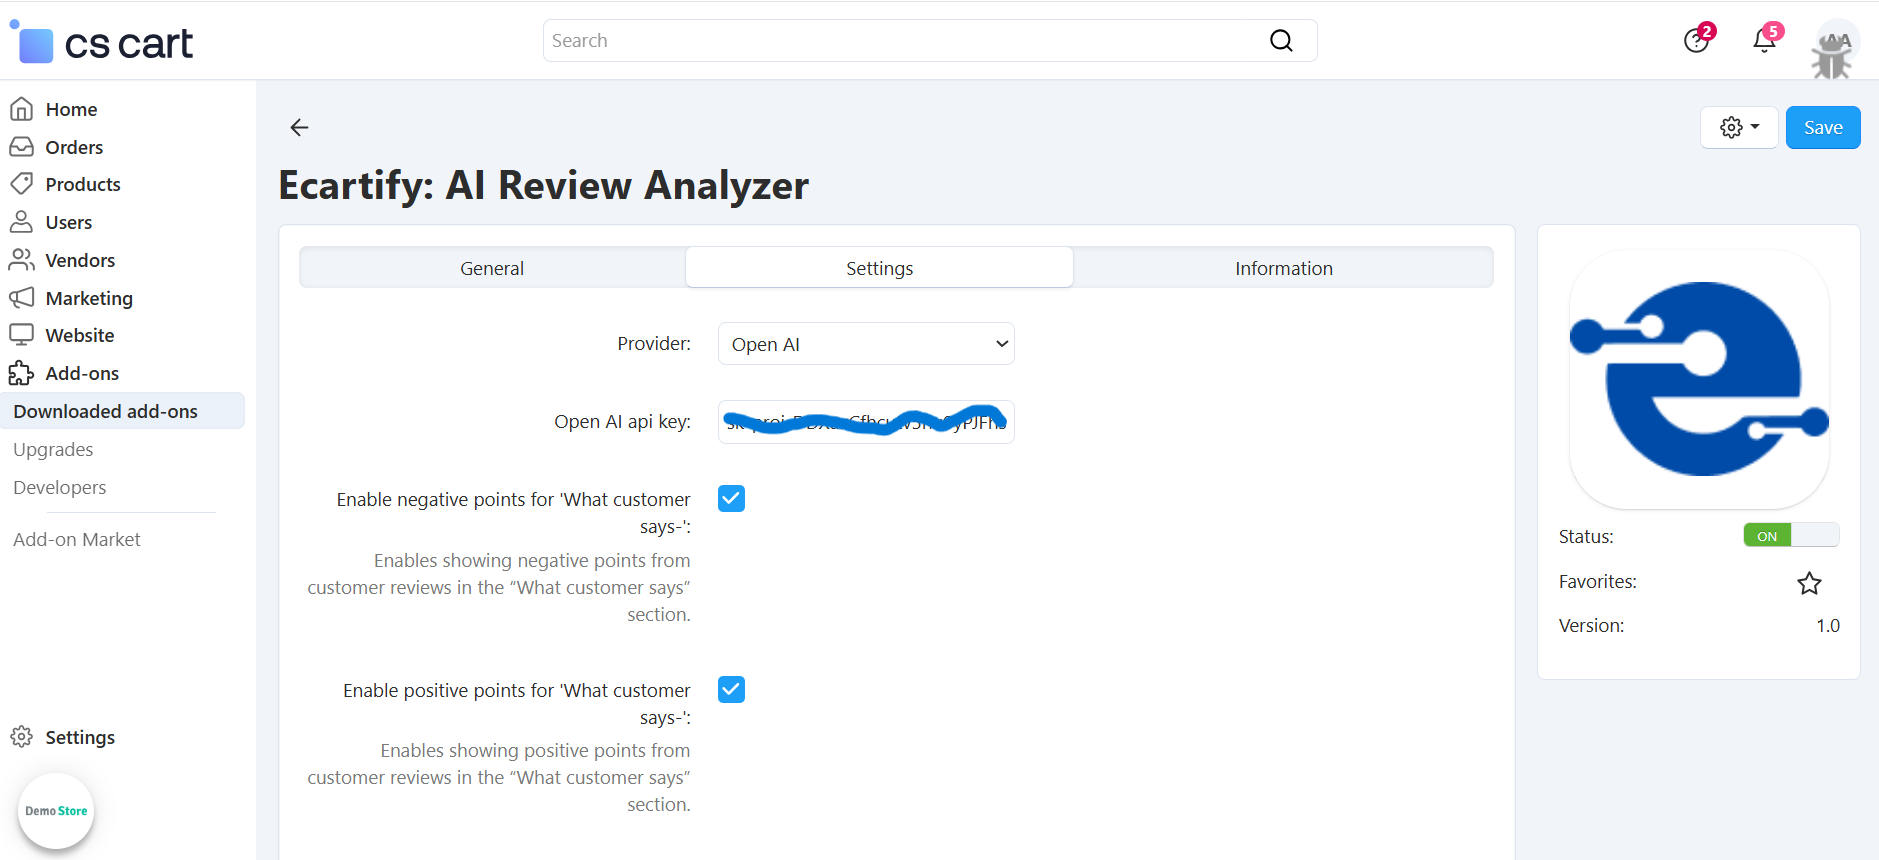
Make sure the required API key is added in the corresponding tab before saving the settings.
Without a valid API key, AI-powered features will not work.
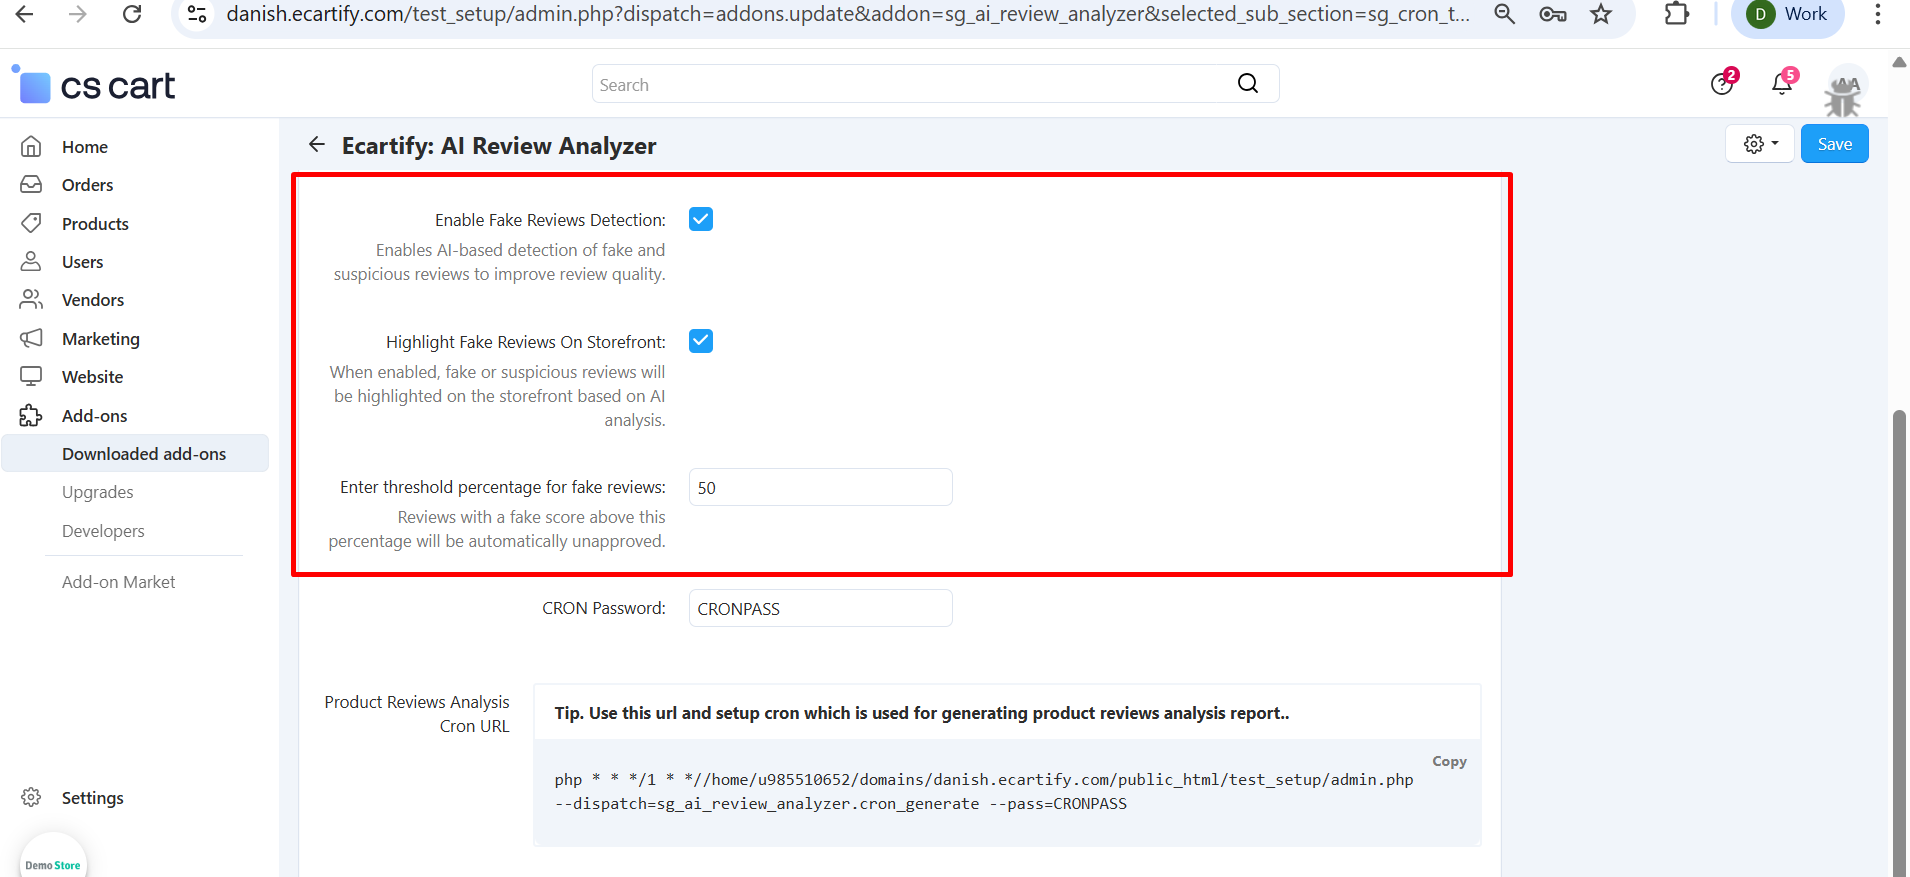
Activates AI-based analysis to detect fake or suspicious product reviews.
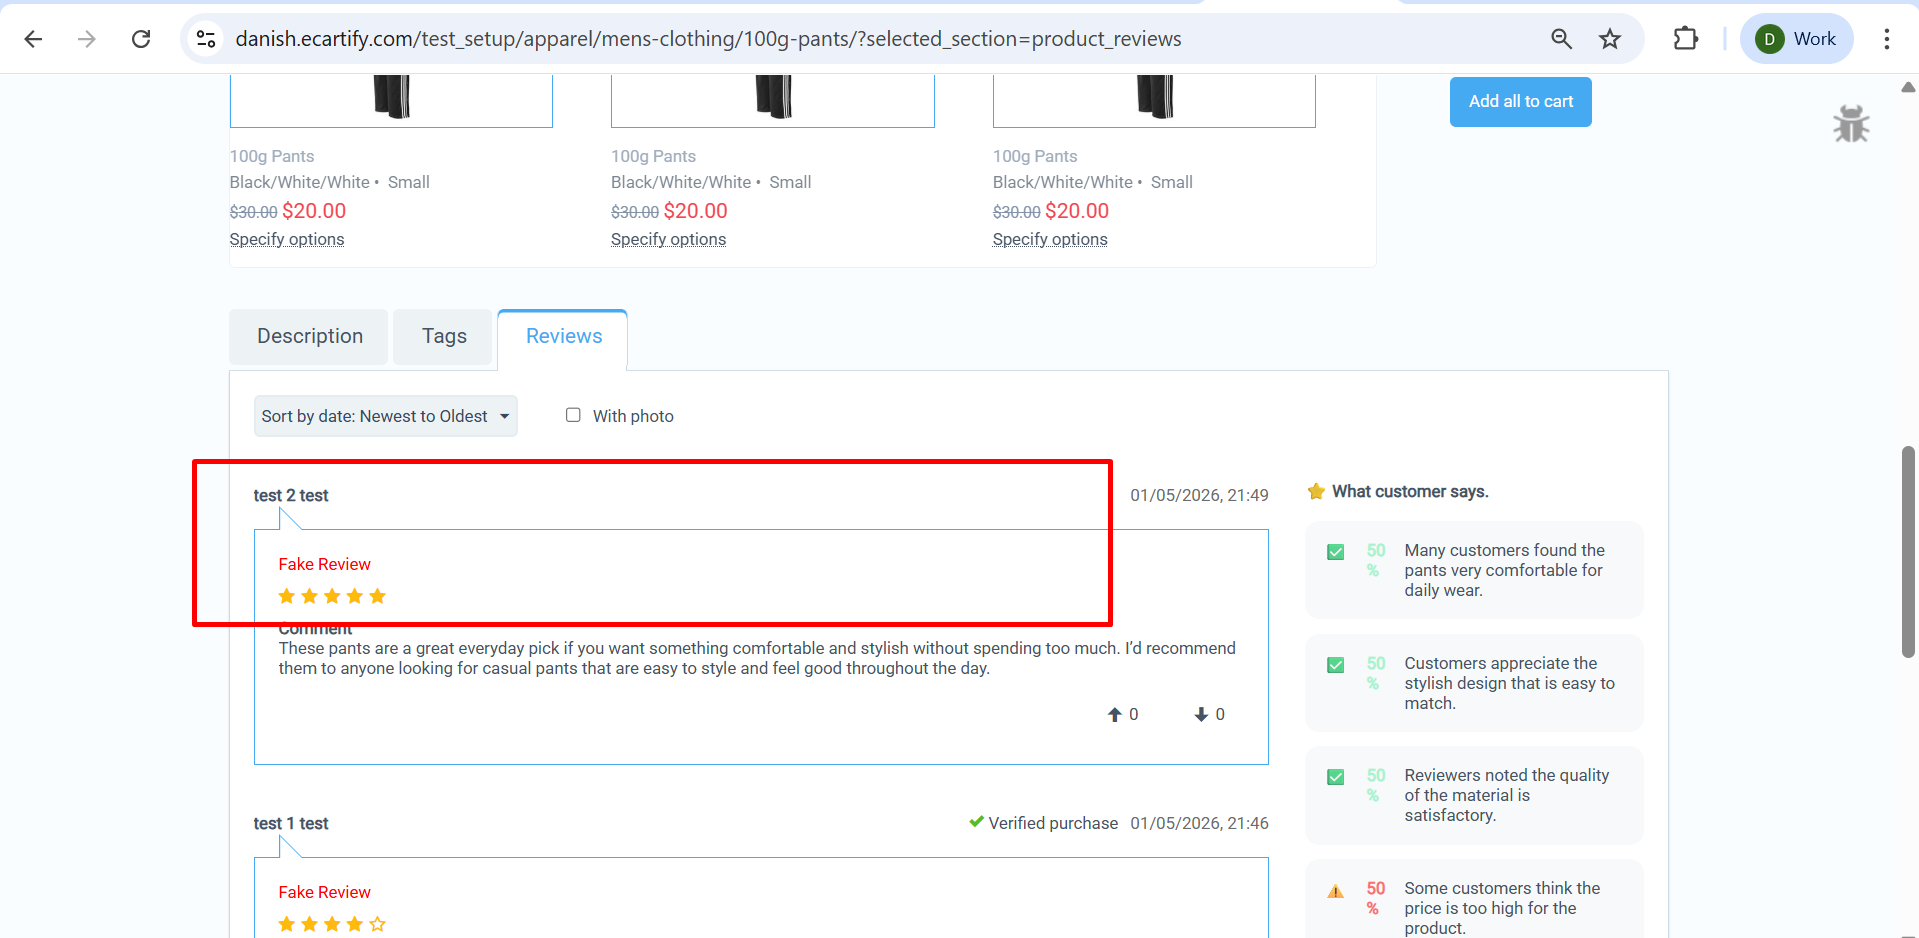
-Highlight Fake Reviews on Storefront
Displays AI-flagged fake or suspicious reviews clearly on the storefront for customer awareness.
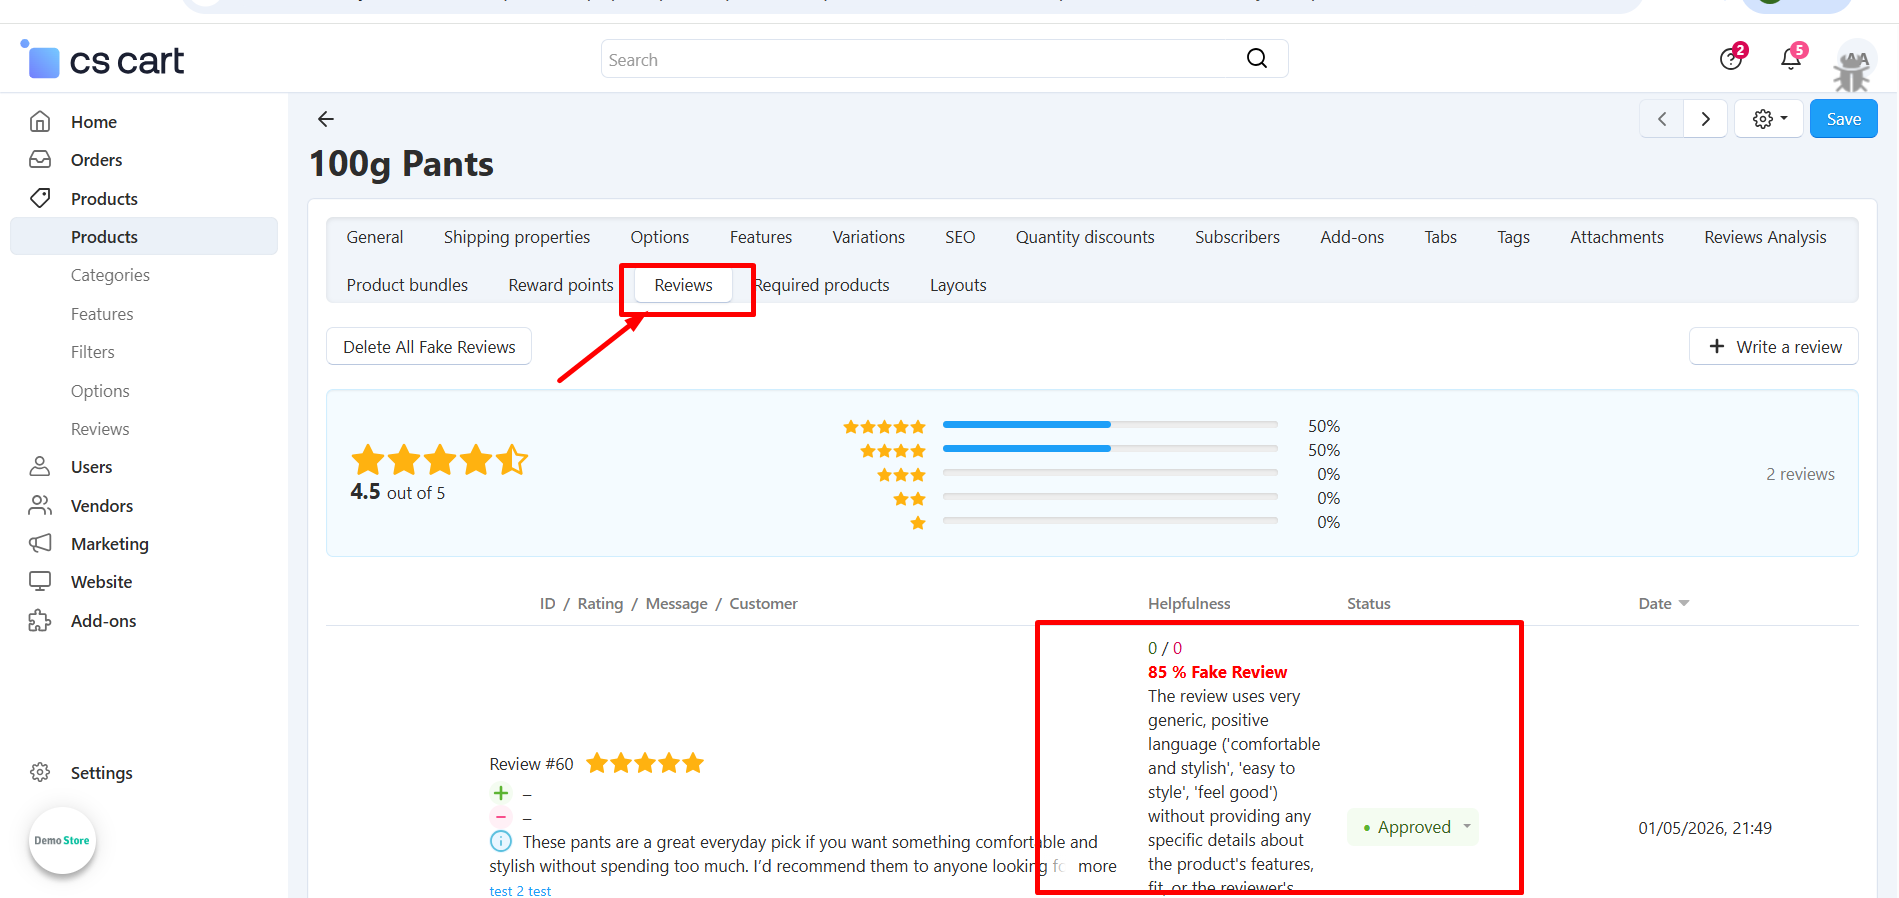
-Threshold Percentage for Fake Reviews
Reviews with a fake score above this percentage will be automatically unapproved.
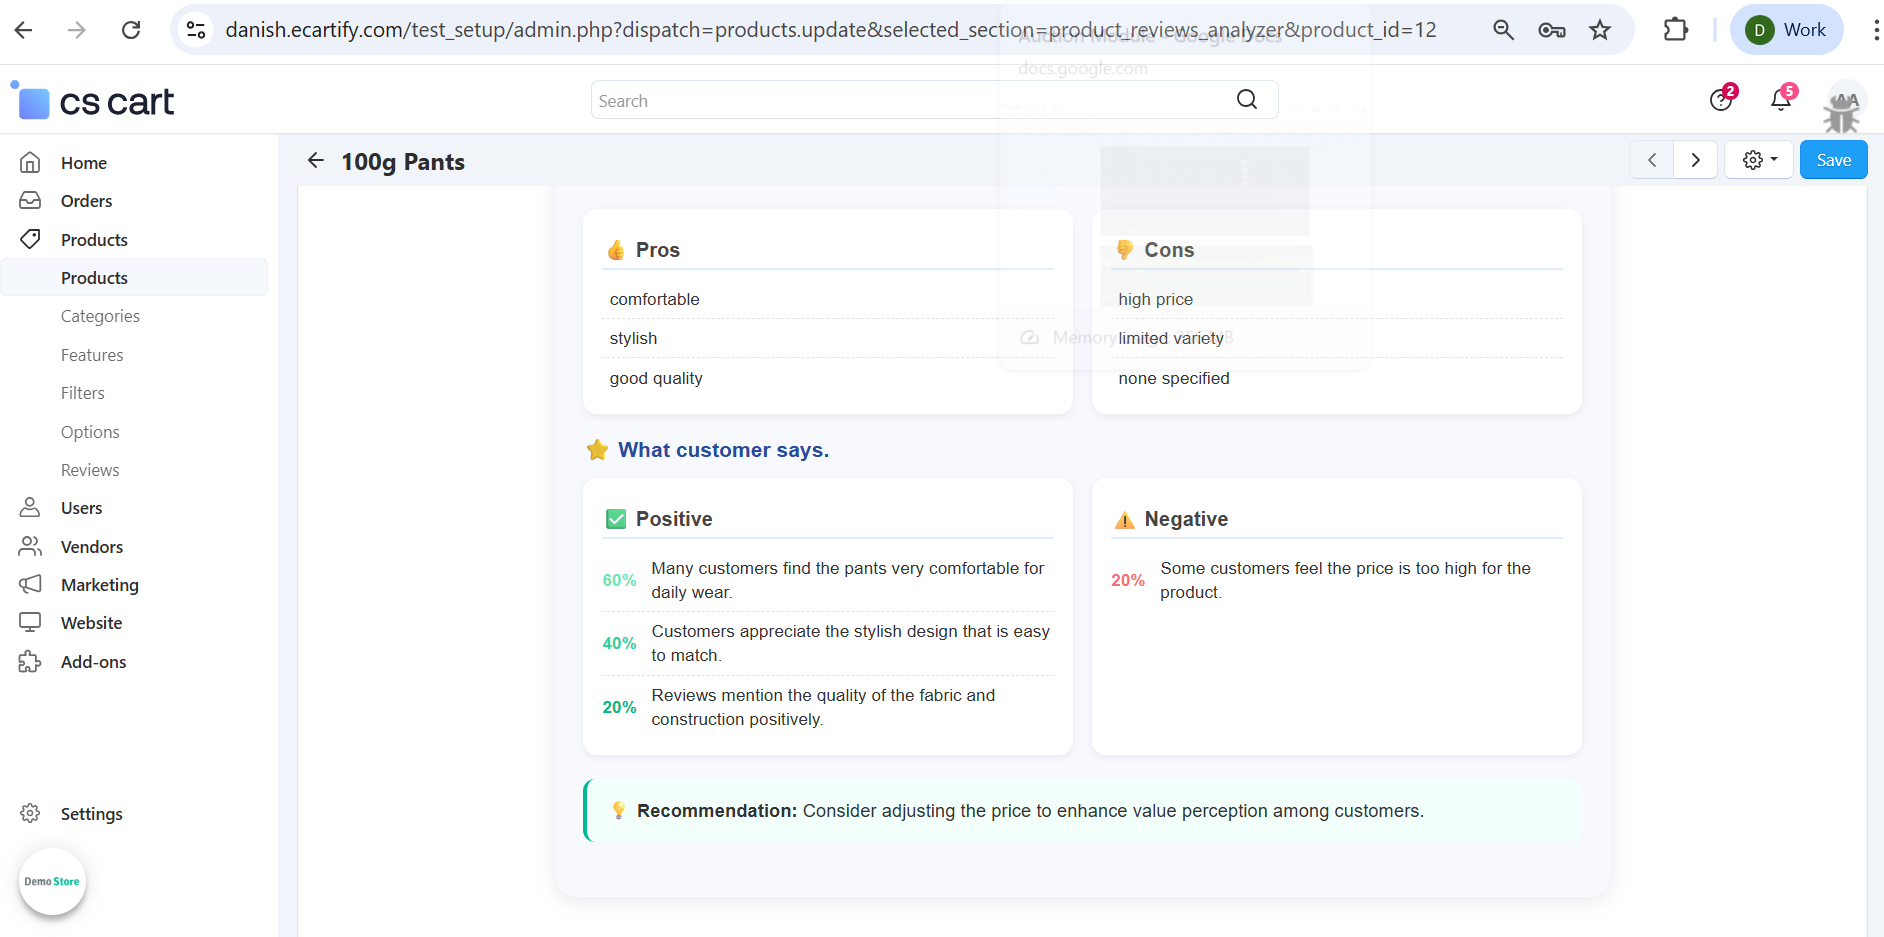
iii) Enable Positive and Negative reviews on Storefront
-Enable Negative Points for “What customer says”
Shows AI-generated negative highlights extracted from customer reviews in the “What customer says” section.
-Enable PostivePoints for “What customer says”
Shows AI-generated positive highlights extracted from customer reviews in the “What customer says” section.
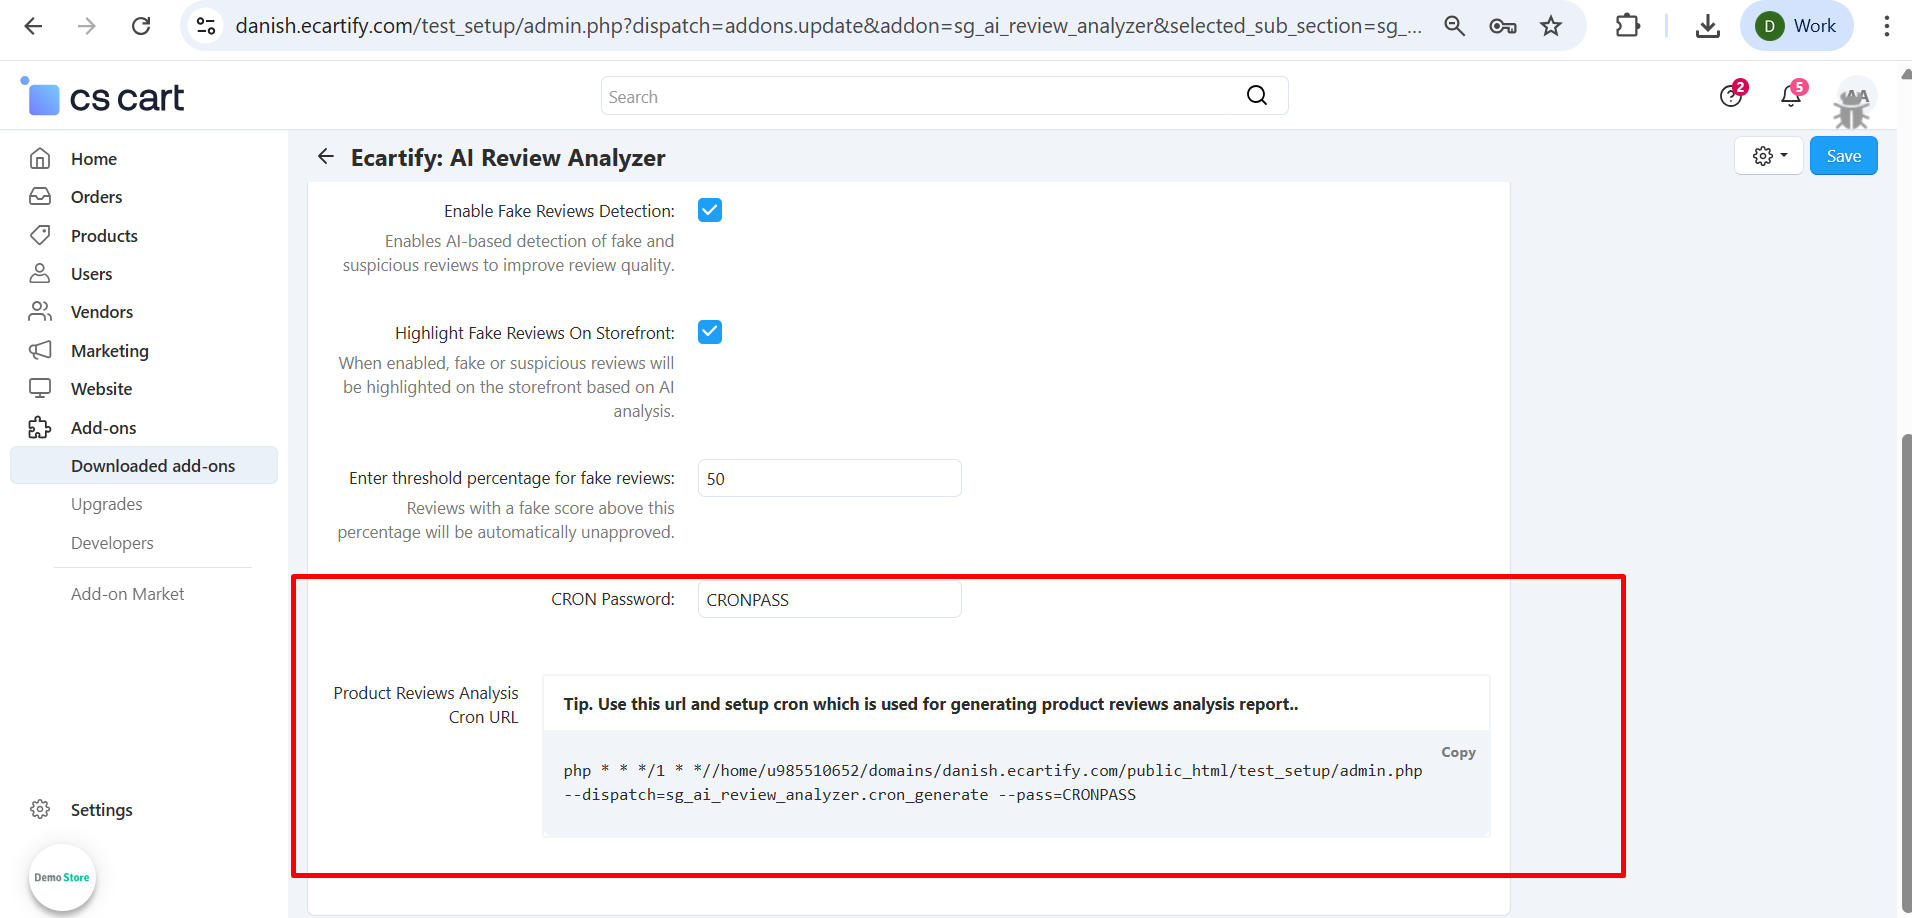
iv) Automatic Cron job:
These settings allow you to automate product review analysis using a CRON job. By configuring the CRON password and using the generated CRON URL, the system can periodically process and analyze product reviews in the background using AI. This ensures review reports, insights, and fake review detection are kept up to date without manual intervention.
All settings are now configured — AI Review Analyzer is ready to generate review analysis reports and detect fake reviews for your store.
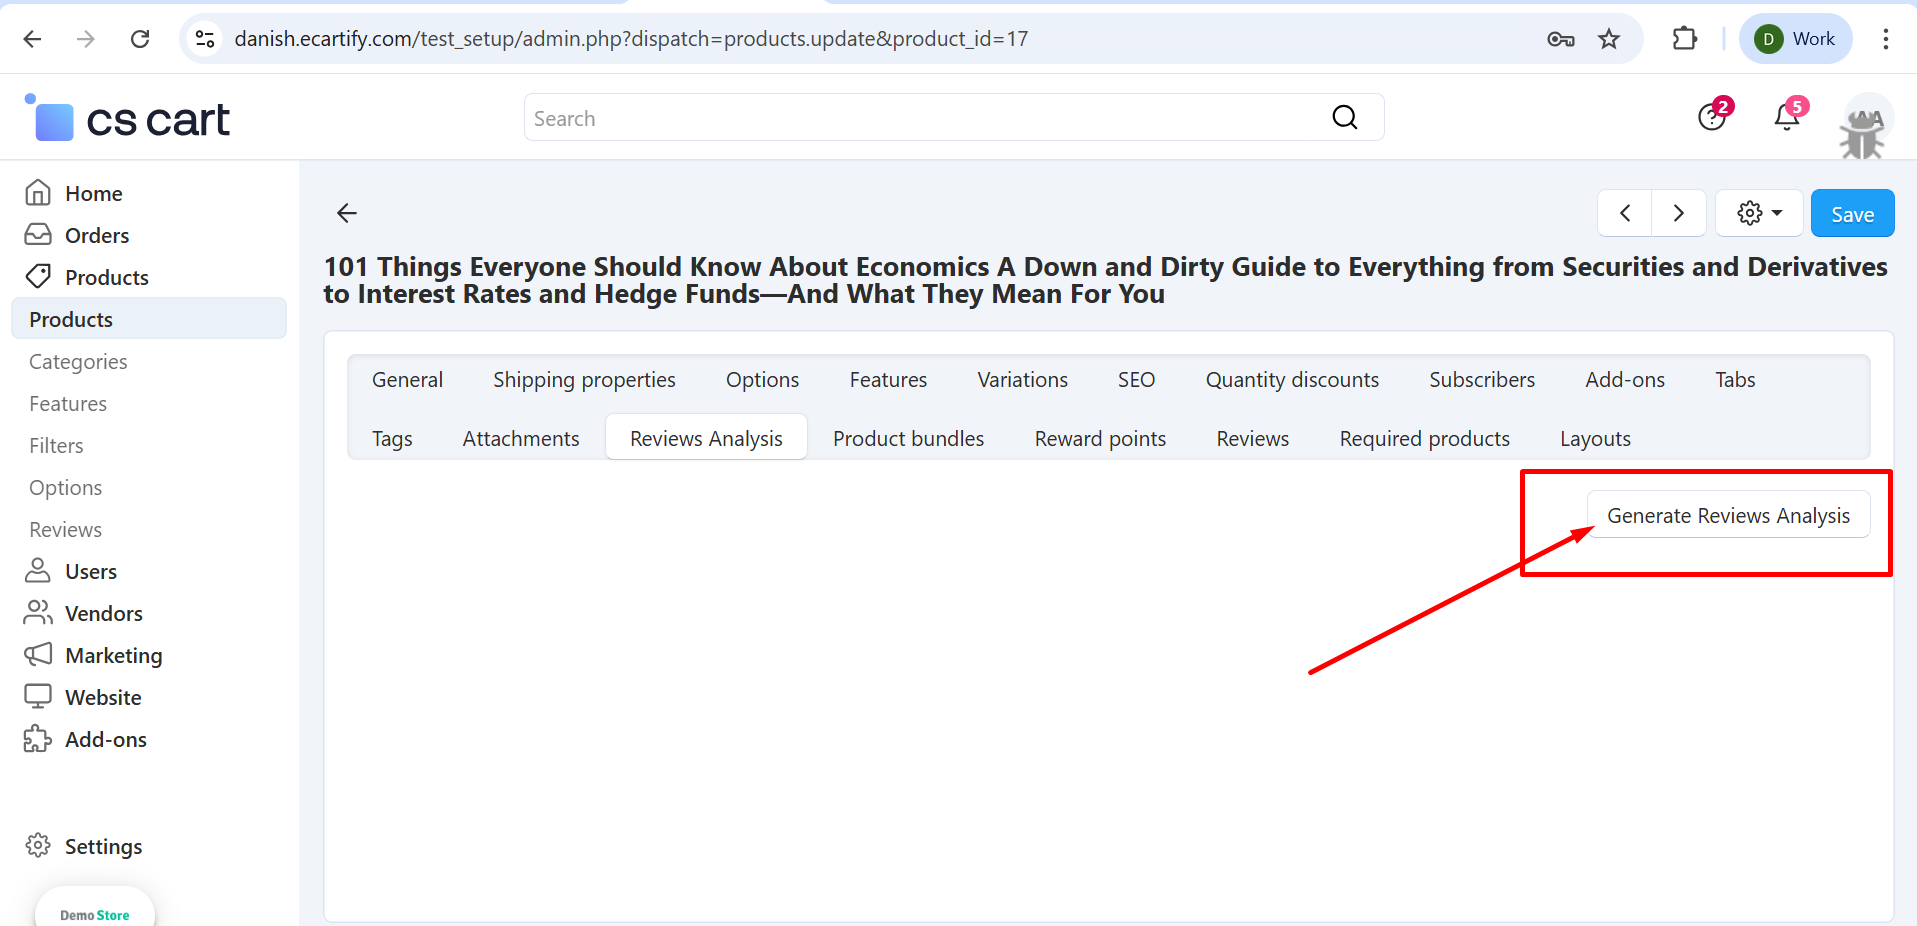
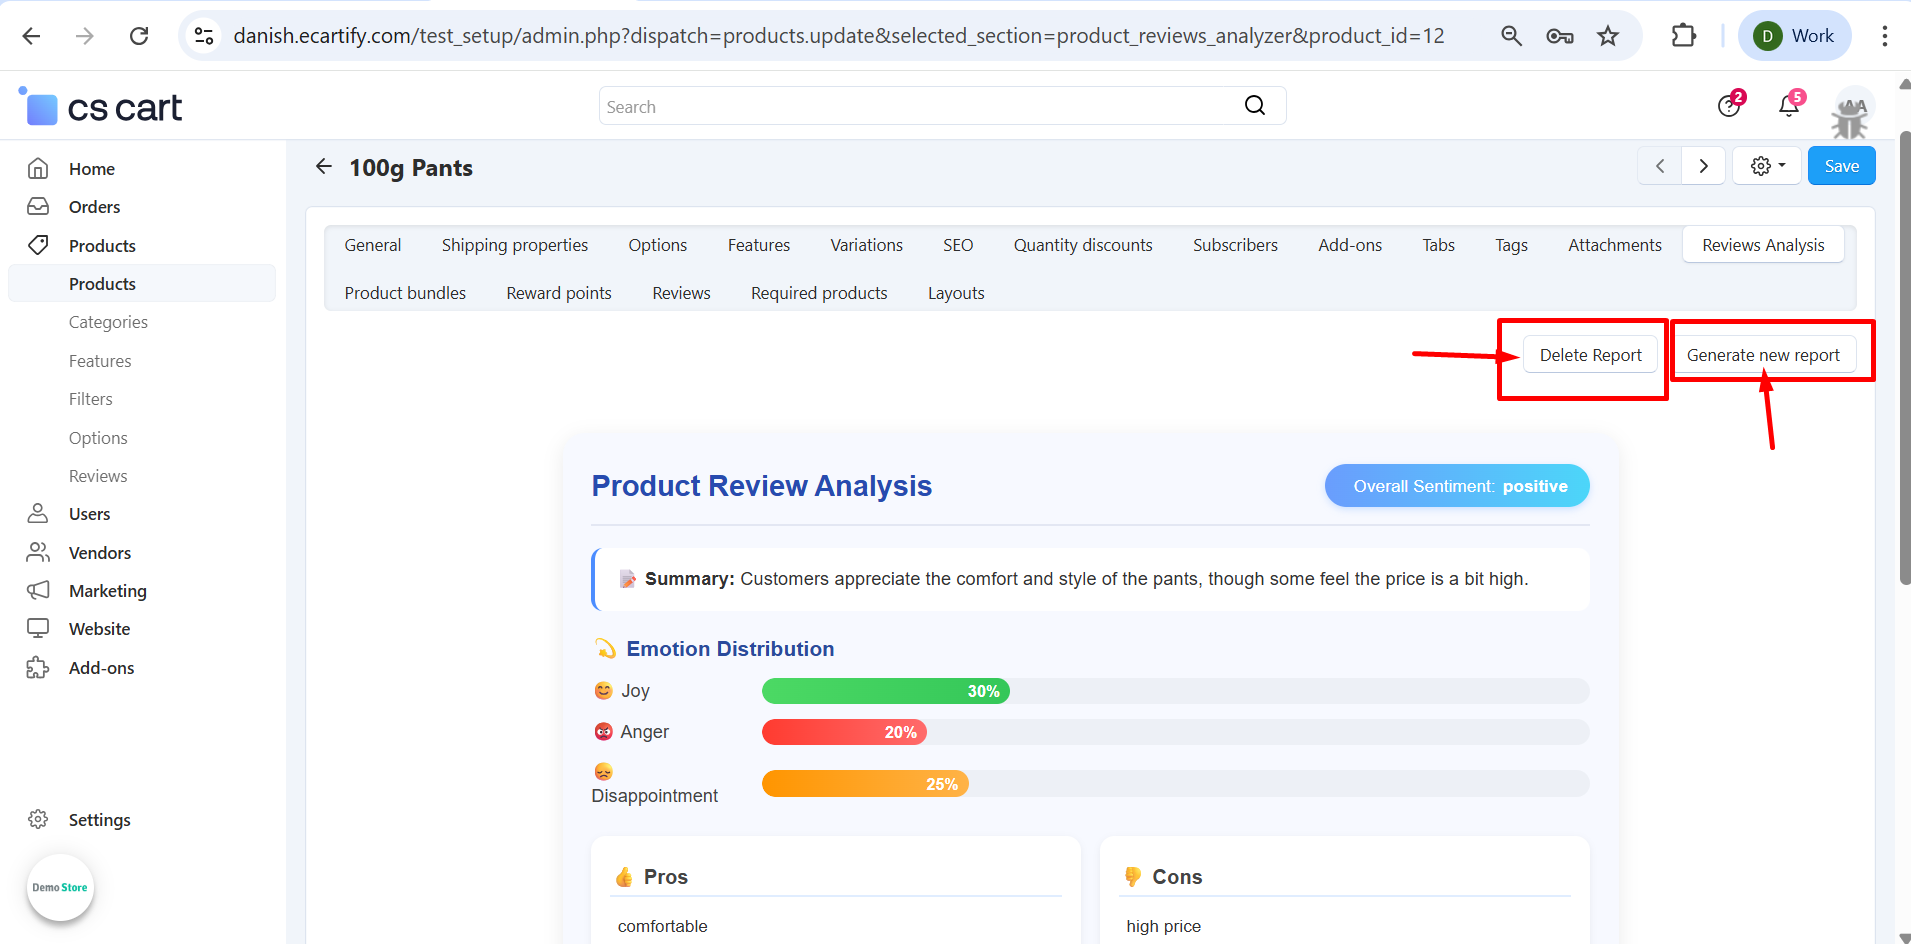
Step 3: How to generate product reviews analysis report
Generating reports with AI Review Analyzer is quick and easy. Follow these steps:
i) Open any product page (existing with reviews) in your CS-Cart admin panel and Click on the Review Analysis tab.
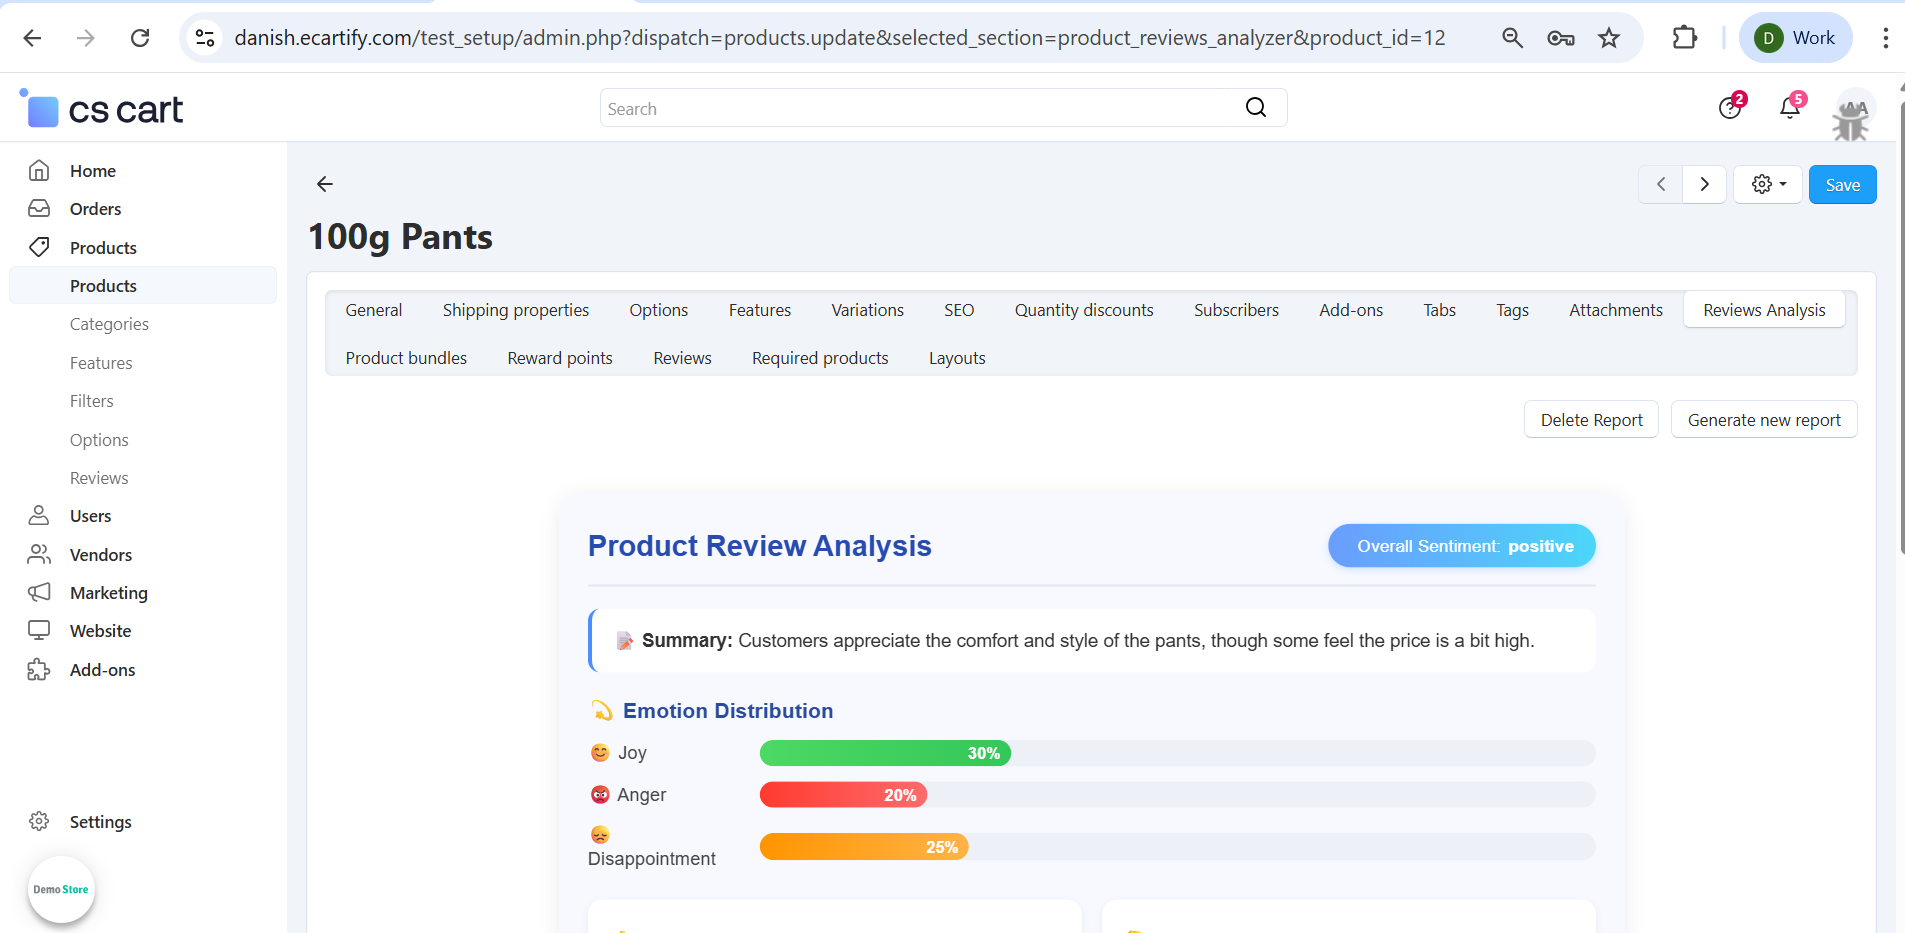
ii) The review analysis report has been successfully generated using AI. All product reviews have been analyzed, and the latest insights are now available.
iii)You can delete and generate report.
.
Step 4: Fake detection on frontend and backend
Runs fake review detection on both frontend submission and backend processing to identify, score, and flag suspicious or fake reviews for moderation.
Fake review on frontend
Fake review on backend
Why Choose AI Review Analyzer for Your CS-Cart Store?
AI Review Analyzer helps you turn raw customer reviews into clear, actionable insights that improve trust, transparency, and conversions on your store. It automatically analyzes reviews to highlight positive and negative feedback, detect fake or low-quality reviews, and generate structured summaries that are easy for both customers and store owners to understand — all without manual effort..
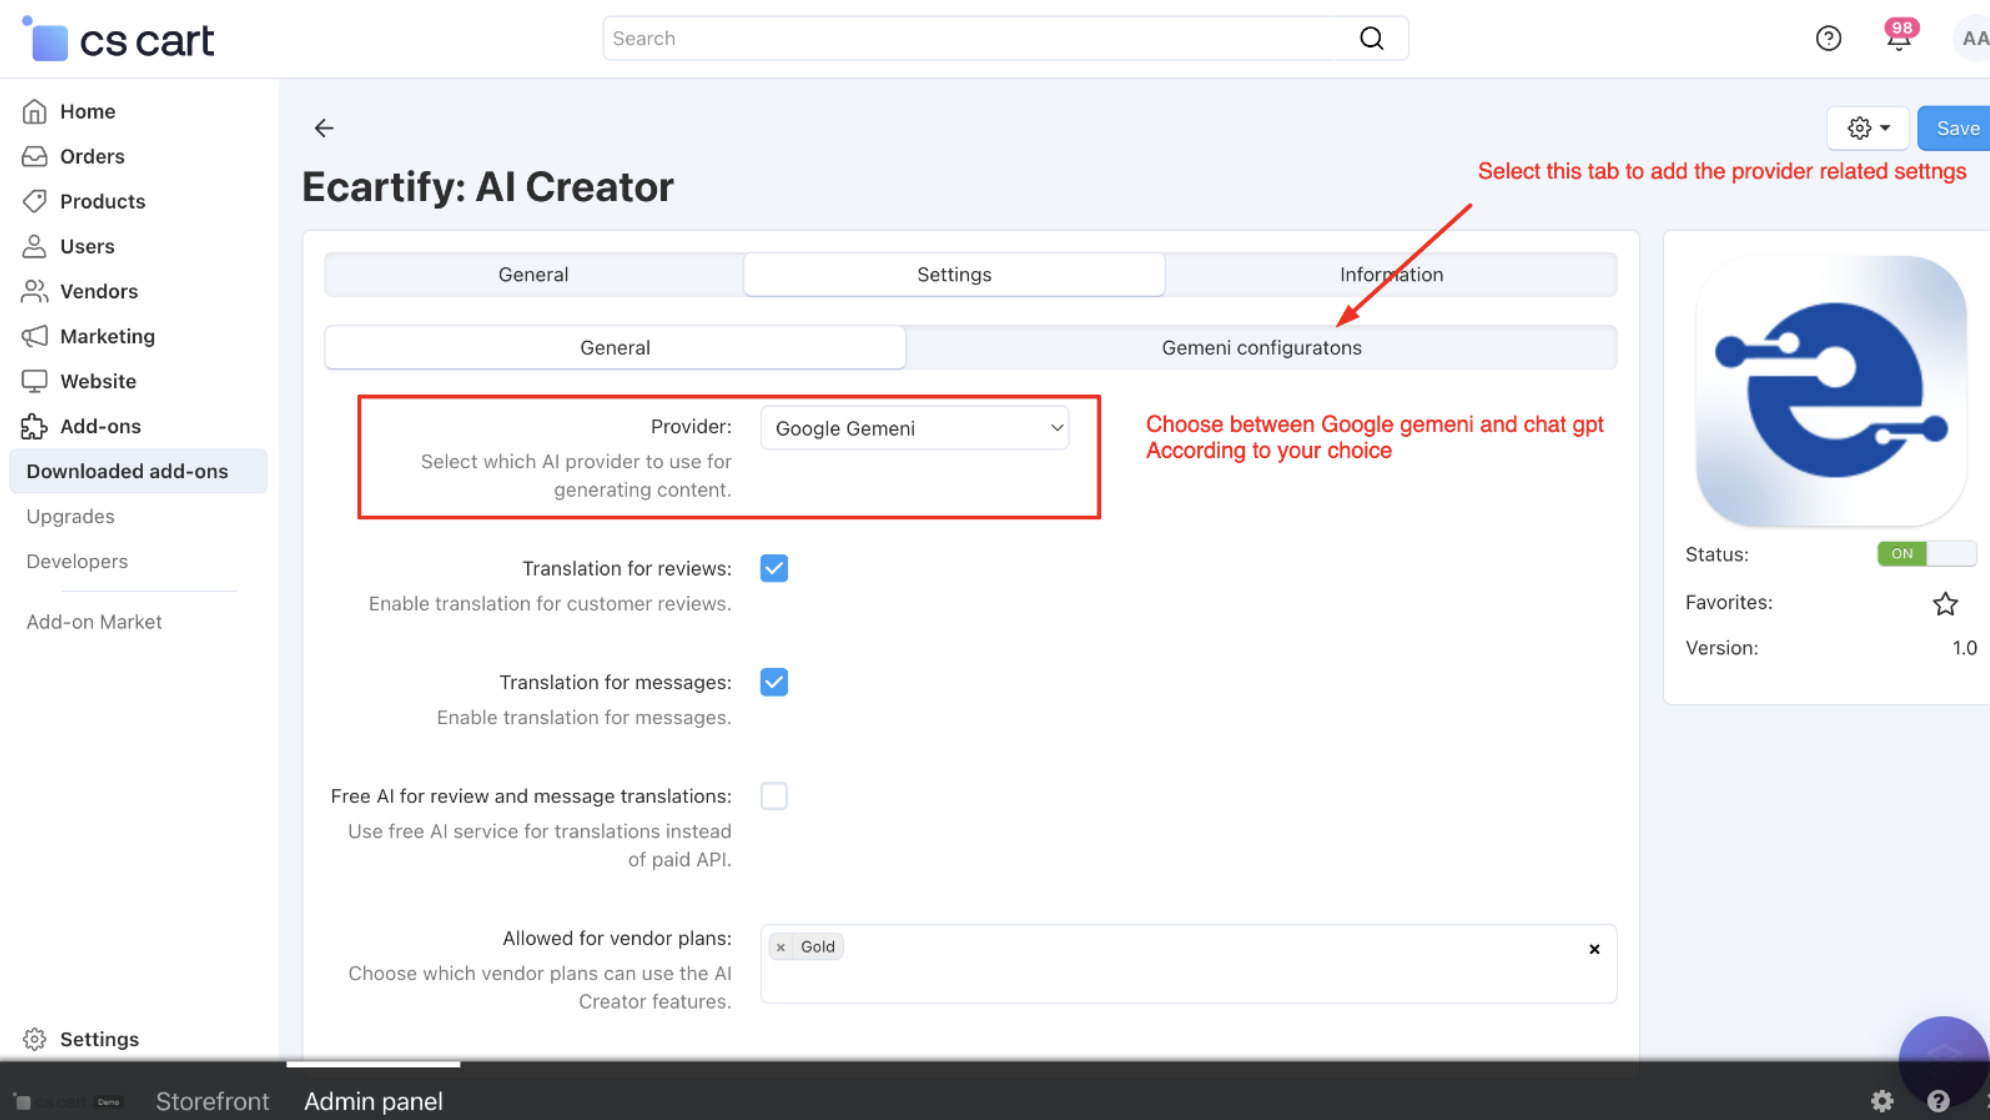
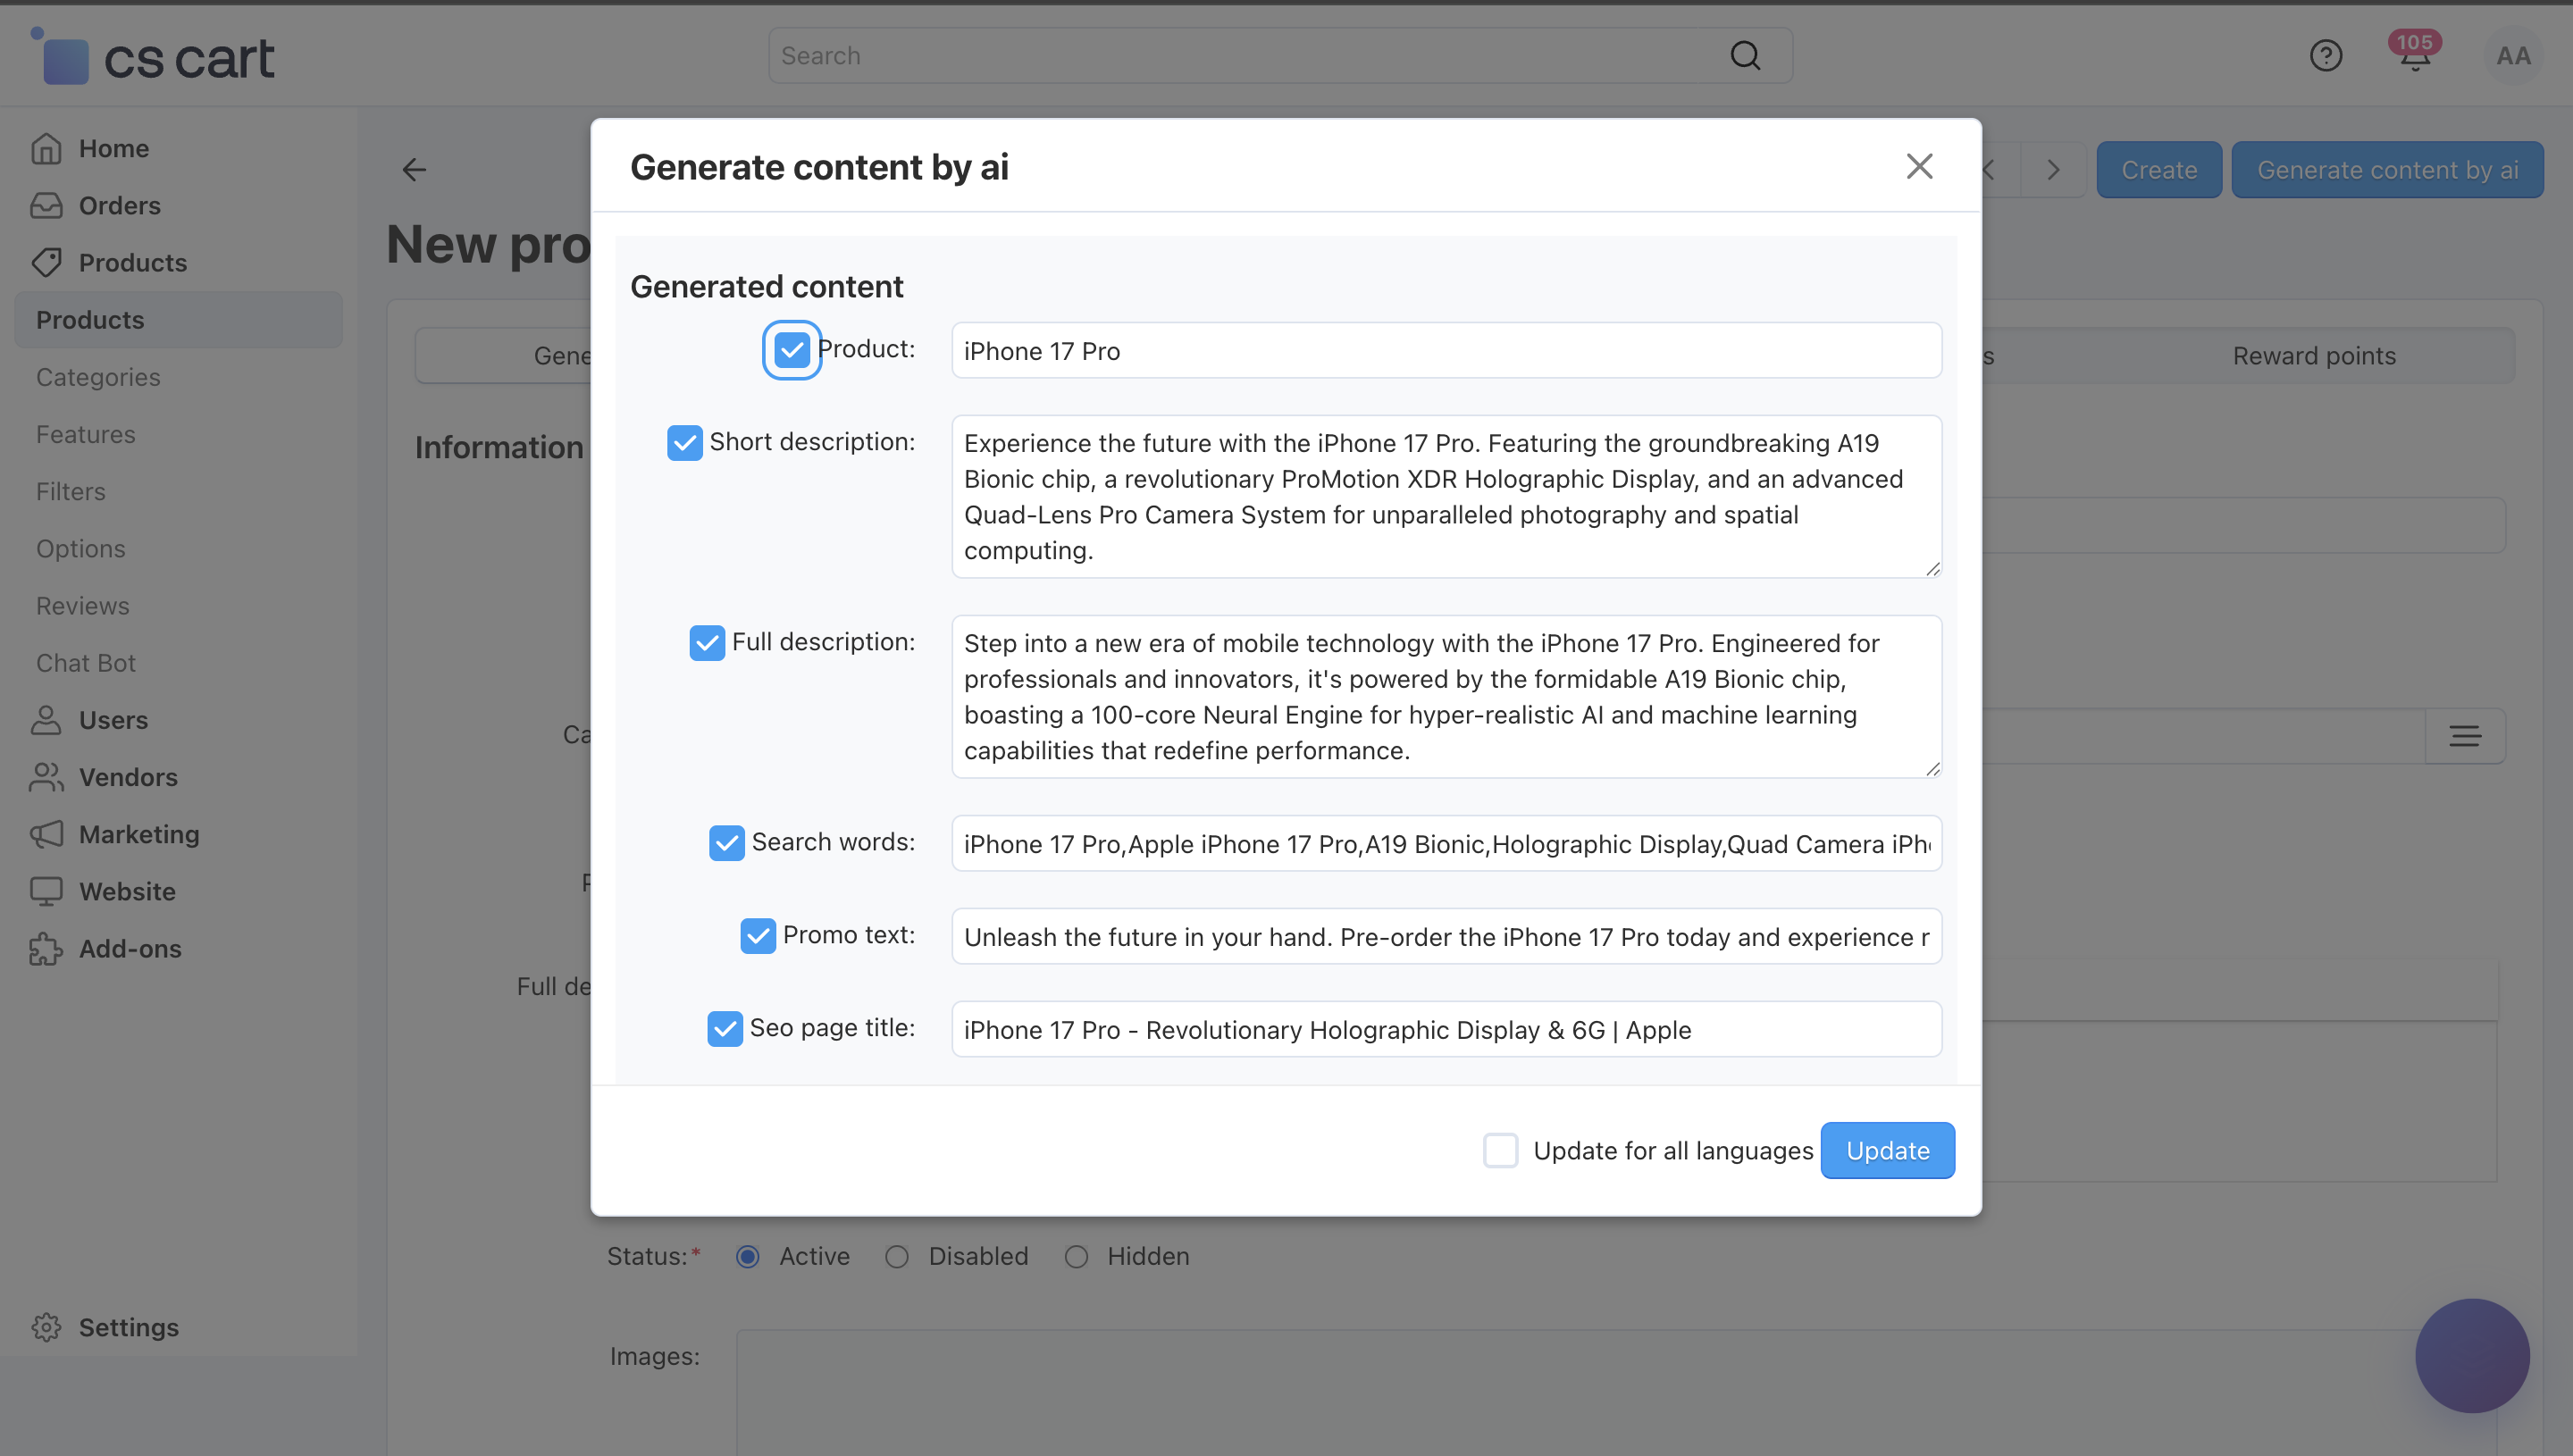
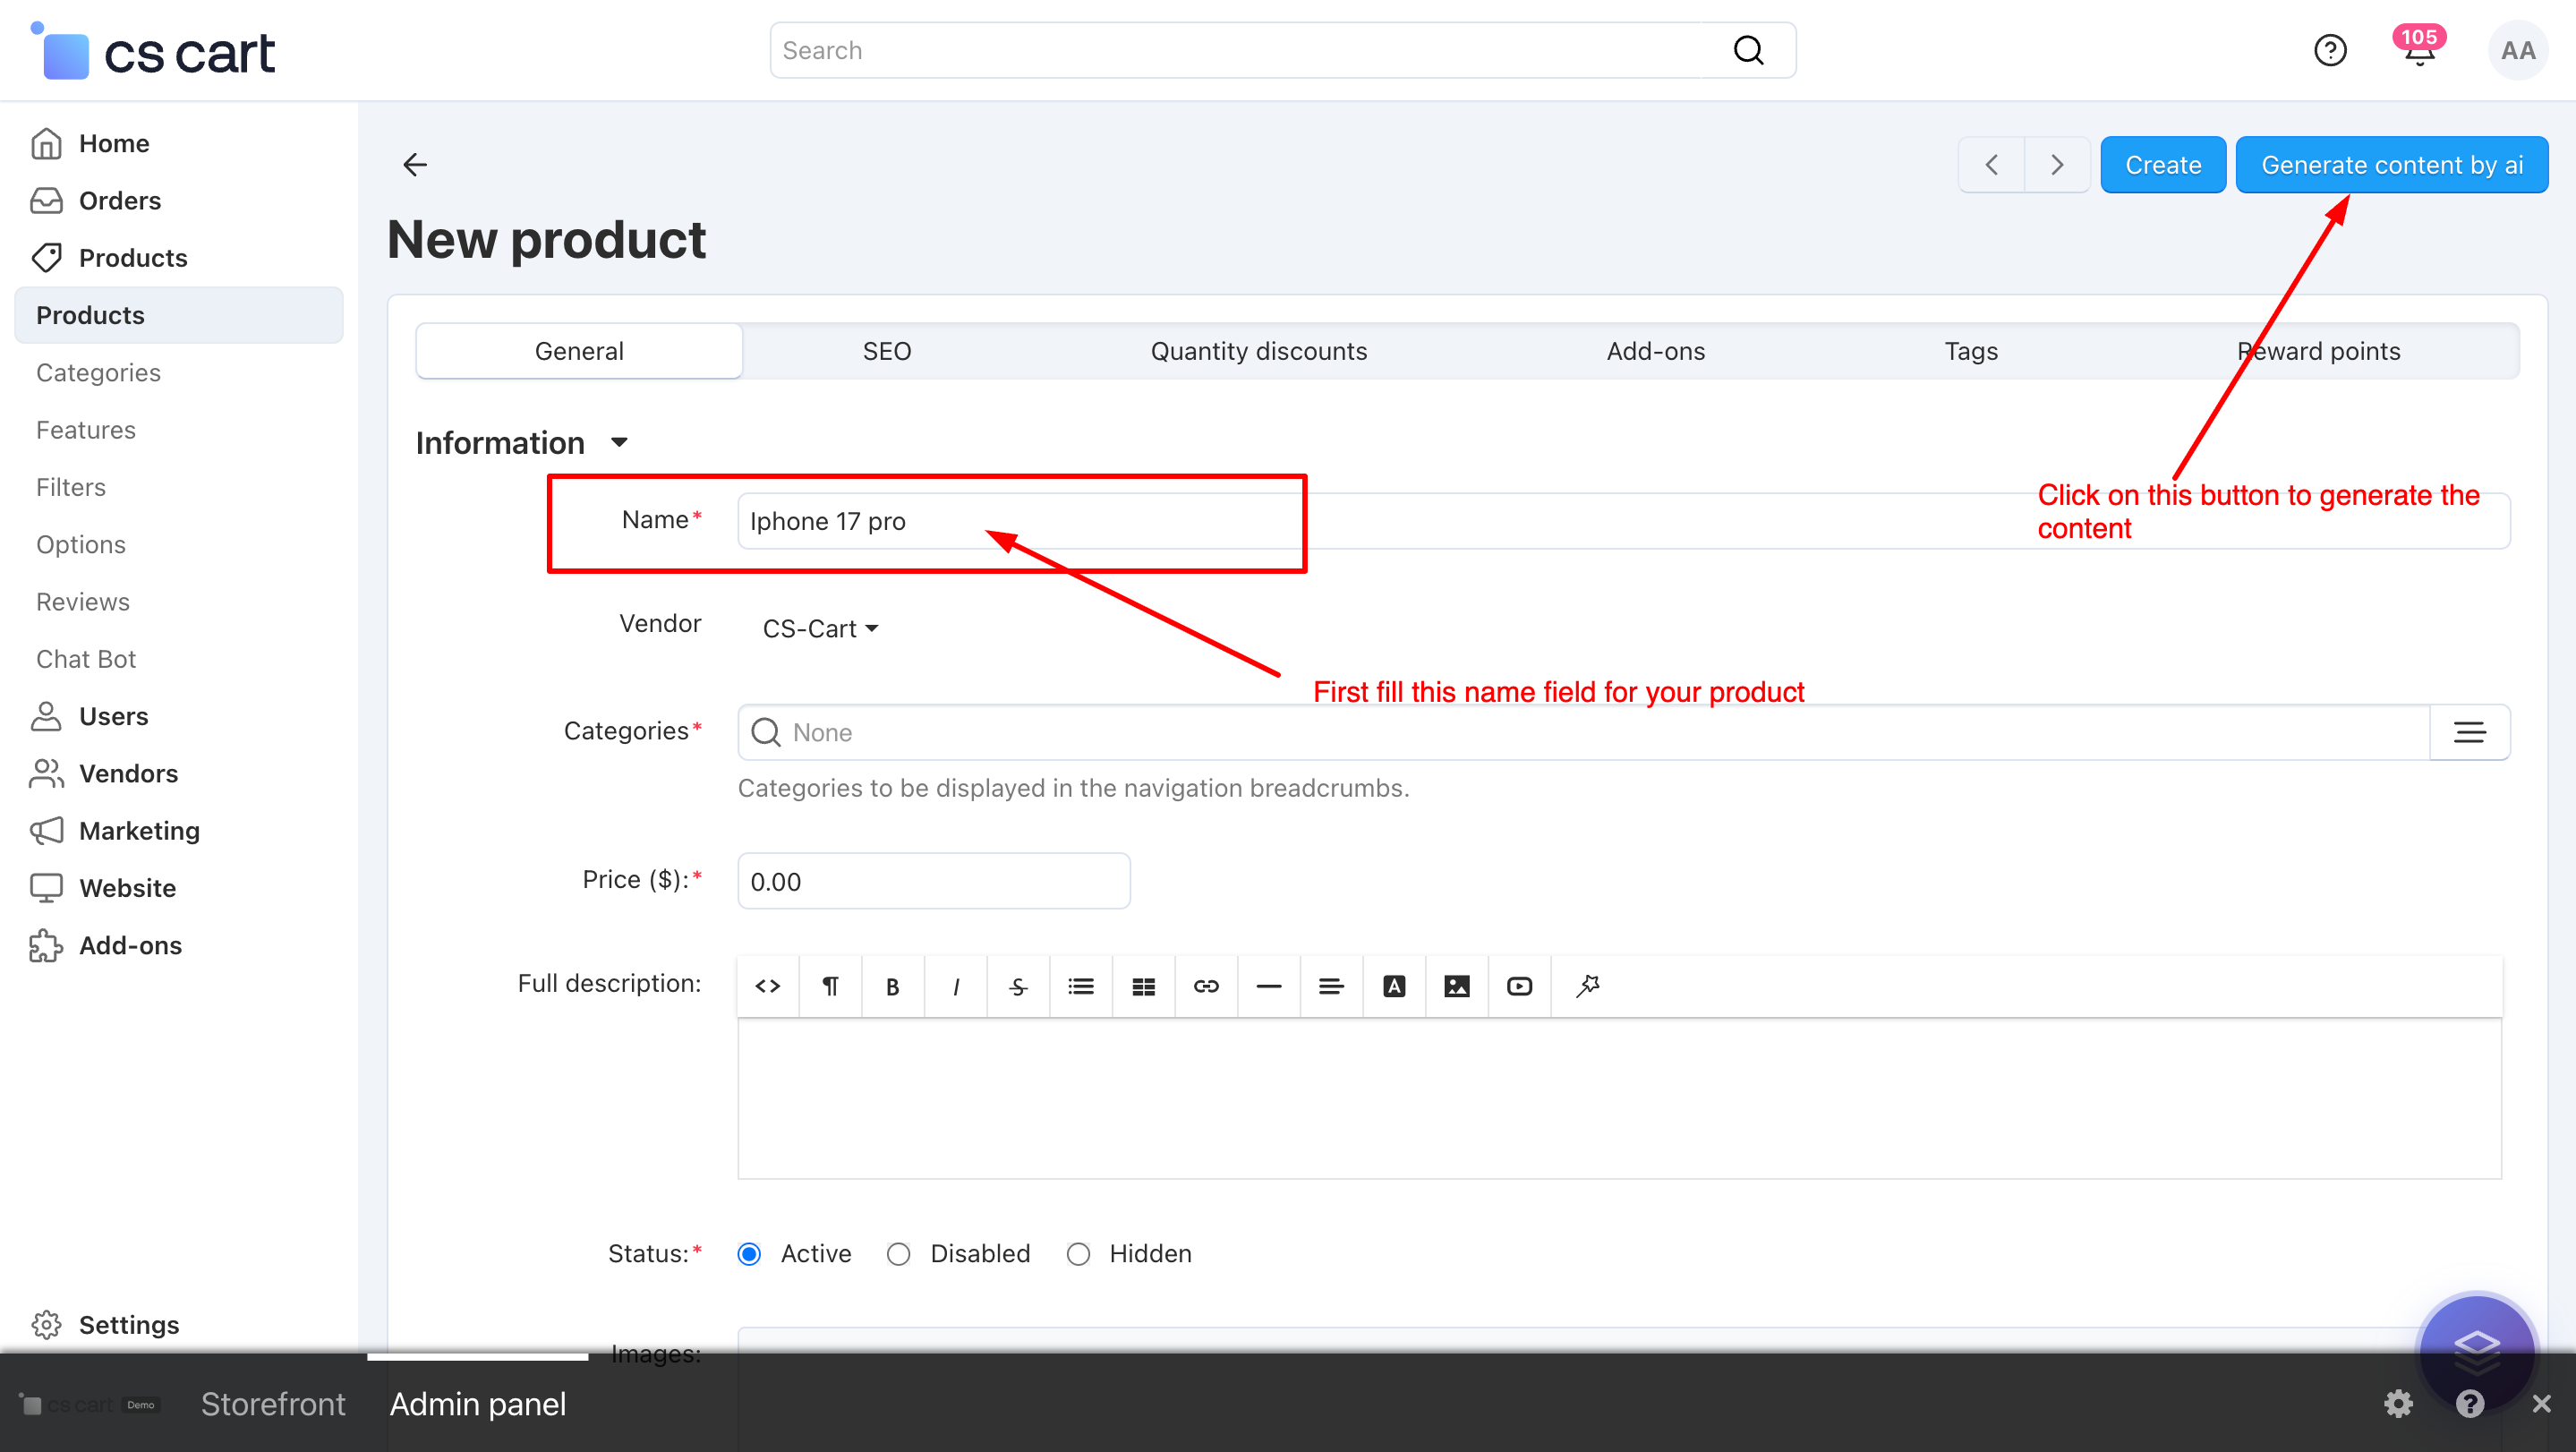
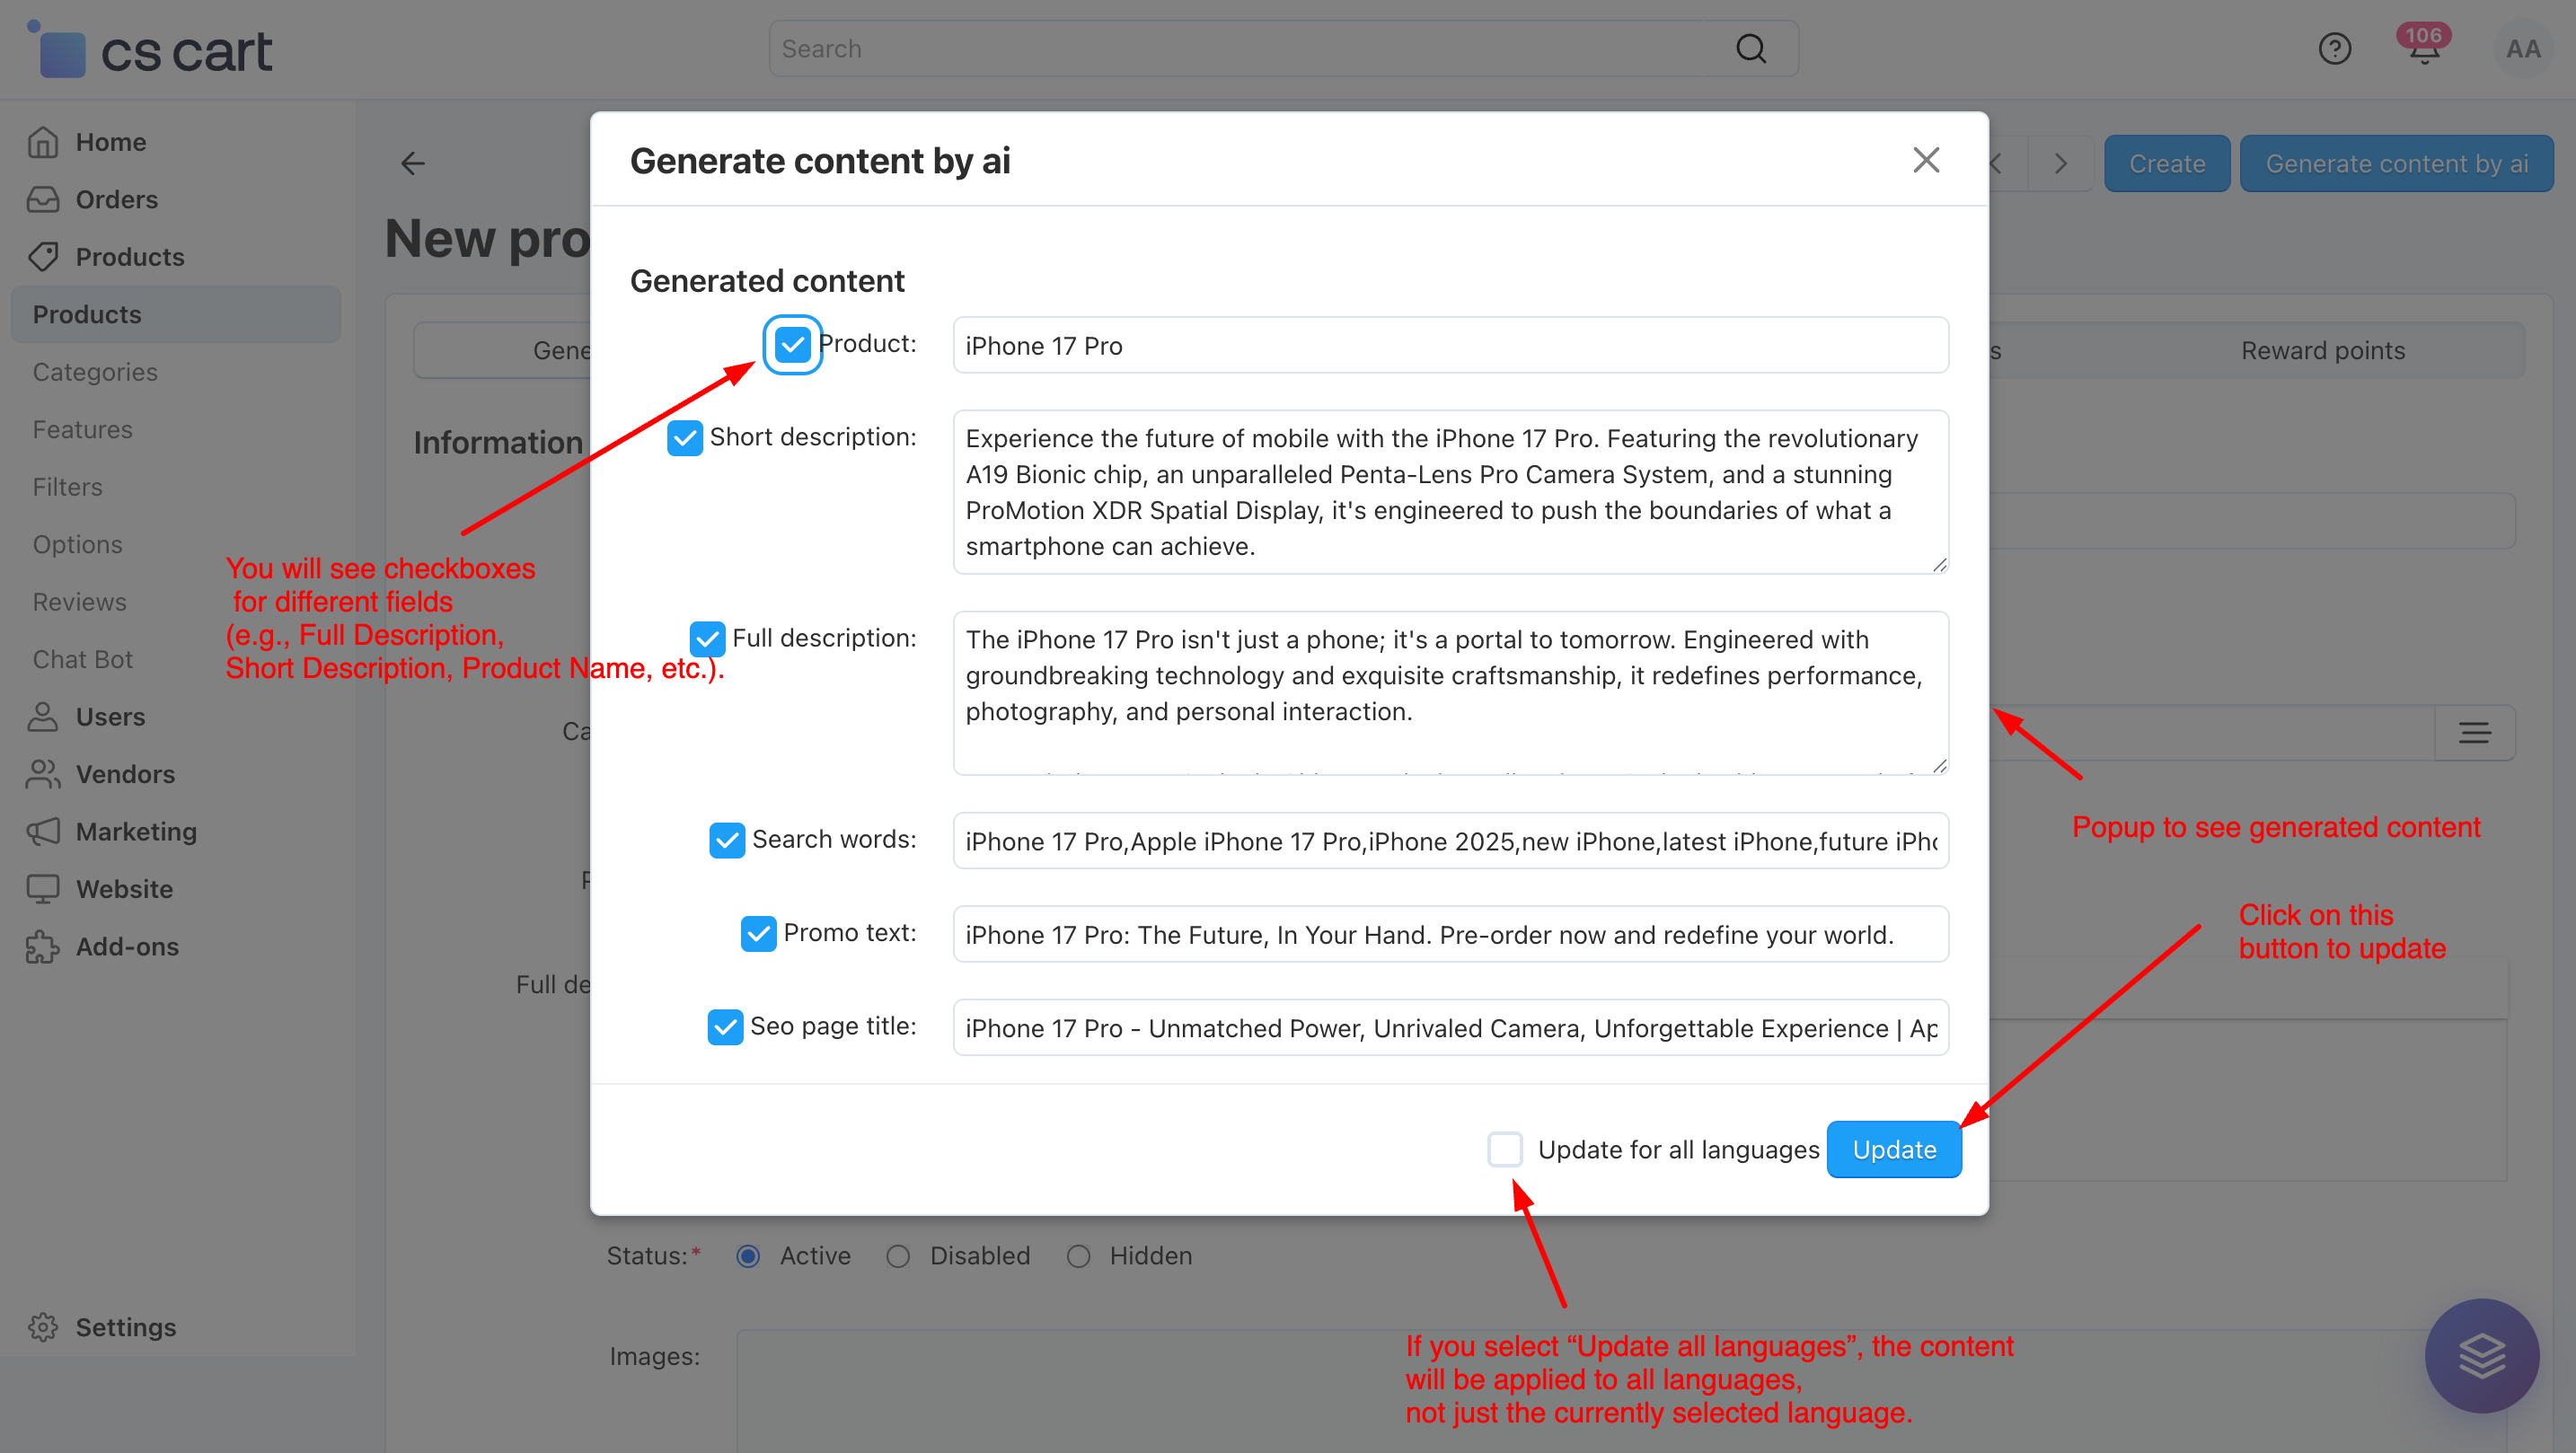
Generate product titles, descriptions, and SEO-friendly content in seconds with advanced AI, and instantly translate chat and review messages across languages for seamless communication.
Multiple AI Engines, One Addon Choose between OpenAI (ChatGPT), Google Gemini, or a free translation engine anytime.
Final Thoughts
Your AI Review Analyzer Add-on is now ready to help you make smarter use of customer feedback in your CS-Cart store. It automatically analyzes customer reviews to extract meaningful positive and negative insights, detect fake or low-quality reviews, and generate structured reports that are easy to understand and act on.
By keeping your review section clean, transparent, and informative, this add-on helps build customer trust, improves product credibility, and supports better purchasing decisions — ultimately leading to higher engagement and increased conversions.
Product Resell Addon allows customers to resell purchased products back to your CS-Cart store. It provides a complete buyback and reselling workflow with multi-vendor and multilingual support. Admins can manage resell requests, update statuses, send automated email notifications, and allow users to upload attachments—fully compatible with all CS-Cart versions.
Product Resell – The Complete Resell & Buyback Solution for CS-Cart
Product Resell supercharges your CS-Cart store with a smart buyback and reselling system.Allow customers to resell purchased products back to your store with a smooth, automated workflow.
Go beyond simple reselling with multi-vendor and multilingual support, status-based management, automated email notifications, and file attachment options. One addon. Complete resell & buyback automation for modern CS-Cart marketplaces.
Key Features of Product Resell Addon
Customer Buyback & Reselling System:
Allows customers to resell purchased products back to the store with an easy request process.
Multi-Vendor Support: Fully compatible with CS-Cart Multi-Vendor, enabling vendors to manage resell requests efficiently.
Multilingual Compatibility:
Supports multiple languages for global marketplaces.
Status-Based Workflow Management: Admins can manage and update resell request statuses with full control.
Automated Email: Pre-built email templates notify users on every status update.
Admin-Friendly Management Panel: Easy-to-use interface for tracking and managing resell requests..
Step-by-Step Setup Guide
Step 1: Install the Addon
Installing the Product Resell Addon is simple:
Login to your CS-Cart admin panel.
Go To Add-ons → Manage add-ons→ Click on ⚙️ gear icon→ Manual installation
Upload the provided ZIP file of the addon.
Once uploaded, the addon will appear under CS-Cart - Add-ons.
Now click on the Product Resell Add-on and configure the required settings.
This process takes only a few minutes and requires no coding knowledge.
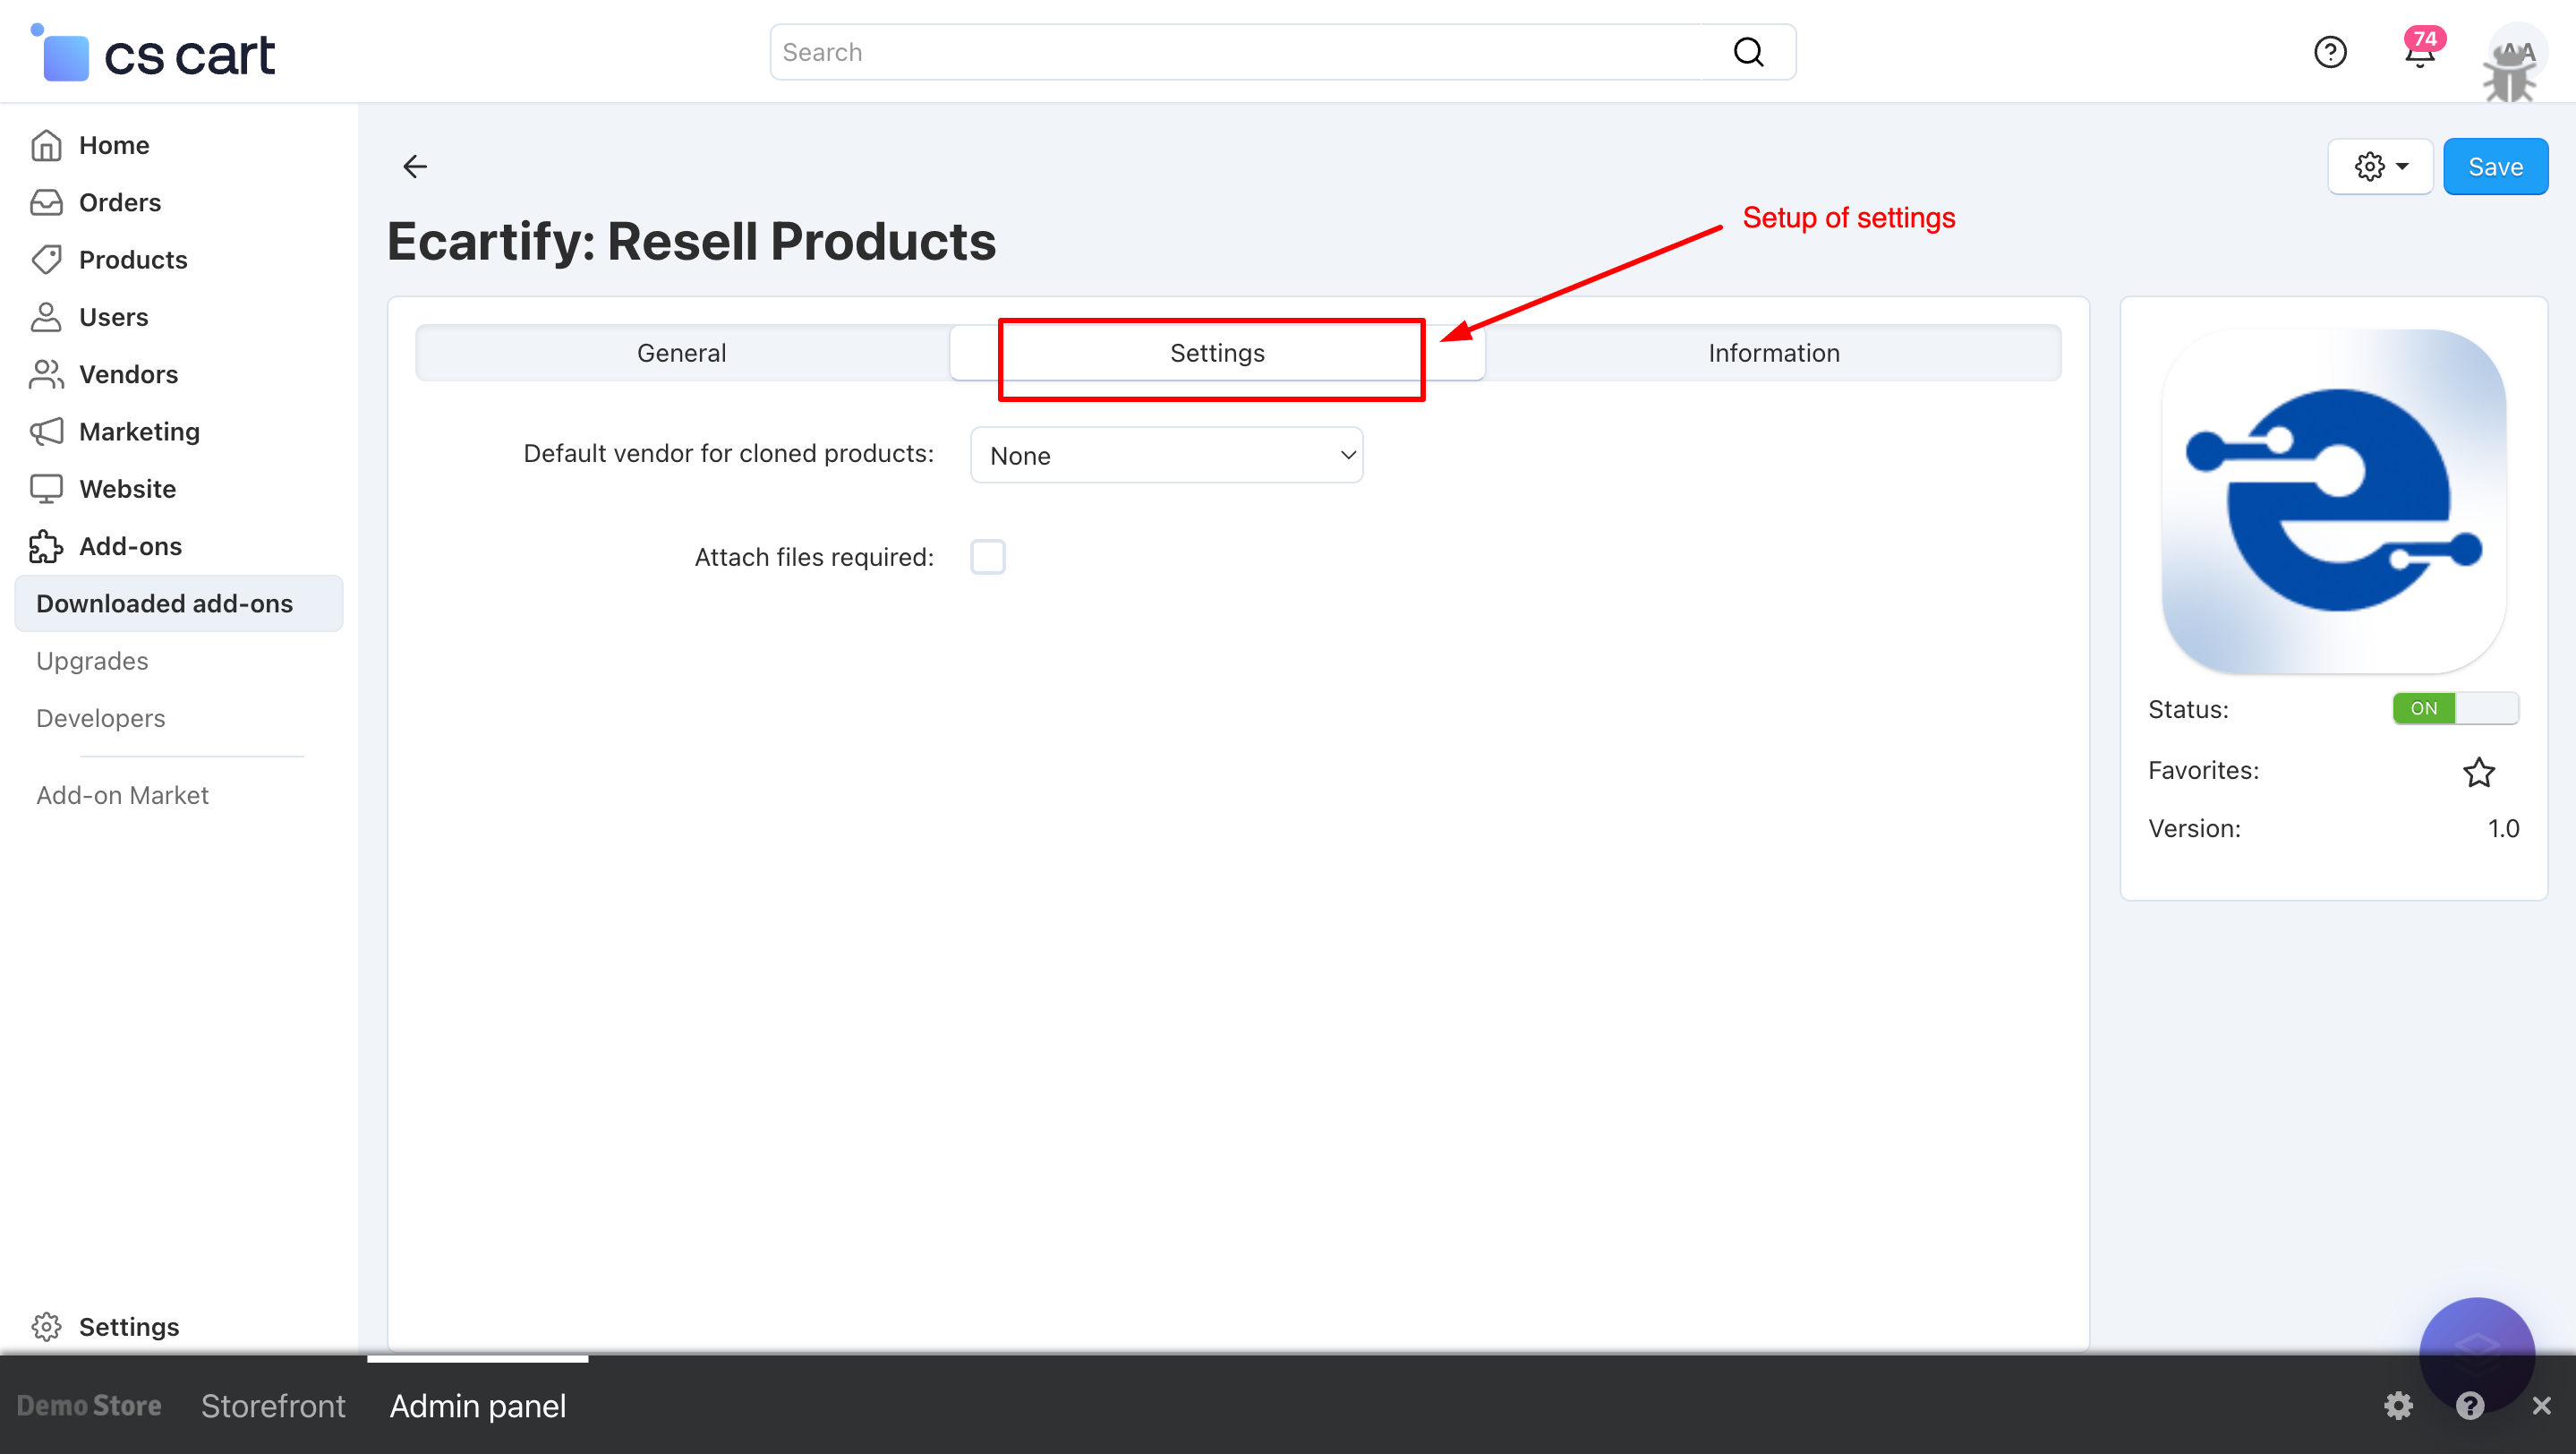
Step 2: Configure the Settings
After installing the add-on, go to Add-ons → Manage add-ons and open the Product Resell Add-on settings page.
Here, you can configure the general options that control how the resell and buyback system operates across your store:
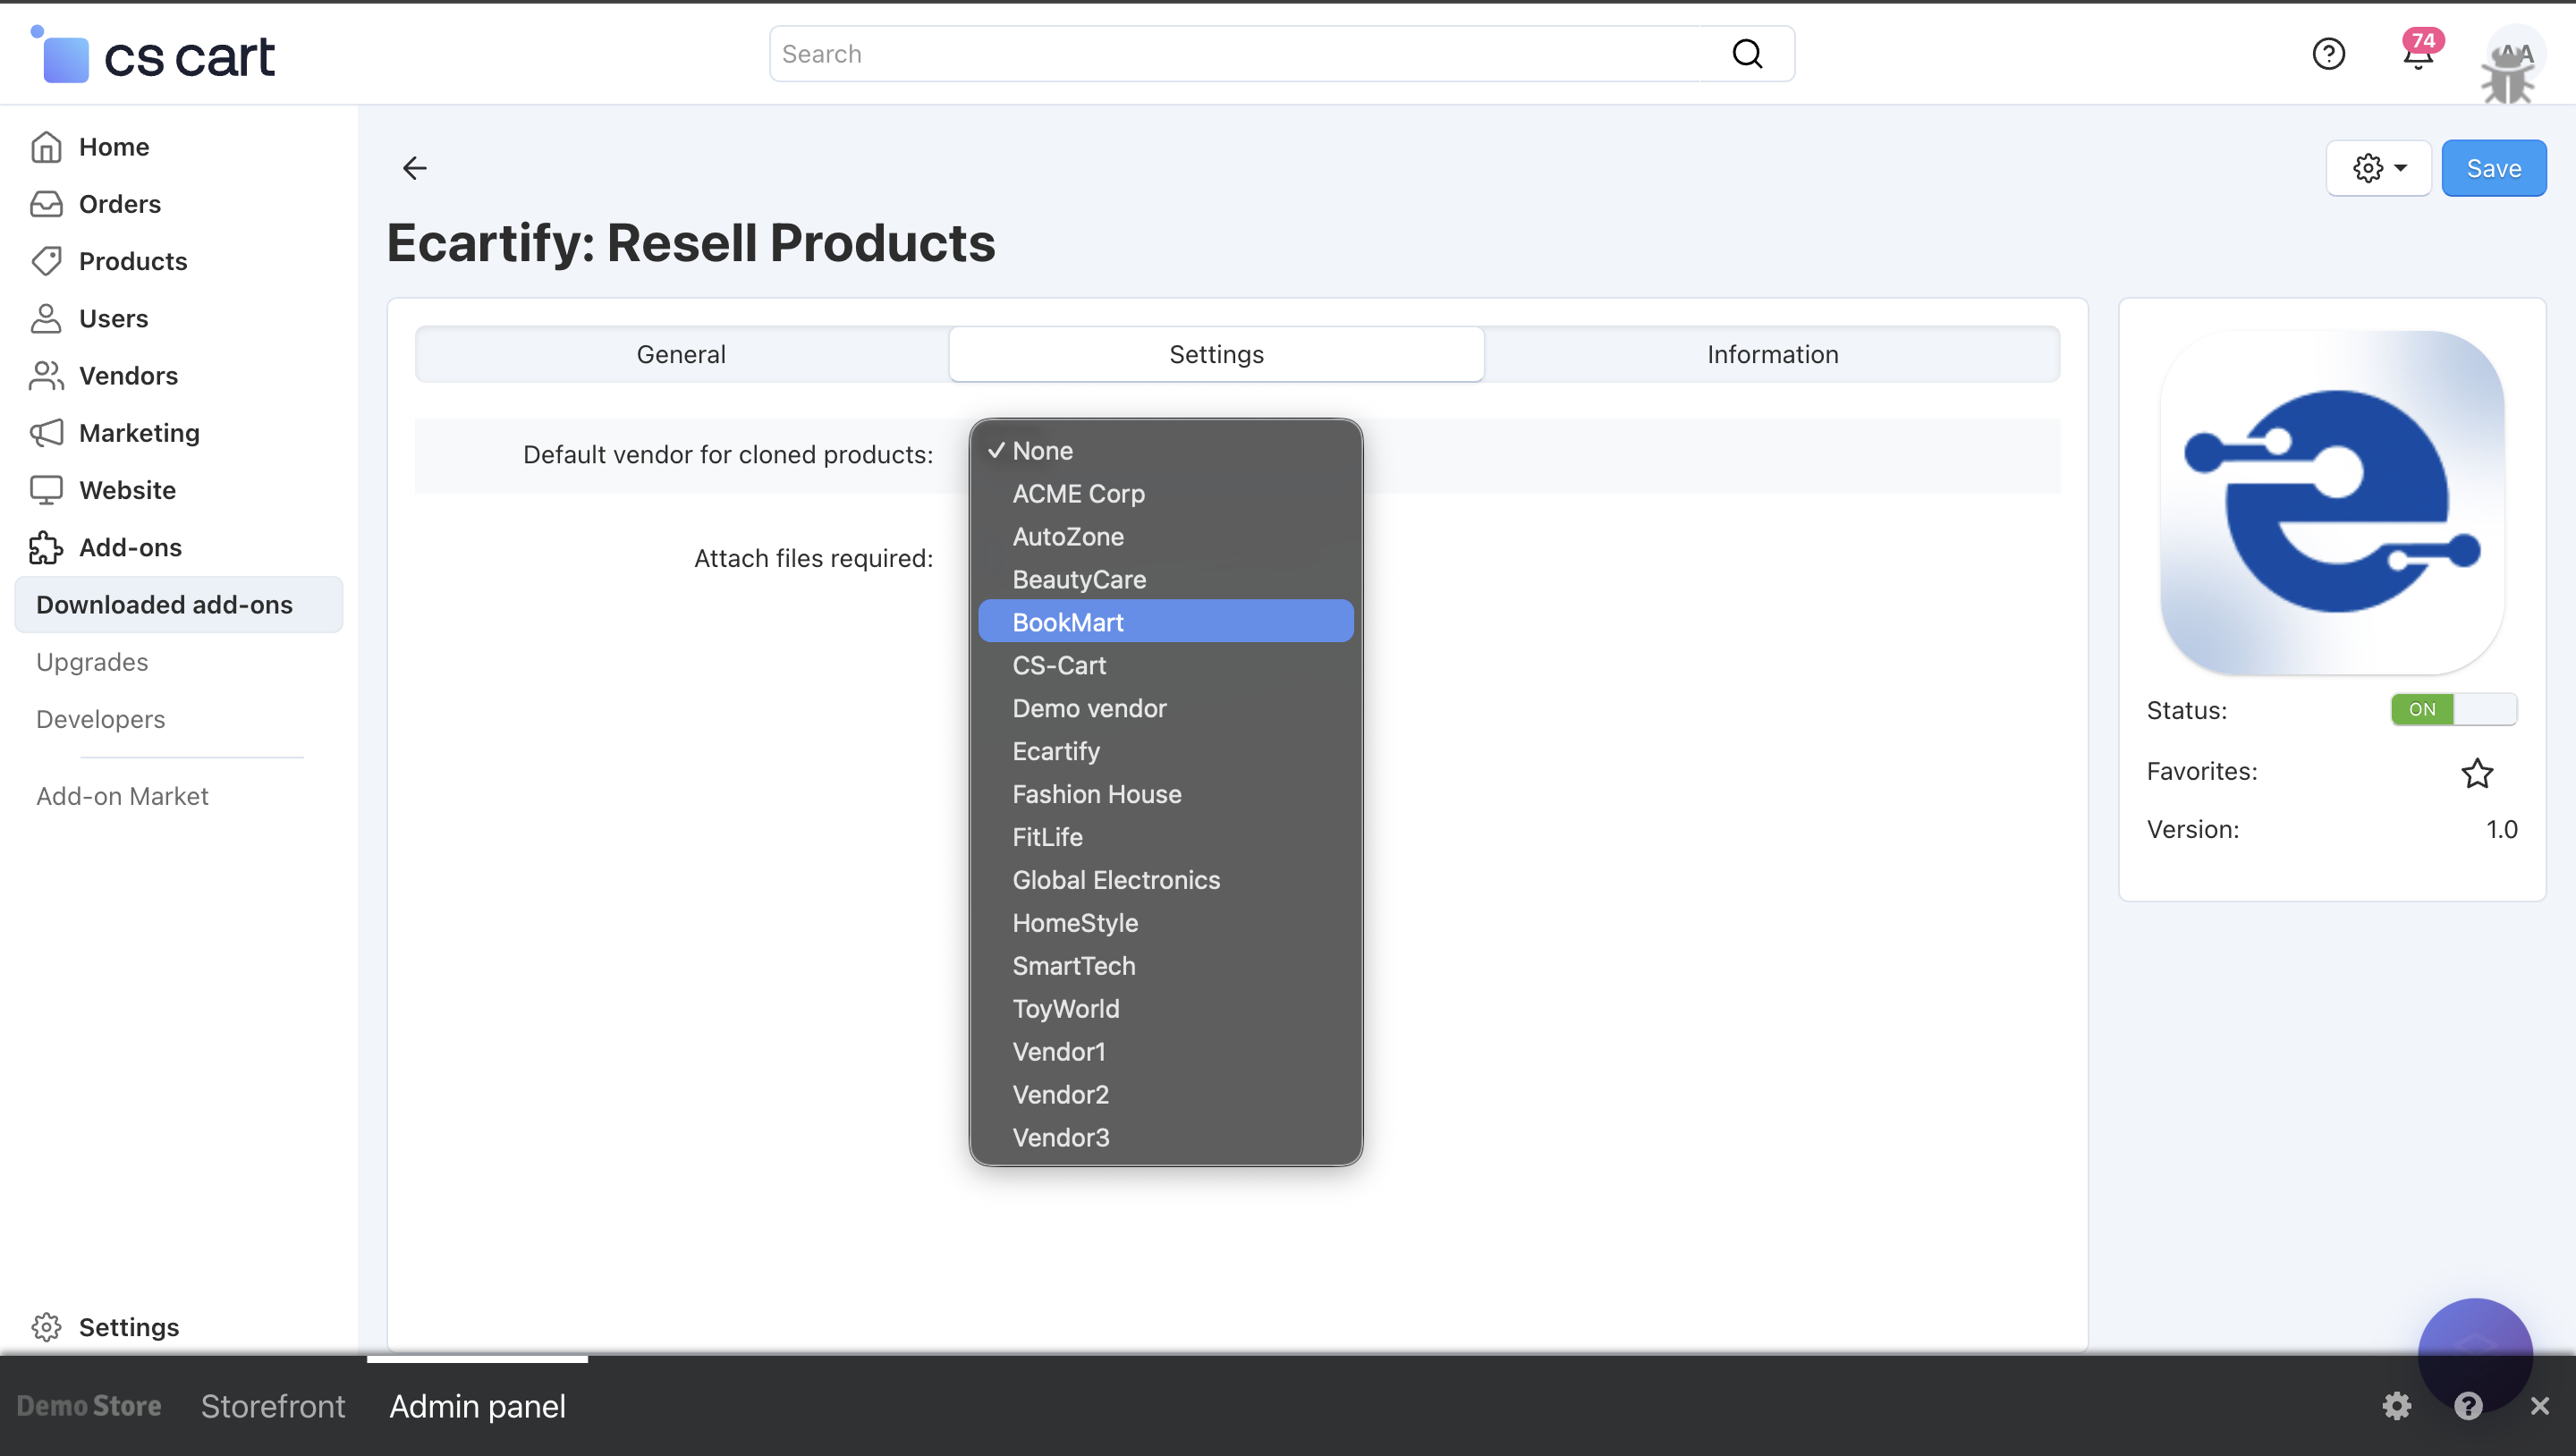
i) Default Vendor for Cloned Products:
Choose the vendor who will be assigned to products cloned during the resell or buyback process.If set to None, the cloned products will be assigned to the store admin by default.
Click on the field to see a list of available vendors. Select the vendor you want to assign as the default for cloned products during the resell or buyback process.
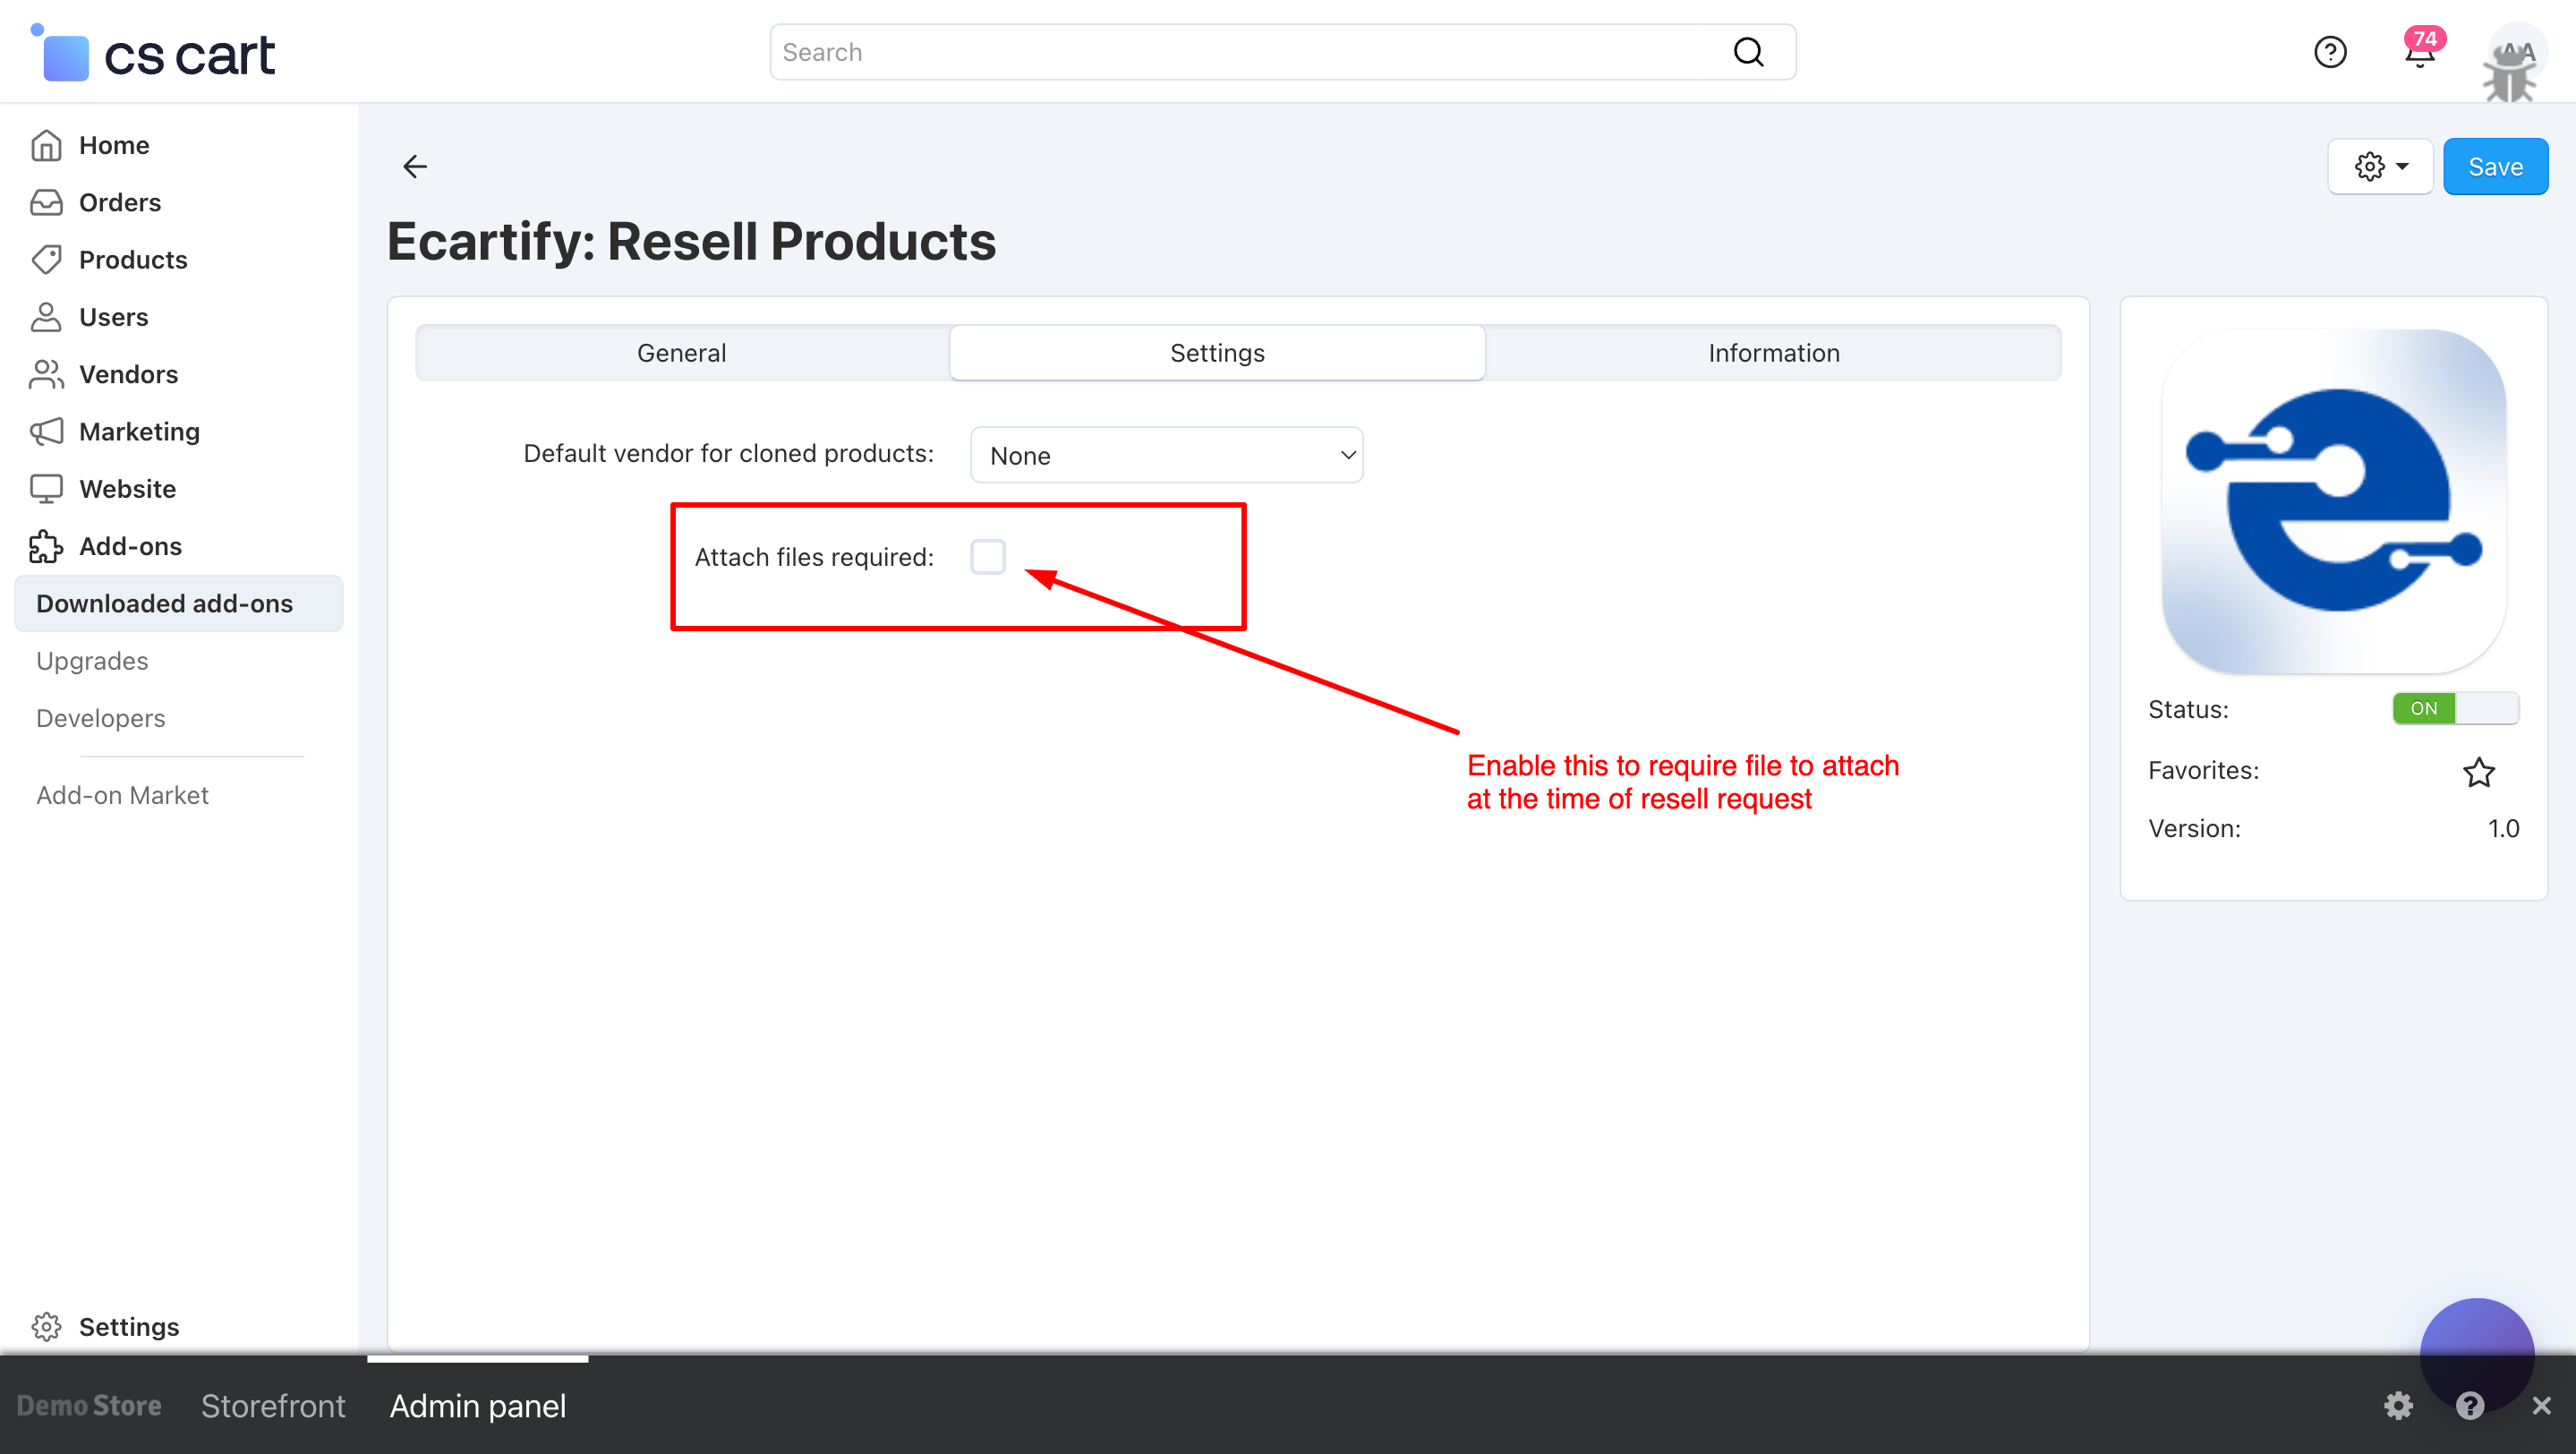
ii) Attach Files Required:
Enable this option to make file attachments mandatory when customers submit a resell request.This ensures that customers provide supporting documents or product images for verification.
Admin Resell Management – Admin can review requests, approve or decline them, assign cloned products to vendors, manage custom statuses, and send automated email notifications, ensuring a smooth and fully controlled resell workflow.
Customer Resell Requests – Customers can submit resell requests, select products, upload attachments, and track the status of their submissions (Pending, Approved, or Declined).
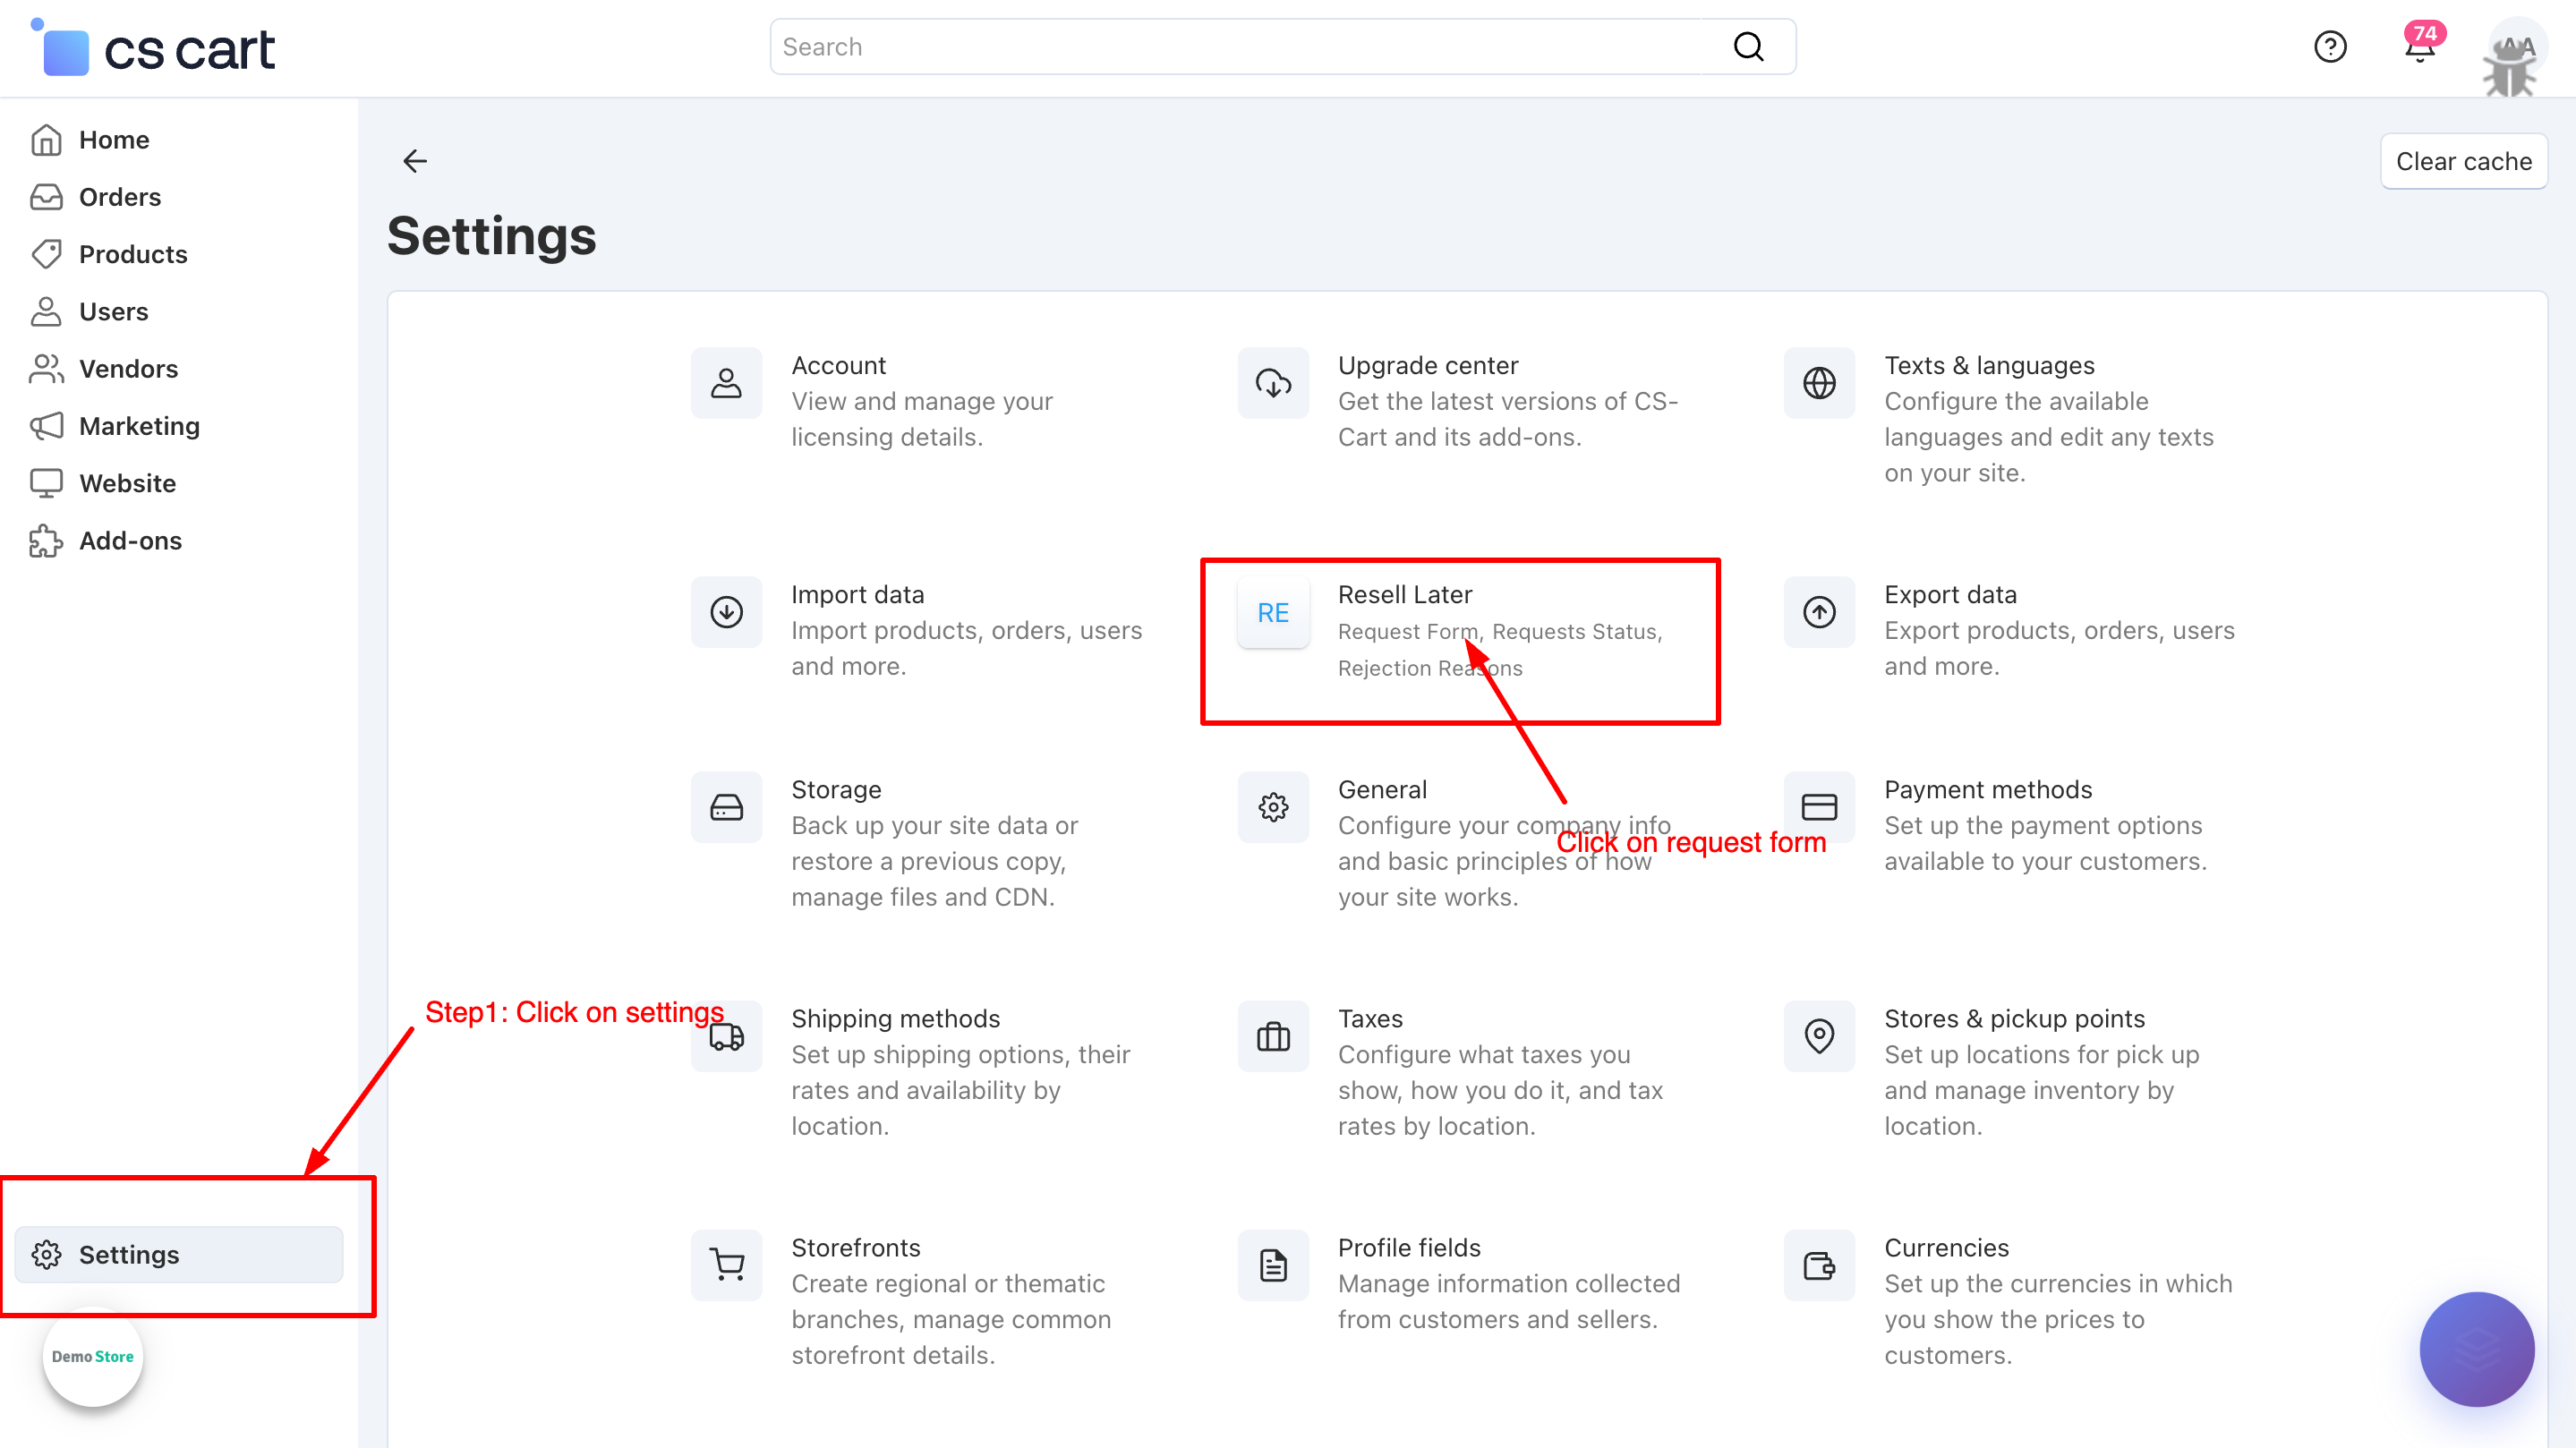
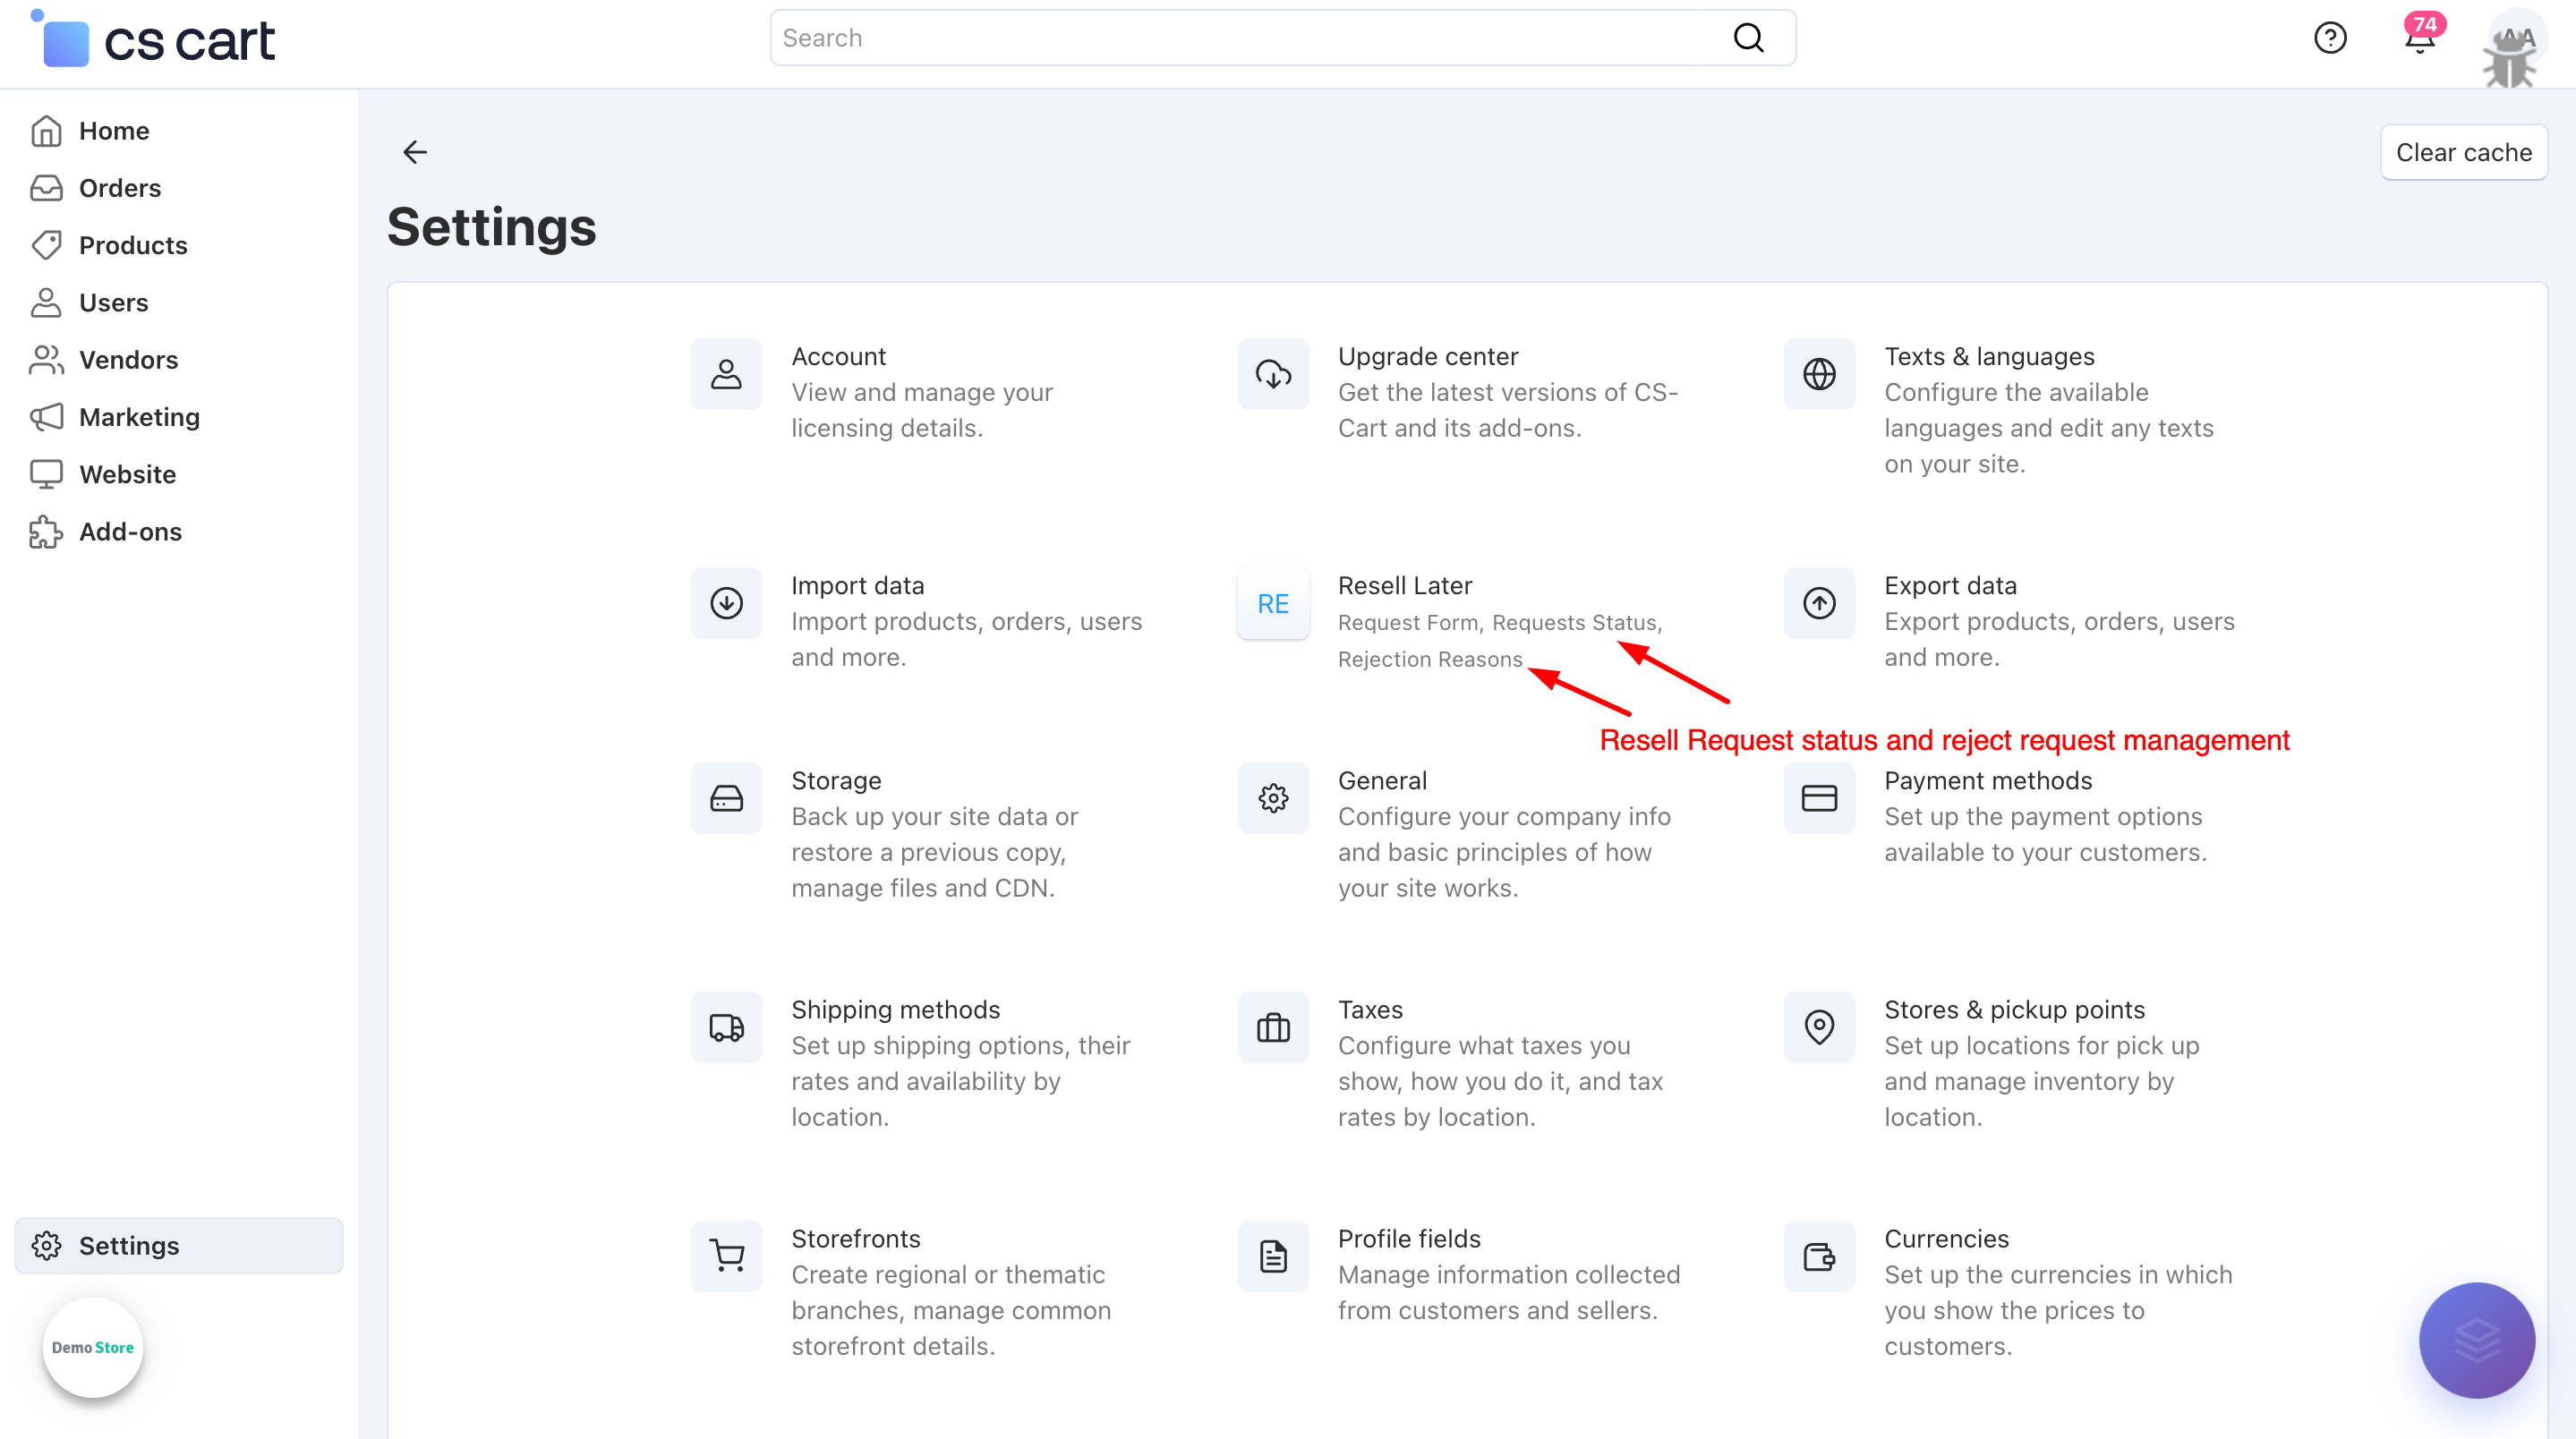
Step 4: Managing Resell Requests Settings
In the Product Resell Add-on, you can manage how customers submit resell requests and how admins handle them. Key sections include:
a) Open the Admin Panel.
b) Click Settings for the Product Resell Add-on.
c) Click Request Form to manage the fields customers see when submitting a resell request.
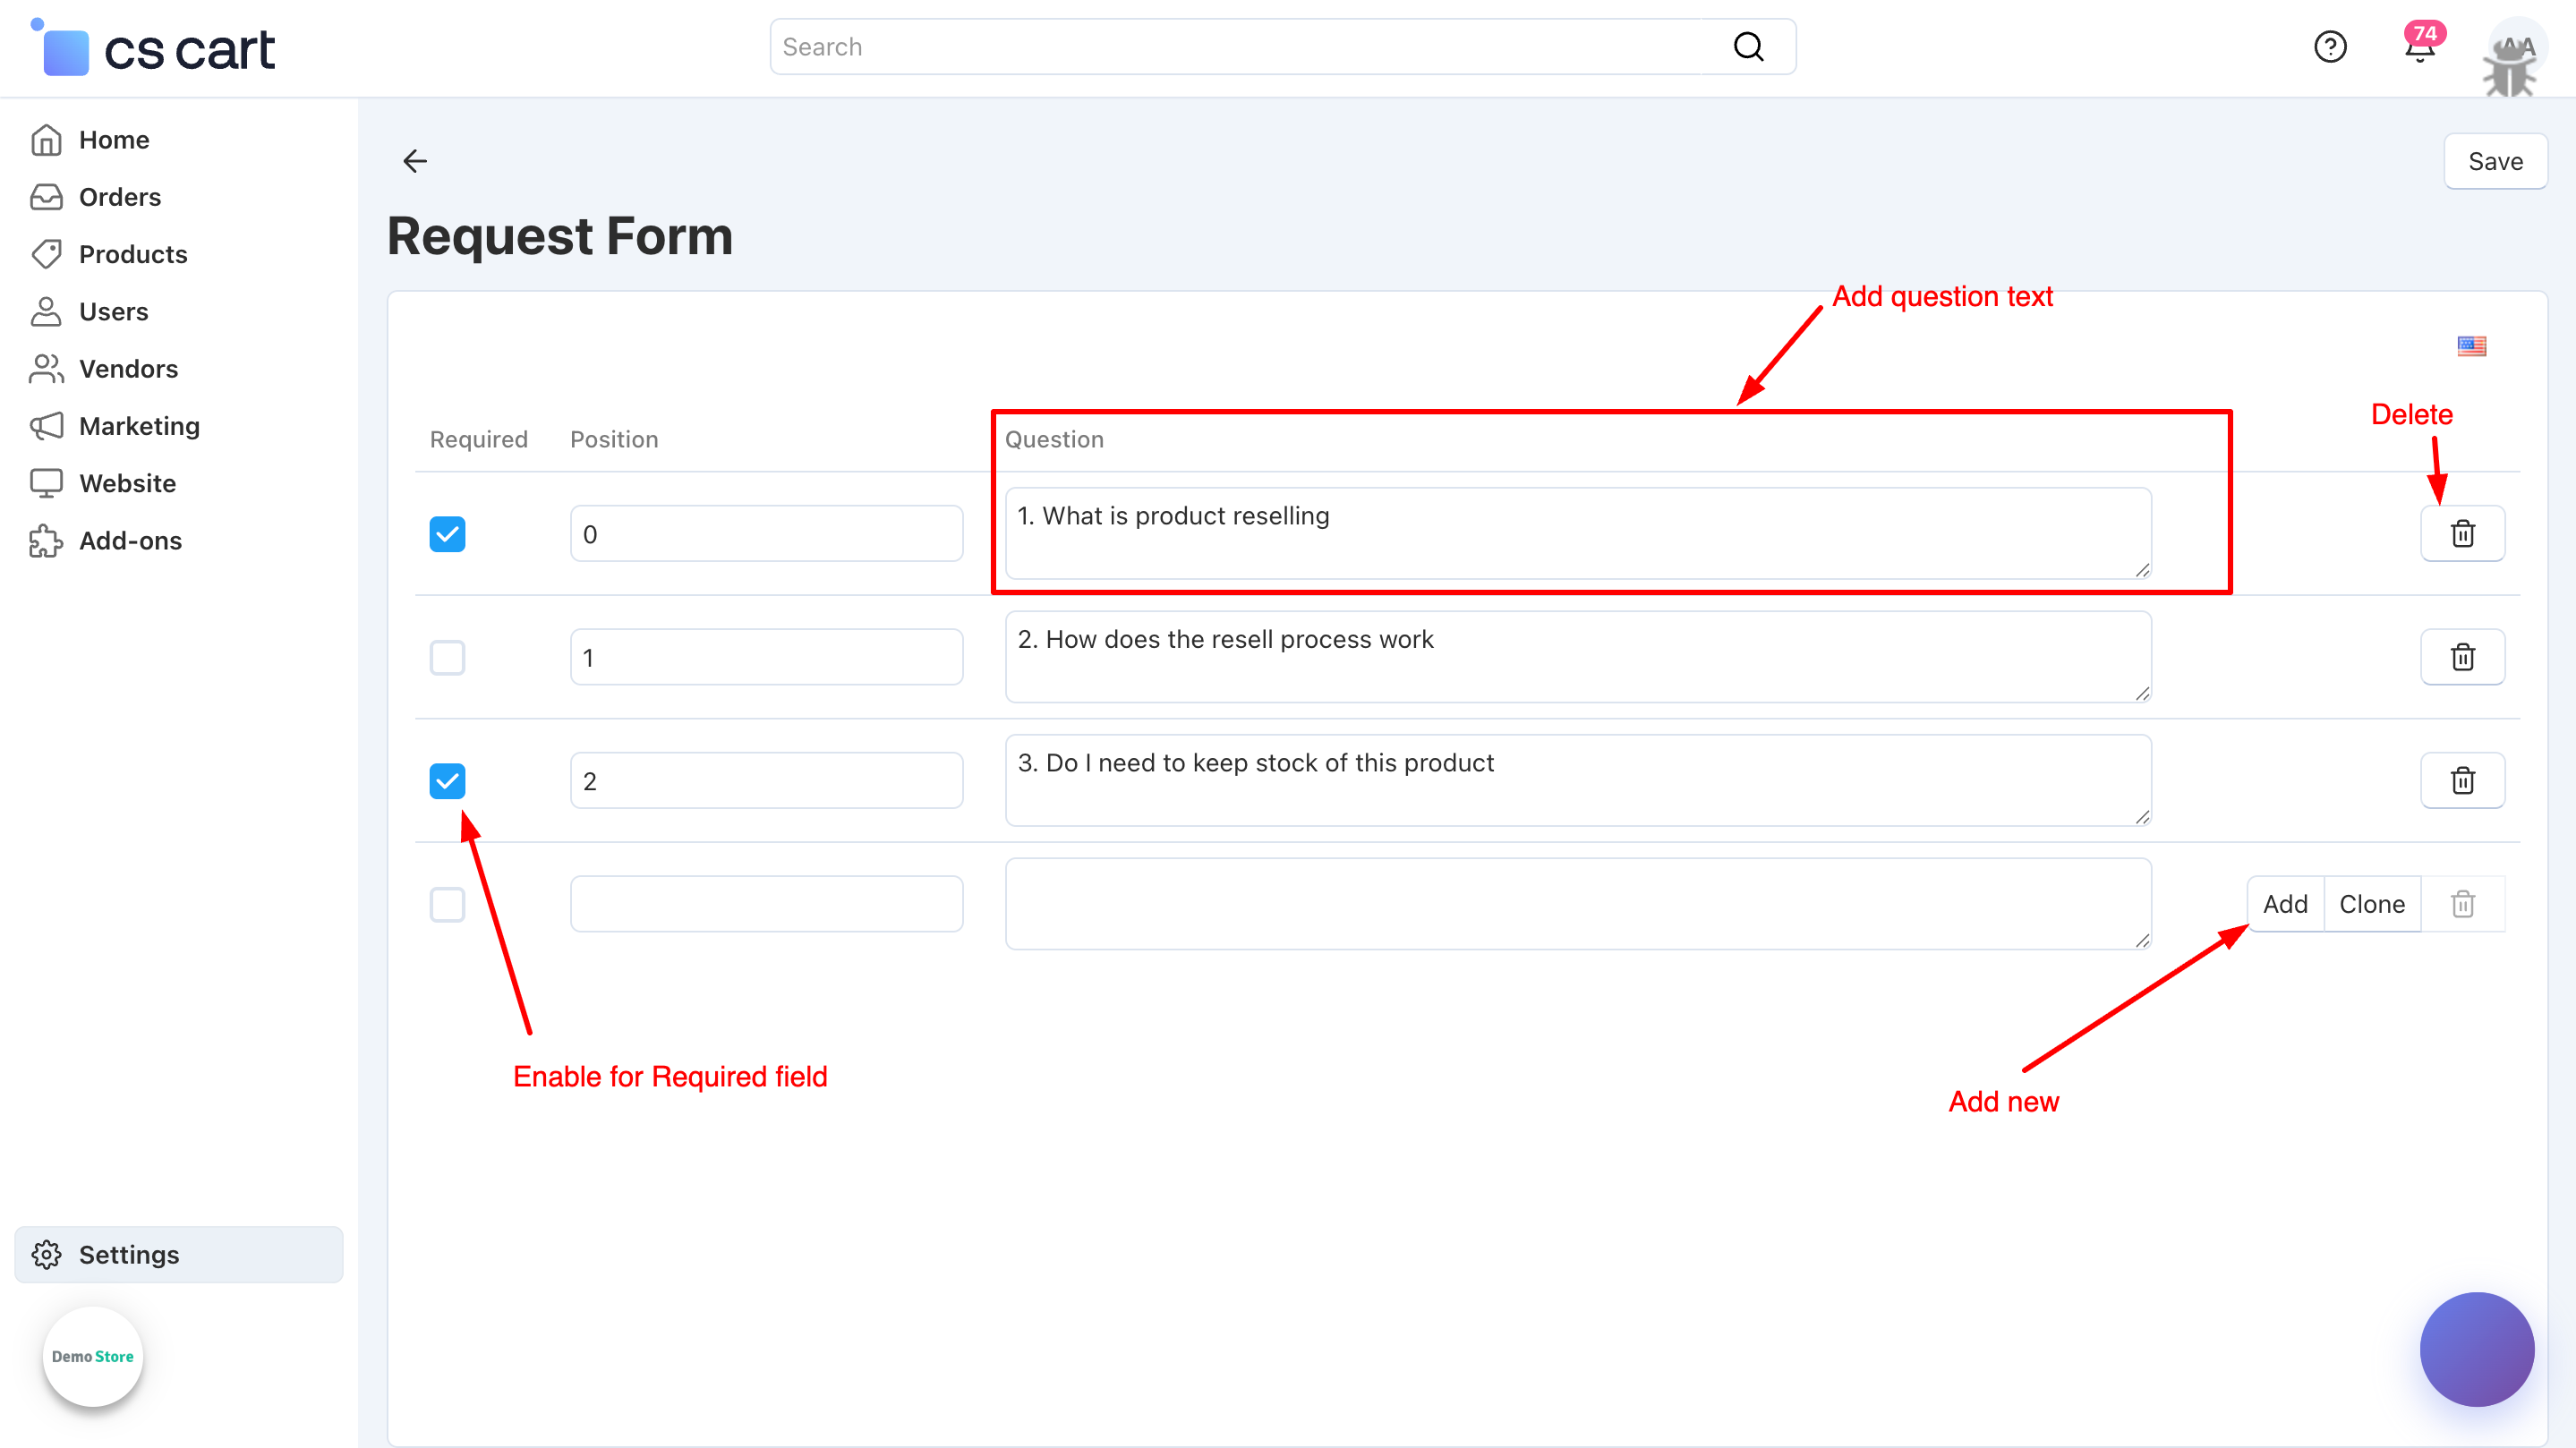
i) Set up the Resell Resuest fields customers will see (product selection, quantity, attachments, notes). Mark fields as mandatory or optional.
ii) Configure each form field by specifying the Question (label shown to the customer), Position (order on the form), and Required (make it mandatory for submission). These settings ensure the resell request form is clear, organized, and collects all necessary information.
iii) Requests Status allows admins to manage and customize the workflow statuses such as Pending, Approved, or Declined, ensuring smooth tracking of resell requests. Rejection Reasons help define clear, predefined messages so customers are properly informed when a request is declined..
Add status by cliking on add status button.
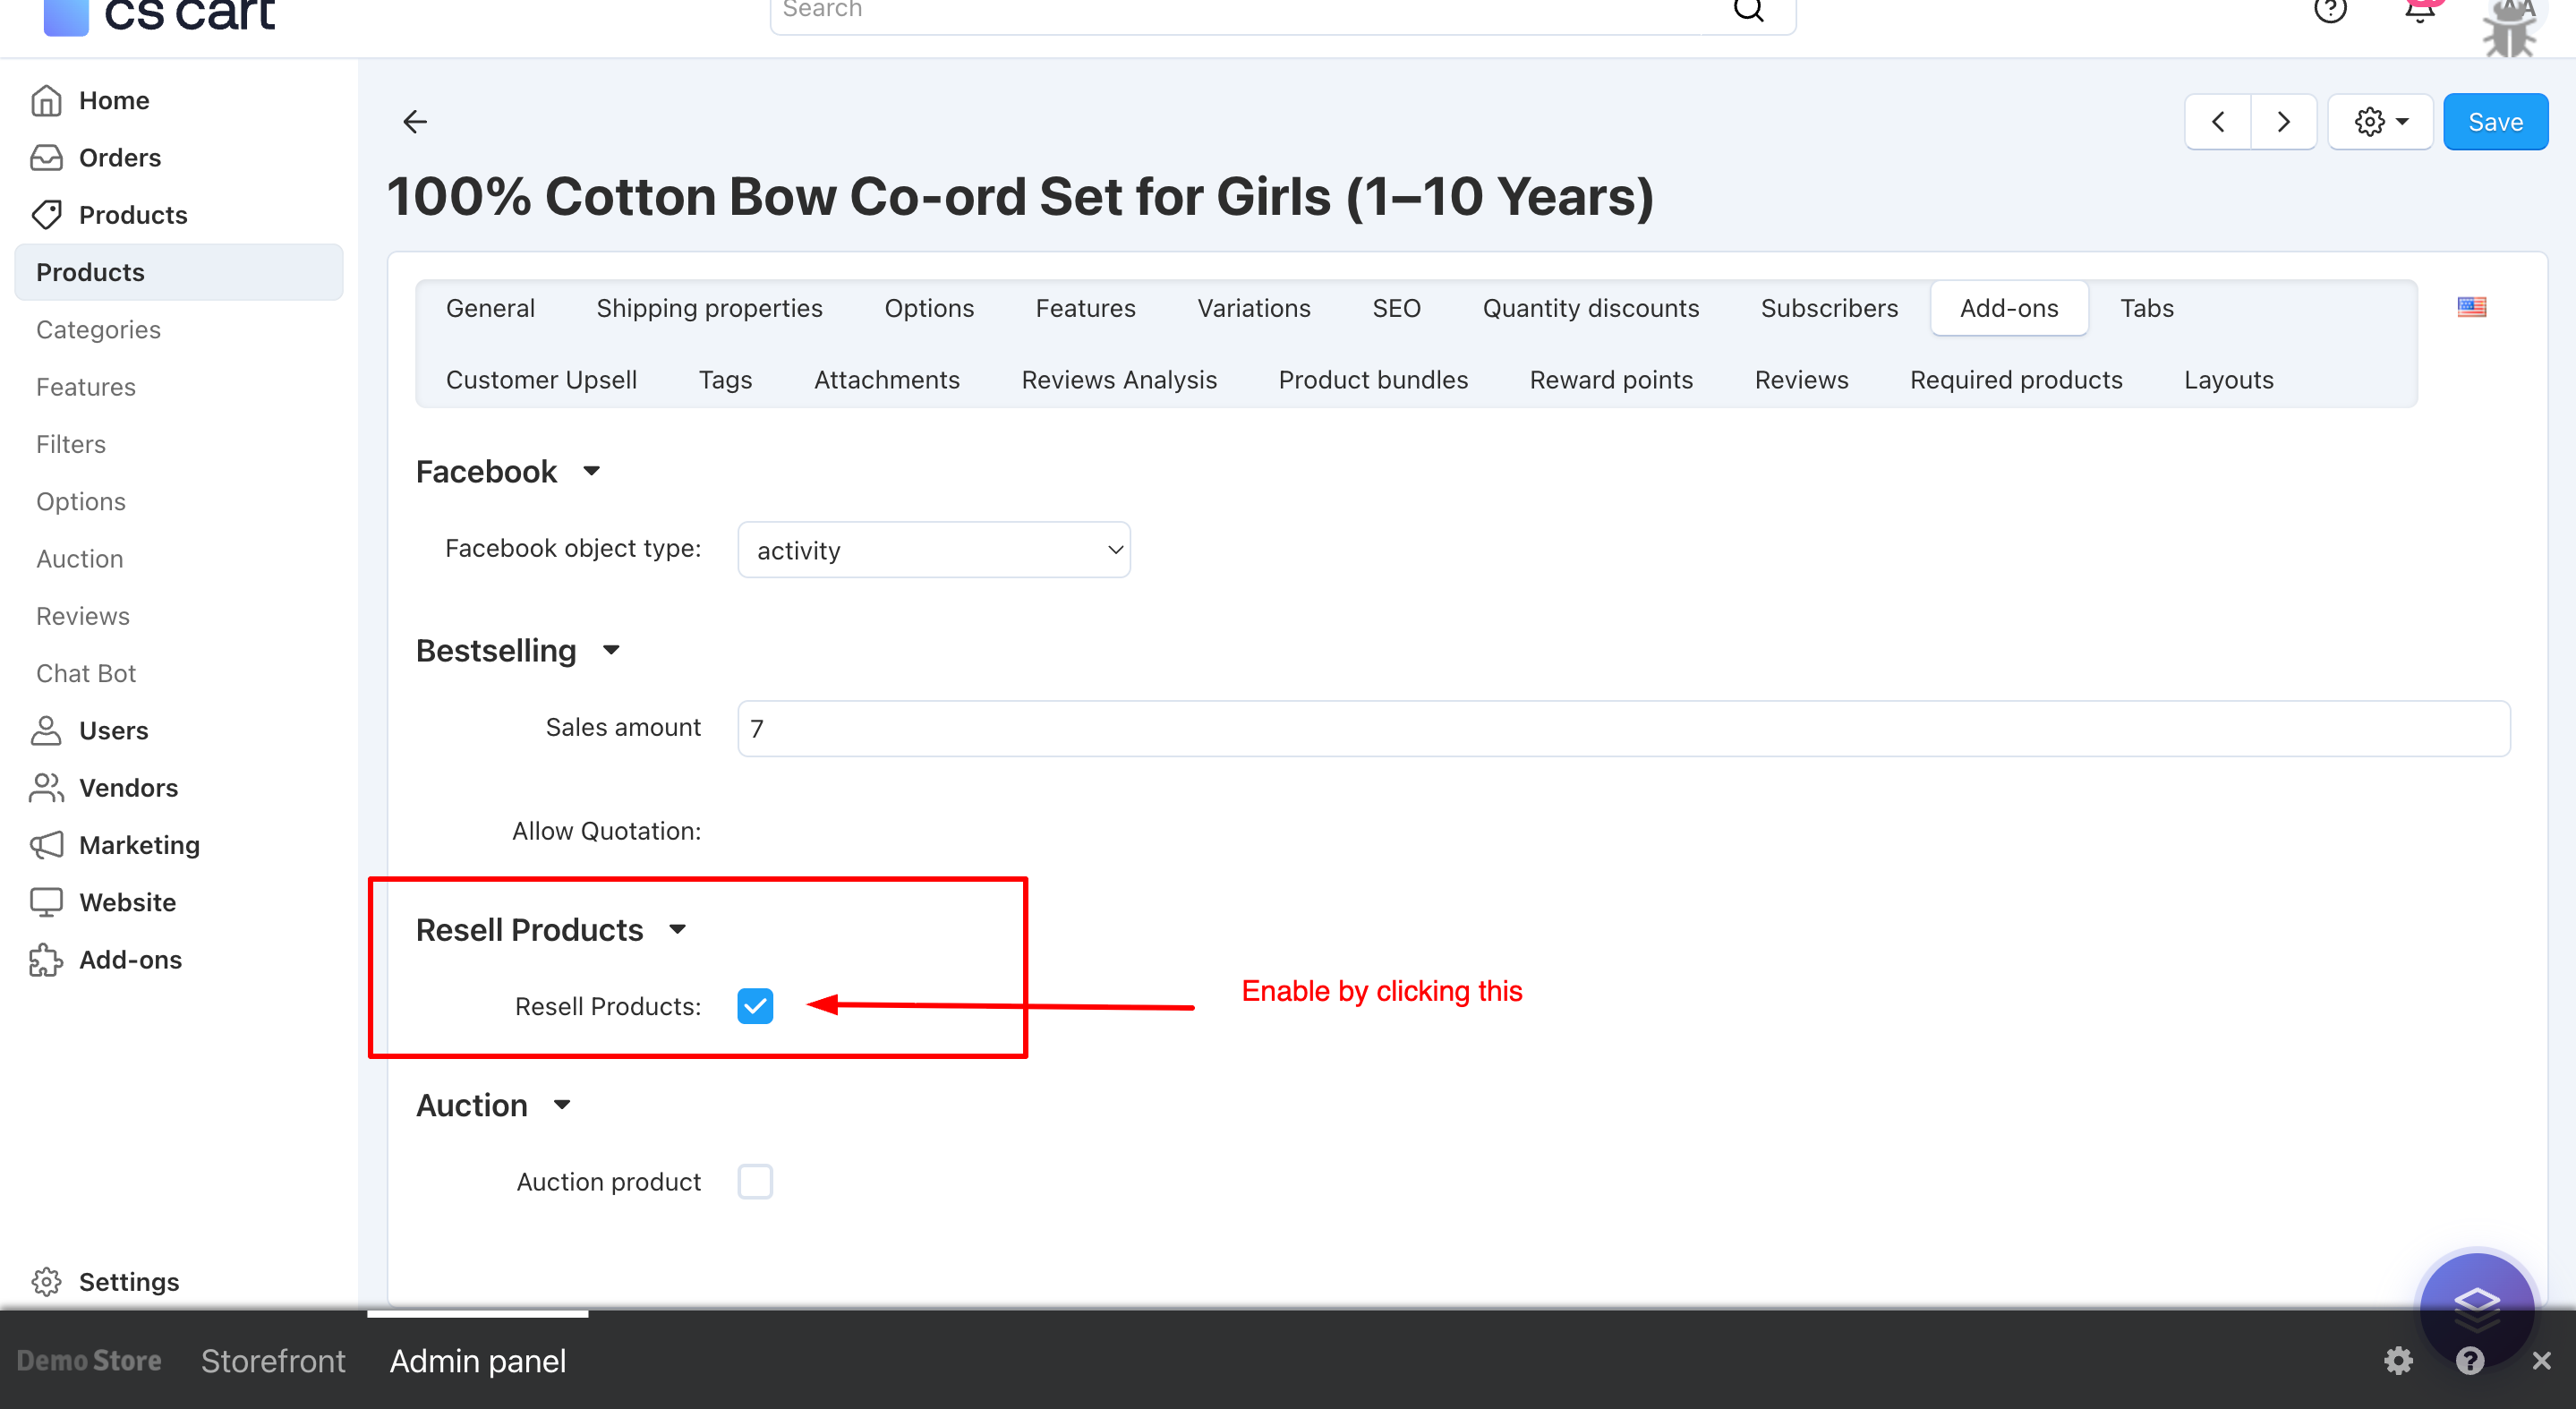
iv) To enable the resell feature, first go to Products → Update Product page. After that, open the Add-ons tab and enable the Resell option.
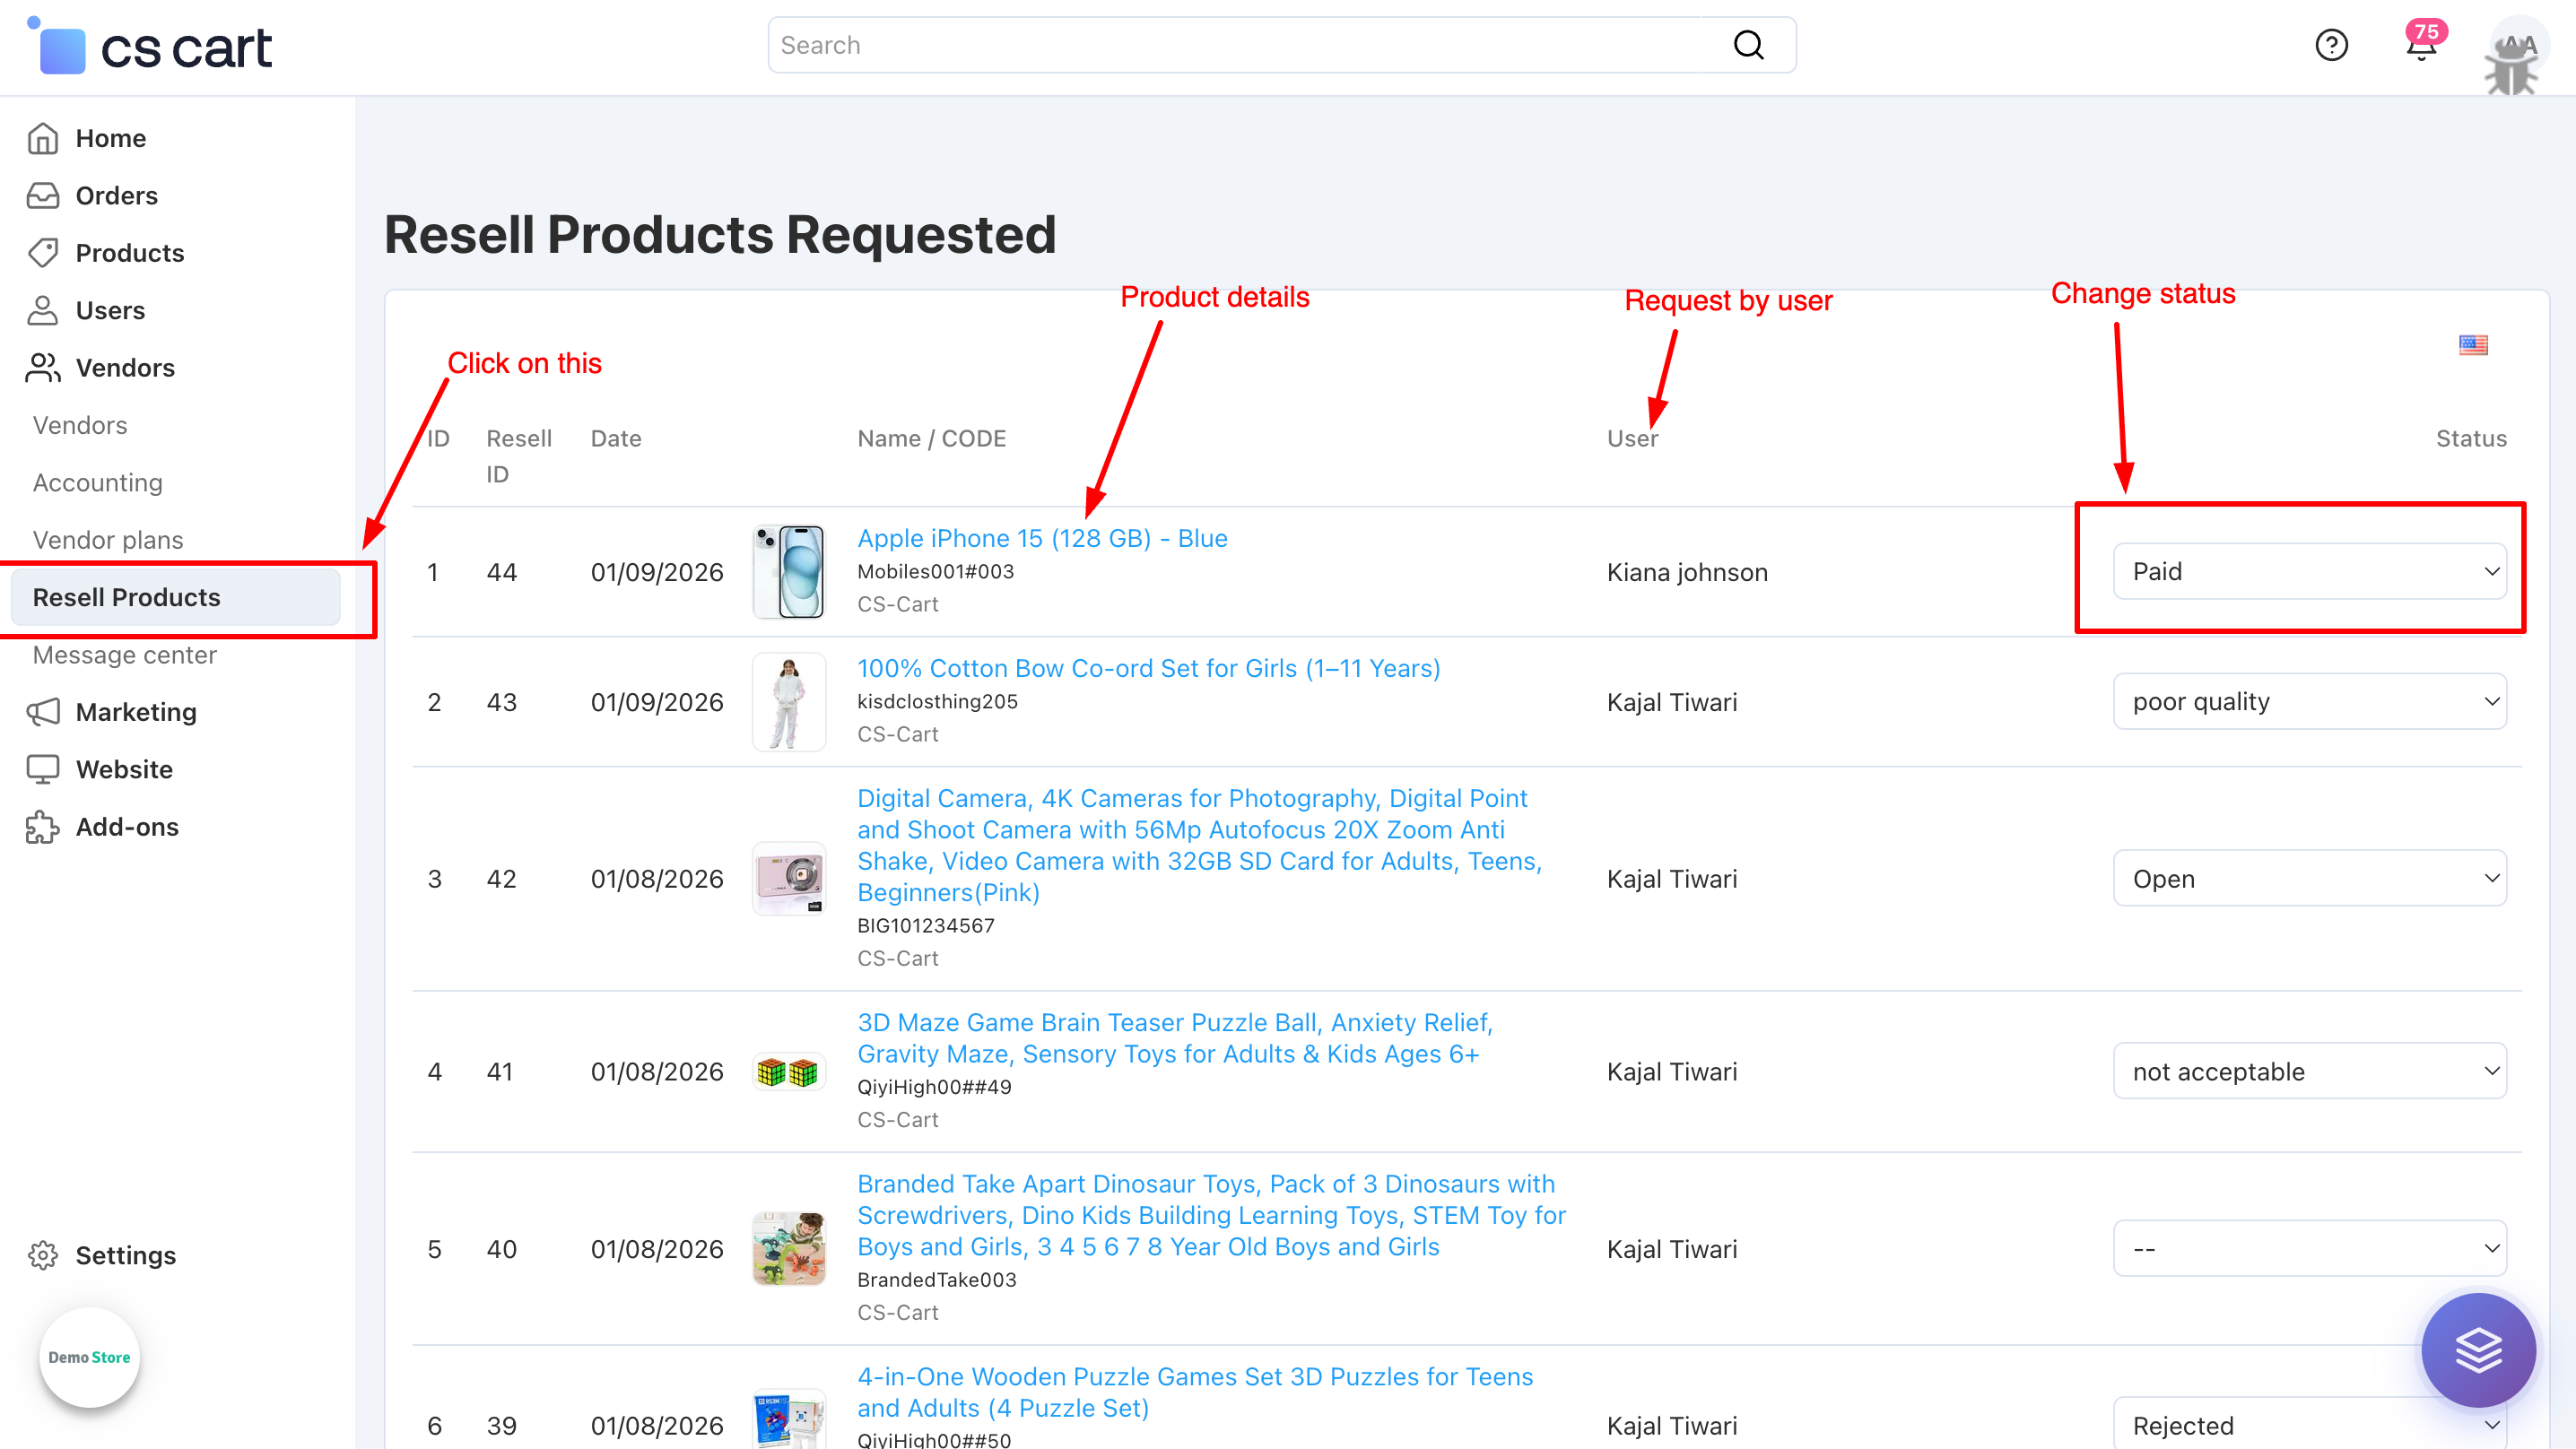
v) All customer resell requests can be managed from the Admin Panel → Vendors → Resell Products, where admins can review requests, update statuses, and apply rejection reasons to clearly inform customers when a request is declined..
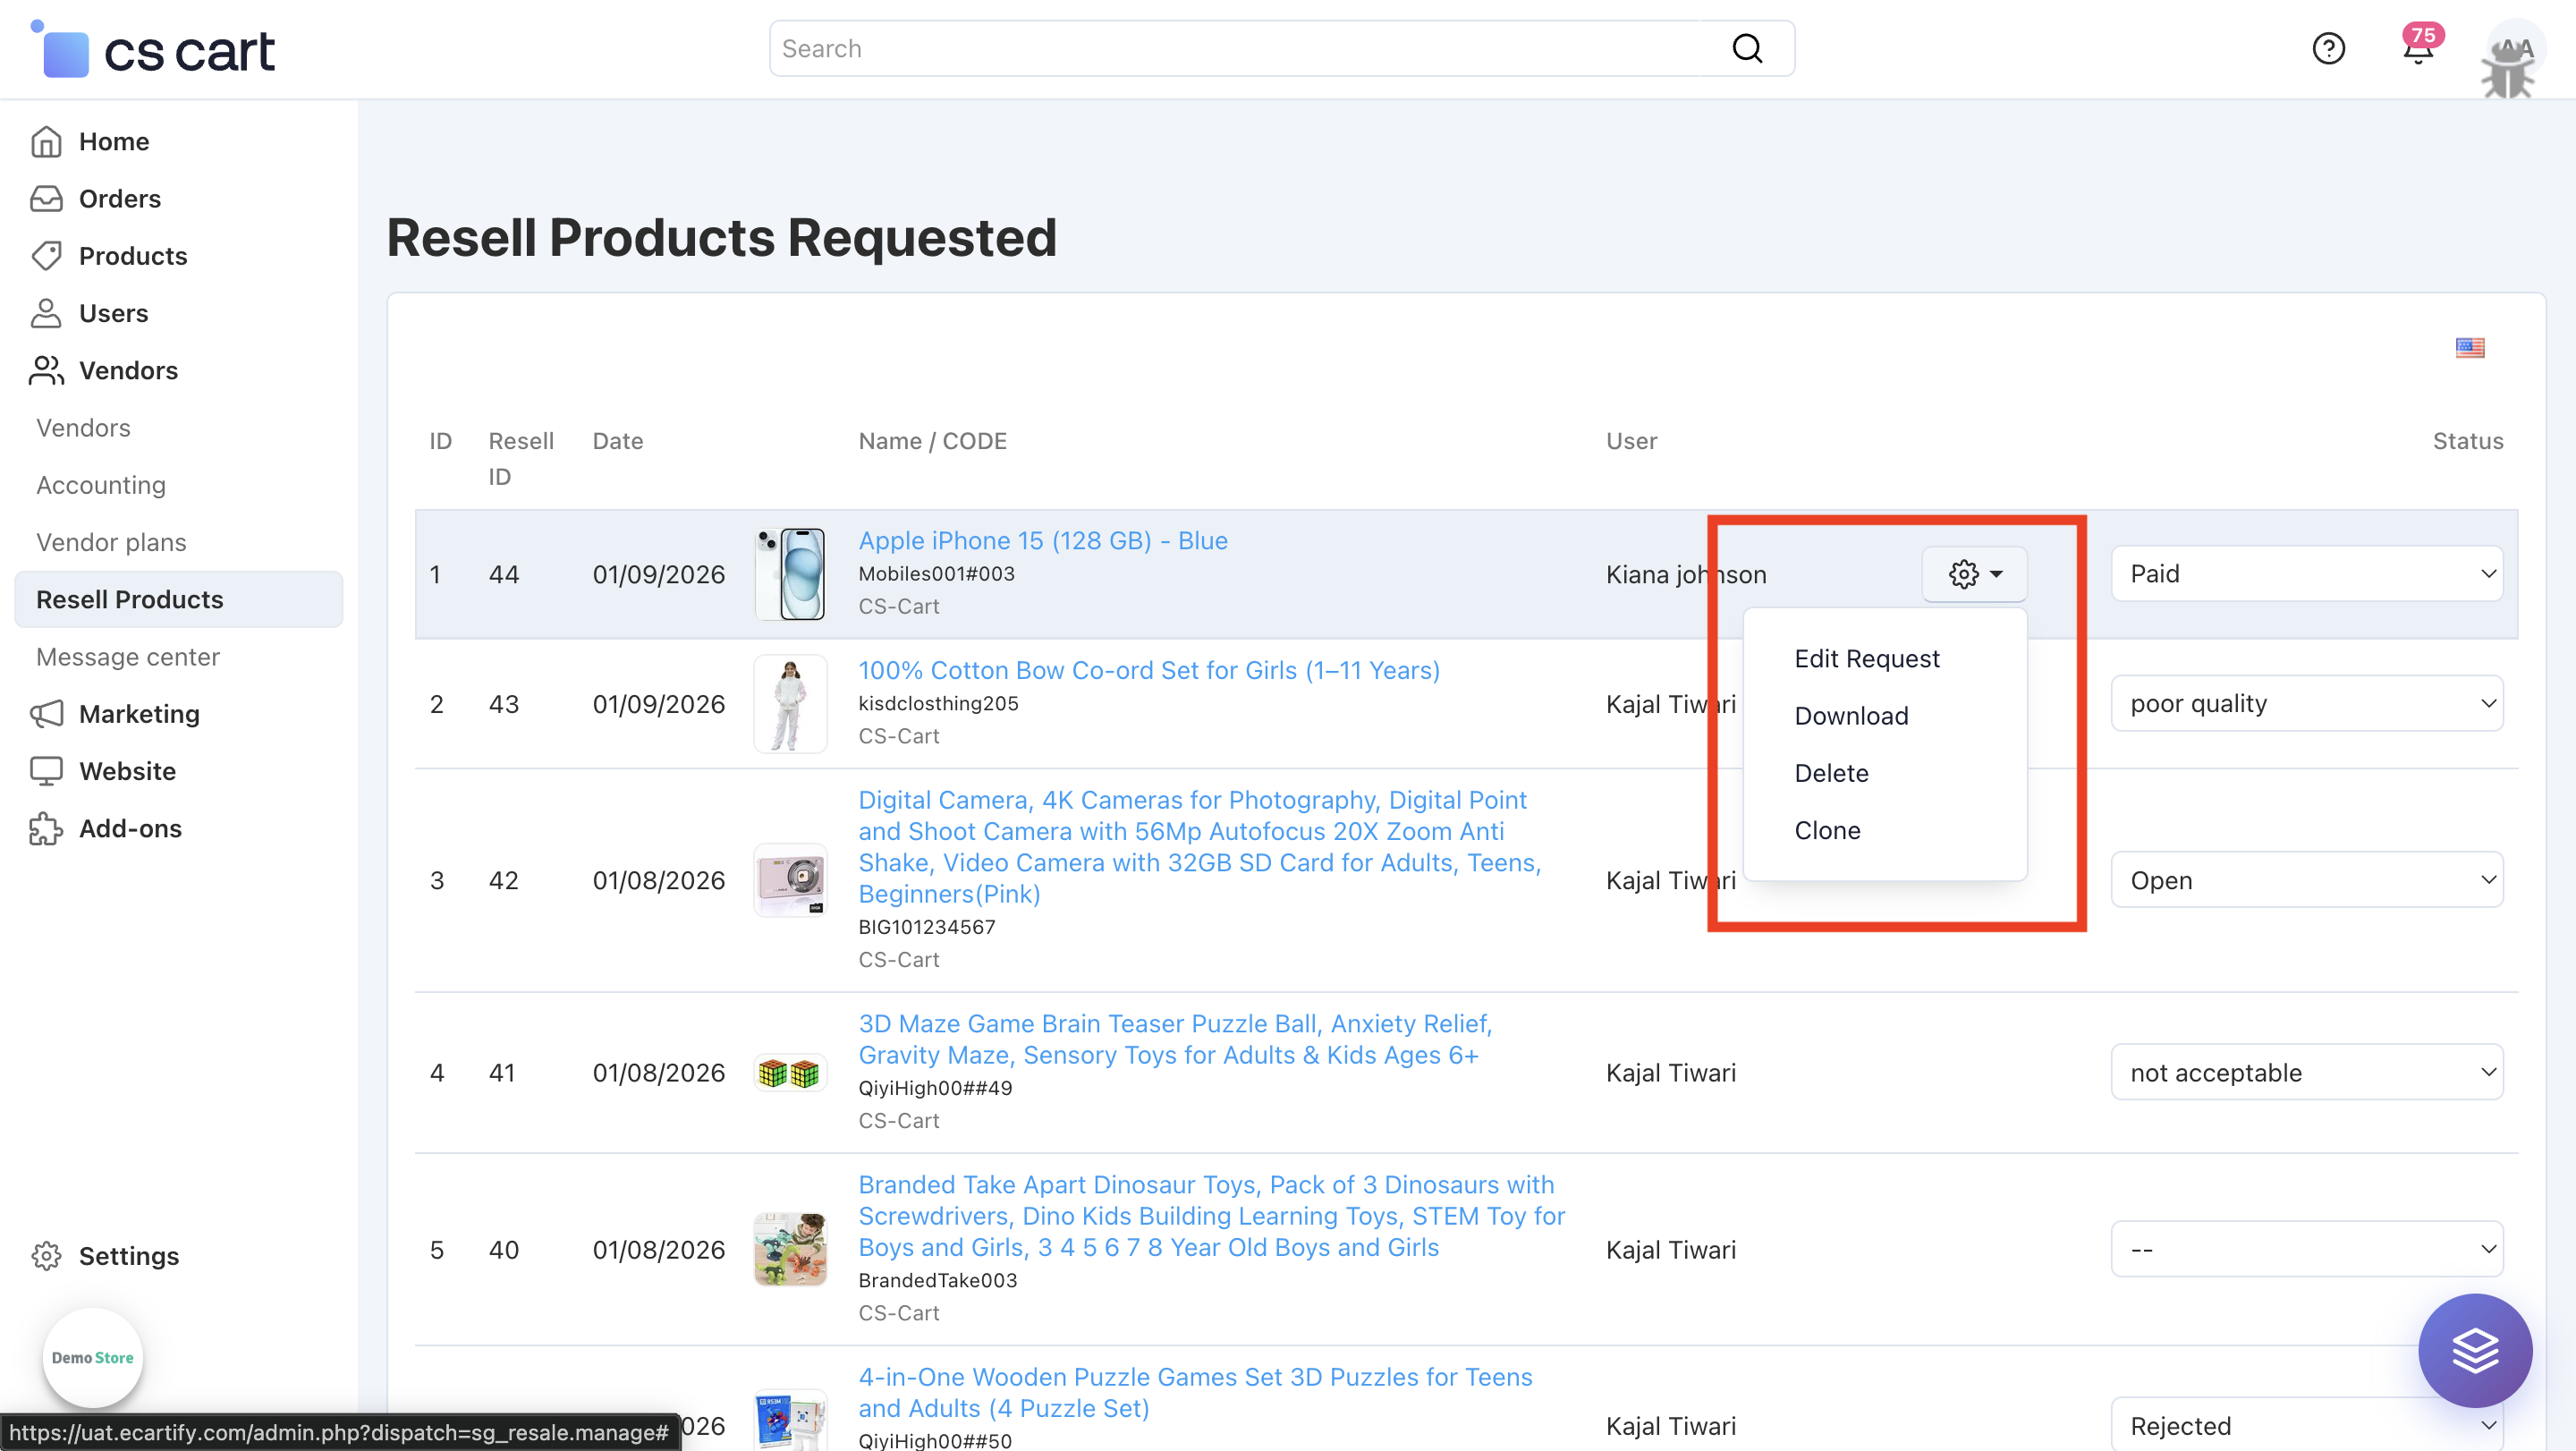
vi) Click on the gear (⚙️) icon to view additional management options, including Edit Request, Download Attachments, Delete Requests, and Clone Products after approval.
a) When you click on Edit Request, a popup window opens where the admin can view the customer’s resell request details, review uploaded attachments.
b) When you click on Download, all attachments uploaded with the resell request are downloaded at once, allowing the admin to easily review the submitted files.
c)Clone option allows the admin to create a copy of the product linked to the resell request. Once the product is cloned, it is automatically assigned to the vendor selected in the add-on settings as the Default Vendor for Cloned Products.
Step 4: How the Product Resell Add-on Works on the Frontend?
On the storefront, the Product Resell Add-on provides a simple and user-friendly experience for customers:
Customers can see the Resell option on eligible products or in their order details.
By clicking Resell, a request form opens where users select the product, upload required attachments, and submit the resell request.
After submission, customers can view and track the request status (Pending, Approved, or Declined) from their account section.
Customers receive email notifications whenever the status of their resell request is updated by the admin.
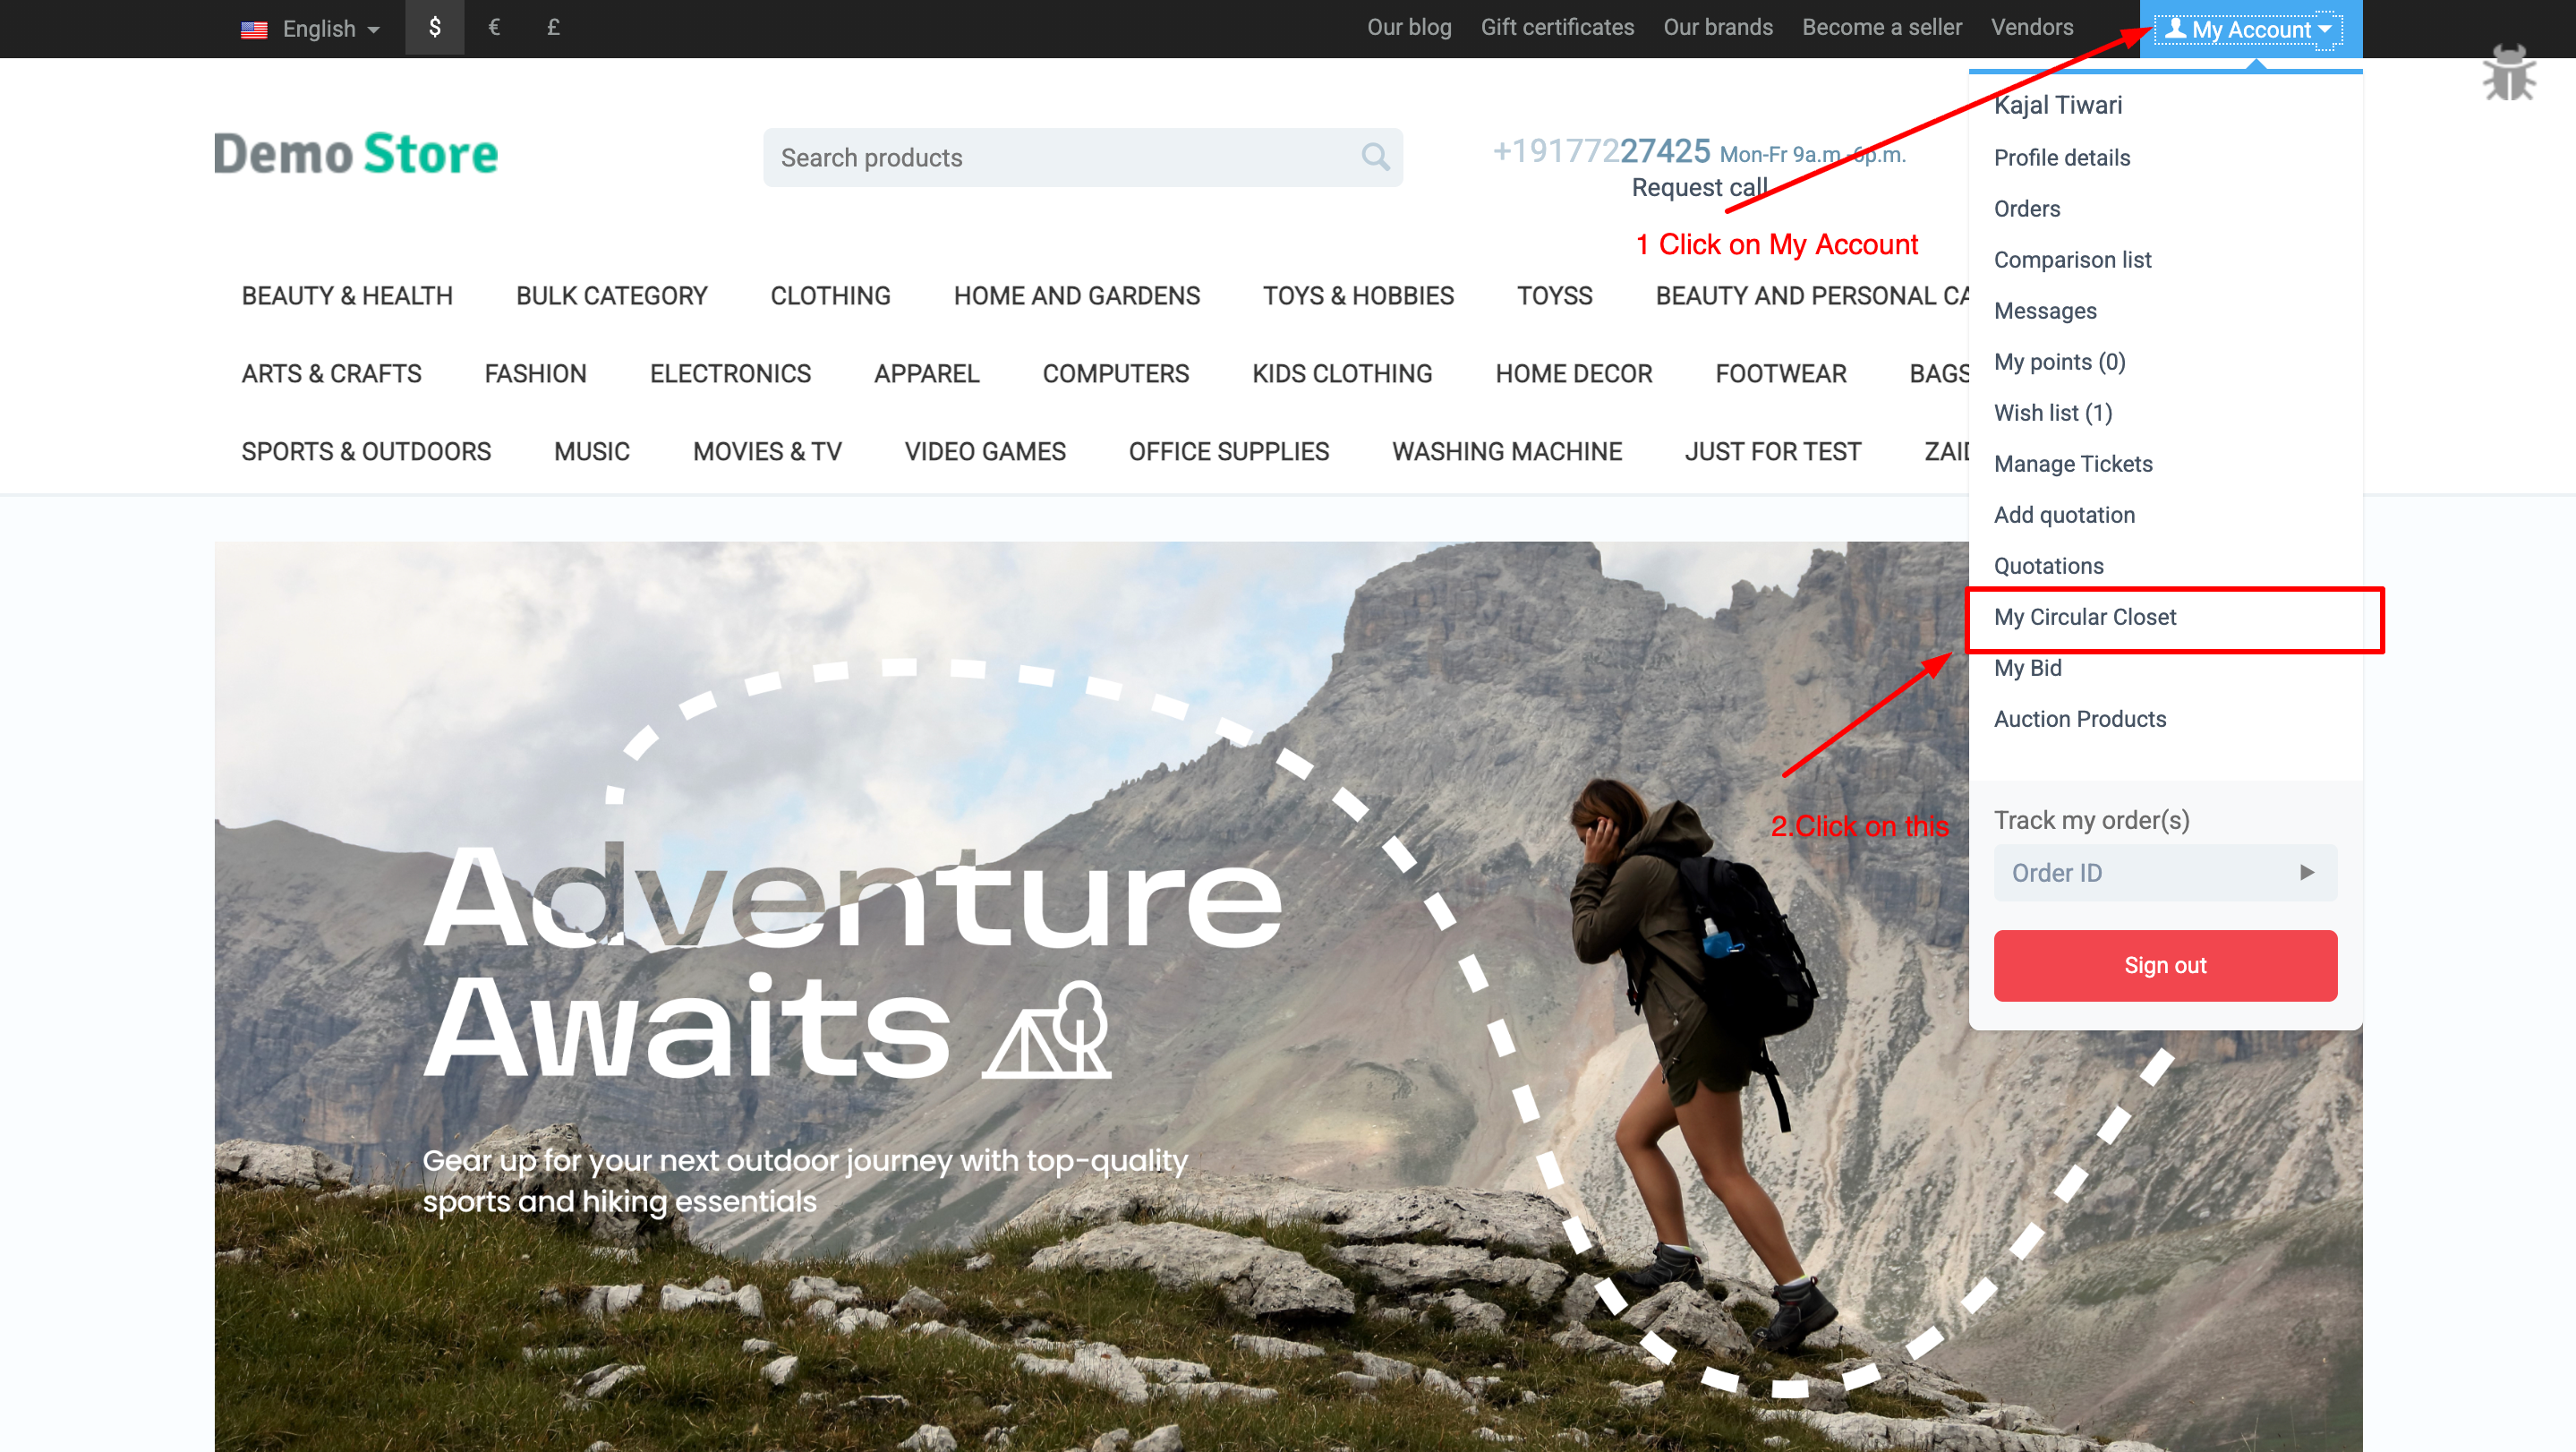
i) To create a resell request from frontend first we need click on My Circular Closet
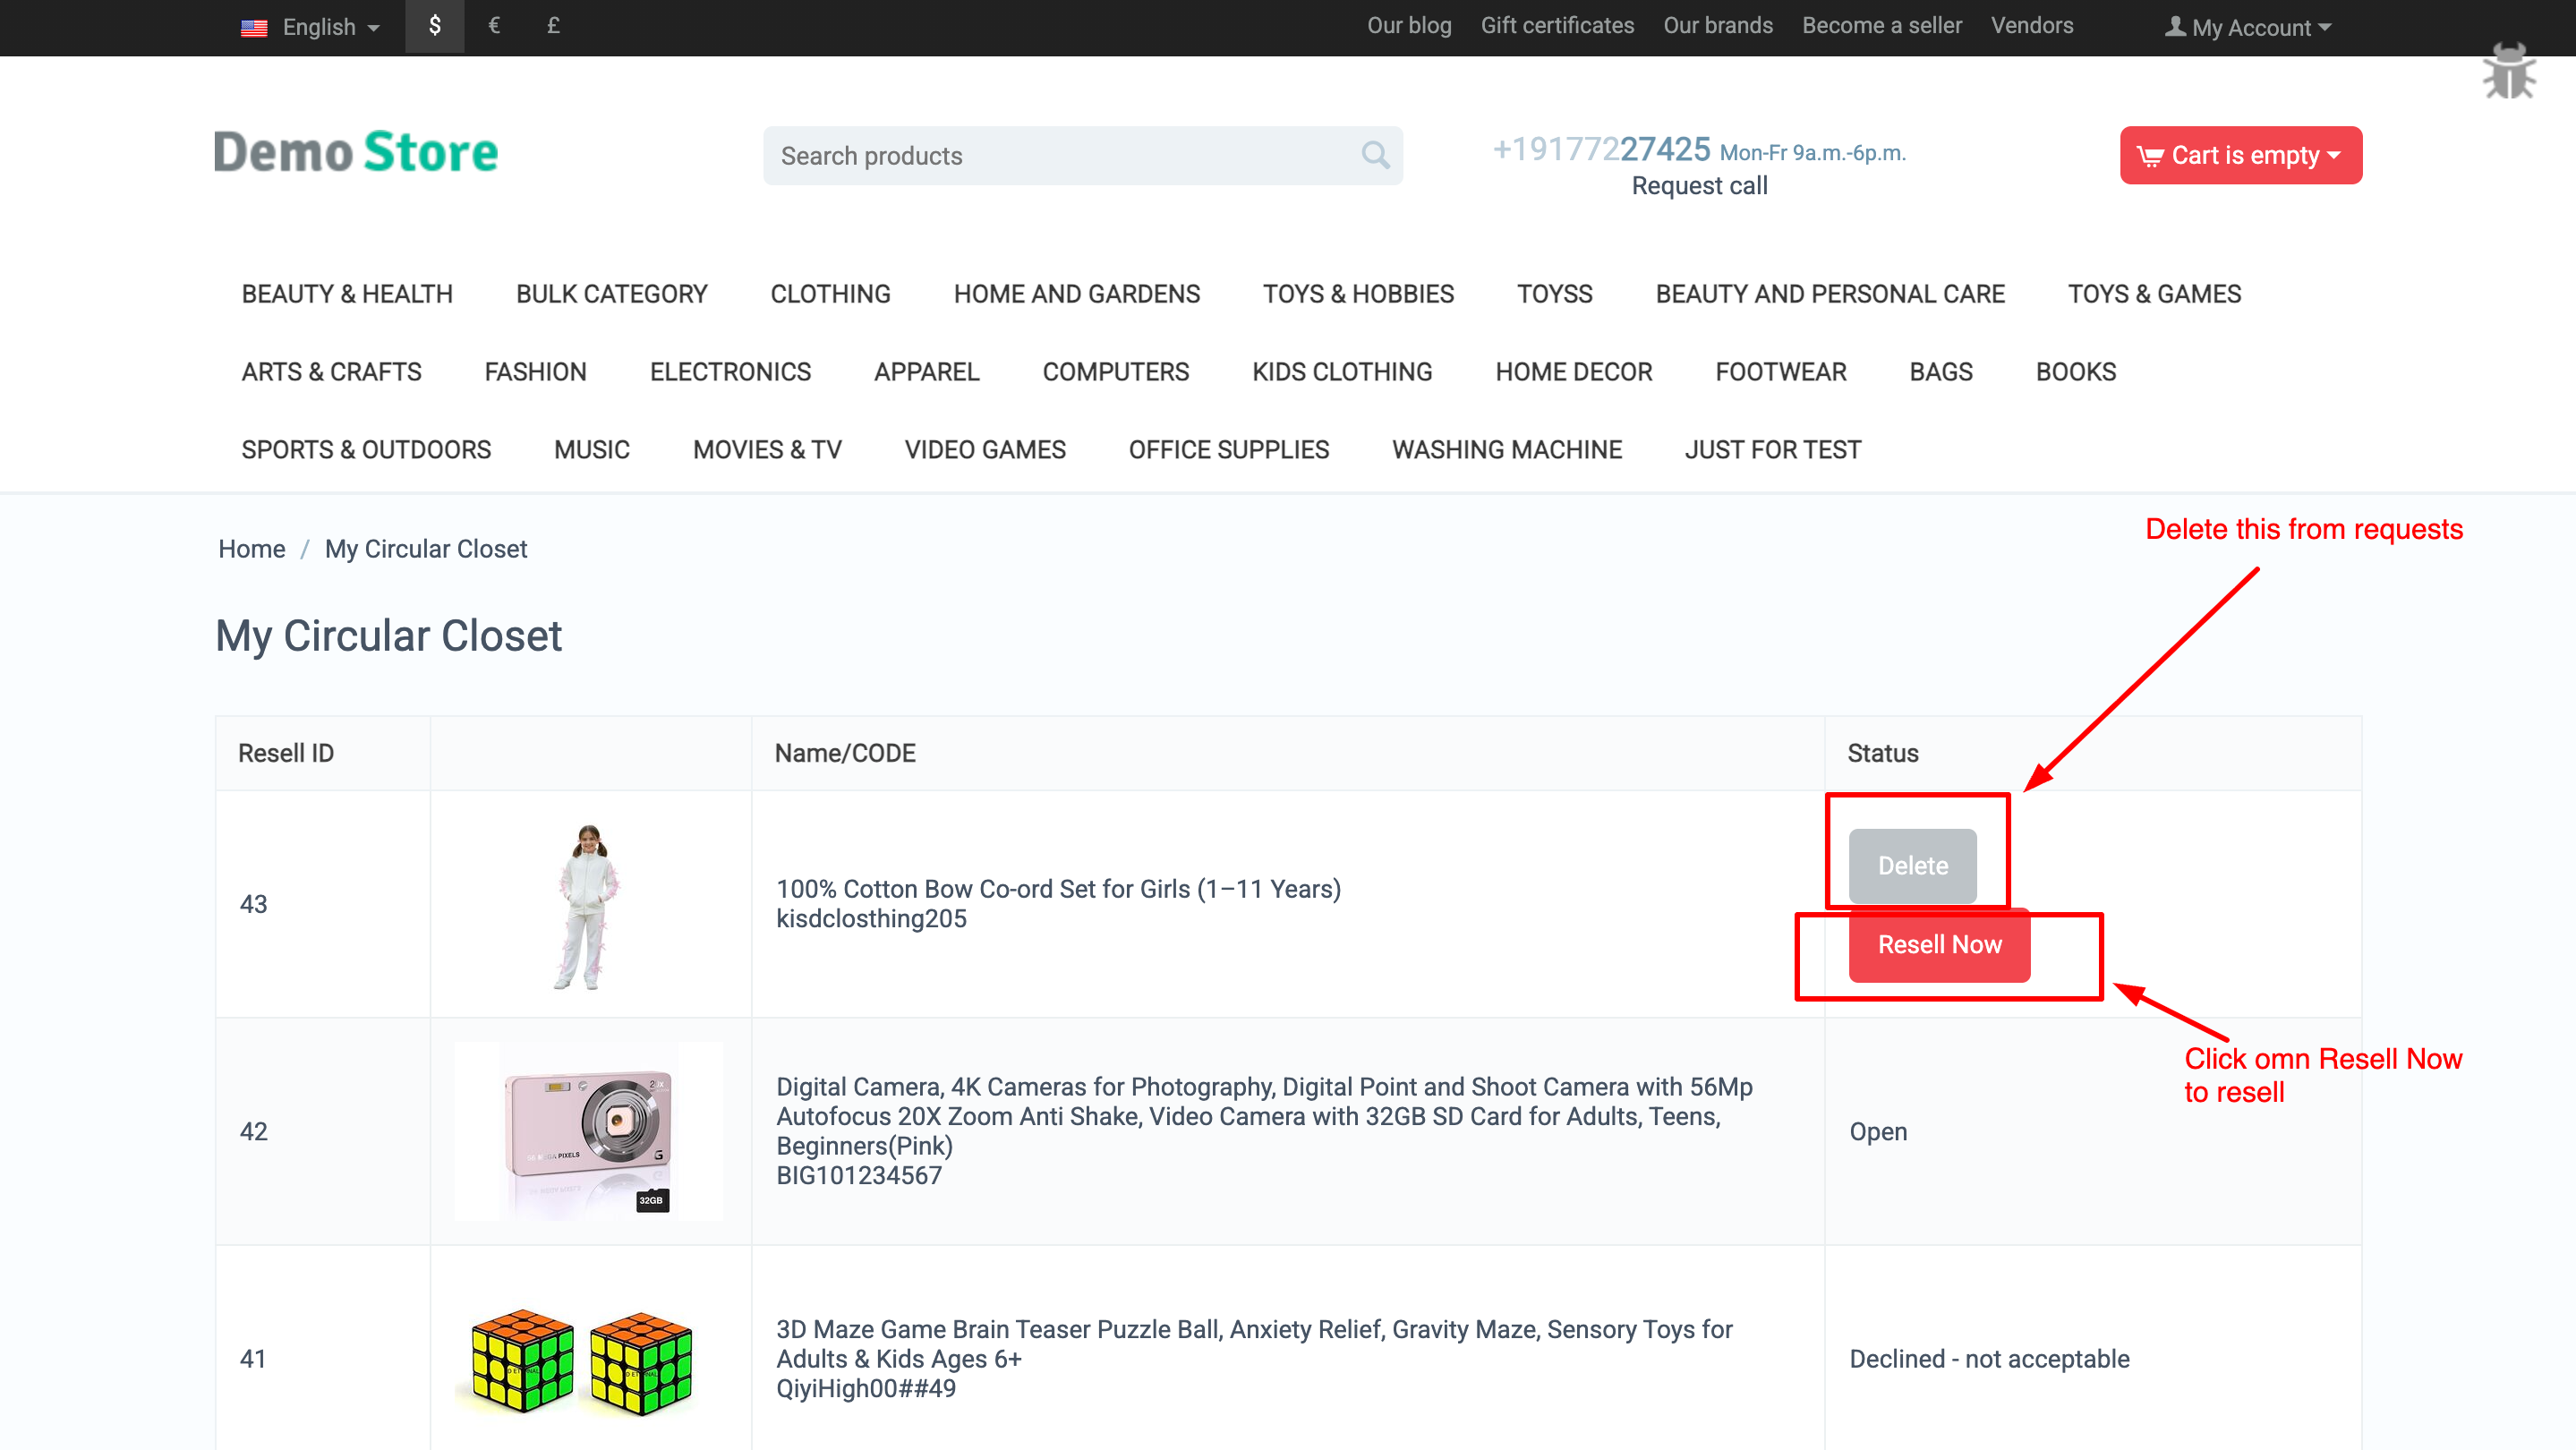
ii) When the resell feature is enabled, a new page called My Closet will be available for the user.
This page will display a listing of all the products that the user is eligible to resell.
To resell a product, the user needs to click on the Resell Now button.
This will start the resell process for the selected product.
Users can also delete a product from the catalog if they no longer want to resell it.
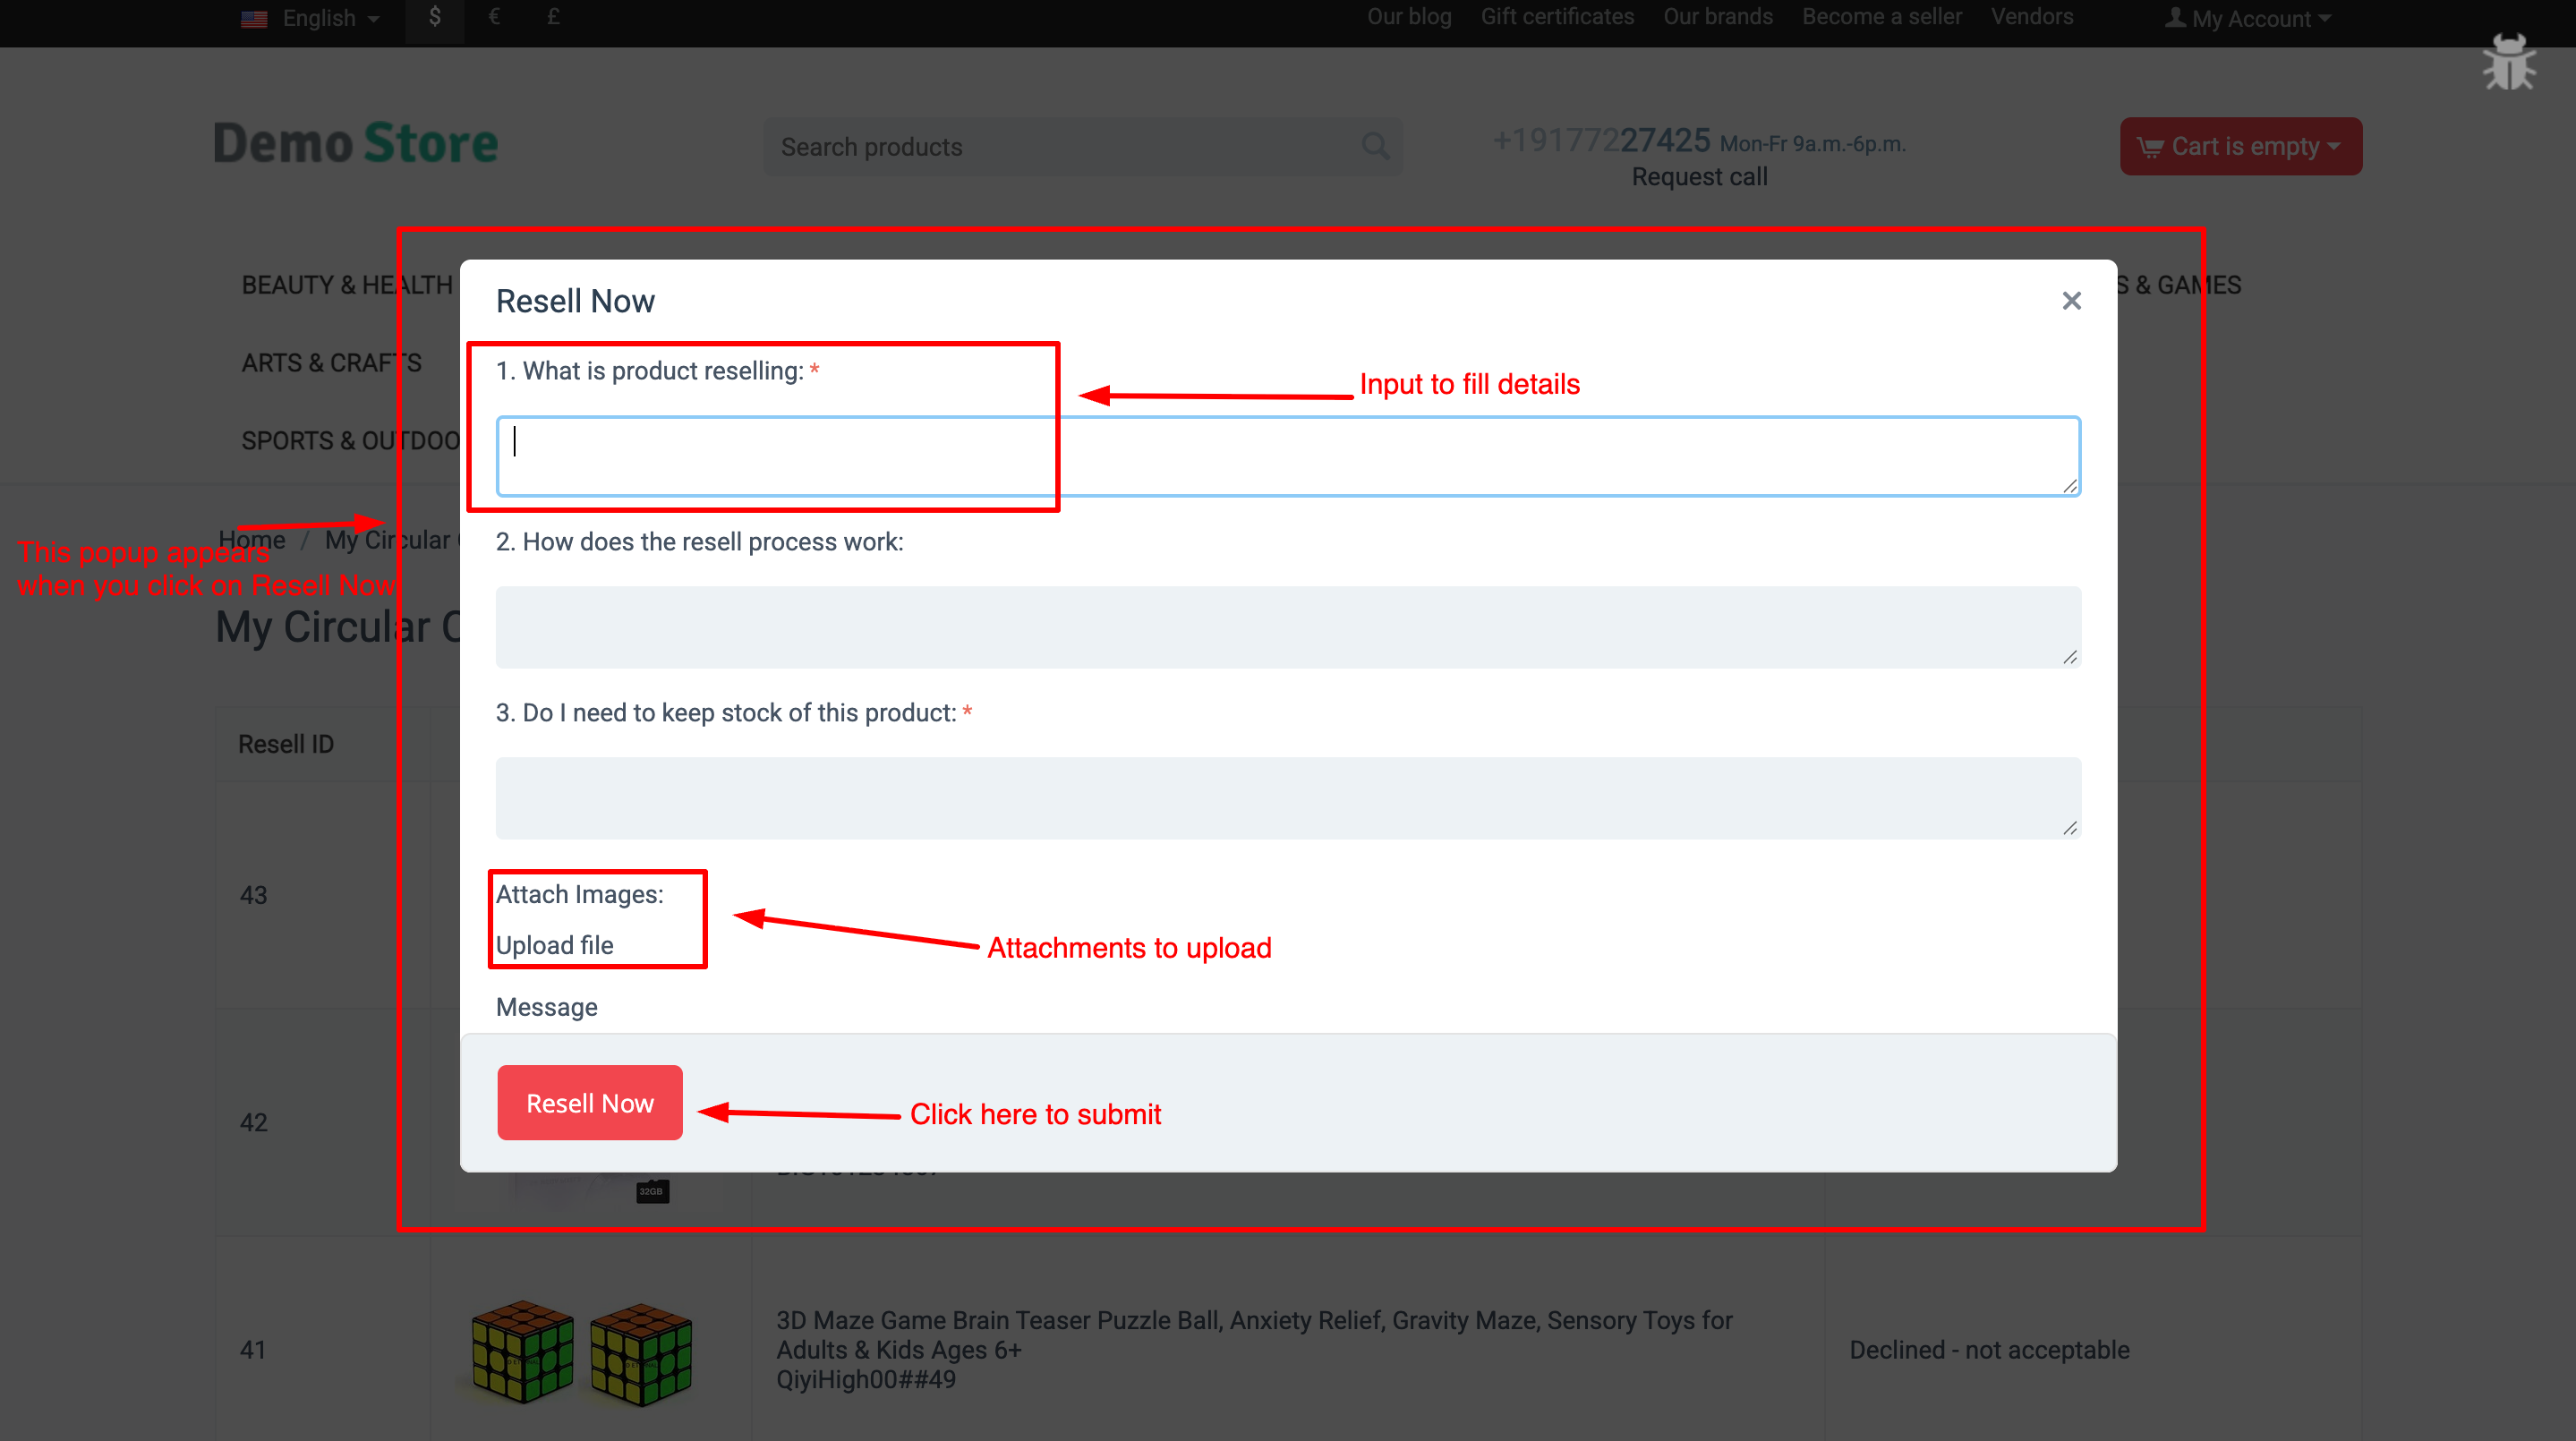
iii) When you click on Resell Now, a popup window appears where you can fill out the resell request form and upload the required attachments. After submitting the form, the request is sent directly to the admin for review. You will receive email notifications whenever the status is updated, and you can also track the current status of your request on the same page.
Why Choose Product Resell Addon for Your CS-Cart Store?
Product Resell Addon helps you easily manage customer resell requests and streamline the buyback process in your CS-Cart store. It allows customers to resell purchased products through a simple frontend form, while admins can review requests, manage statuses, assign vendors, and clone products with full control—saving time, improving transparency, and boosting marketplace engagement.
Easy Customer Resell Requests
Customers can resell purchased products through a simple popup form with attachment support.
Complete Admin Control Admins can review requests, manage statuses, edit or delete requests, and approve reselling with full control.
Smart Vendor Assignment & Product Cloning Approved products are cloned automatically and assigned to the default vendor set in add-on settings.
Automated Notifications & Status Tracking Customers receive email updates on every status change and can track request progress from the storefront.
Your Product Resell Addon is now ready to streamline the resell and buyback process in your CS-Cart store. Customers can easily submit resell requests, upload attachments, and track their status, while admins can efficiently review requests, manage statuses, assign vendors, and clone products. This ensures a transparent workflow, faster processing, and better customer satisfaction.
Pro Tip: Configure email notifications and mandatory attachments to keep customers informed and maintain smooth operations. Set default vendors for cloned products to save time, and use custom statuses to match your store’s workflow for maximum efficiency.
Turn every customer interaction into a revenue opportunity with proven upselling strategies that increase order value and customer satisfaction.
Ecartify: Customer Upsell – Boost Sales with Gamified Engagement
Transform your checkout experience with interactive spin wheels and quiz games! The Customer Upsell addon engages customers at the perfect moment, increases average order value, and recovers abandoned carts through gamified discounts and smart product recommendations. Perfect for e-commerce stores looking to boost conversions!
Key Features of Customer Upsell
Interactive Spin Wheel: Engage customers with exciting spin-to-win games offering instant discounts.
Quiz Games: Create fun quizzes that reward customers with discounts and promotions.
Product Upsells: Display related products with special discounts during checkout.
Your Customer Upsell addon is ready to revolutionize how customers interact with your store. Say goodbye to boring checkouts and abandoned carts. With gamified engagement and smart upselling, you can:
Pro Tip: Start with a 60% win rate (more green segments) and 10% win discount to maximize engagement. After analyzing data, adjust segment ratios and discount amounts to optimize profitability. The abandoned cart notifications work best with a 2% discount code for the first reminder and 5% for the 7-day follow-up!
Ready to gamify your checkout? Install Customer Upsell today and watch your conversion rates and revenue soar!
Enhance your CS-Cart store with lightning-fast and accurate product search powered by Apache Solr. This addon delivers smarter search results, better relevance, advanced filtering, and high performance even with large product catalogs.
Solr Search – The High-Performance Product Search Engine for CS-Cart
Solr Search supercharges your CS-Cart store with lightning-fast and scalable product search. By replacing heavy SQL queries with Apache Solr, it delivers accurate results even for large product catalogs without slowing down your store.
Go beyond basic search with background product syncing and cron-based automation. One addon. Enterprise-grade search. Built to keep your CS-Cart store fast, responsive, and ready to scale.
Key Features of Solr Search addon
High-Performance Product Search:
Replaces slow SQL queries with Apache Solr for ultra-fast and accurate search results.
Optimized for Large Catalogs: Handles thousands or millions of products without impacting store performance..
Background Product Sync:
Index products in the background without blocking your CS-Cart frontend.
Cron-Based Automation: Automatically keep Solr data updated using scheduled cron jobs.
Advanced Filtering & Sorting: Supports filters like price, category, vendor, attributes, and custom fields
Faster Page Load Times: Reduces database load and improves overall site speed.
Scalable & Future-Ready: Designed to grow with your business as your product catalog expands.
CS-Cart & Multi-Vendor Compatible: Works seamlessly with CS-Cart, Multi-Vendor, Ultimate editions, any theme, and any hosting.
Multilingual Search Support: Supports multilingual product search with accurate results across all CS-Cart languages.
Step-by-Step Setup Guide
Step 1: Install the Addon
Installing the AI Creator Addon is simple:
Works seamlessly with CS-Cart, Multi-Vendor, Ultimate editions, any theme, and any hosting.
Login to your CS-Cart admin panel.
Go To Add-ons → Manage add-ons→ Click on ⚙️ gear icon→ Manual installation
Upload the provided ZIP file of the addon.
Once uploaded, the addon will appear under CS-Cart - Add-ons.
Now click on the Solr Search add-on and add the required settings.
This process takes only a few minutes and requires no coding knowledge.
Step 2: Configure the Settings
After installing the add-on, go to Add-ons → Manage add-ons and open the Solr Search settings page. From here, you can configure the core options that control how Solr works in your store, including product indexing, search behavior, multilingual support, and cron-based background synchronization:
i) Connect Solr Server:
Click the Connect button and enter your Solr server details to establish a connection. This is the first step to enable fast, scalable product search for your CS-Cart store.
After clicking, a request will be sent to the Solr server. Product indexing will start only after the connection is approved, ensuring your store’s search data is synced securely and accurately.
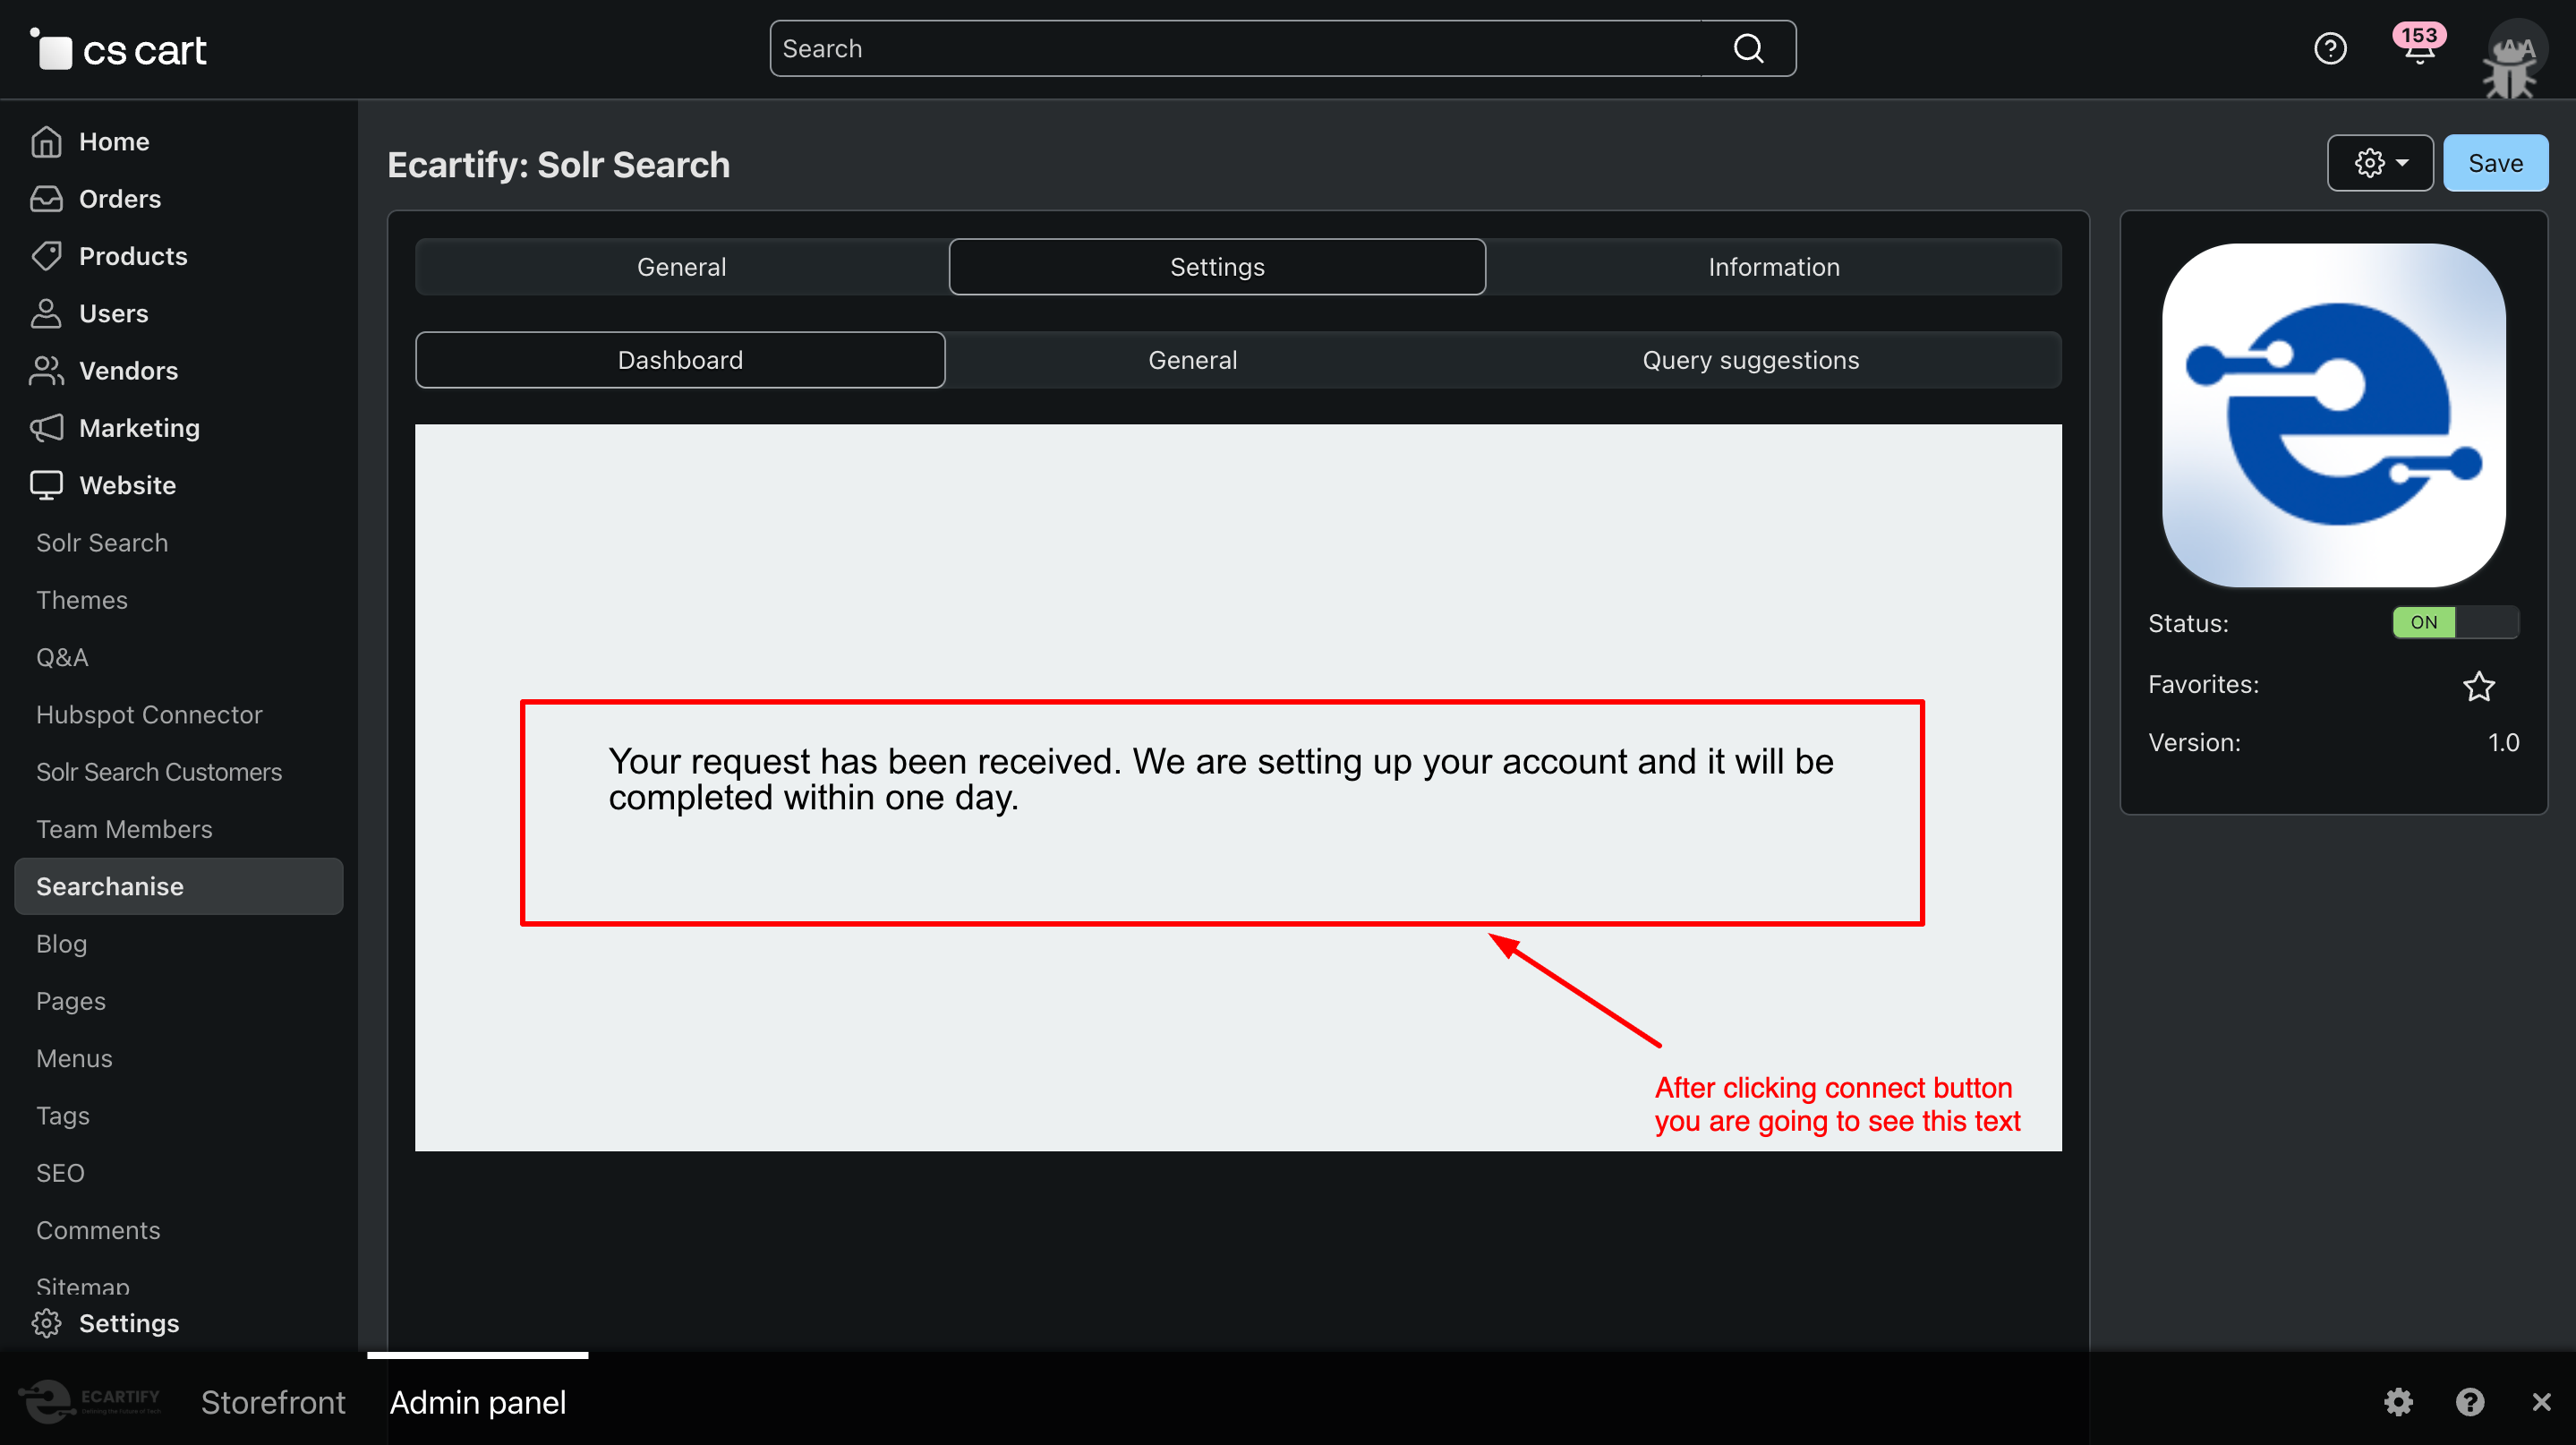
When you click the Connect button, your CS-Cart store sends a request to set up the Solr connection. Once the request is received, you’ll see the message:
ii) Solr Dashboard Overview:
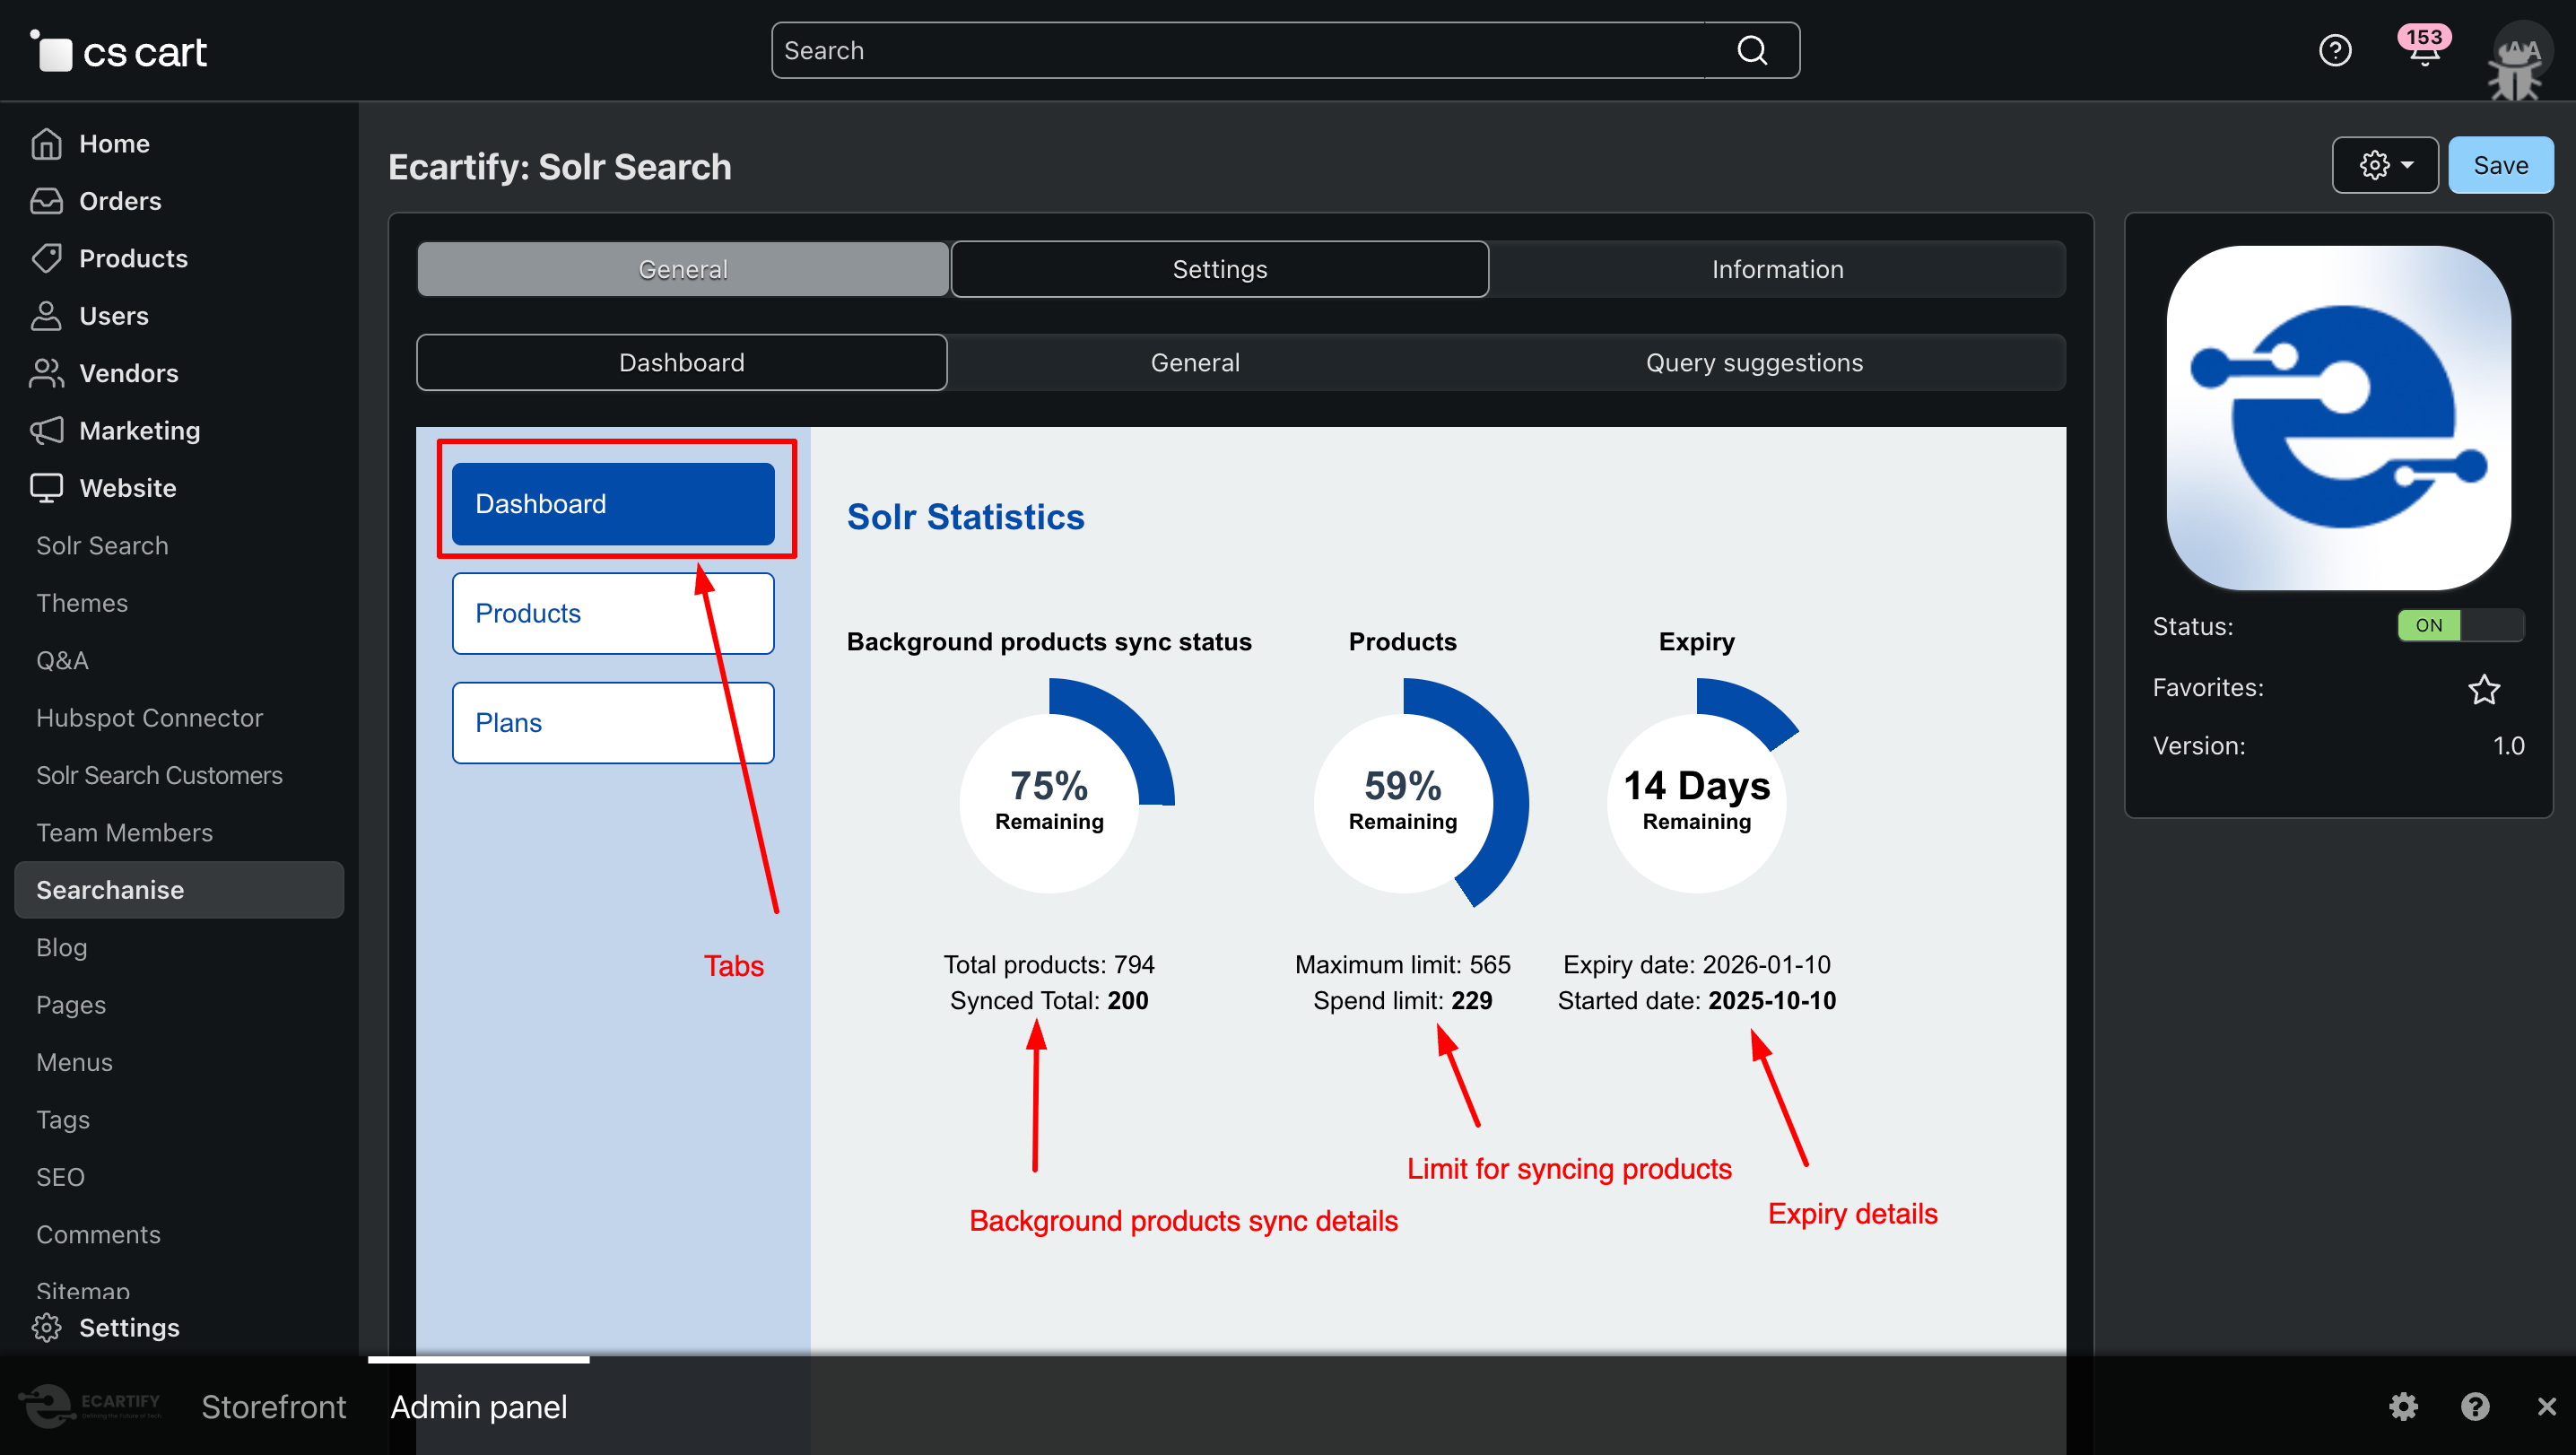
After the setup is complete, you will see a dedicated Solr dashboard. This dashboard displays the total number of synced products, plan expiry information, and control options to pause syncing or remove all indexed products from Solr.
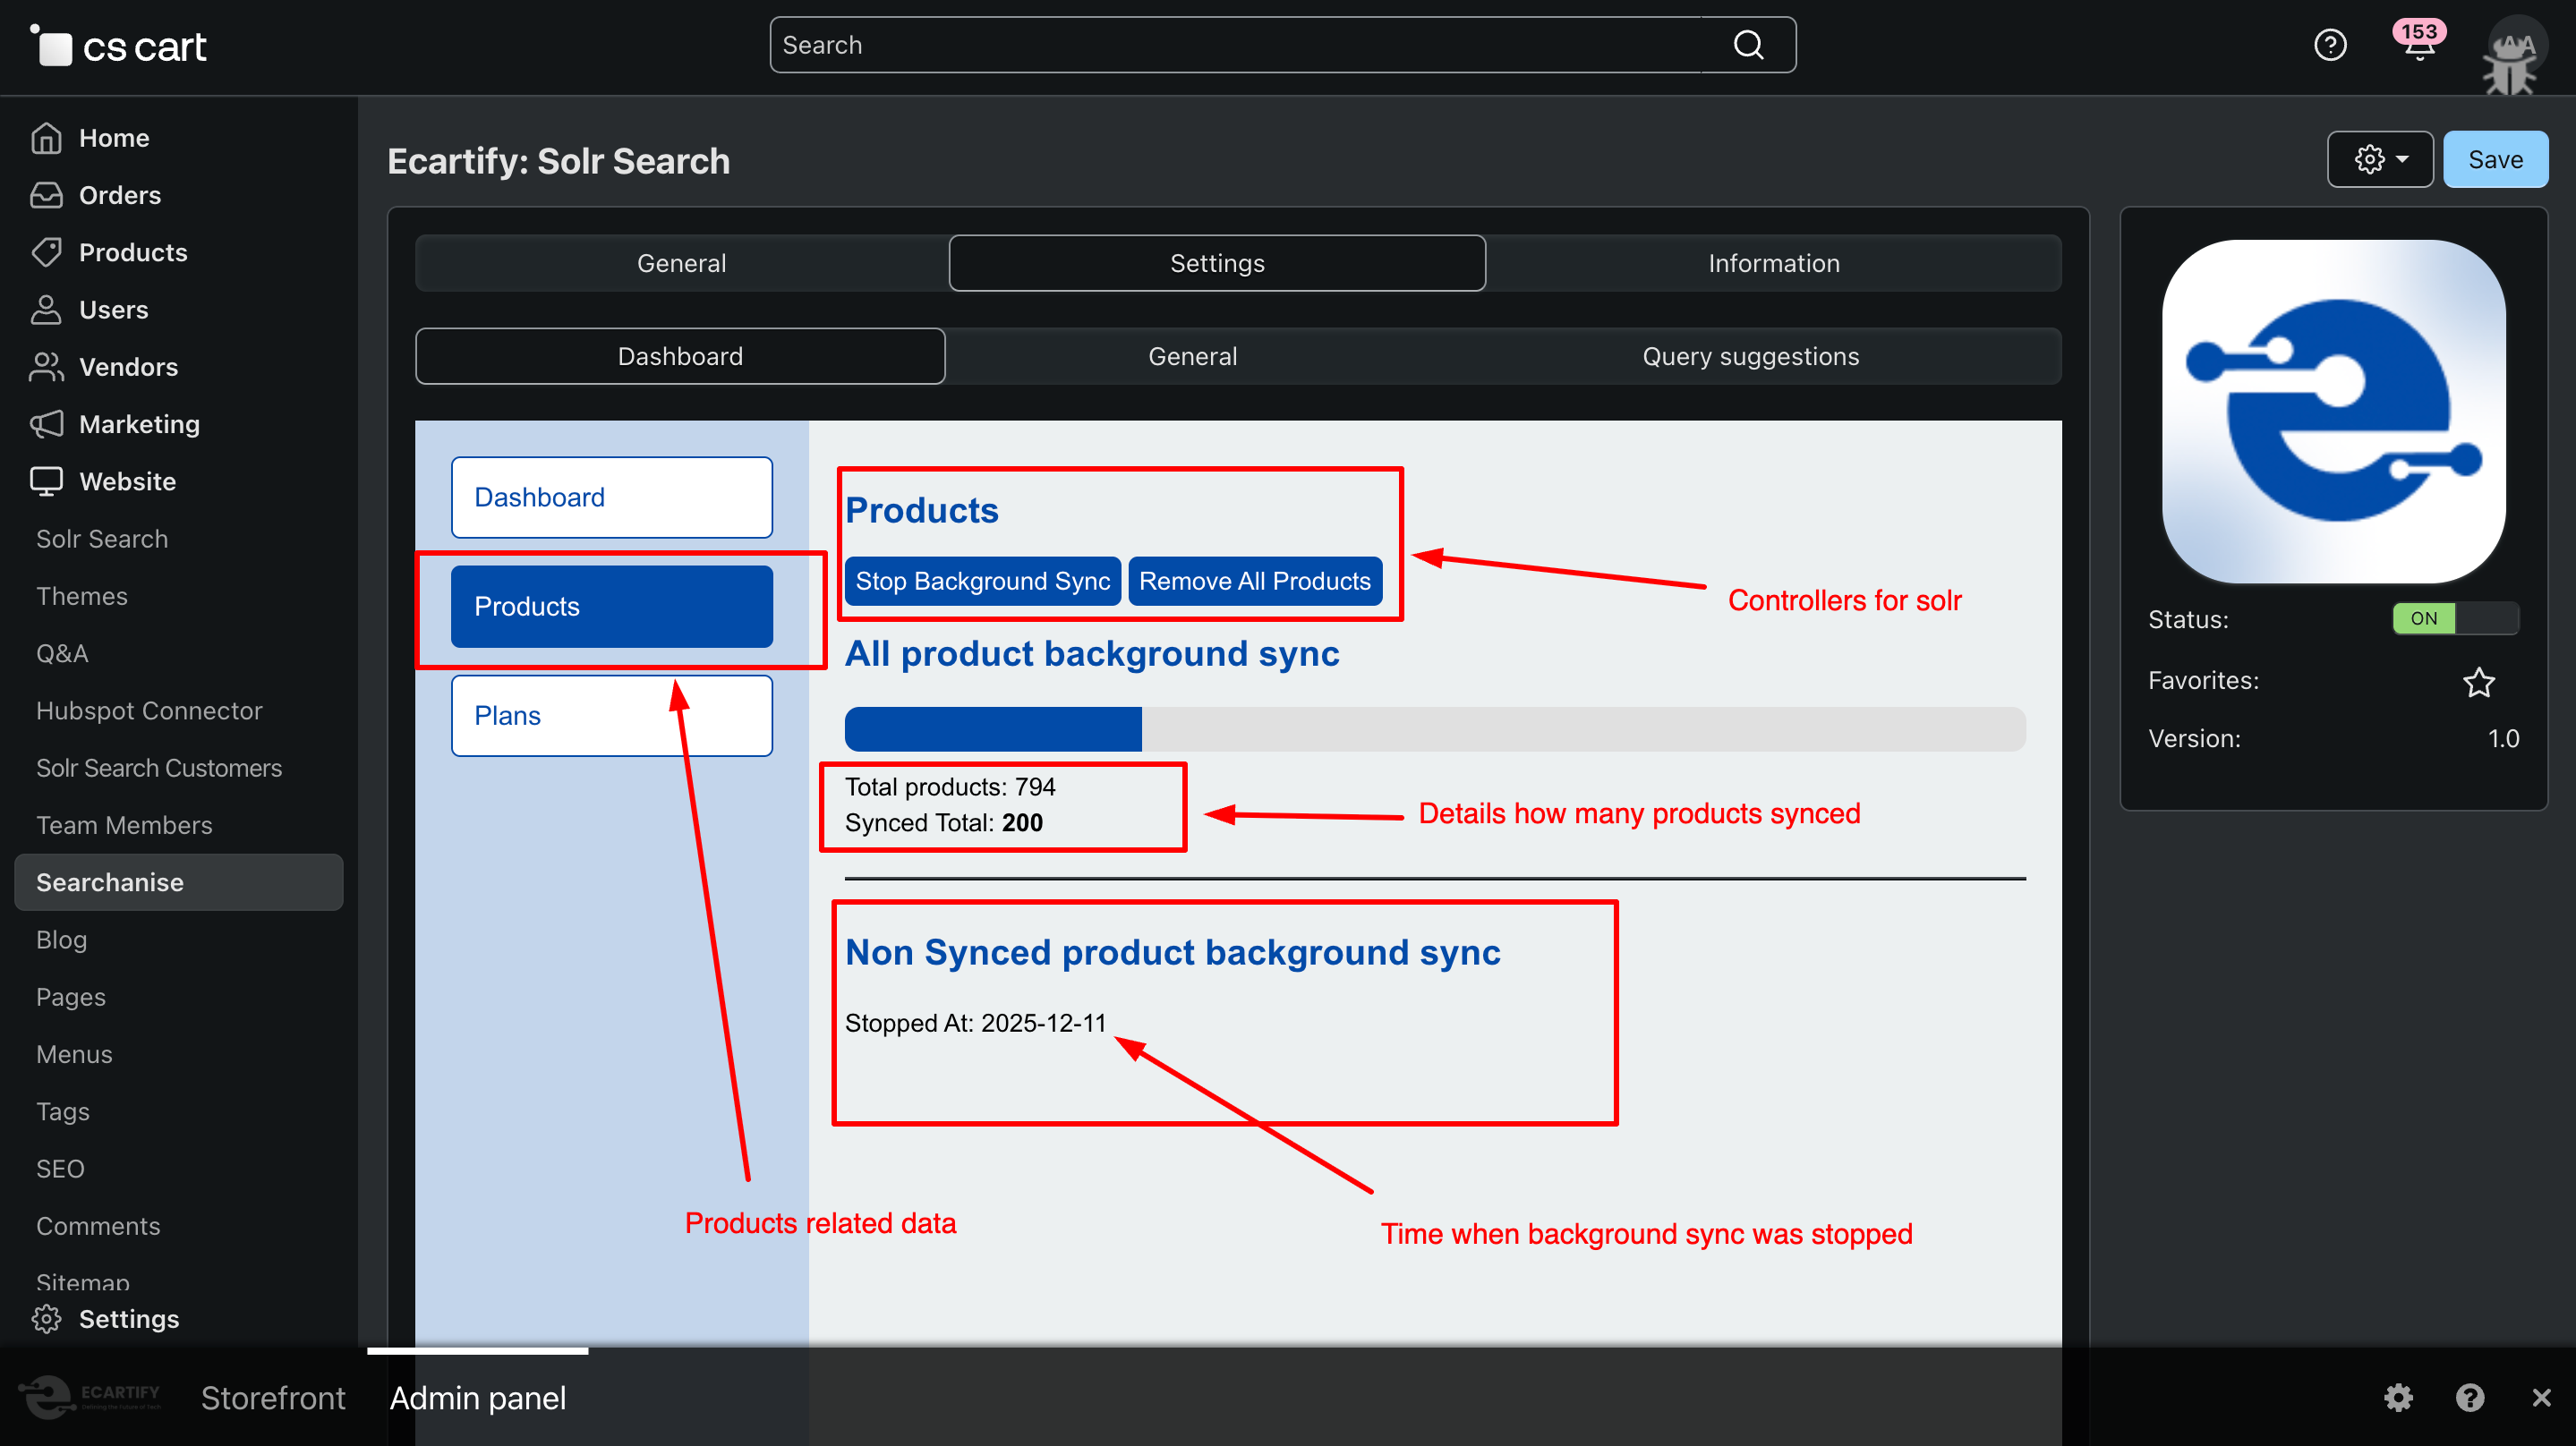
iii) Product Sync Control Section:
This section of the dashboard shows detailed product sync information, including when syncing was last stopped and how many products have been synced. It also provides control options to stop syncing or remove all products from Solr whenever needed.
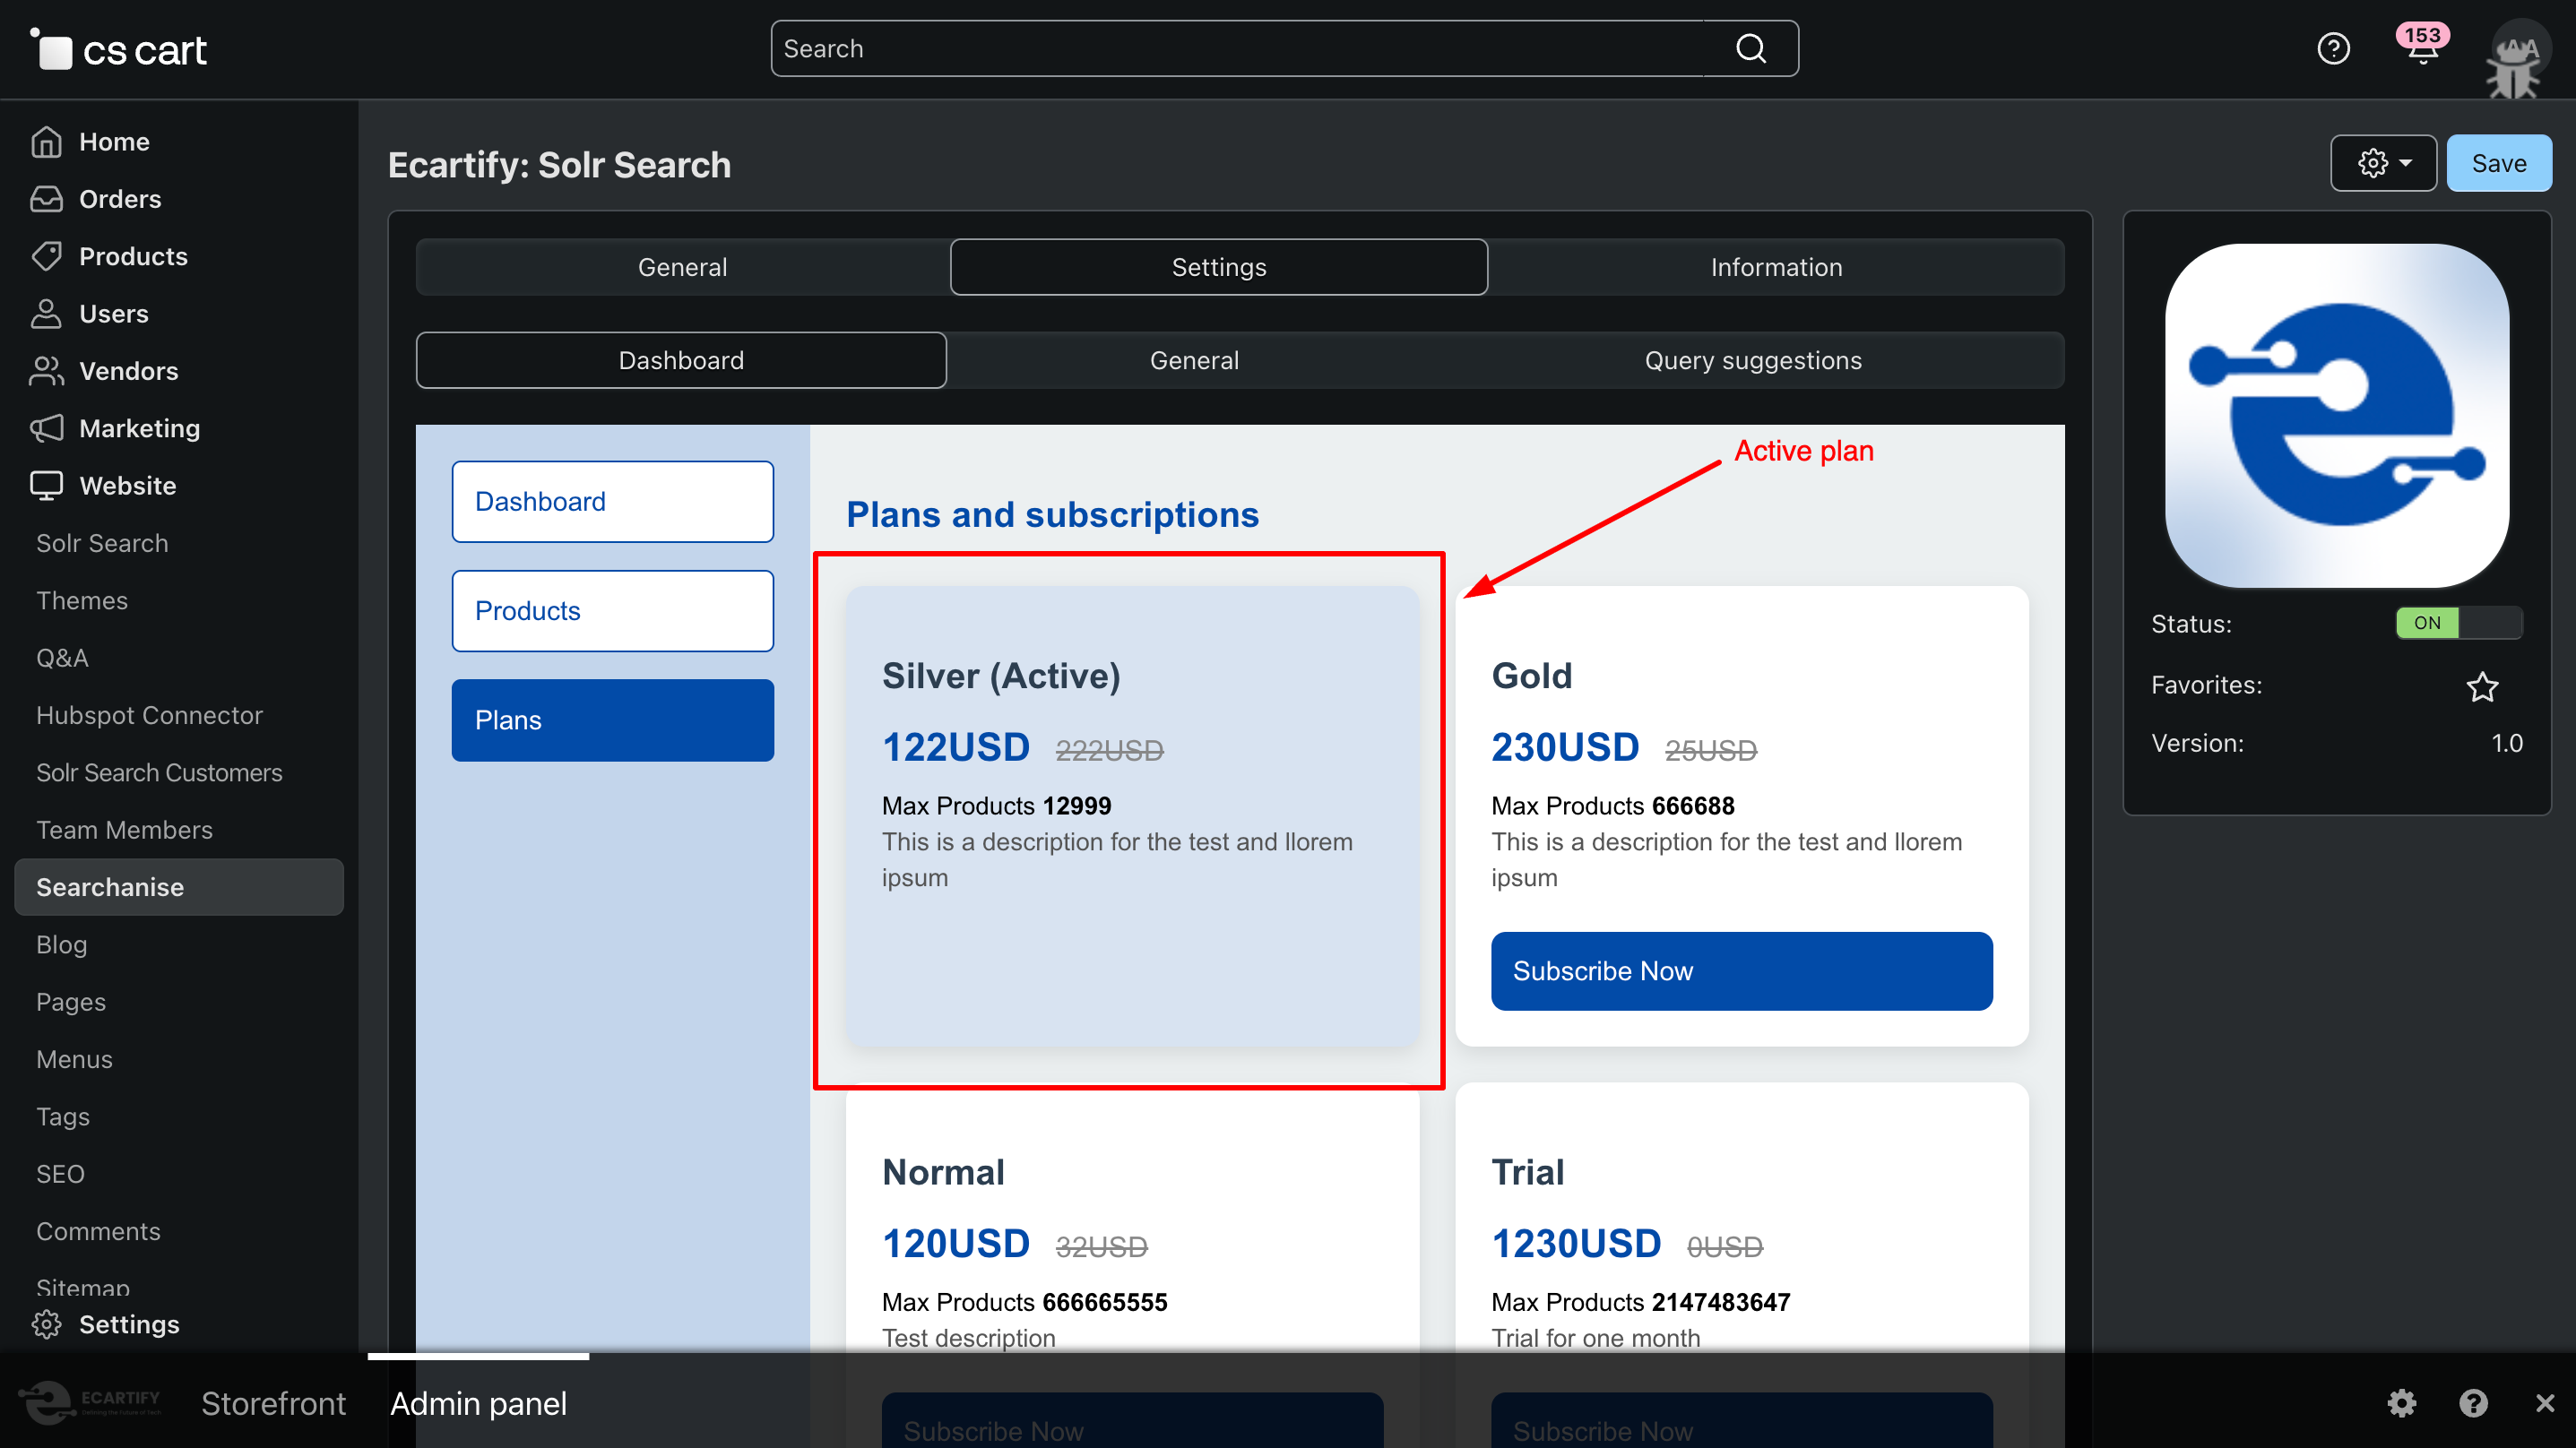
iv) Plan Details & Status:
This section displays plan-related information, including which plan is currently active and its status. You can also view other available plans and manage plan-related details directly from the dashboard.
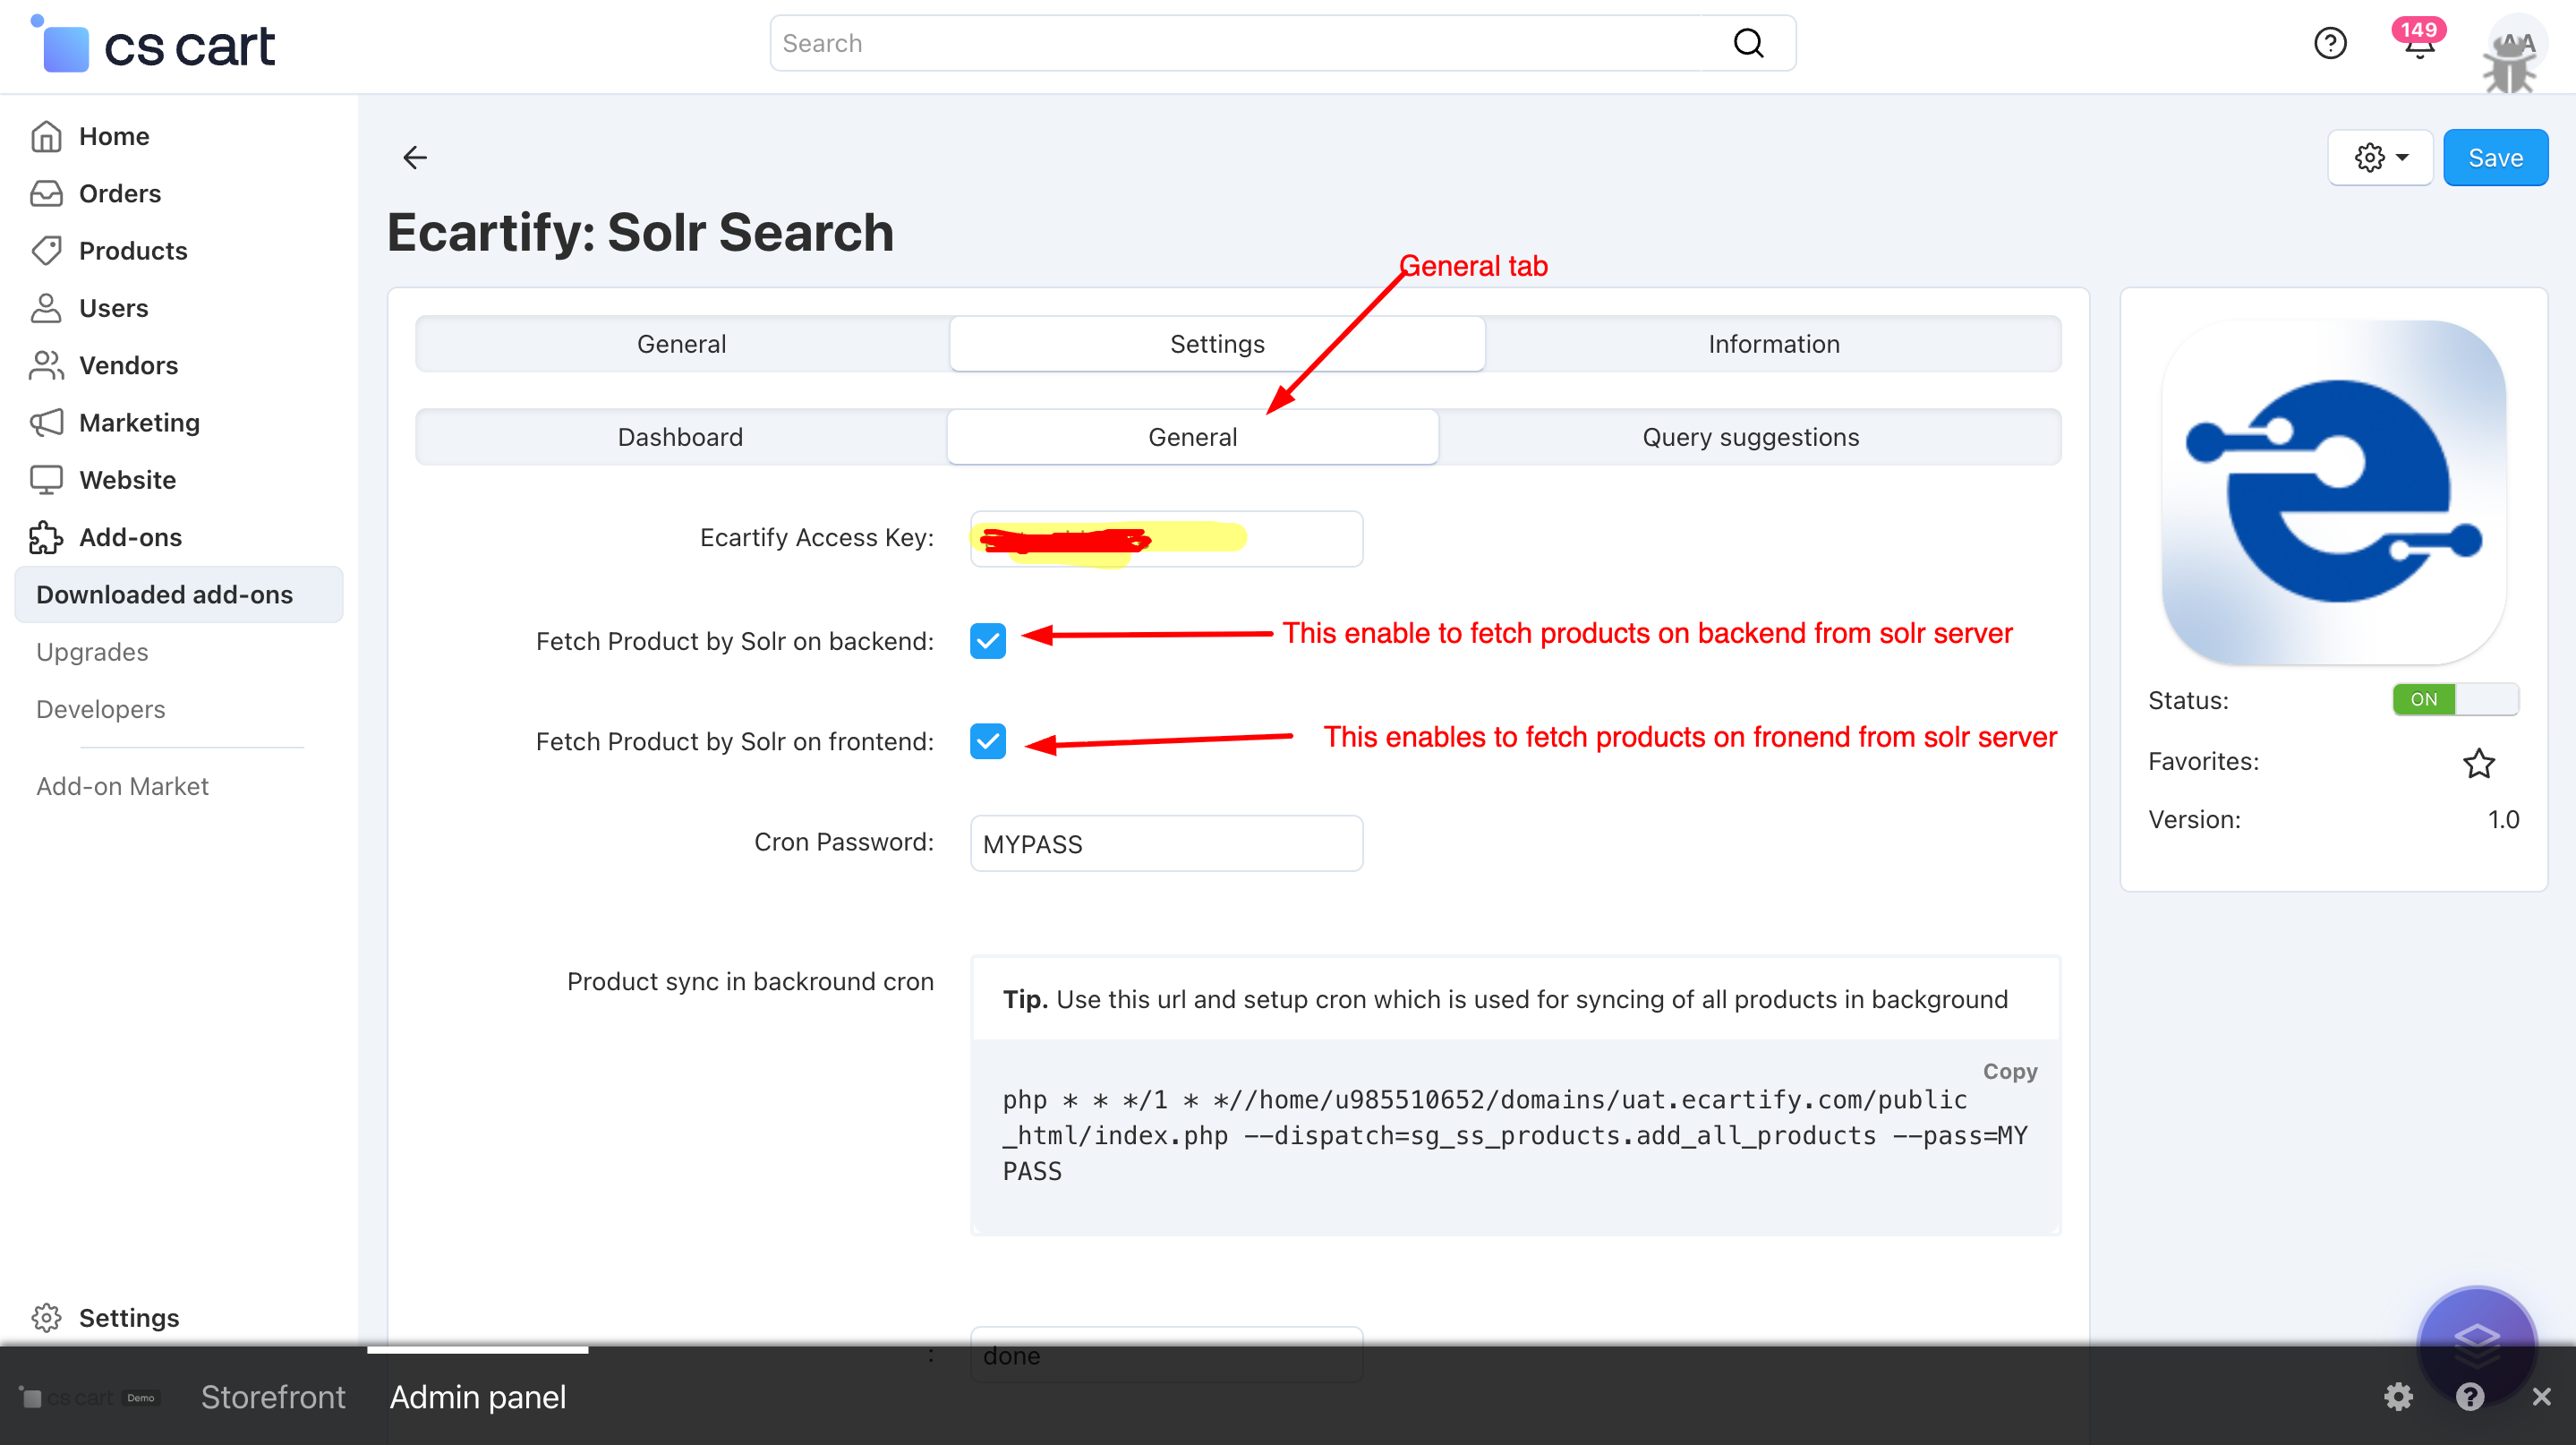
v) General settings:
The General Settings section allows you to configure and manage your Solr connection and product synchronization easily.
The access key is automatically generated when you click the Connect button, or you can manually purchase a plan and use the provided key via the plan purchase link available on the settings page.
Fetch products via solr :
Fetch Product by Solr on Backend:
Enables Solr-based product loading in the CS-Cart admin panel.
Fetch Product by Solr on Frontend:
Enables Solr-powered product loading on the storefront, improving page load speed and search performance.
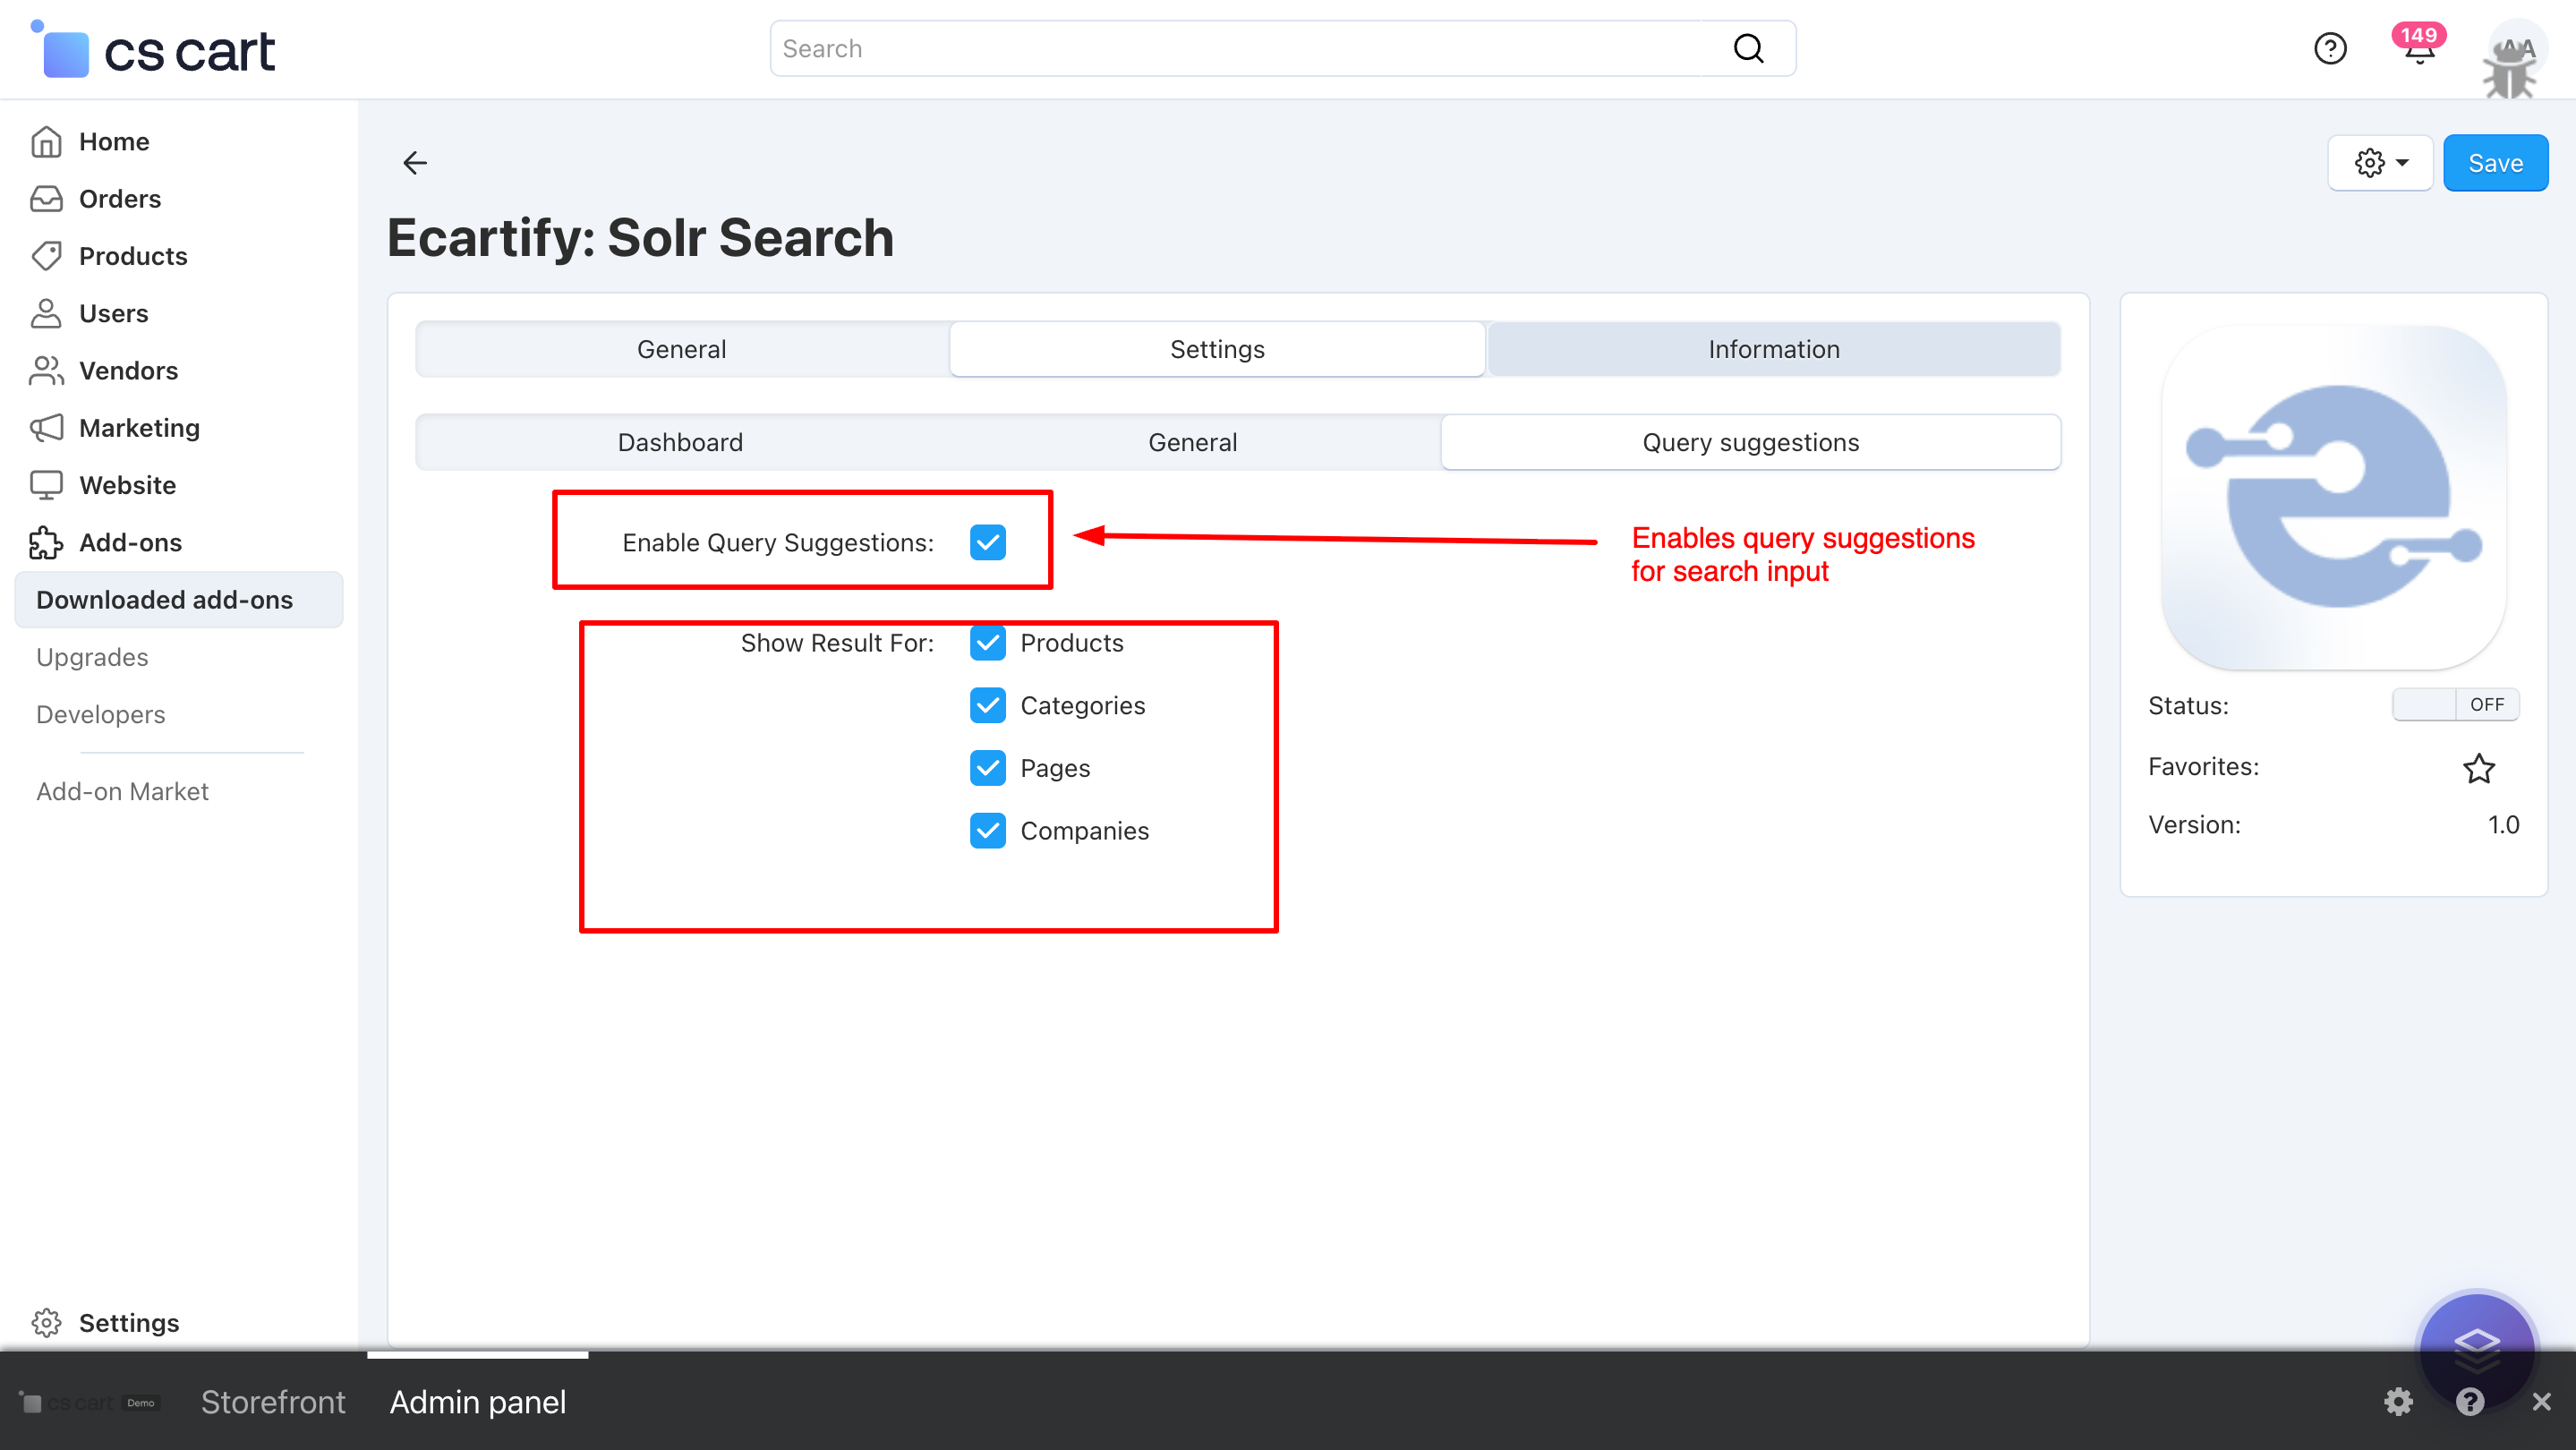
vi) Query Suggestions:
This setting enables real-time search suggestions while typing in the search input. It displays relevant Products, Categories, Pages, and Companies based on the entered query, helping users find results faster and improving overall search experience.
If a result type is enabled, suggestions will be displayed only for that type during search input.
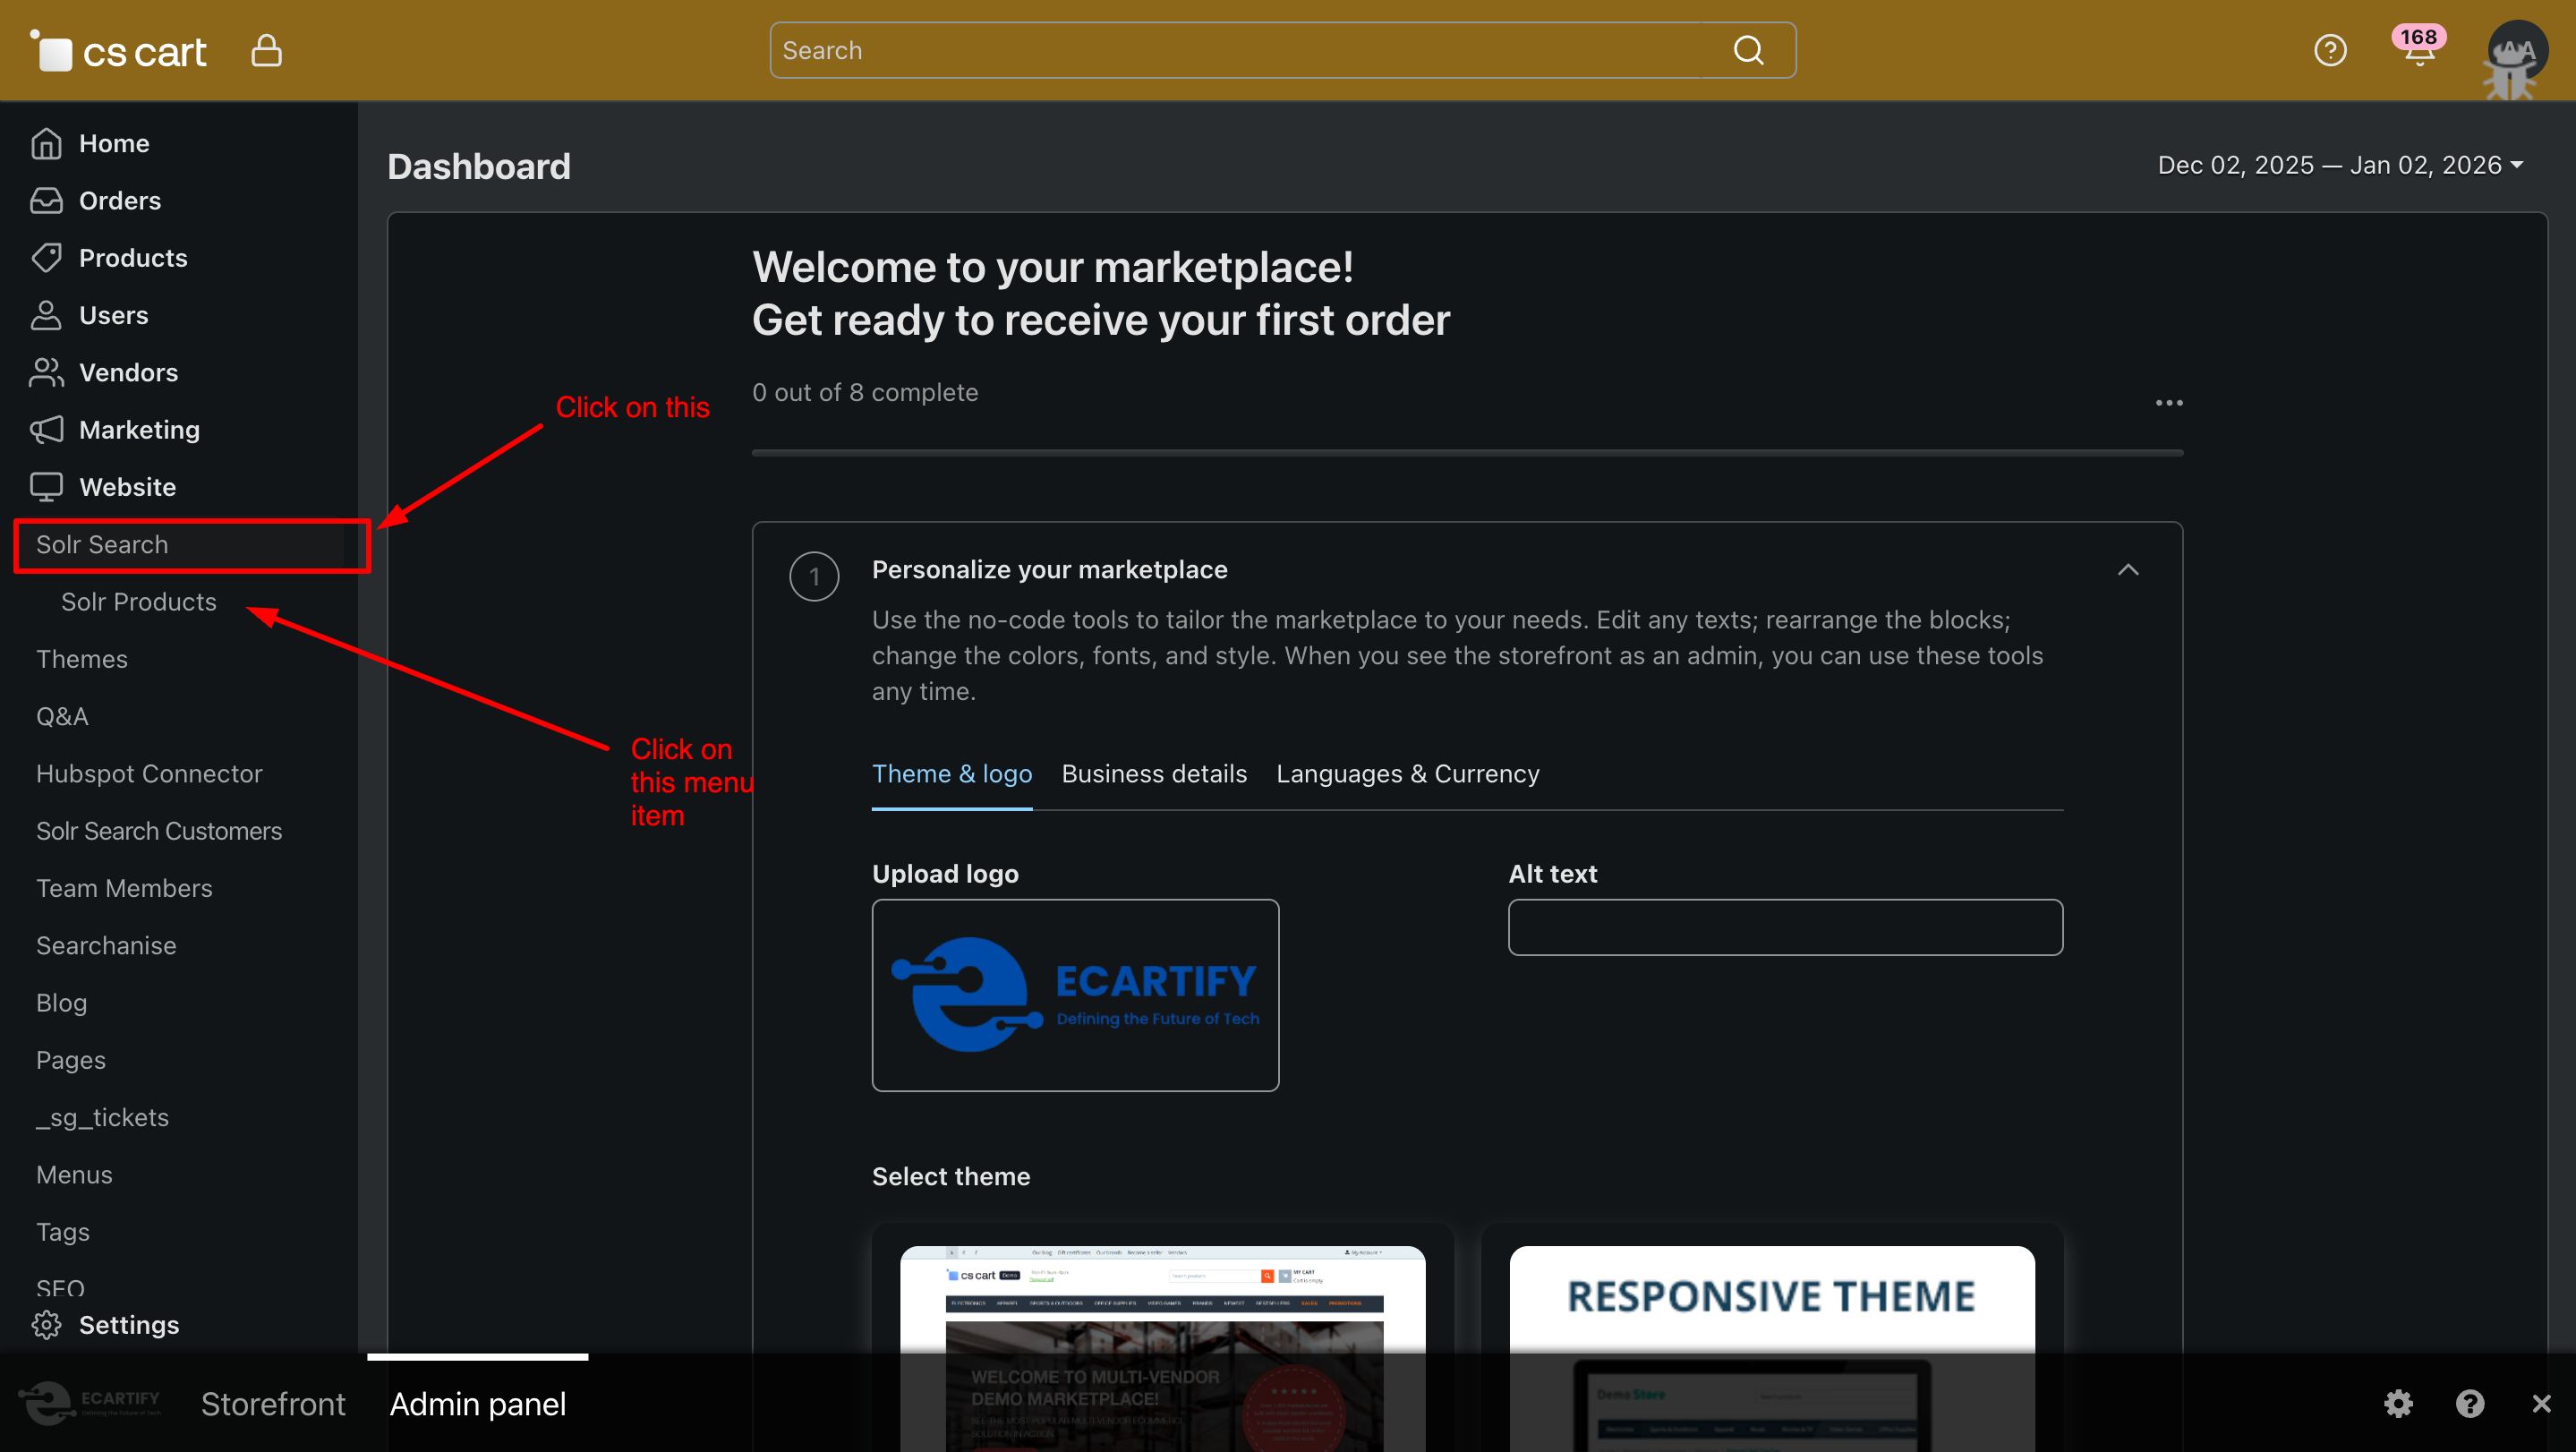
Step 3: Access Solr Search & Products Page
To start using the Solr Search addon:
Go to your CS-Cart Admin Panel.
From the Website menu, click on the Solr Search tab.
Inside Solr Search, click on Products.
A dedicated Solr Products page will open, where you can manage product syncing and search behavior using Solr.
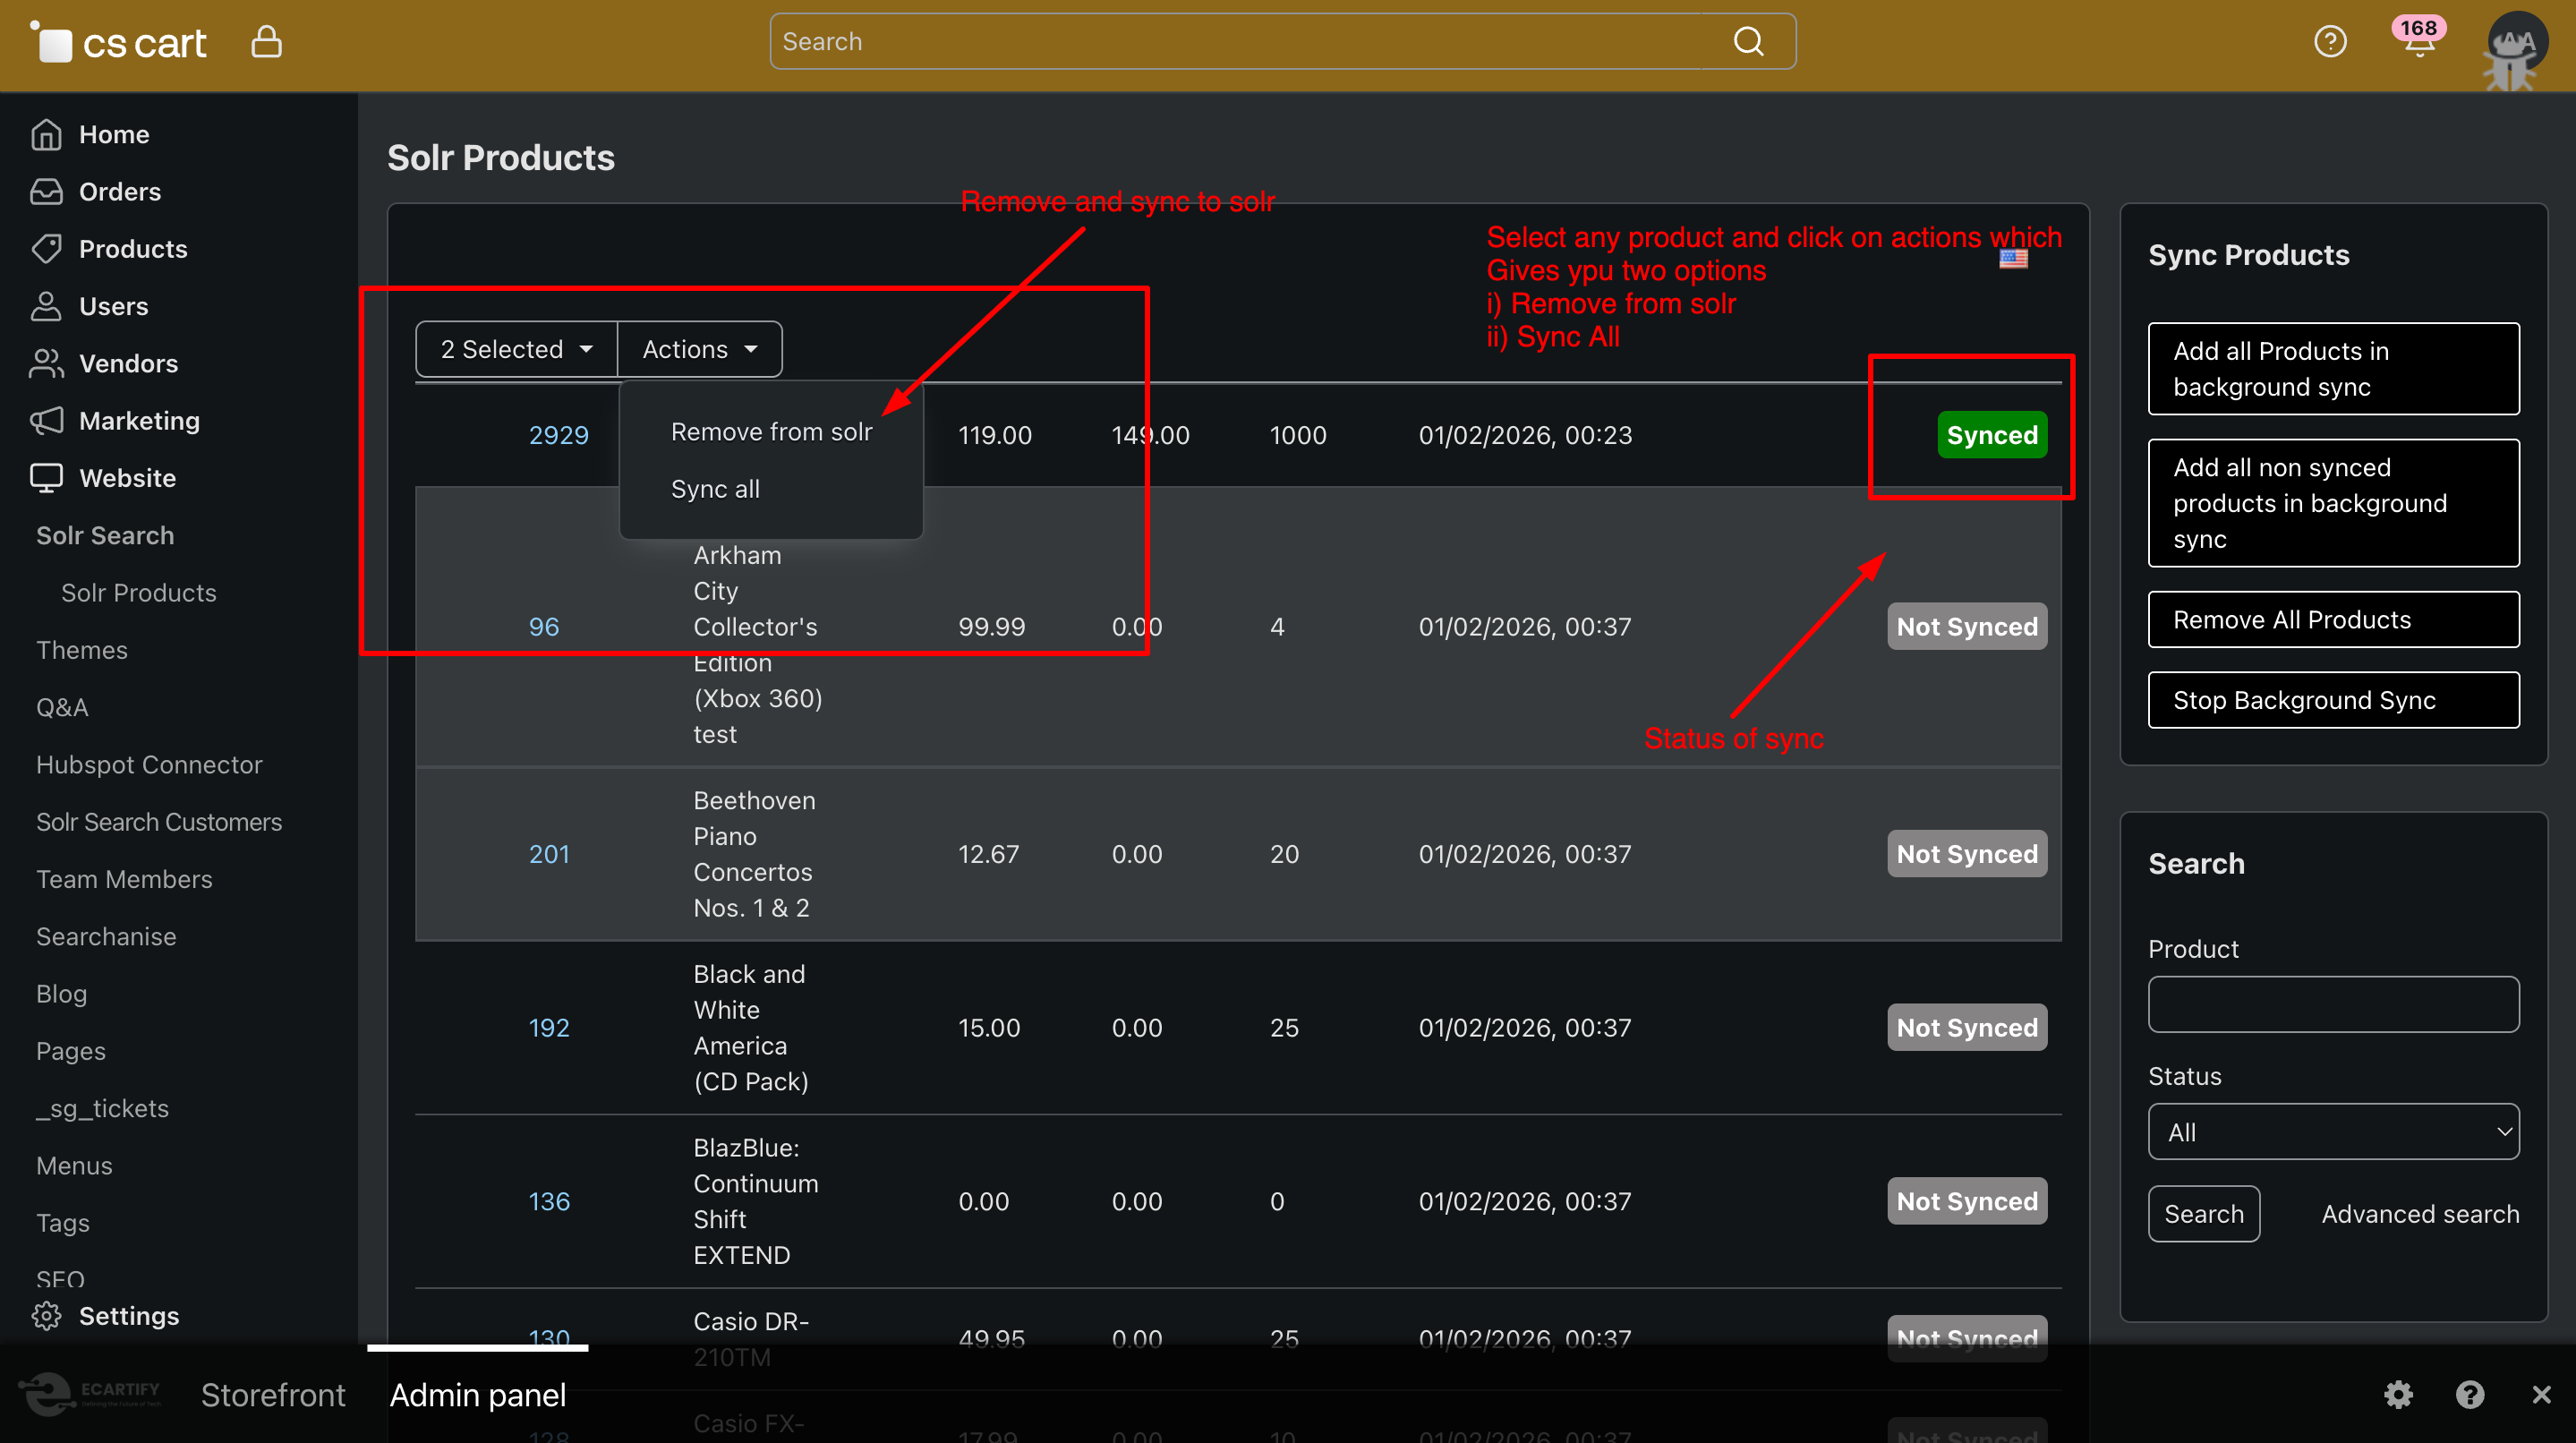
Step 4: How to Sync Products with Solr
Syncing products from CS-Cart to Solr is simple and efficient. Follow these steps:
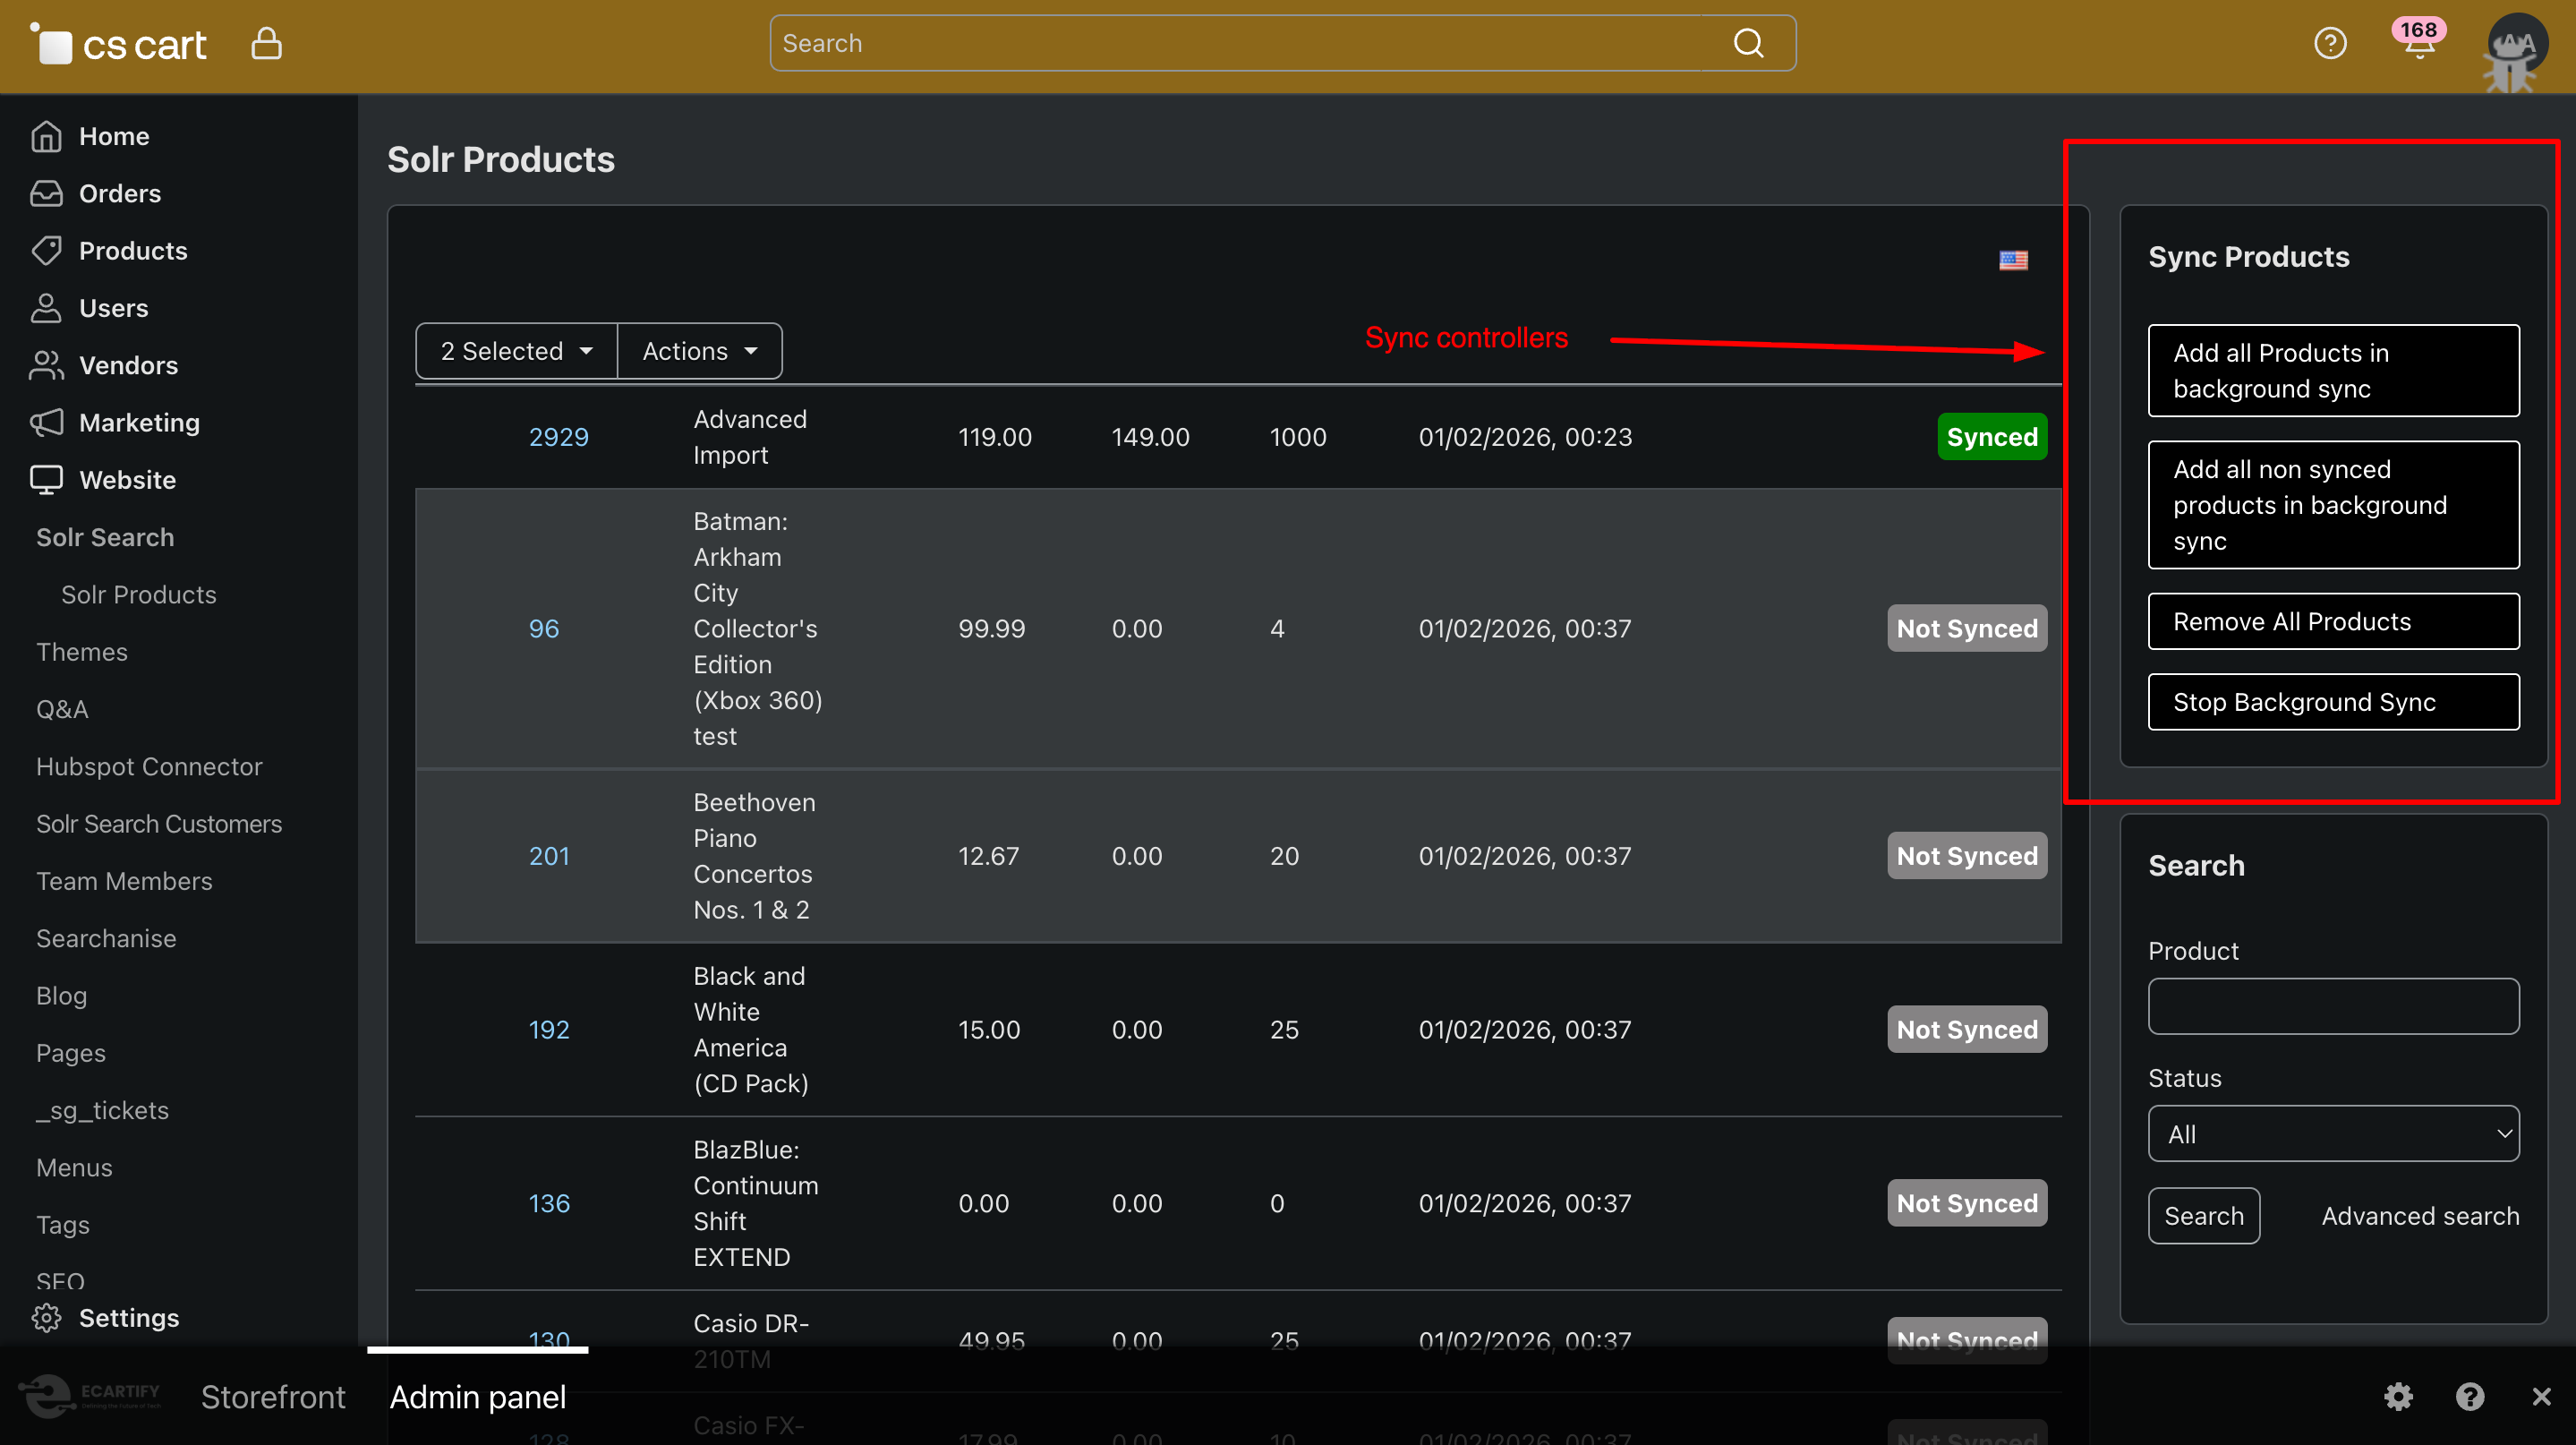
i) Go to Website → Solr Search → products from the CS-Cart Admin Panel menu. You will see the Products Sync page, where all product-related Solr actions are available.
ii) Sync Options Available
Sync Products
Sync selected products instantly to Solr.
Add All Products in Background Sync
Sends all products to Solr using background cron (recommended for large catalogs).
Add All Non-Synced Products in Background Sync
Syncs only products that are not yet indexed in Solr.
Remove All Products
Deletes all indexed products from Solr.
Stop Background Sync
Stops any running background sync process.
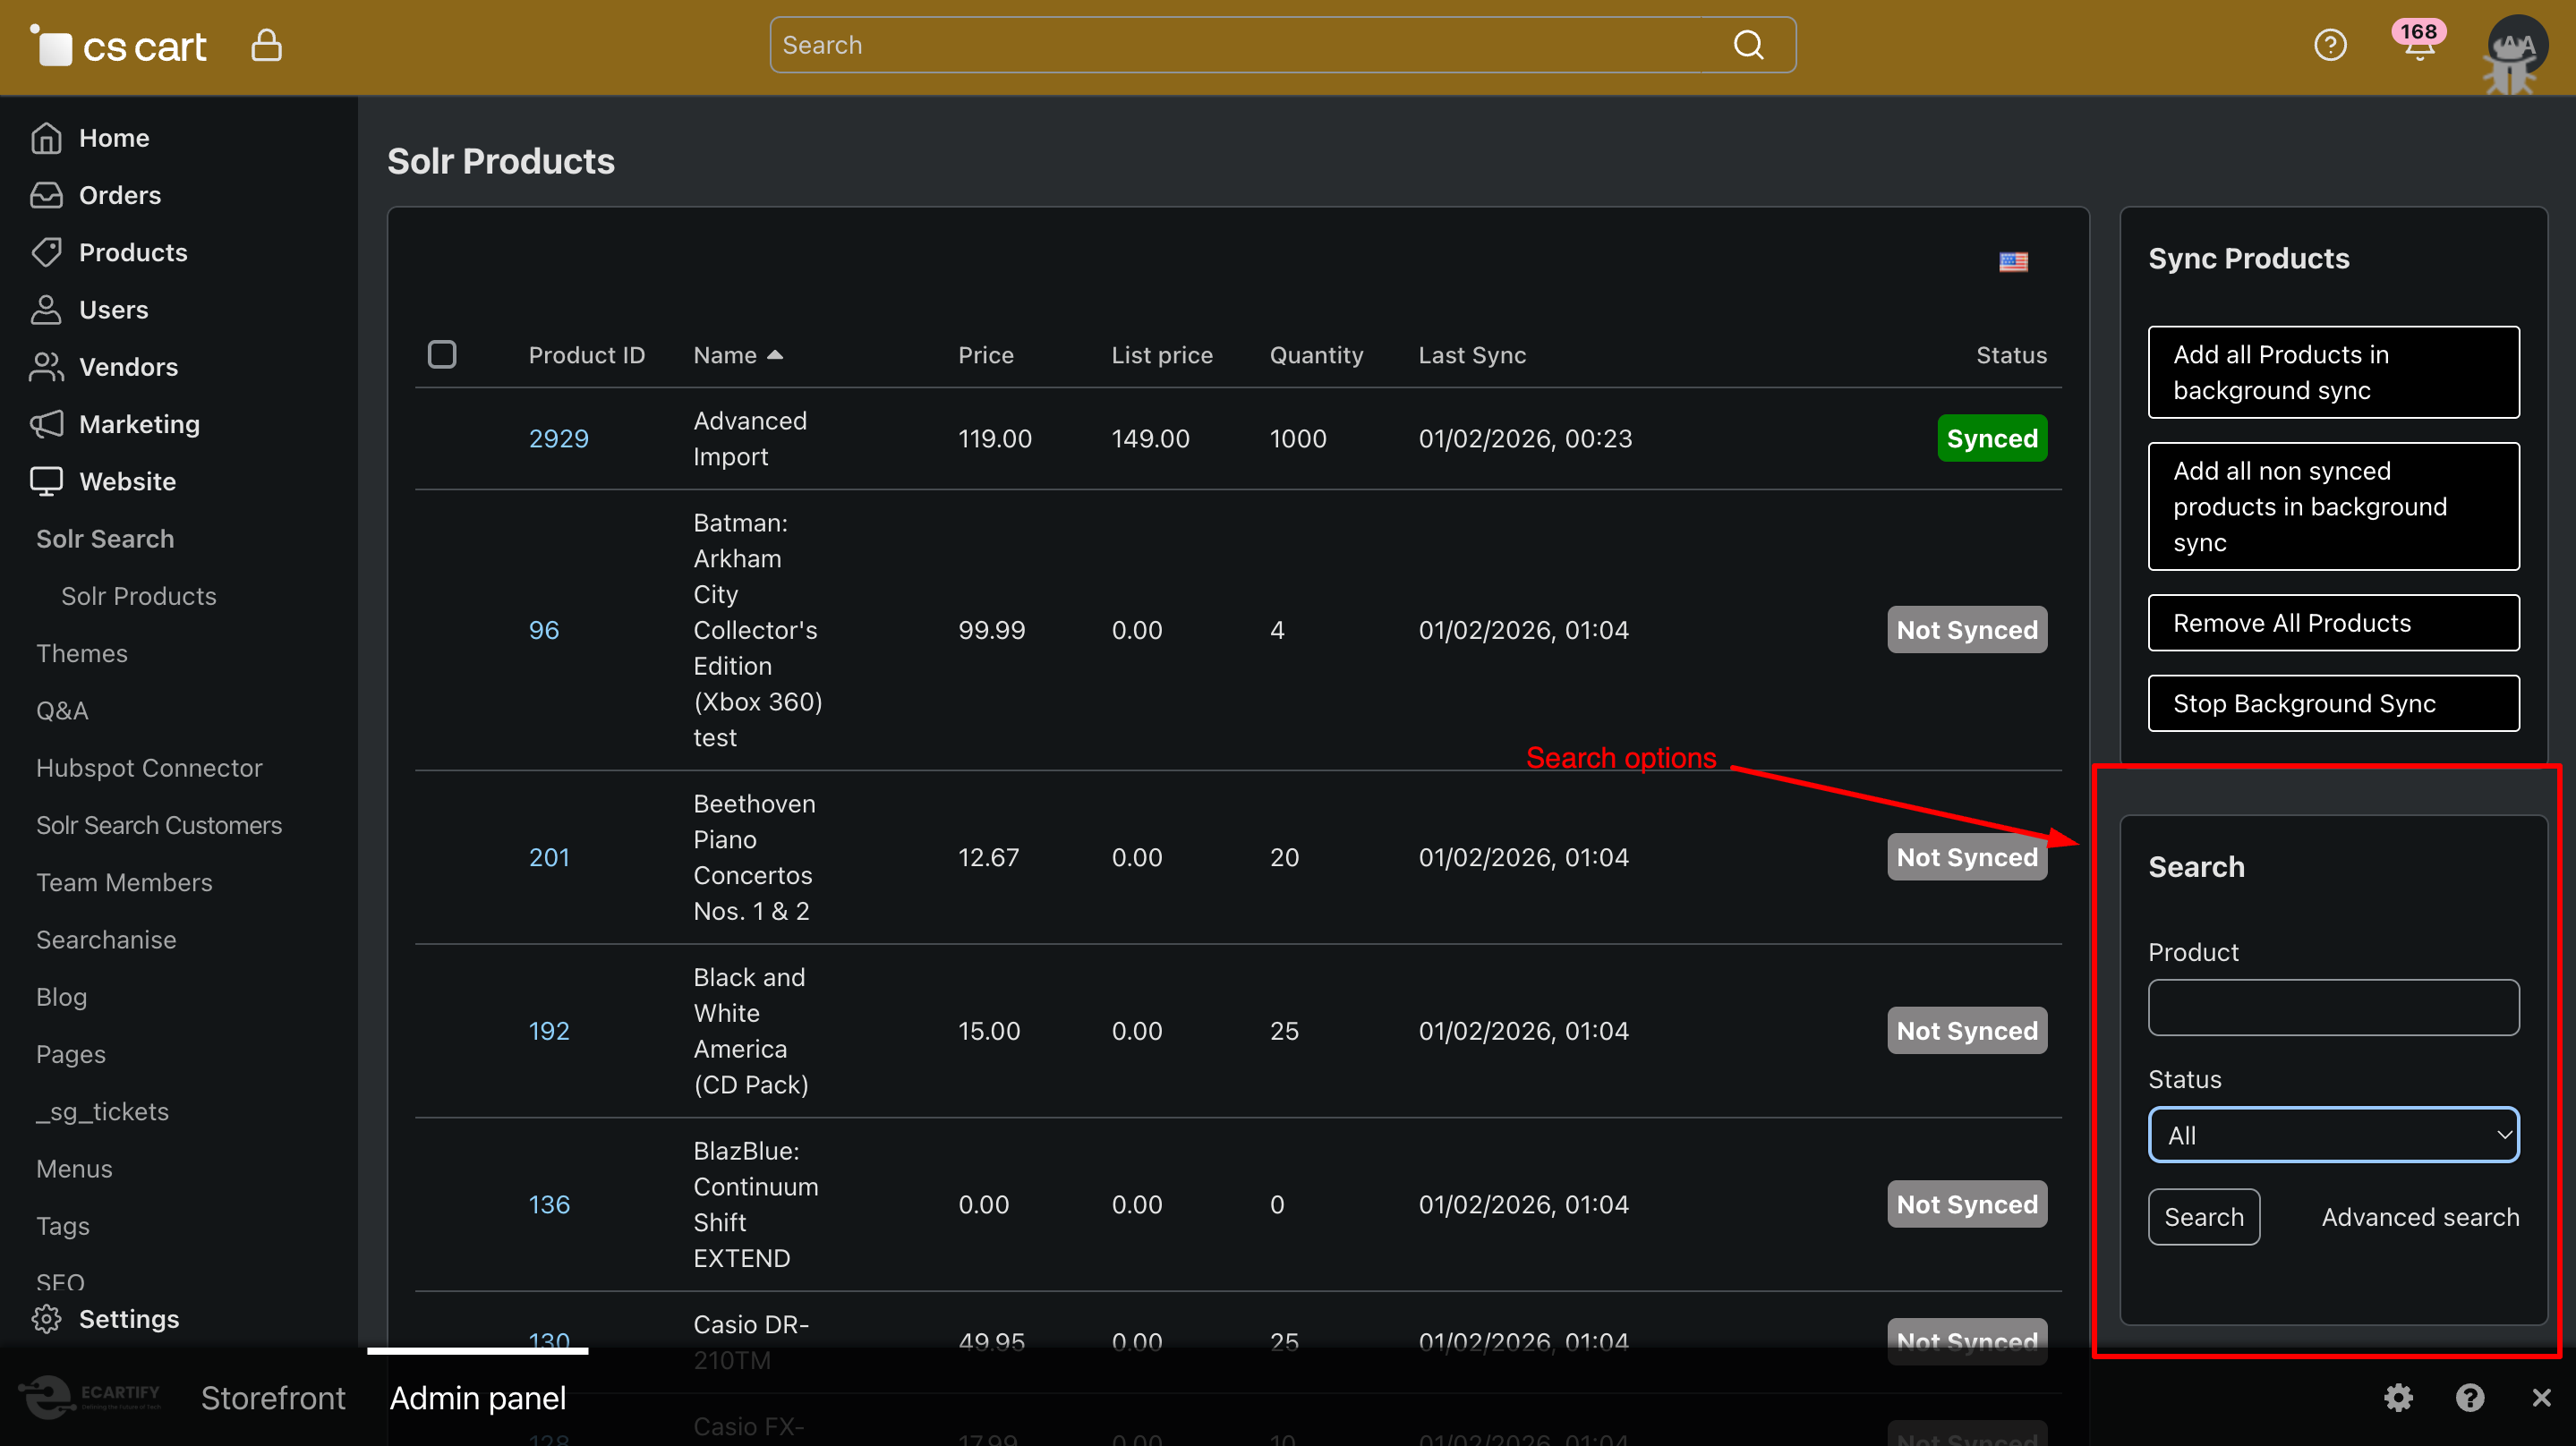
iii) Use the Search, Product, and Status (All / Synced / Not Synced) options to quickly find and manage products during the Solr sync process.
.
Step 4: Products result and Query suggestions by solr search
To fetch products from Solr Search on the storefront, you must enable frontend Solr results in the addon settings, so all search queries are routed through Solr instead of CS-Cart’s default SQL search.
Query suggestions will appear directly in the storefront search input as users type, but only when the option is enabled in the addon settings from the CS-Cart admin panel.
Why Choose Solr Search for Your CS-Cart Store?
Solr Search Addon connects your CS-Cart store directly with Apache Solr, allowing products to be fetched from Solr instead of the database. This removes the load from SQL queries and delivers lightning-fast search results even with a large product catalog.
Instant High-Speed Search Results
Fetch products directly from Solr instead of SQL, ensuring faster response times and smooth
performance—even with thousands of products.
Optimized for Large Product Catalogs
No matter how many products your store has, Solr handles search efficiently without slowing down your CS-Cart
store.
Advanced & Accurate Search
Deliver highly relevant search results using Solr’s powerful indexing, filtering, and ranking capabilities.
Query Suggestions & Smart Results
Show smart query suggestions directly in the storefront search input, helping users find products faster as
they type.
Background Product Sync
Sync all products, only non-synced products, or remove products using background cron jobs—without impacting store performance.
Seamless CS-Cart Integration
Built specifically for CS-Cart, the addon integrates smoothly with your existing store setup and admin workflow.
Your Solr Search Addon is now ready to supercharge search performance in your CS-Cart store. By fetching products directly from Apache Solr instead of SQL, your store delivers faster, more accurate, and highly relevant search results—even with a large product catalog. This results in smoother browsing, quicker product discovery, and an overall improved shopping experience that boosts conversions.
Pro Tip: For best performance, always keep your products fully synced with Solr using background cron sync and enable frontend product fetching via Solr in addon settings. This ensures lightning-fast search results and reduced database load, even during high traffic.
Advanced Import: Fast, Accurate & Automated Data Uploads
Streamline importing products, customers, and more — all with smart mapping and automation for seamless data management.
Ecartify: Advanced Import
Managing large product catalogs in CS-Cart can be overwhelming—especially when dealing with complex CSV files, huge imports, unstable processes, or accidental data overwrites. Store owners often struggle with slow imports, incorrect field mapping, and the fear of breaking existing product data.
That's exactly why we built Ecartify: Advanced Import — a powerful extension designed to enhance and modernize CS-Cart's native Advanced Import functionality.
Large CSV imports often freeze browsers or time out, leaving you frustrated and your data incomplete. Our addon solves this by moving the entire import process to the background, where a cron job handles everything in smaller, stable batches.
Benefits:
No more browser timeouts or frozen screens
Import continues running even if you close your browser
Perfect for large files (20,000 – 500,000+ products)
Monitor progress in real-time with clear visibility
Product Rollback System (Revert to Previous Data):
Made a mistake? Used the wrong CSV file? Mapped fields incorrectly? No problem.
The addon automatically saves each product's previous version before updating it. This means you can instantly rollback imported products to their exact previous state with just one click.
Rollback can restore:
• Product titles and descriptions
• Prices
• Stock quantities
• Categories
• Any other imported field
This feature protects your store from bad imports and accidental data overwrites, giving you peace of mind.
AI-Powered Auto-Mapping of CSV Columns:
Inspired by our popular NLP SmartSearch AI Addon, we've added intelligent automation to the import process. The addon can automatically detect and map CSV column headers to the appropriate CS-Cart product fields using AI.
You don't need to manually map fields over and over again. The AI understands different naming conventions and automatically matches them correctly. This is a massive time-saver for big marketplaces and multi-vendor stores that receive product files from multiple suppliers.
Ecartify: Advanced Import is more than just an addon—it's a complete upgrade to how CS-Cart handles product management and data imports.
Importing products becomes safer, smarter, and significantly faster, thanks to cron-based background processing, AI-powered automation, and comprehensive rollback protection.
If you're looking to modernize your store's import system, improve admin workflows, eliminate manual field mapping, and avoid costly data mistakes, this addon is absolutely essential.
Ready to Transform Your Product Imports?
Stop struggling with slow, unstable imports. Upgrade to Ecartify: Advanced Import today and experience the difference that AI and automation can make.
Unlock Deeper Insights and Multi-Vendor Analytics in Your CS-Cart Marketplace
Extended Sales Report
Running a successful marketplace requires more than just viewing basic sales numbers. You need flexible reporting, multi-vendor insights, export-ready analytics, and the ability to filter data based on business-specific conditions.
But CS-Cart's default reporting module, while useful, lacks several advanced capabilities that growing marketplaces demand.
Introducing Ecartify: Extended Sales Report — a powerful analytics extension designed to help CS-Cart admins view, filter, compare, and download advanced sales reports with ease.
What is Ecartify: Extended Sales Report?
Ecartify: Extended Sales Report enhances the existing CS-Cart "Sales Reports" module by adding powerful features that transform how you analyze your marketplace data:
Vendor-based filtering and reporting
Report export options: CSV, PDF, and Spreadsheet formats
New vendor-specific conditions for deeper insights
Clean UI integration within the CS-Cart admin panel
More meaningful breakdowns of sales data
Better control over report formats for accounting and auditing
This addon is built for marketplace owners who need more than the default "number of sales" table—especially those managing multiple vendors.
Key Features of Ecartify: Extended Sales Report
Vendor-Based Sales Conditions (Brand New Feature):
The most powerful addition: vendor-specific conditions in CS-Cart sales reports. Admins can now filter reports based on:
Specific individual vendors
Multiple vendors at once for comparison
Vendor groups or categories
Vendor performance over custom time periods
Example Reports You Can Generate:
"Show total products sold by Vendor A in 2025"
"Compare Vendor A, Vendor B, and Vendor C in a single report"
"Display the number of items sold by each vendor across months"
"Show top 10 vendors by revenue this quarter"
Download Reports in Multiple Formats:
Export your custom sales reports in professional formats that fit your business needs:
CSV Format
Perfect for accounting software and ERP system imports
PDF Format
Ideal for sharing reports or archiving documents
Spreadsheet
Excel/ODS files for deep analytics and custom editing
All export formats use clean, readable layouts similar to native CS-Cart exports, ensuring consistency and professionalism.
Enhanced Report UI Integrated with CS-Cart:
The addon seamlessly integrates into CS-Cart's existing interface with zero learning curve:
Ecartify: Extended Sales Report is the missing piece for CS-Cart marketplaces that demand deeper visibility, richer analytics, and cleaner data export tools.
It transforms CS-Cart's default sales report system into a professional-grade reporting suite—with special focus on vendor-based insights that multi-vendor stores desperately need.
If you want full control over vendor analytics, professional reporting formats, and multi-condition filtering capabilities, this addon will completely transform how you manage and understand sales data inside CS-Cart.
Ready to Unlock Deeper Marketplace Insights?
Stop struggling with limited reporting. Upgrade to Ecartify: Extended Sales Report and get the vendor analytics and export capabilities your marketplace deserves.
Supercharge your CS‑Cart store’s search with AI‑powered Natural Language Processing for smarter, faster, and more accurate results.
Upgrade Your Search Experience
NLP SmartSearch AI Addon – Complete Description & Setup
Boost your CS-Cart store's search functionality with the NLP (Natural Language Processing) SmartSearch AI Addon. This intelligent tool enables customers to use conversational, natural language queries to quickly find the products they need. Whether users type “show me blue jeans under $40” or “find wireless headphones with noise cancellation,” this addon delivers fast, accurate, and AI-powered product suggestions.
AI-Powered Recommendations: Predicts customer intent to improve user experience and increase conversions.
Instant Suggestions: Provides live product suggestions as shoppers type, reducing bounce rates.
Multi-Language Support: Works with different languages and phrases for global stores.
Easy Installation: No technical expertise required—get started in just a few minutes.
Step-by-Step Setup Guide
Install the Addon
Installing the NLP SmartSearch AI Addon is simple:
Login to your CS-Cart admin panel.
Upload the provided ZIP file of the addon.
Once uploaded, the addon will appear under CS-Cart - Add-ons.
This process takes only a few minutes and requires no coding knowledge.
Configure the Settings
After installation, navigate to the Add-on Settings page. Here, you will find two API URLs that are crucial for running the addon:
Copy both URLs carefully—these will be used to trigger the addon manually or via automated cron jobs.
These URLs ensure that your store’s product index remains up to date for faster and smarter search results.
Proper configuration guarantees that your search data stays optimized for high performance and SEO visibility.
Run the Addon
You can run the addon in two ways:
Manual Run: Paste each API URL directly into your browser and execute them one by one. This is ideal for quick testing or troubleshooting.
Automatic Run (Recommended): Add the URLs to your server’s cron jobs so they run automatically at scheduled times. Automation ensures your product data remains fresh without manual effort.
Test on the Frontend
Visit your store’s frontend to experience the addon in action:
Type any product name into the search bar.
Once you enter three or more letters, the addon will instantly display smart product suggestions.
Observe how quickly the system predicts and presents relevant products.
This real-time interaction improves user engagement and creates a more professional shopping experience.
NLP SmartSearch AI in Action
The true power of this addon lies in its ability to handle natural language queries. For example, type:
The NLP SmartSearch AI engine will immediately return a list of t-shirts priced below $30.
This AI-driven search mimics how people naturally speak and think, improving customer satisfaction and boosting conversions.
Why Choose NLP SmartSearch AI for Your CS-Cart Store?
Traditional keyword-based searches often fail to capture customer intent, leading to poor user experience and lost sales. The NLP SmartSearch AI Addon eliminates these problems by understanding contextual meaning and delivering results that match natural speech patterns. This leads to:
understanding contextual meaning and delivering results that match natural speech patterns. This leads to:
Higher search accuracy and customer satisfaction.
Better product discovery, even with vague or conversational queries.
Reduced bounce rates and increased revenue potential.
Your NLP SmartSearch AI Addon is now ready to enhance your store’s search capabilities. Customers will enjoy a fast, intelligent, and user-friendly shopping experience, while you benefit from increased conversions and stronger SEO performance.
Pro Tip: Combine this addon with a well-structured product catalog and clear pricing to maximize search efficiency and rankings on search engines.
AI-Powered Chatbots That Elevate Support & store management
The AI Agent & Chatbot provides comprehensive assistance across all aspects of CS-Cart development and store management
Ecartify: AI Agent & Chatbot – Your Intelligent Development Assistant
Transform your CS-Cart development workflow with the AI Agent & Chatbot. This addon brings AI-powered assistance directly into your admin and vendor panels. Auto-generate addons, Simple debug code instantly, perform CRUD operations, and get expert CS-Cart guidance - all through natural conversation. Perfect for developers, store owners, and multi-vendor marketplaces!
Step-by-Step Setup Guide
Step 1: Install the Addon
Installing the AI Agent & Chatbot is simple and takes just minutes:
Download the addon from CS-Cart marketplace or Ecartify website
Login to your CS-Cart admin panel and go to Add-ons
Upload and install "Ecartify: AI Agent & Chatbot"
Activate the addon from the add-ons list
The addon will appear in your Products menu as "Chat Bot" for easy access!
Step 2: Configure N8N Integration
After installation, navigate to the addon settings page. You have two easy options to get started:
Option 1: Use Our Ready-Made Server (Recommended)
We provide a free N8N server that's already configured and ready to use! Live URL: You can find the URL on the addon settings page.
Simply paste this URL into the addon settings and start asking questions immediately. Note: Currently free during beta. Future subscription plans may apply.
Option 2: Host Your Own N8N Server
Prefer complete control? Set up your own N8N server:
• Install N8N on your hosting
• Go to Addon Settings and import our workflow template
• Configure Gemini or any AI model
• Get your webhook URL
• Add it to the addon settings
Both options work perfectly - choose what fits your needs!
Step 3: Configure Chatbot
Enable/Disable Widget: Turn the chat interface on or off as needed
Add N8N URL: Check step 2
Set Default Vendor for product: Limit queries to a specific vendor's data (perfect for multi-vendor stores)
Set Default Category for product: Filter results to a specific product category automatically
Step 4: Access AI Assistant
Start using your intelligent CS-Cart development assistant:
Navigate to Chat Bot: Go to Products → Chat Bot in your admin panel
View Capabilities: See what the AI can help you with (Create Addons, Debug Code, CS-Cart Help, CRUD Operations)
Start Chatting: Type your request in natural language and get instant AI-powered assistance
Access Configuration: Switch to Configuration tab to manage API settings and domain access
The AI assistant is now ready to help with all your CS-Cart development needs!
Step 5: Set Up Vendor Plans (Multi-Vendor)
Control which vendors can access the AI agents:
Navigate to Vendor Plans: Go to Vendors → Vendor plans
Edit Plan Privileges: Open any vendor plan (Gold, Silver, etc.)
Enable "Show Agent On Vendor End": Check this option to give vendors access to AI Agent
Save Configuration: Vendors in this plan will now see the AI chatbot
Multi-Tenant Security: Each vendor only accesses their own isolated data
What Can the AI Agent Do?
The AI Agent & Chatbot provides comprehensive assistance across all aspects of CS-Cart development and store management:
Create Addons
Full Addon Generation: Describe what you want, AI creates complete addon with all necessary files.
Best Practices: Code follows CS-Cart coding standards and best practices
Time Saving: What takes hours to code manually, AI generates in minutes. just need to save file.
Debug Code & Fix Files
Fetch & Fix Feature: Enter file path, AI analyses and fixes all issues
Error Detection: AI finds bugs, syntax errors, logic issues automatically
Code Optimization: Improves performance and code quality
Save Back Easily: One-click to save corrected code back to file.
Learn & Understand: AI explains what was wrong and how it was fixed
CS-Cart Expert Help
Hook System Guidance: Learn which hooks to use and how to implement them
Controller Assistance: Get help with frontend/backend controller structure
Schema Explanation: Understand addon schemas, database schemas, and configurations
CRUD Operations
Product Management: Create, update, delete products through chat
Order Operations: View, search, and manage orders with natural language
Your AI Agent & Chatbot is now ready to revolutionize how you develop and manage CS-Cart stores. Say goodbye to time-consuming coding, manual debugging, and complex database operations. With AI-powered assistance, you can:
Pro Tip: Start with simple requests like "Show me all products" to get familiar with the AI. Then progress to addon generation and file debugging. The AI learns your coding style and preferences over time for even better results!
Grow with WhatsApp Reports | Daily, Weekly & Monthly Insights for Vendors
Automatically send business performance reports to vendors via WhatsApp.
Orders, revenue, and key metrics — delivered on time, every time.
Ecartify: Business WhatsApp Report
Keep your vendors informed with the Business WhatsApp Report addon. Automatically send daily, weekly, and monthly business reports directly to vendor WhatsApp numbers. Track orders, revenue, customers, and key metrics without manual effort. Perfect for multi-vendor marketplaces that need automated, professional reporting!
Key Features of Business WhatsApp Report
Automated Report Scheduling: Send daily, weekly (any day), and monthly reports automatically via WhatsApp.
WhatsApp Business API: Secure integration with official WhatsApp Business API for reliable delivery.
Multi-Vendor Support: Each vendor receives reports with only their isolated data and metrics.
Comprehensive Metrics: Orders, revenue, customers, products, order status, and top-selling items.
Flexible Scheduling: Choose specific days for weekly reports (Monday-Sunday).
Vendor Management: Centralized dashboard to manage WhatsApp numbers and report preferences per vendor.
Report Logs & Tracking: View complete history of sent reports with status, timestamps.
Analytics Dashboard: Monitor success rates, daily statistics, and delivery performance.
Your Business WhatsApp Report addon is now ready to revolutionize how you communicate with vendors. Say goodbye to manual report creation, email chains, and vendor inquiries about performance. With automated WhatsApp delivery, you can:
Pro Tip: Start with daily reports enabled for all vendors to establish the routine. After vendors become familiar with the format, you can customize frequencies based on individual preferences. The analytics dashboard helps you monitor delivery success and optimize timing!
AI Creator helps you generate high-quality product content for your CS-Cart store using AI. Create product descriptions, titles, and SEO text in seconds, with optional multilingual and translation support.
AI Creator – The Product Content Generator & Translation Engine for CS-Cart
AI Creator supercharges your CS-Cart store with powerful AI content generation. Create professional, SEO-friendly, and multilingual product content in seconds using Google Gemini or OpenAI (ChatGPT).
Go beyond content with built-in chat and review translation, including a free translation option to reduce costs. One addon. Two AI engines. Complete automation for modern CS-Cart stores.
Key Features of AI Creator
Dual AI Engine: Gemini + ChatGPT:
Use Google Gemini for creative content or OpenAI (ChatGPT) for SEO-focused writing.
Choose what fits your needs and budget
Full Multilingual Support: Generate content in any language your store supports: English, Hindi, Arabic, French, German, Spanish — or any custom language used in CS-Cart.
Works on All CS-Cart Setups:
CS-Cart, Multi-Vendor, Ultimate, Any theme, Any hosting, Any custom modifications
NEW: AI Chat & Review Translation System: A powerful built-in translation feature designed for global stores.(included free api for translation)
Easy Installation: No technical expertise required—get started in just a few minutes.
Step-by-Step Setup Guide
Step 1: Install the Addon
Installing the AI Creator Addon is simple:
Login to your CS-Cart admin panel.
Go To Add-ons → Manage add-ons→ Click on ⚙️ gear icon→ Manual installation
Upload the provided ZIP file of the addon.
Once uploaded, the addon will appear under CS-Cart - Add-ons.
Now click on the AI Creator add-on and add the required settings.
This process takes only a few minutes and requires no coding knowledge.
Step 2: Configure the Settings
After installing the add-on, navigate to the Add-ons → Manage add-ons section and open the AI Creator add-on settings page. Here, you can configure the general options that control how the AI Creator works across your store, including content generation, translations, and vendor access:
i) Switch between two AI engines:
Use Google Gemini for creative, detailed, and natural-sounding content, or OpenAI (ChatGPT) for structured, precise, and SEO-optimized writing.
You can change the AI anytime based on your content goals, accuracy needs, or budget — giving you full control and flexibility.
Select the preferred AI provider to generate content and translations. This provider will be used for all AI-powered features enabled in the add-on. Choose the provider that best fits your content style, performance needs, or cost preferences.
Make sure the required API key is added in the corresponding tab before saving the settings.
Without a valid API key, AI-powered features will not work.
Use the provided options to enable or disable translation for customer reviews and customer/vendor messages as needed. You can easily turn these features on or off from the settings panel — refer to the screenshot for a step-by-step view on how to enable them.
iii) Free AI for review and message translations:
Enable this option to use the built-in free translation service for translating customer reviews and messages instead of paid AI APIs. This helps reduce or completely avoid API costs while still allowing smooth multilingual communication. You can switch to Gemini or OpenAI (ChatGPT) anytime if higher accuracy is needed.
iv) Allowed for vendor plans:
Use this option to select which vendor plans are allowed to access and use the AI Creator features. This gives you full control over AI usage by vendors and helps manage permissions based on different subscription or pricing plans.
All settings are now configured — AI Creator is ready to generate and translatecontent for your store.
Step 3: Unlock the Power of AI Creator
You can run the addon in two ways:
Generate AI-powered product content that is professional, SEO-friendly, and multilingual using Google Gemini or OpenAI (ChatGPT).
Translate customer reviews and messages instantly using AI or the free translation engine to save time and costs.
Step 4: How to generate product content
Generating content with AI Creator is quick and easy. Follow these steps:
i) Open any product page (new or existing) in your CS-Cart admin panel and fill in the product title. (Note: For updating an existing proudct,click on ⚙️gear button first)
ii) Review the content in the popup. You will see checkboxes for different fields (e.g., Full Description, Short Description, Product Name, etc.).
Only the fields you check will be updated when you click Save.
If you select “Update all languages”, the content will be applied to all languages, not just the currently selected language.
iii) After clicking Apply, the selected content is automatically added to the respective input fields on the product page. Review the content carefully in the input fields. Click Save on the product page to finally save the changes.
.
Step 4: How to translate chat and reviews
For Chat and reviews page in your CS-Cart backend and frontend.
You will see a Translate button next to the message.
Click on translate button
Translated text
Why Choose AI Creator for Your CS-Cart Store?
AI Creator helps you instantly generate high-quality, SEO-friendly product content for new and existing products in your CS-Cart store using multiple AI engines. It also allows you to translate review and chat messages from one language to another, giving you full control over what gets updated while saving time and improving conversions and customer engagement.
Generate product titles, descriptions, and SEO-friendly content in seconds with advanced AI, and instantly translate chat and review messages across languages for seamless communication.
Multiple AI Engines, One Addon Choose between OpenAI (ChatGPT), Google Gemini, or a free translation engine anytime.
SEO-Friendly & Conversion-Focused Get optimized, keyword-rich content that ranks better and converts more.
Multilingual Content & Chat Translation Generate and translate content across multiple languages with ease.
Your AI Creator Addon is now ready to simplify product content creation and multilingual communication in your CS-Cart store. You can instantly generate SEO-friendly product content and translate customer reviews and chat messages from one language to another, making it easier to understand customer feedback and respond globally. This results in better engagement, improved trust, and higher conversions.
Pro Tip: Use the free translation API for translating reviews and chat messages to save costs, and leverage OpenAI or Google Gemini for high-quality product content and advanced translations on important pages.
Xero Accounting Financial Control with Seamless Xero Integration
Sync invoices, payments, and reports automatically to eliminate errors and spend more time growing your business.
Ecartify: Xero Accounting Integration
Transform your CS-Cart accounting workflow with the Xero Connector. This powerful addon automatically synchronizes orders, invoices, payments, products, and inventory between your CS-Cart store and Xero accounting software. Eliminate manual data entry, reduce errors, and maintain real-time financial visibility with secure, automated synchronization.
Key Features of Xero Connector
Automatic Invoice Creation: Orders instantly become Xero invoices with complete details, line items, and taxes.
Real-Time Payment Tracking: Payments automatically sync to Xero for accurate cash flow monitoring.
Credit Note Management: Refunds and cancellations generate credit notes automatically in Xero.
Customer Synchronization: Customer data syncs as Xero contacts, maintaining consistent records.
Product & Inventory Sync: Products and stock levels stay synchronized across both platforms.
Flexible Account Mapping: Map transactions to correct Xero accounts for accurate financial reporting.
Tax Configuration: Automatic tax calculation and recording for GST/VAT compliance.
OAuth 2.0 Security: Industry-standard secure authentication with encrypted data transmission.
API Health Monitoring: Real-time connection status and comprehensive diagnostics dashboard.
Step-by-Step Setup Guide
Step 1: Install the Addon
Installing the Xero Accounting Integration addon is simple and takes just a few minutes:
Download the addon from CS-Cart marketplace or Ecartify website
Login to your CS-Cart admin panel and navigate to Add-ons
Upload and install "Ecartify: Xero Connector"
Activate the addon from the add-ons list
No coding knowledge required - the installation is fully automated!
Step 2: Create Xero Developer App
Before connecting, you need to create a Xero Developer App to obtain API credentials:
1.Visit Xero Developer Portal: Go to developer.xero.com and log in with your Xero account
2.Create New App: Click "New App" and fill in your application details (name, company URL, etc.)
3.Get Credentials: Once created, you'll receive your Client ID and Client Secret
4.Add Redirect URIs: Add both redirect URLs provided in the addon settings to your Xero app configuration
Step 3: Connect to Xero
Configure the authentication settings to securely connect your store to Xero:
Enter Client ID: Paste your Xero OAuth 2.0 Client ID from the developer portal
Enter Client Secret: Paste your Client Secret (keep this confidential)
Add Redirect URIs: Copy both provided URLs and add them to your Xero Developer App
Click Connect to Xero: Authenticate via OAuth 2.0 secure connection
Once connected, you'll see your organization details and connection status!
Step 4: Enable Synchronization Features
Choose which data you want to sync between CS-Cart and Xero:
Invoice Sync: Automatically create Xero invoices when orders are placed or updated
Payment Sync: Record payments in Xero when orders are marked as paid
Credit Notes: Create credit notes for cancelled or refunded orders
Customer Sync: Sync customer contact information to Xero
Product Sync: Synchronize product catalog with Xero inventory items
Your Xero Connector is now ready to revolutionize how you manage your CS-Cart store finances. Say goodbye to manual data entry, reconciliation headaches, and time-consuming bookkeeping tasks. With automated synchronization, you can:
Pro Tip: Start by syncing historical orders in batches to populate your Xero account, then enable automatic synchronization for all future transactions. Use the API Health dashboard to monitor your integration and ensure everything runs smoothly!
Ready to automate your accounting? Install Xero Connector today and experience error-free, real-time financial management!
Unlock Smarter Automation with a Universal AI Agent
Learn how a flexible, adaptable AI agent can streamline processes, learn from context, and handle multi-step tasks across systems.
Ecartify: Universal AI Agent – Complete Description & Setup
Transform your CS-Cart store management with the Universal AI Agent. This revolutionary addon enables you to interact with your store's database using natural language - no SQL knowledge required! Simply ask questions like "Show me products with low stock" or "What were today's sales?" and get instant, accurate answers. Manage inventory, analyze sales, create products, and track orders - all through simple conversation.
Key Features of Universal AI Agent
Natural Language Interface: Ask questions in plain English - no technical knowledge required.
Comprehensive CRUD Operations: Create, Read, Update, and Delete products, categories, orders, and users.
Instant Analytics: Get real-time insights on sales, inventory, and customer behavior.
Granular Security Controls: Control what operations the AI can perform with approval workflows.
Multi-Vendor Support: Perfect for marketplaces with vendor-specific access controls.
Conversation Memory: Maintains context across multiple queries for natural interactions.
Rate Limiting: Built-in protection against abuse with customizable request limits.
SQL Preview: See the actual database query before execution for complete transparency.
Easy N8N Integration: Use our free server or host your own.
Step-by-Step Setup Guide
Step 1: Install the Addon
Installing the Universal AI Agent addon is simple and takes just a few minutes:
Download the addon from CS-Cart marketplace or Ecartify website
Login to your CS-Cart admin panel
Navigate to Add-ons → Manage add-ons
Upload the provided ZIP file
Click Install & Activate
No coding knowledge required - the entire process is automated!
Step 2: Configure N8N Integration
After installation, navigate to the addon settings page. You have two easy options to get started:
Option 1: Use Our Ready-Made Server (Recommended)
We provide a free N8N server that's already configured and ready to use! Live URL: You can find the URL on the addon settings page.
Simply paste this URL into the addon settings and start asking questions immediately. Note: Currently free during beta. Future subscription plans may apply.
Option 2: Host Your Own N8N Server
Prefer complete control? Set up your own N8N server:
• Install N8N on your hosting
• Go to Addon Settings and import our workflow template
• Configure Gemini or any AI model
• Get your webhook URL
• Add it to the addon settings
Both options work perfectly - choose what fits your needs!
Step 3: Configure Chat Widget
Customize how the AI assistant appears in your admin panel:
Enable/Disable Widget: Turn the chat interface on or off as needed
Position Anywhere: Choose from bottom-right, bottom-left.
Set Default Vendor: Limit queries to a specific vendor's data (perfect for multi-vendor stores)
Set Default Category: Filter results to a specific product category automatically
The widget provides one-click access to AI assistance - always there when you need it, hidden when you don't!
Step 4: Configure Security Settings
Control exactly what the AI can do with your database for maximum safety:
Auto-confirm Read Operations: Automatically execute SELECT queries without manual approval
Require Confirmation for Write Operations: Manual approval needed for INSERT, UPDATE, DELETE operations
Enable Direct SQL Execution: Allow or block direct SQL query execution (use with caution)
Rate Limiting: Set maximum requests per user per hour (recommended: 100)
Excluded Tables: Specify which database tables to hide from the AI (e.g., sessions, api_sessions)
Maximum Search Results: Limit results to improve performance (recommended: 50)
Step 5: Configure Conversation Settings
Maintain context and transparency across multiple queries:
Conversation Memory: Set how many previous messages to remember (default: 20 messages) This allows the AI to understand follow-up questions and maintain context
Conversation Logging: Enable logging for analytics and debugging purposes Review past conversations to improve efficiency
Log Retention: Auto-delete logs older than specified days (default: 90 days) Keeps your database clean and compliant
SQL Preview: Show users the actual SQL query before execution Complete transparency for what's happening in your database
Step 6: Set Up Vendor Permissions (Optional)
Running a multi-vendor marketplace? Give vendors controlled access to the AI agent:
Administrator Control: Go to Vendors → Vendor plans Edit or create a vendor plan Check "Show Agent On Vendor End" Vendors with this plan can use the AI agent in their panel
Automatic Data Isolation: Each vendor sees only their own data No access to other vendor's information Admins get full marketplace analytics Perfect for secure multi-vendor operations
What Can You Do with Universal AI Agent?
The AI agent can perform comprehensive CRUD (Create, Read, Update, Delete) operations on all major store entities:
Products
Create single or multiple products with all details
Update product prices, inventory, and descriptions
Search and filter products by any criteria
Find low stock items and out-of-stock products
Identify profitable products and best sellers
Delete test products or discontinued items
Categories
Create category hierarchies effortlessly
Update category information and structure
Count products per category instantly
Find empty categories that need attention
Reorganize category structure with simple commands
Users
Create new users (Admin/Vendor/Customer)
Update user information and profiles
Search users by type, status, or activity
Count active and disabled users
Manage user permissions and roles
Orders
View detailed order information
Search orders by status, date, or customer
Calculate revenue (daily, weekly, monthly)
Find top-selling products
Identify best customers and VIPs
Track unpaid orders and pending payments
Perfect For Every Store Size
Small Store Owners
Quick Inventory Checks: No need to navigate multiple pages - ask and get instant answers
Simple Analytics: Get insights without complex reporting tools or technical knowledge
Fast Product Updates: Change prices, update stock, or modify details in seconds through conversation
Multi-Vendor Marketplaces
Vendor Access Control: Give vendors limited AI access through customizable vendor plans
Automatic Data Isolation: Each vendor sees only their own data - complete security and privacy
Admin Oversight: Administrators get full marketplace analytics and control
Your Universal AI Agent is now ready to revolutionize how you manage your CS-Cart store. Say goodbye to complex SQL queries, tedious navigation, and time-consuming manual tasks. With natural language commands, you can: Pro Tip: Start with read-only operations to get comfortable with the AI, then gradually enable write operations as you build confidence. Use the SQL preview feature to learn how your natural language queries translate to database commands!
Welcome to Your Premier CS-Cart Development Company
Looking for the best CS-Cart addons and expert CS-Cart developers? You've come to the right place. As a leading CS-Cart agency, we specialize in CS-Cart customization, CS-Cart theme customization, and CS-Cart plugin development. Whether you need to hire CS-Cart developer expertise or access free CS-Cart addons, our CS-Cart web development services have you covered.
Our CS-Cart development company offers comprehensive solutions for your CS-Cart e-commerce platform needs, from CS-Cart store setup to advanced CS-Cart multi-vendor marketplace configurations.
Best CS-Cart Addons & Extensions
CS-Cart SEO Addons
Boost your CS-Cart store visibility with our top CS-Cart SEO addons. These CS-Cart extensions are designed to optimize your CS-Cart marketplace for search engines, improving your rankings and driving organic traffic.
CS-Cart SEO
Best CS-Cart addons
SEO optimization
CS-Cart Marketing Addons
Supercharge your sales with our CS-Cart marketing addons. From email campaigns to promotional tools, these top CS-Cart extensions help you convert visitors into customers.
Marketing tools
CS-Cart integrations
Conversion optimization
CS-Cart Payment Gateway Addons
Accept payments seamlessly with our CS-Cart payment gateway addons. Support multiple payment methods and provide a smooth checkout experience on your CS-Cart e-commerce platform.
Payment solutions
CS-Cart addons
Secure checkout
CS-Cart Shipping Addons
Streamline your logistics with our CS-Cart shipping addons. These CS-Cart plugin list includes real-time shipping rates, tracking, and multi-carrier support for your CS-Cart store.
Shipping solutions
Logistics
CS-Cart features
CS-Cart Multi-Vendor Addons
Enhance your CS-Cart multi-vendor marketplace with specialized CS-Cart marketplace addons. Perfect for CS-Cart dropshipping and vendor management solutions.
Multi-vendor
Marketplace
Vendor management
Free CS-Cart Addons
Get started with our collection of free CS-Cart addons. Essential tools to boost your store without breaking the bank, including basic CS-Cart analytics and CS-Cart security tips implementations.
Free addons
Starter pack
Essential tools
Ready to Hire CS-Cart Developer Experts?
Our team of best CS-Cart developers is ready to transform your CS-Cart e-commerce platform. From CS-Cart freelance developer projects to enterprise CS-Cart web development services, we deliver excellence.
CS-Cart Speed Optimization: Performance tuning for faster CS-Cart store optimization
CS-Cart Security: Implement CS-Cart security tips and best practices
CS-Cart Analytics: Advanced tracking and CS-Cart analytics implementation
Why Choose Our CS-Cart Development Company?
As a leading CS-Cart agency with years of experience, we understand the CS-Cart platform inside and out. Our best CS-Cart developers have worked on hundreds of CS-Cart e-commerce platform projects, from simple CS-Cart stores to complex CS-Cart multi-vendor marketplaces.
Our Expertise Includes:
CS-Cart vs Shopify comparisons and migrations
CS-Cart vs WooCommerce platform transitions
CS-Cart vs Magento expert consulting
CS-Cart pricing optimization strategies
CS-Cart conversion optimization techniques
CS-Cart best practices implementation
CS-Cart marketplace themes customization
CS-Cart vendor dashboard enhancements
CS-Cart multi-vendor features development
CS-Cart marketplace pricing strategies
Whether you're looking for a CS-Cart freelance developer for a quick project or want to hire CS-Cart developer teams for ongoing CS-Cart web development services, our CS-Cart development company is your trusted partner. We work with all CS-Cart features, CS-Cart templates, and can handle any CS-Cart customization challenge.
Top CS-Cart Extensions & Plugin List
Explore our curated collection of the best CS-Cart addons available:
Advanced CS-Cart SEO addons for better search rankings
Powerful CS-Cart marketing addons to drive sales
Secure CS-Cart payment gateway addons for global transactions
Flexible CS-Cart shipping addons with multi-carrier support
Comprehensive CS-Cart analytics and reporting extensions
Mobile-optimized CS-Cart themes and templates
Transform Your CS-Cart Store Today
Join hundreds of satisfied clients who chose our CS-Cart development company for their CS-Cart customization needs. From CS-Cart theme customization to complex CS-Cart plugin development, we're your go-to CS-Cart agency.