

Price Tracker – Show Price History & Build Buyer Trust
Let customers see how a product's price has changed over time, and highlight real deals with an automatic lowest-price badge — right on your CS-Cart storefront.Get Started
Price Tracker for CS-Cart – Price History Graphs & Lowest Price Badges
Give your customers full price transparency with the Price Tracker add-on. Every product gets a dedicated price history graph — visible on both the admin panel and the storefront — so shoppers can see exactly how the price has moved over time.
A configurable Lowest Price Badge automatically highlights genuine deals by comparing the current price against the lowest price over an admin-defined period, building trust and encouraging faster purchase decisions.
Running a multi-currency store? No problem — the price graph and badge are fully currency-aware, always showing prices in whatever currency the customer is browsing in.
Note: price history starts accumulating from the moment a product's price is first changed after installing the add-on — the Price Tracker tab and badge only appear once at least one price change has been recorded for that product.
Key Features of Price Tracker
Price Tracking & Analytics
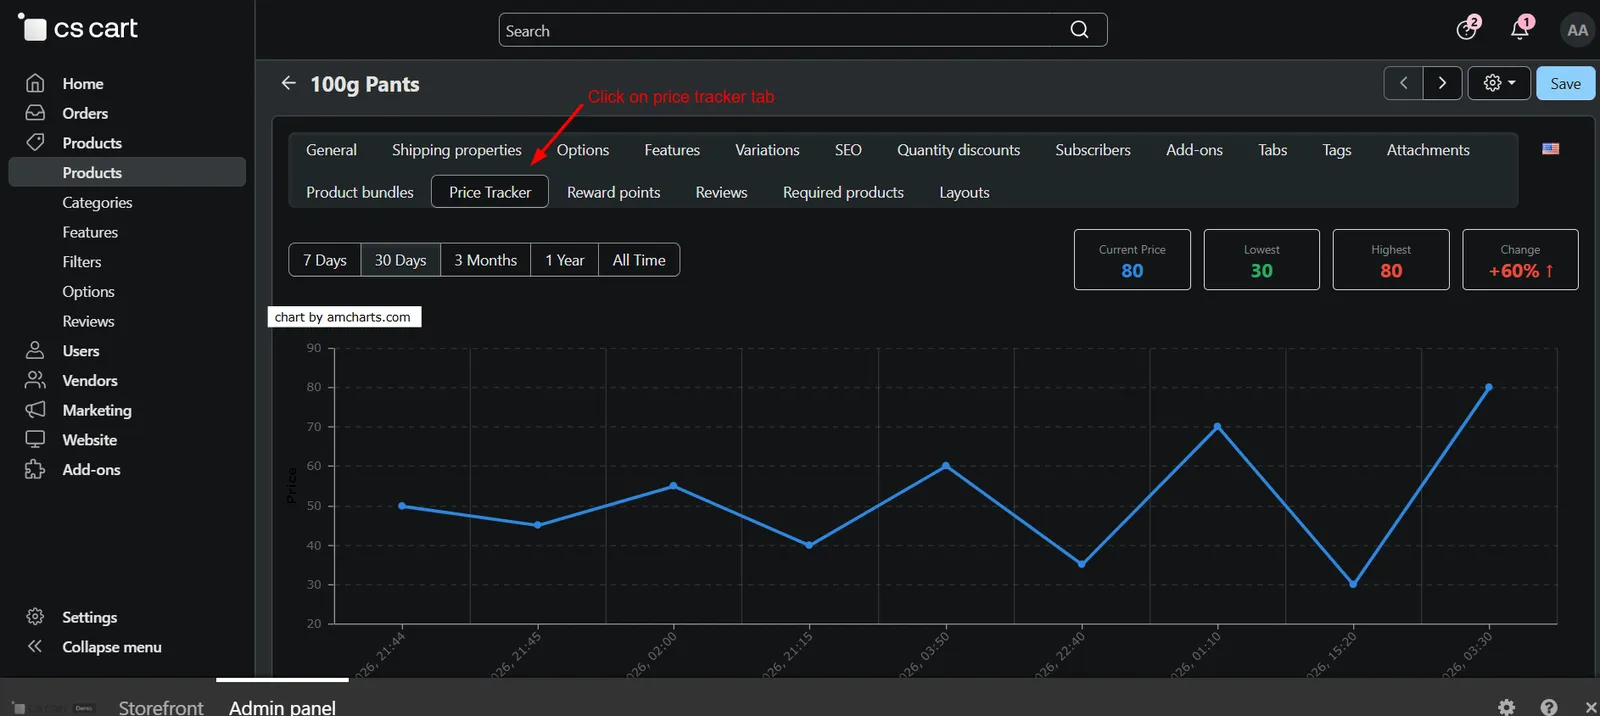
Every product gets a visual price-history chart showing how the price has changed over time, plotted as an easy-to-read line graph. The graph builds up as price changes happen after installation.
Instantly view Current Price, Lowest, Highest, and percentage Change for a product, calculated automatically from historical price data.
Switch between 7 Days, 30 Days, 3 Months, 1 Year, and All Time views to analyze price trends over any period.
Storefront Display
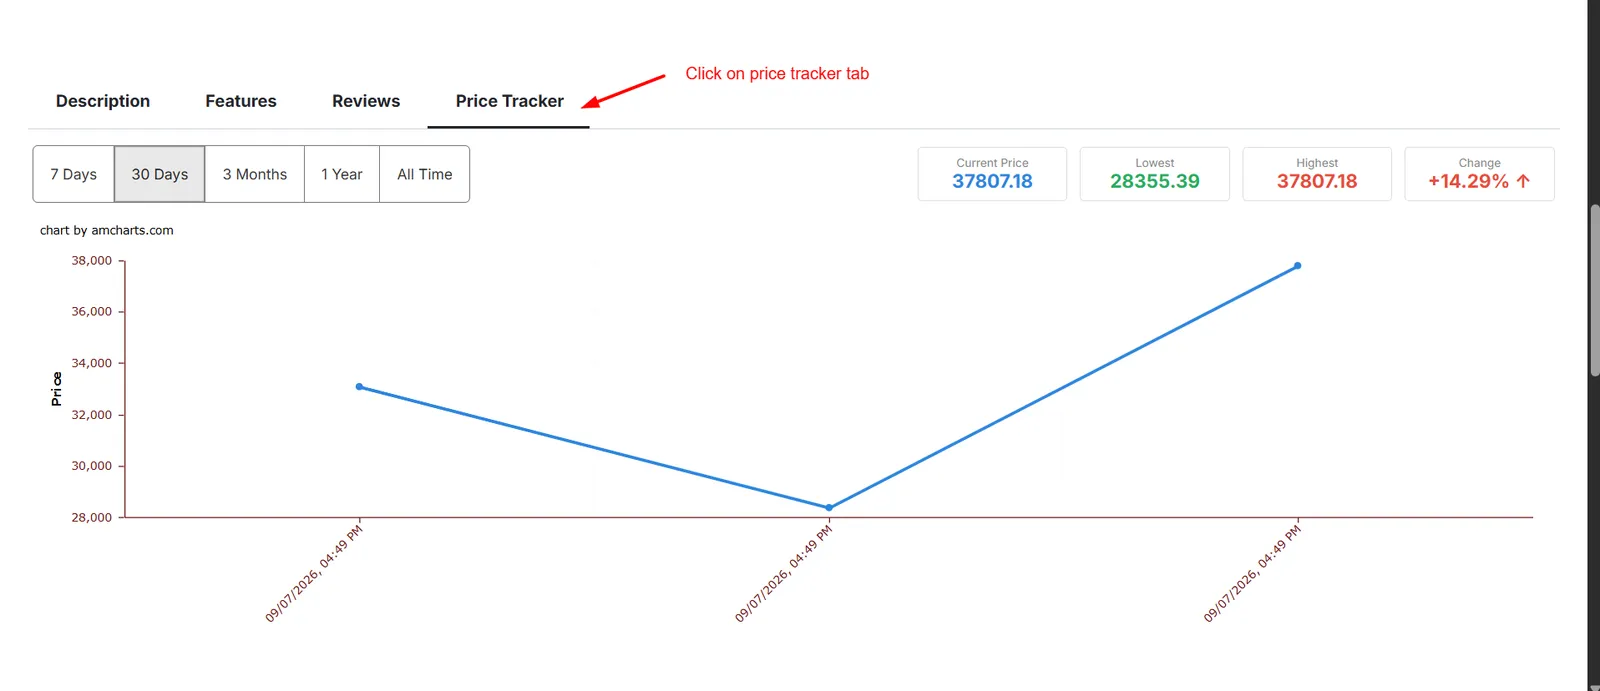
Customers get their own "Price Tracker" tab on every product page, so they can see price history before buying — the tab appears once the product has at least one recorded price change.
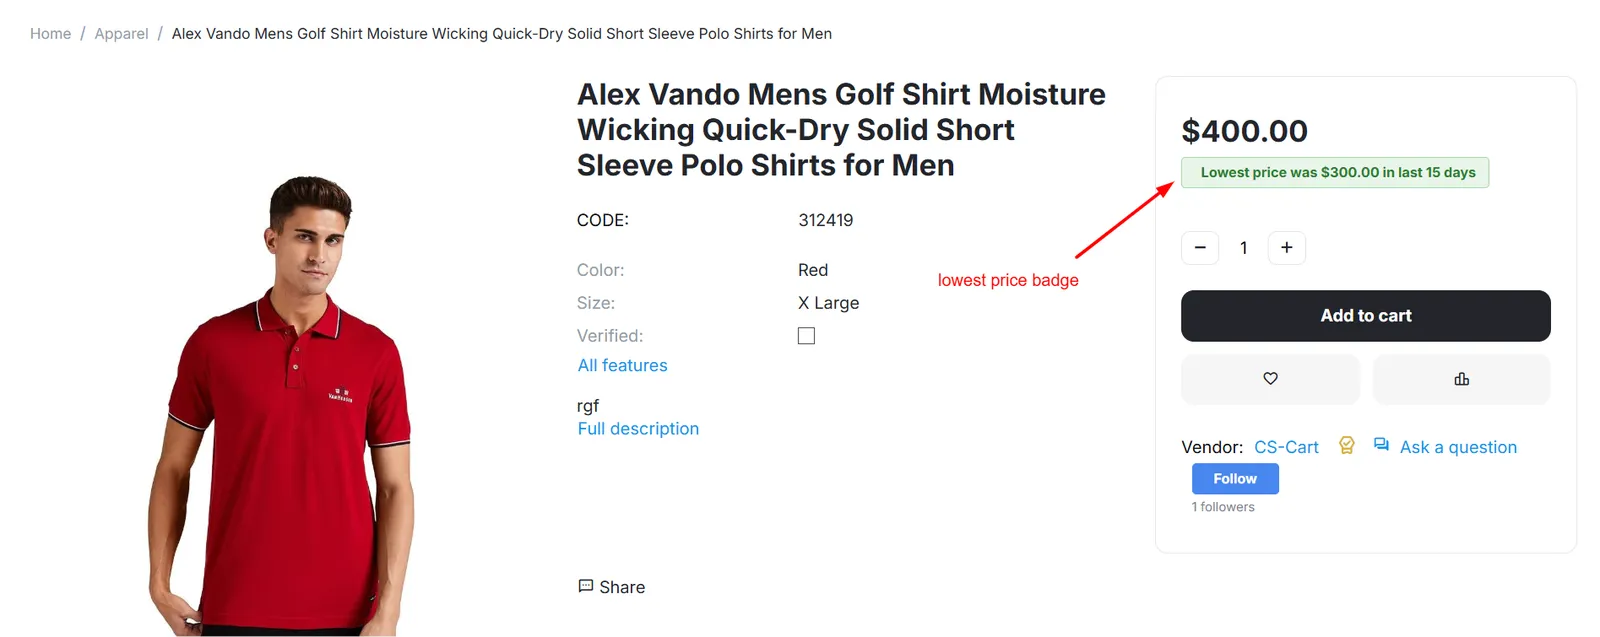
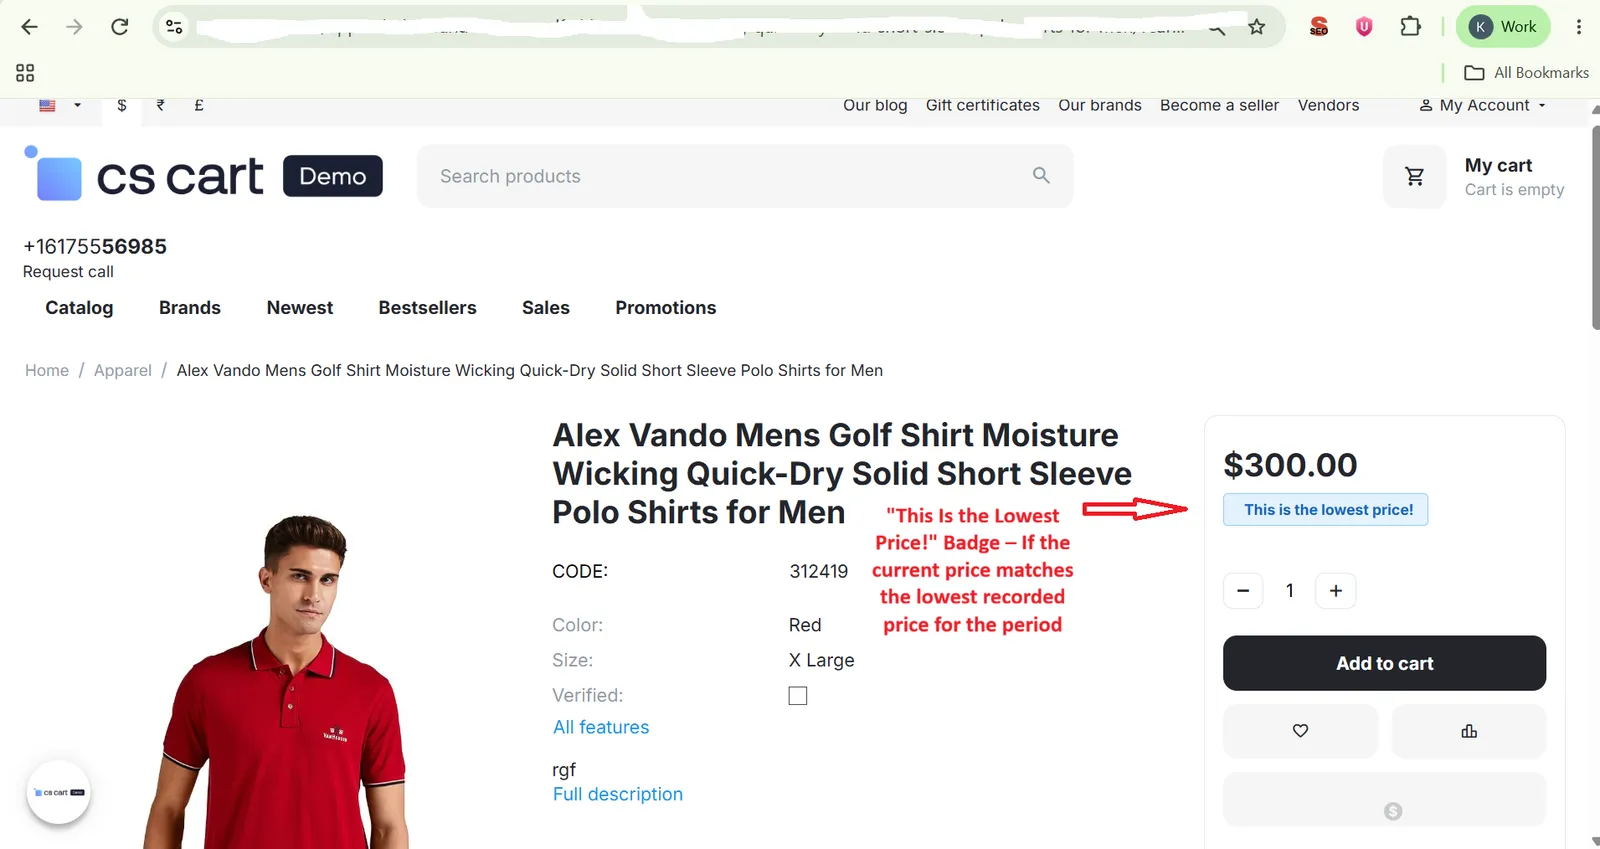
A badge automatically appears near the product price. If the current price is above the lowest price recorded in the configured period, it shows "Lowest price was [price] in last [N] days." If the current price matches the recorded lowest, it switches to a "This is the lowest price!" badge instead.
The price graph and badge always display in the storefront's active currency, keeping data accurate for every shopper.
Configuration
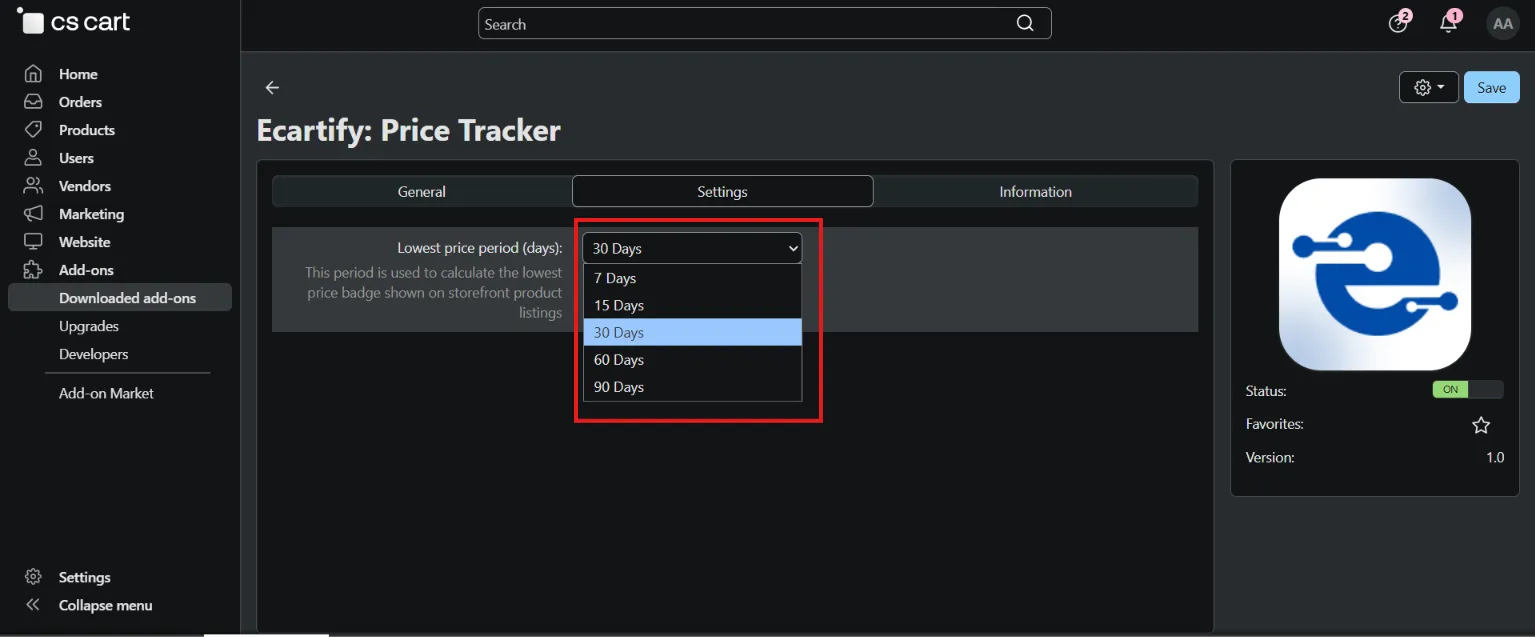
Choose the lowest-price calculation window — 7, 15, 30, 60, or 90 days — directly from the add-on settings.
Step-by-Step Setup Guide
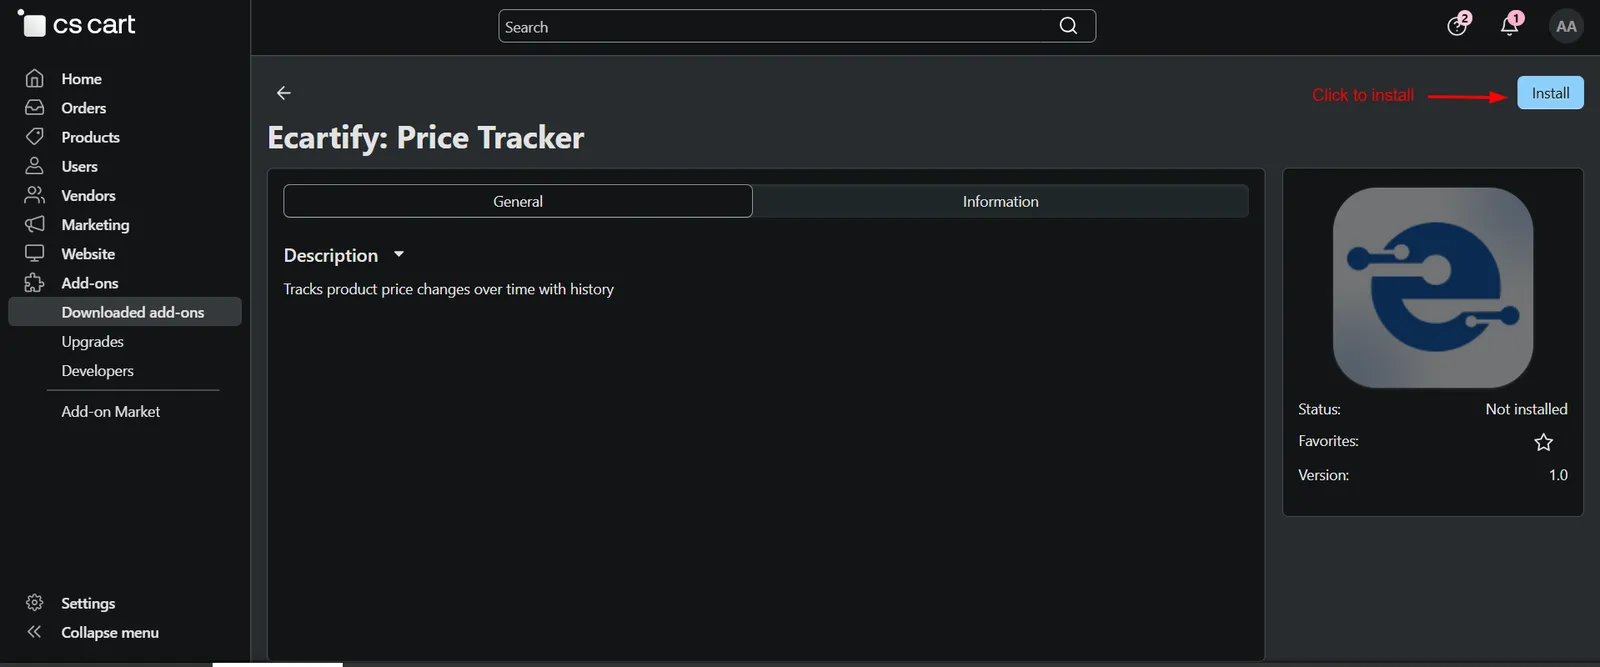
Step 1: Install the Add-on
Get Price Tracker running on your CS-Cart store in a few minutes:
- Download the Add-on – Download the Price Tracker package from the Ecartify website or CS-Cart Marketplace.
- Open Add-ons – Go to Add-ons → Manage Add-ons in the CS-Cart admin panel.
- Upload the Package – Click the "+" button and upload the Ecartify: Price Tracker package.
- Install & Activate – Click 'Install' and set the add-on status to 'ON'.
Step 2: Configure the Lowest Price Period
Go to Add-ons → Ecartify: Price Tracker → Settings to set the calculation period:
- Open Settings Tab – Open the add-on's Settings tab from the admin panel.
- Choose Lowest Price Period – Select 7, 15, 30, 60, or 90 Days from the dropdown.
- Save Configuration – Save so the storefront lowest-price badge updates based on the selected period.
Step 3: View Price Tracker in Admin Panel
Go to Products → [Select a Product] → Price Tracker tab to view the price history. Note: this tab shows data only after the product's price has changed at least once since the add-on was installed — a brand-new product with no price changes yet will show an empty graph:
- Open the Price Tracker Tab – On any product's edit page, click the Price Tracker tab.
- Use Time Filters – Switch between 7 Days, 30 Days, 3 Months, 1 Year, or All Time.
- Review Stats – Check Current, Lowest, Highest price, and % Change at a glance.
Step 4: View Price Tracker on Storefront
Customers can view price history directly on the product page, once history exists for that product:
- Open a Product Page – Visit any product page on the storefront.
- Click the Price Tracker Tab – Customers can view the same price history graph as in the admin panel. The tab is hidden for products that haven't had a price change yet.
Step 5: Lowest Price Badge on Storefront
Once configured, the badge appears automatically wherever the product price is shown, and switches between two states depending on the current price:
- "Lowest Price Was" Badge – If the current price is higher than the lowest price recorded in the configured period, the badge shows "Lowest price was [price] in last [N] days," letting shoppers know the product has been cheaper recently.
- "This Is the Lowest Price!" Badge – If the current price matches the lowest recorded price for the period, the badge switches to "This is the lowest price!" to highlight a genuine deal.
- Currency-Aware – The badge price always matches the storefront's active currency.
Real-World Benefits & Results
Buyer Trust & Transparency
Customers can see genuine price history instead of relying on unverifiable "sale" claims.
The lowest price badge helps shoppers instantly spot a good deal, and confirms it clearly when the current price is the best it's been.
Price data always matches the storefront's active currency.
Simple for Admins
Price history is captured and graphed automatically every time a product's price changes.
Filter price history by 7 days up to All Time with a single click.
Just set the lowest-price period once — the badge updates itself going forward.
Price Transparency That Builds Buyer Confidence
Give your customers the full picture with real price history, and let a smart lowest-price badge do the selling for you — automatically, across every currency.
Visual, filterable price history on both admin panel and storefront.
Automatically highlights genuine deals, and confirms when the current price is the lowest it's been.
Prices always shown in the storefront's active currency.
Set the lowest-price period once from the settings tab.
Dedicated Price Tracker tab on every product page for customers, once price history exists.
Current, Lowest, Highest and % Change, calculated automatically.