

Saferpay Payment Gateway – Secure Payments & Easy Refunds
Accept payments securely on your CS-Cart store with Saferpay, and manage refunds, currency conversion, and vendor permissions — all from your admin panel.Get Started
Saferpay Payment Gateway for CS-Cart – Secure Checkout & Simplified Refunds
Give your customers a secure, trusted checkout experience with the Saferpay add-on, built on Saferpay's full Initialize → Assert → Capture transaction flow. Every payment is verified before funds are captured, keeping your store protected against failed or incomplete transactions.
Refunds no longer need a separate dashboard — process full or partial refunds directly from the CS-Cart admin panel, fully connected to the RMA (Return Merchandise Authorization) flow. Marketplace vendors can also be given controlled refund permissions, reducing manual work for admins.
Multi-currency stores are handled automatically with coefficient-based currency conversion, so order totals stay accurate no matter which currency the customer pays in.
Key Features of Saferpay Integration
Payment Processing
Full Initialize → Assert → Capture flow ensures every transaction is verified with Saferpay before funds are actually captured, reducing failed or duplicate payments.
Automatic currency conversion using CS-Cart's secondary currency and coefficient-based calculation, so order totals stay accurate for customers paying in a different currency.
Refund Management
Process full or partial refunds directly from the order admin panel, without logging into a separate Saferpay dashboard.
Refunds are connected to CS-Cart's Return Merchandise Authorization flow, keeping return records and refund records in sync automatically.
Grant marketplace vendors controlled refund access, so admins don't have to process every single refund manually.
Configuration
Map Saferpay transaction statuses to CS-Cart order statuses directly from the payment method's Configure popup — no addon settings page hunting required.
Step-by-Step Setup Guide
Step 1: Install the Add-on
Get Saferpay running on your CS-Cart store in a few minutes:
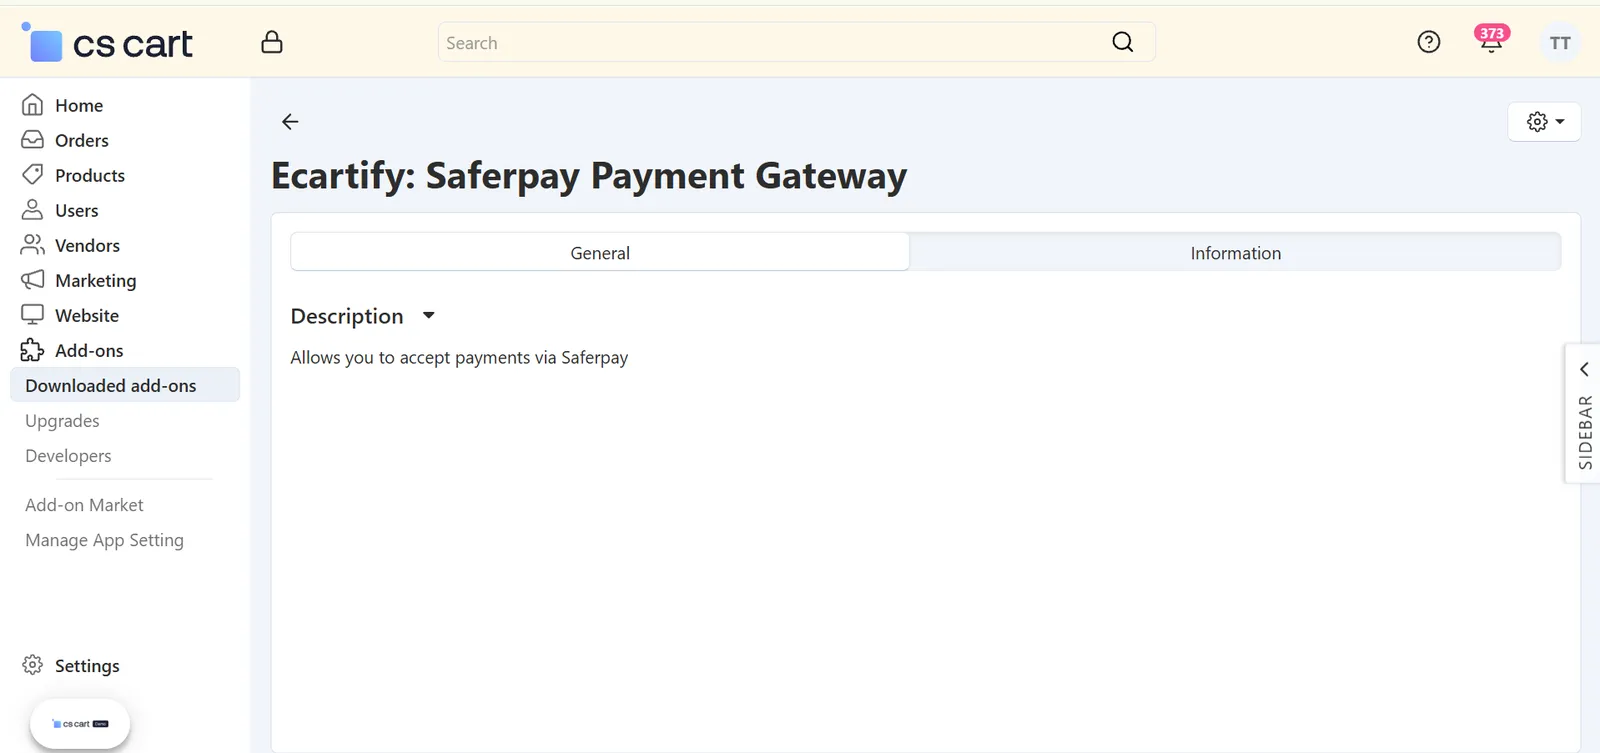
- Download the Add-on – Download the Saferpay package from the Ecartify website or CS-Cart Marketplace.
- Open Add-ons – Go to Add-ons → Manage Add-ons in the CS-Cart admin panel.
- Upload the Package – Click the "+" button and upload the Ecartify: Saferpay package.
- Install & Activate – Click 'Install' and set the add-on status to 'ON'.
Step 2: Add Saferpay as a Payment Method
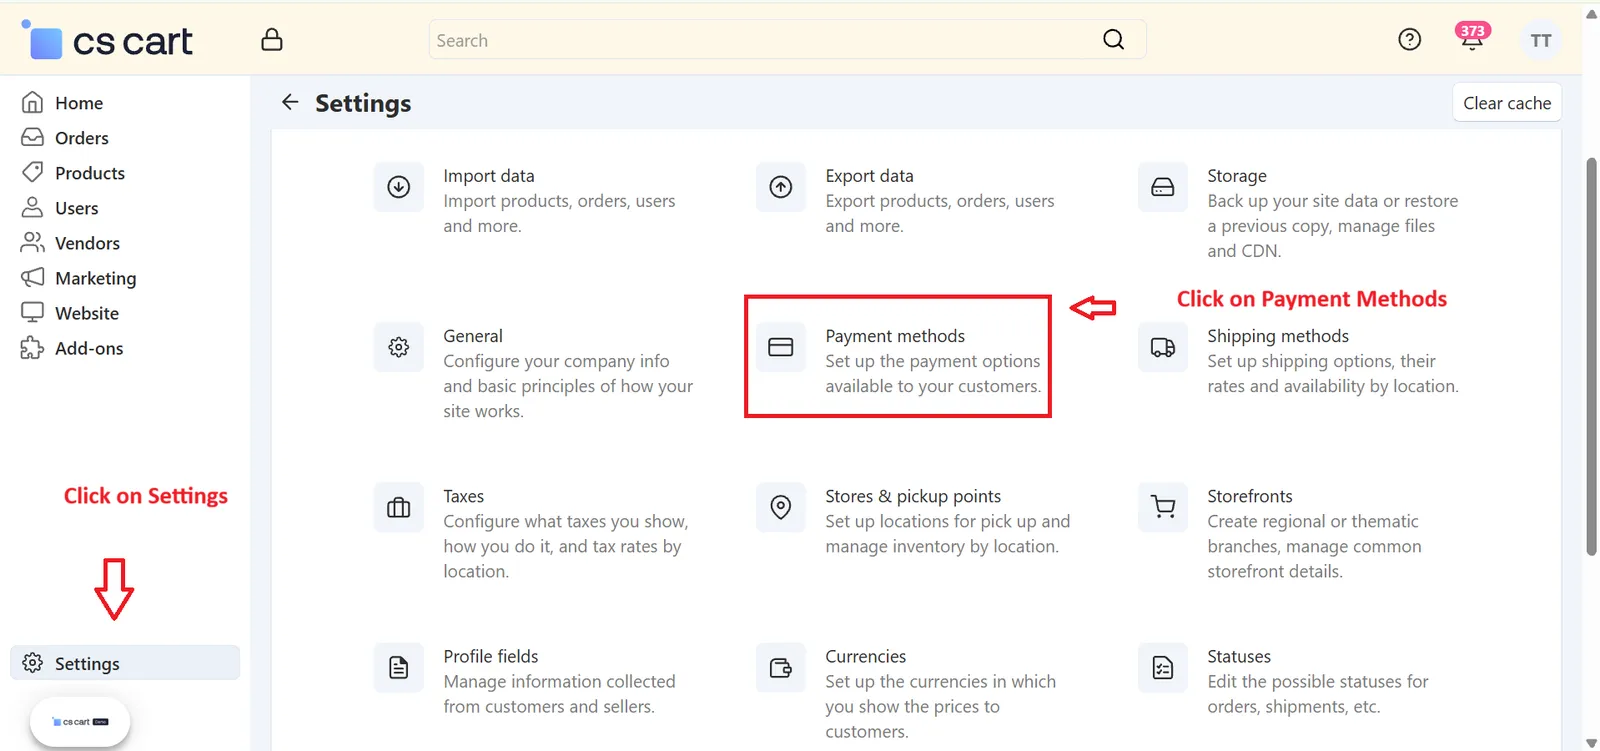
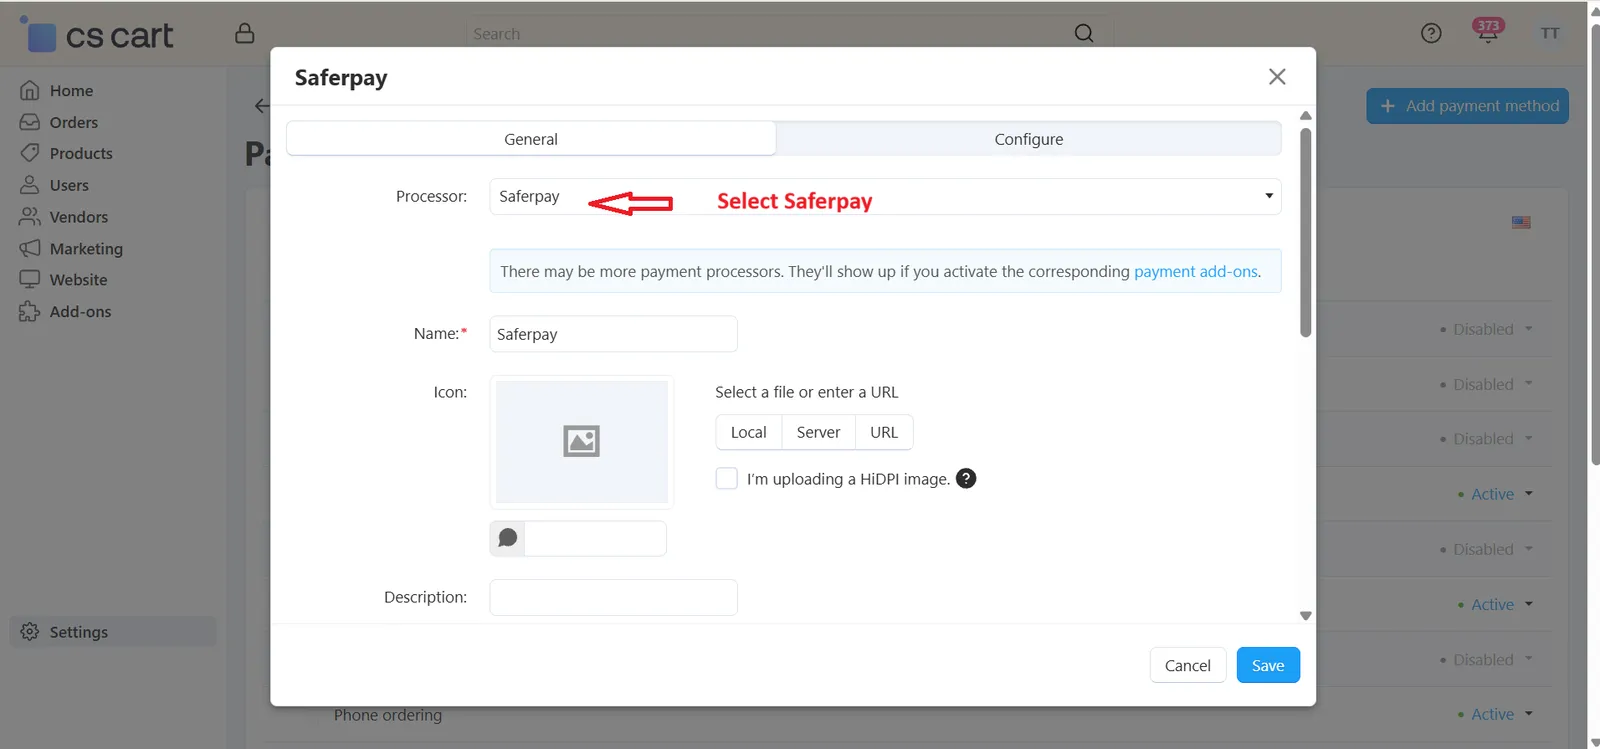
Go to Administration → Payment Methods → Add Payment Method and select Saferpay as the processor:
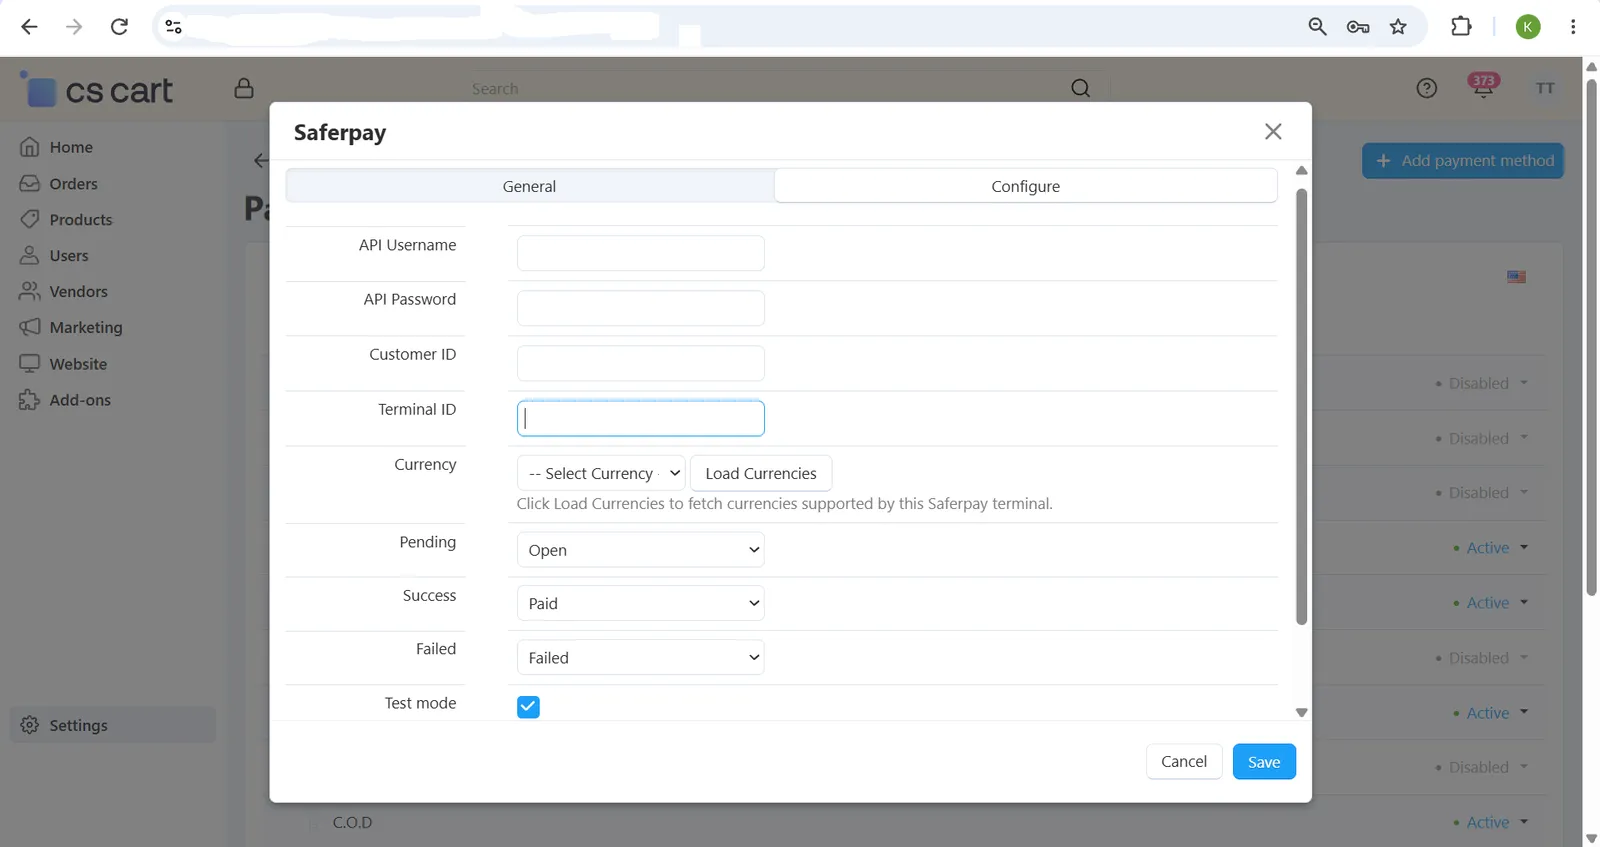
- Enter API Credentials – Add your Saferpay Customer ID, Terminal ID, and API credentials as provided by Saferpay.
- Choose Environment – Select Test mode first to verify the integration before switching to Live.
- Save the Payment Method – Save so it becomes available on your storefront checkout.
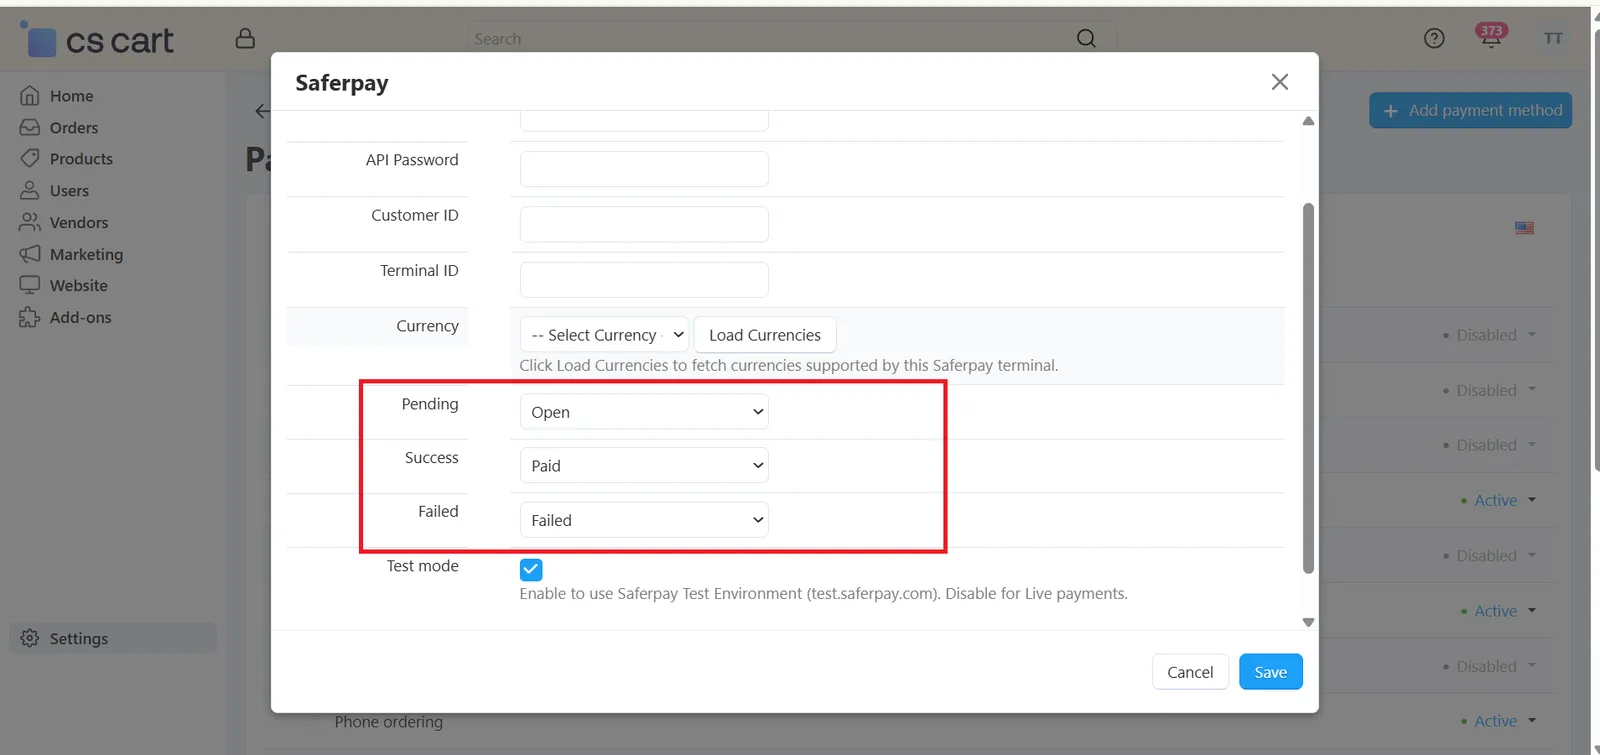
Step 3: Configure Status Mapping
Open the payment method's Configure popup to map Saferpay statuses to CS-Cart order statuses:
- Map Each Status – Assign a CS-Cart order status for each Saferpay transaction outcome, such as Captured, Authorized, or Failed.
- Save Configuration – Once saved, order statuses will update automatically as Saferpay reports transaction outcomes.
Step 4: Set Up Multi-Currency Conversion
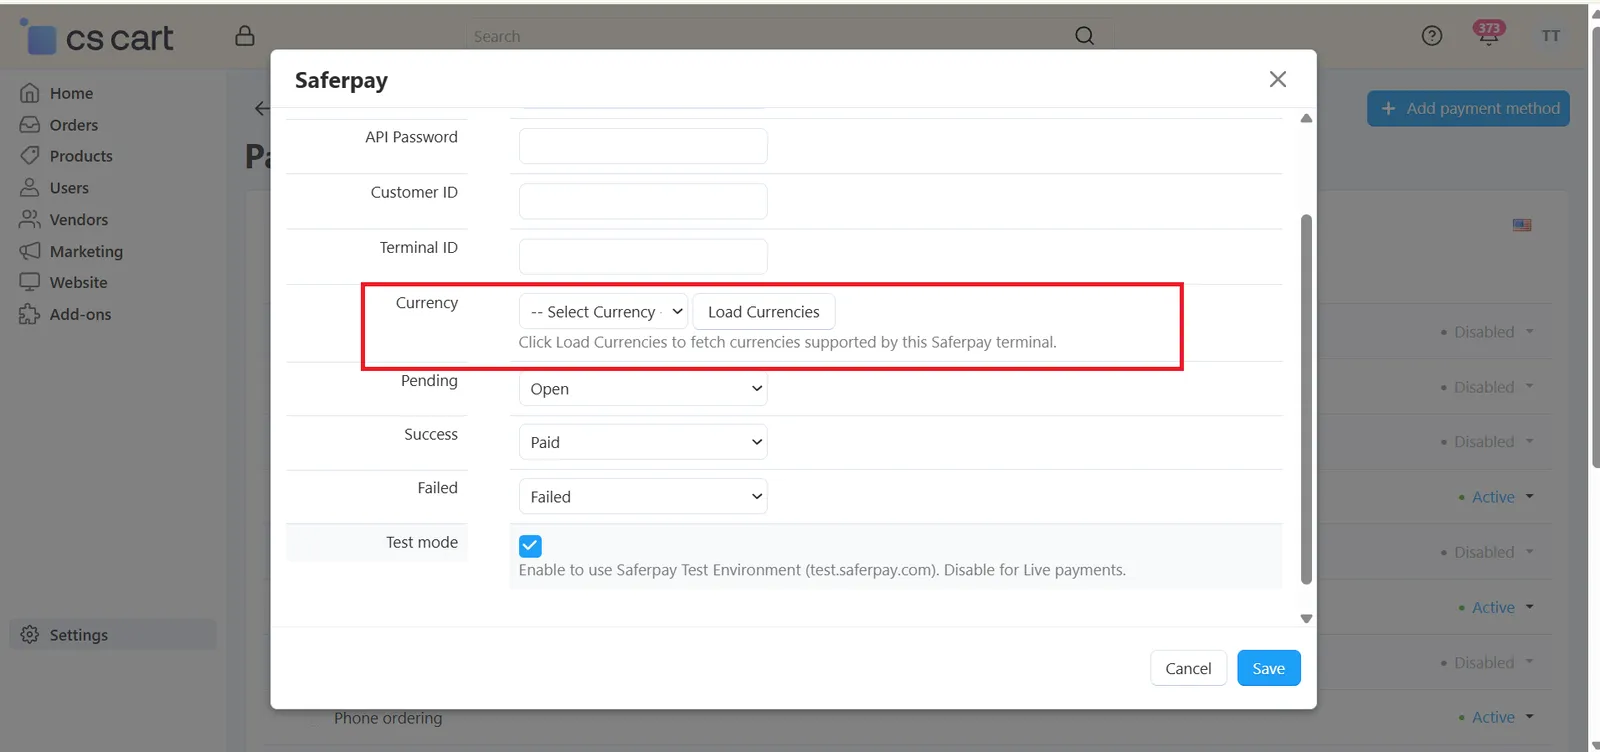
If your store sells in multiple currencies, make sure the secondary currency is configured correctly:
- Set Secondary Currency – Configure your store's CART_SECONDARY_CURRENCY under General Settings.
- Automatic Conversion – The addon automatically converts order totals using the configured coefficient, so the amount sent to Saferpay always matches what the customer sees at checkout.
Step 5: Test a Transaction
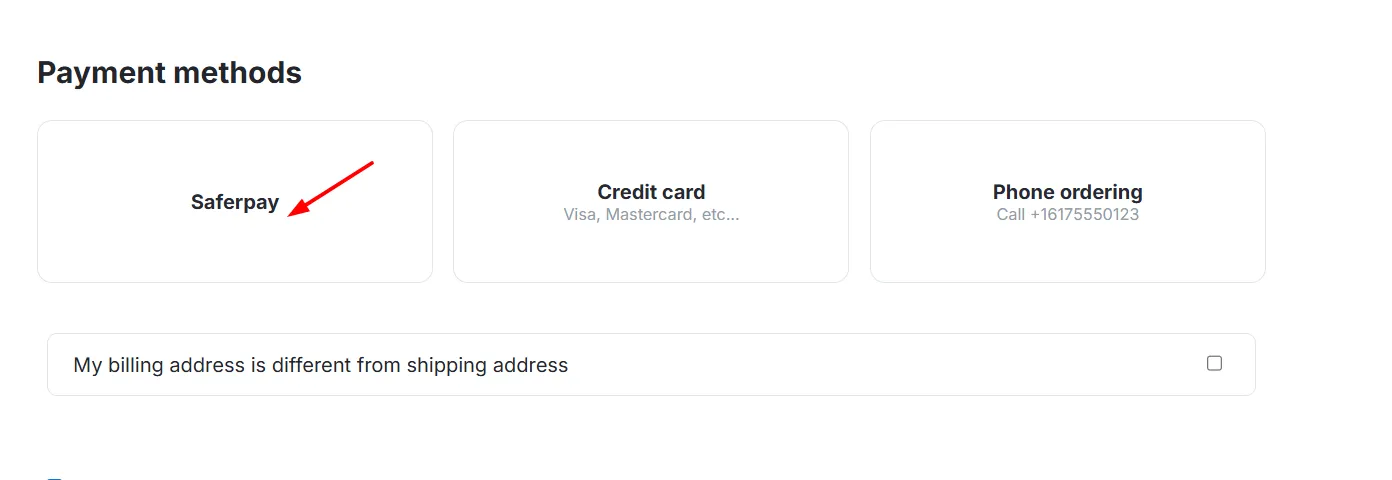
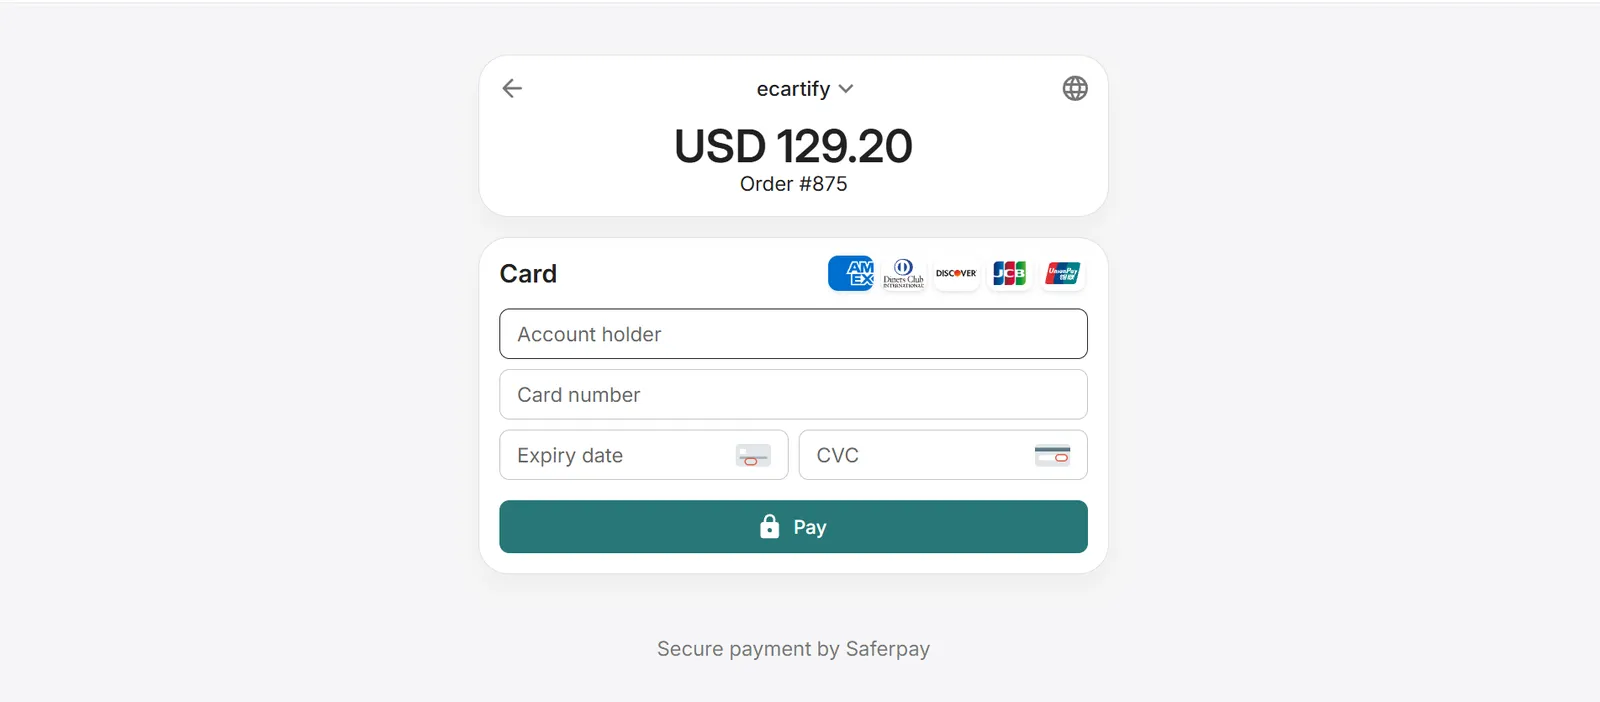
Before going live, place a test order and confirm the full payment flow works end-to-end:
- Initialize:
Customer is redirected to Saferpay's secure payment page at checkout. - Assert:
Saferpay confirms the transaction result back to CS-Cart once the customer completes payment. - Capture:
Funds are captured and the order status updates automatically based on your status mapping.
Step 6: Process a Refund
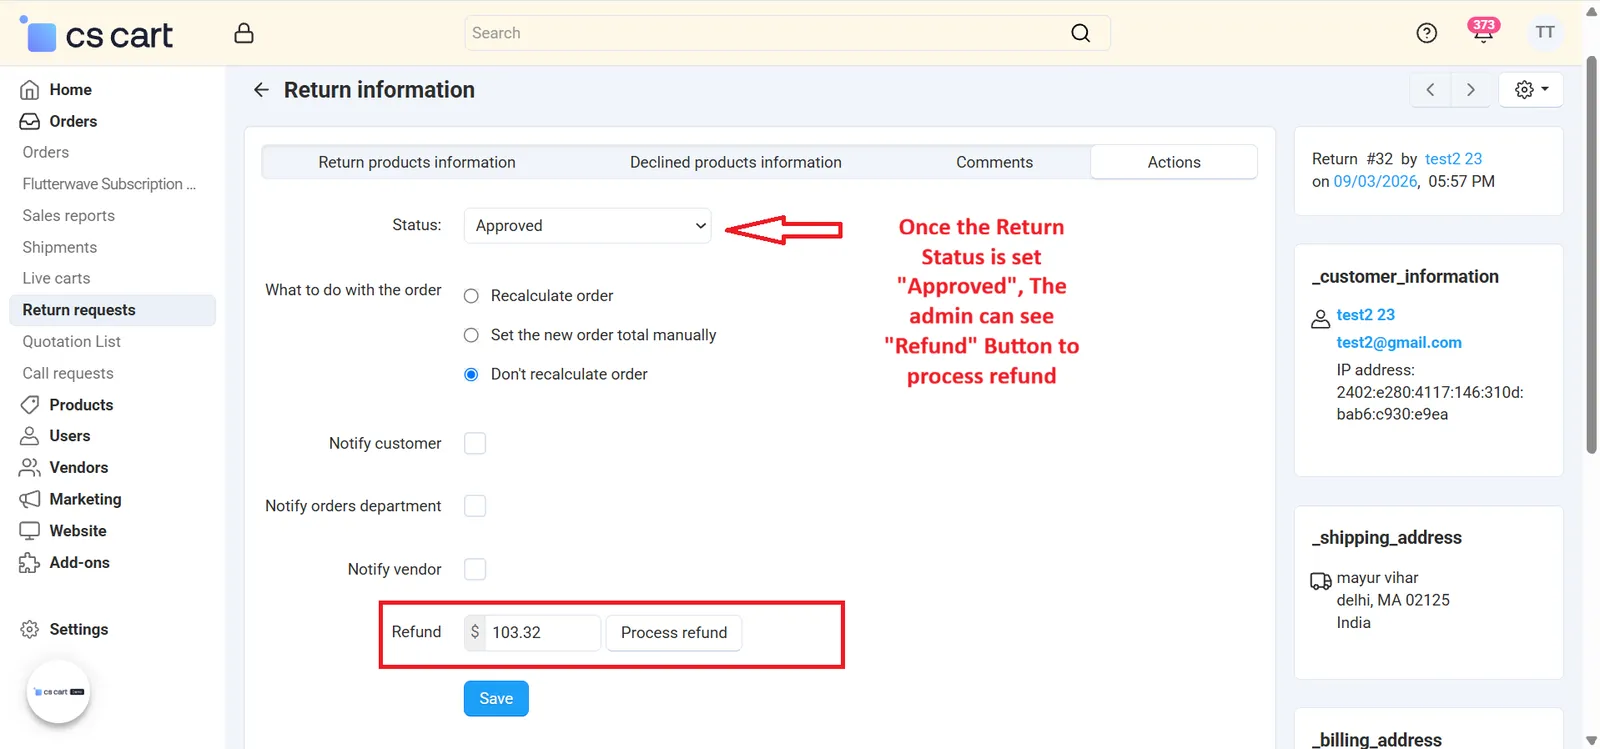
Go to Orders → [Select an Order] to issue a refund directly from the admin panel:
- Open the Refund Panel – On a paid order, open the Saferpay refund section within the order details page.
- Choose Full or Partial Refund – Enter the refund amount, or refund the full order total in one click.
- Confirm Refund – The refund is sent to Saferpay directly, and the order/RMA record updates automatically — no manual reconciliation needed.
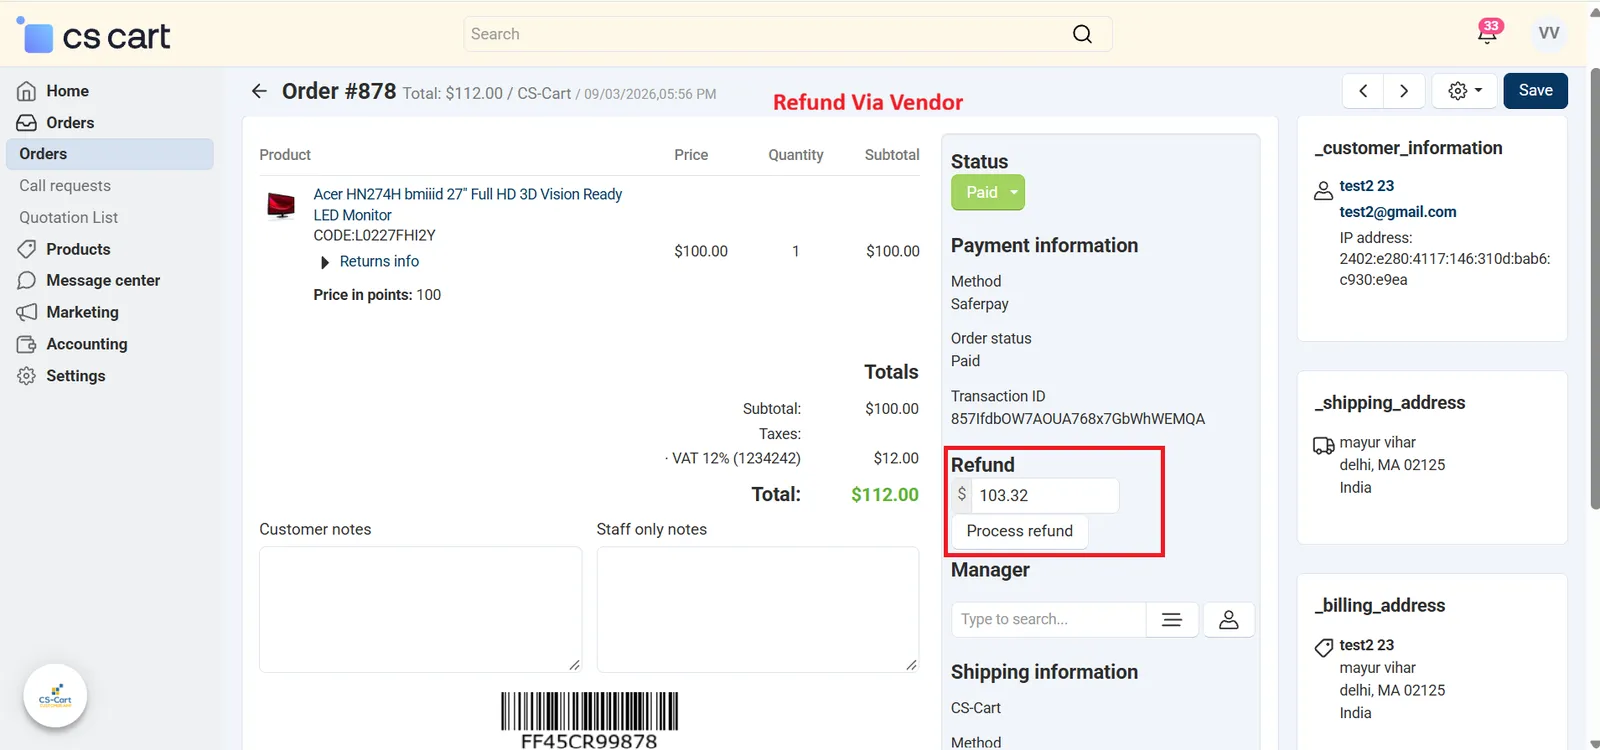
Step 7: Process Refund from Vendor Panel
Go to Vendor Panel → Orders → [Select an Order]. If a refund request has been submitted for that order, the Refund button will be visible on the order details page.
Real-World Benefits & Results
Secure & Reliable Payments
The Initialize → Assert → Capture flow ensures funds are only captured after payment is verified.
Reduce failed or duplicate transactions with a properly verified payment flow.
Coefficient-based conversion keeps order totals accurate across currencies.
Simplified Refunds
Process refunds directly from the CS-Cart admin panel.
Refund records stay in sync with return requests automatically.
Let vendors handle their own refunds, reducing admin workload.
Easy Configuration
Configure Saferpay-to-CS-Cart status mapping right from the payment method popup.
Verify the full flow in Test mode before switching to Live transactions.
Works out of the box for both single-vendor and multi-vendor CS-Cart stores.
Secure Payments, Simpler Refunds — Starting Today
Give your customers a trusted checkout experience with Saferpay, and give your team a refund process that doesn't need a separate dashboard or manual reconciliation.
Full Initialize → Assert → Capture flow protects your store from failed transactions.
Process full or partial refunds directly from the admin panel, connected to RMA.
Automatic coefficient-based conversion keeps order totals accurate.
Give vendors controlled refund permissions to reduce admin workload.
Configure status mapping and test transactions in minutes.
Test mode lets you verify everything before going live.