

Smart Group – Automated Customer Segmentation
Automatically segment customers based on order history, search behaviour, activity, risk, and geography — with AI-powered insights.Get Started
Ecartify: Smart Group for CS-Cart – Automated Customer Segmentation & AI Insights
Stop treating every customer the same. The Smart Group add-on automatically analyses customer behaviour, including order history, search activity, engagement, risk, and location, and places customers into relevant smart groups.
Each customer gets health and risk scores, while smart tags can automatically trigger emails, coupons, or webhooks when specific conditions are met. Smart Groups can also be synced with CS-Cart usergroups to apply existing pricing, discount, and permission rules.
With the optional OpenAI integration, you can use Get AI Take to receive a simple, actionable recommendation for individual customers. The built-in Pipeline Tester lets you verify segmentation results, while the automated Cron Pipeline keeps customer groups and tags updated.
Key Features of Smart Group
Customer Segmentation
Every active customer is continuously evaluated across five smart group types — Order, Search, Activity, Risk, and Geo — and assigned or removed automatically as their behavior changes.
Each customer gets a live Health Score and Risk Score, plus total orders, total spent, visits, refunds, disputes, and chargebacks — all recomputed on every pipeline run.
Automation & Smart Actions
Create tags like "Frequent Searcher" with priority-based auto-assign rules that fire automatically when a customer matches the criteria — no manual tagging required.
Fire an email, issue a coupon, or call a webhook the moment a customer newly qualifies for a smart tag — turning segmentation into automated marketing.
A single secured cron endpoint recomputes health & risk, re-evaluates every group type, fires smart tag actions, and expires old memberships in configurable batch sizes.
CS-Cart Integration
Map any Smart Group to a native CS-Cart usergroup and choose whether to sync on assignment, removal, or both — your existing pricing and permission rules apply instantly.
Testing & Customer Monitoring
Test the full segmentation pipeline against a single customer or a batch, and watch each stage — Health Snapshot, Risk Metrics, Evaluate Groups, Assign Groups, Evaluate Tags — run step by step.
A single table view across all customers showing Health, Orders, Spent, Days Since Order, Risk, Groups, and Tags — sort through your whole customer base at a glance.
Data & AI
Every storefront search query is optionally logged and used to power Search Interest Groups and the Frequent Searcher smart tag.
Set independent retention windows for search logs, visit logs, and action logs (default 90/180/180 days) — old entries are purged automatically during cron cleanup.
Connect an OpenAI API key and get a one-click, plain-English recommendation on any customer dashboard — e.g. suggesting a targeted promo based on recent search behavior and purchase gaps.
Install 2 CS-Cart usergroups, 6 sample smart groups, 3 pre-configured smart tags, and 2 usergroup mappings instantly — see the whole addon working before you configure anything by hand.
Step-by-Step Setup Guide
Step 1: Install the Add-on
Get Smart Group running on your CS-Cart store in just a few minutes:
- Download the Add-on – Download the Smart Group package from the Ecartify website or CS-Cart Marketplace.
- Open Add-ons – Go to Add-ons → Manage Add-ons in the CS-Cart admin panel.
- Upload the Package – Click the "+" button and upload the Ecartify: Smart Group package.
- Install & Activate – Click 'Install' and set the add-on status to 'ON'.
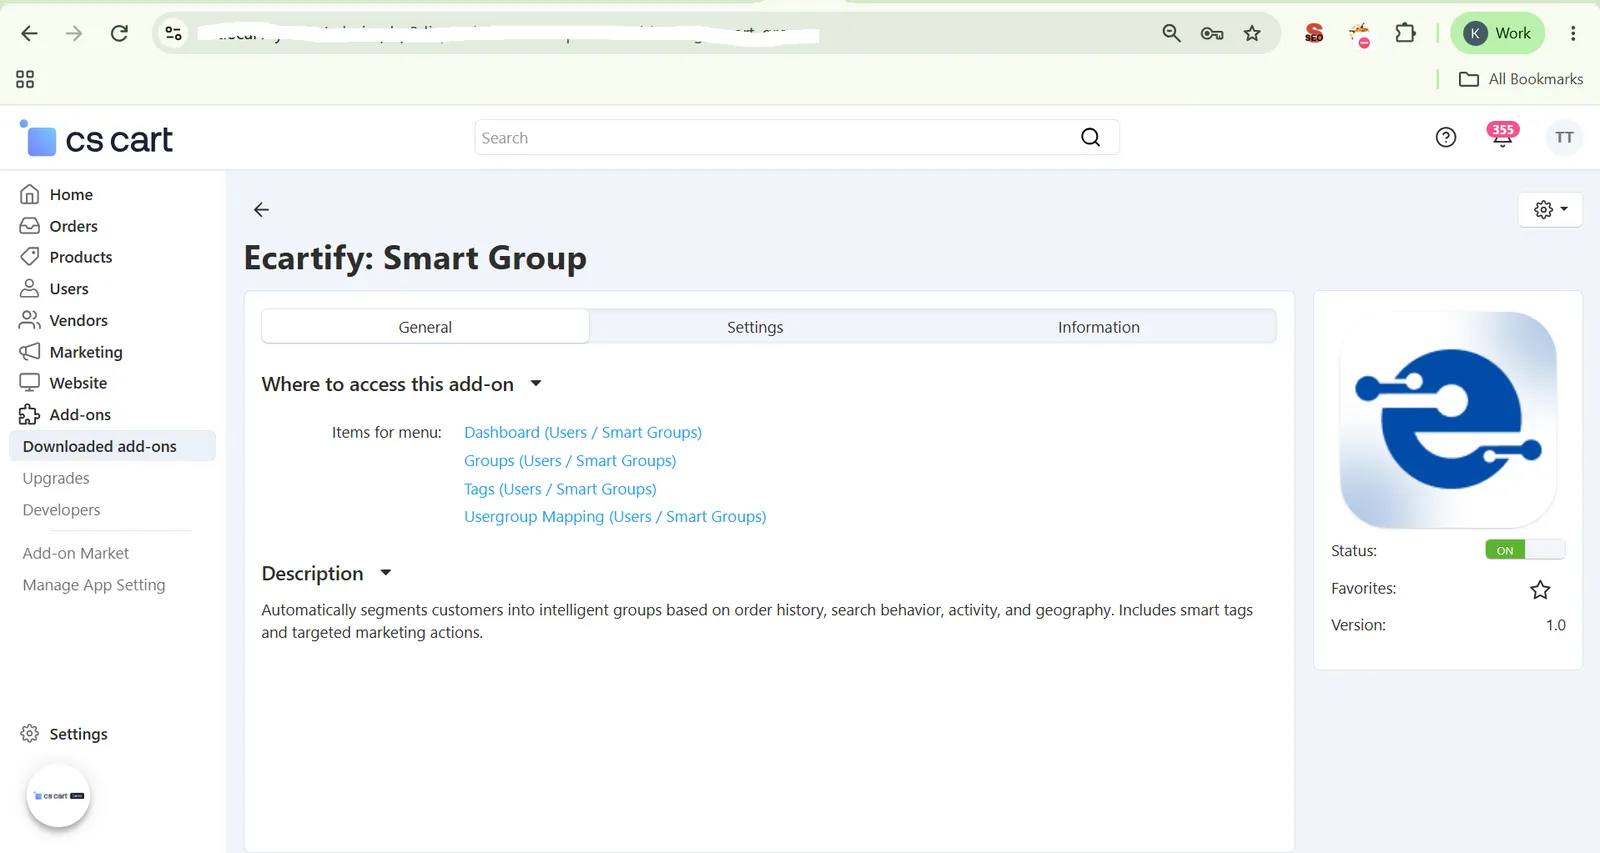
- Open Settings – Go to Add-ons → Downloaded Add-ons → Ecartify: Smart Group → Settings to continue configuration.
Step 2: Configure General Settings
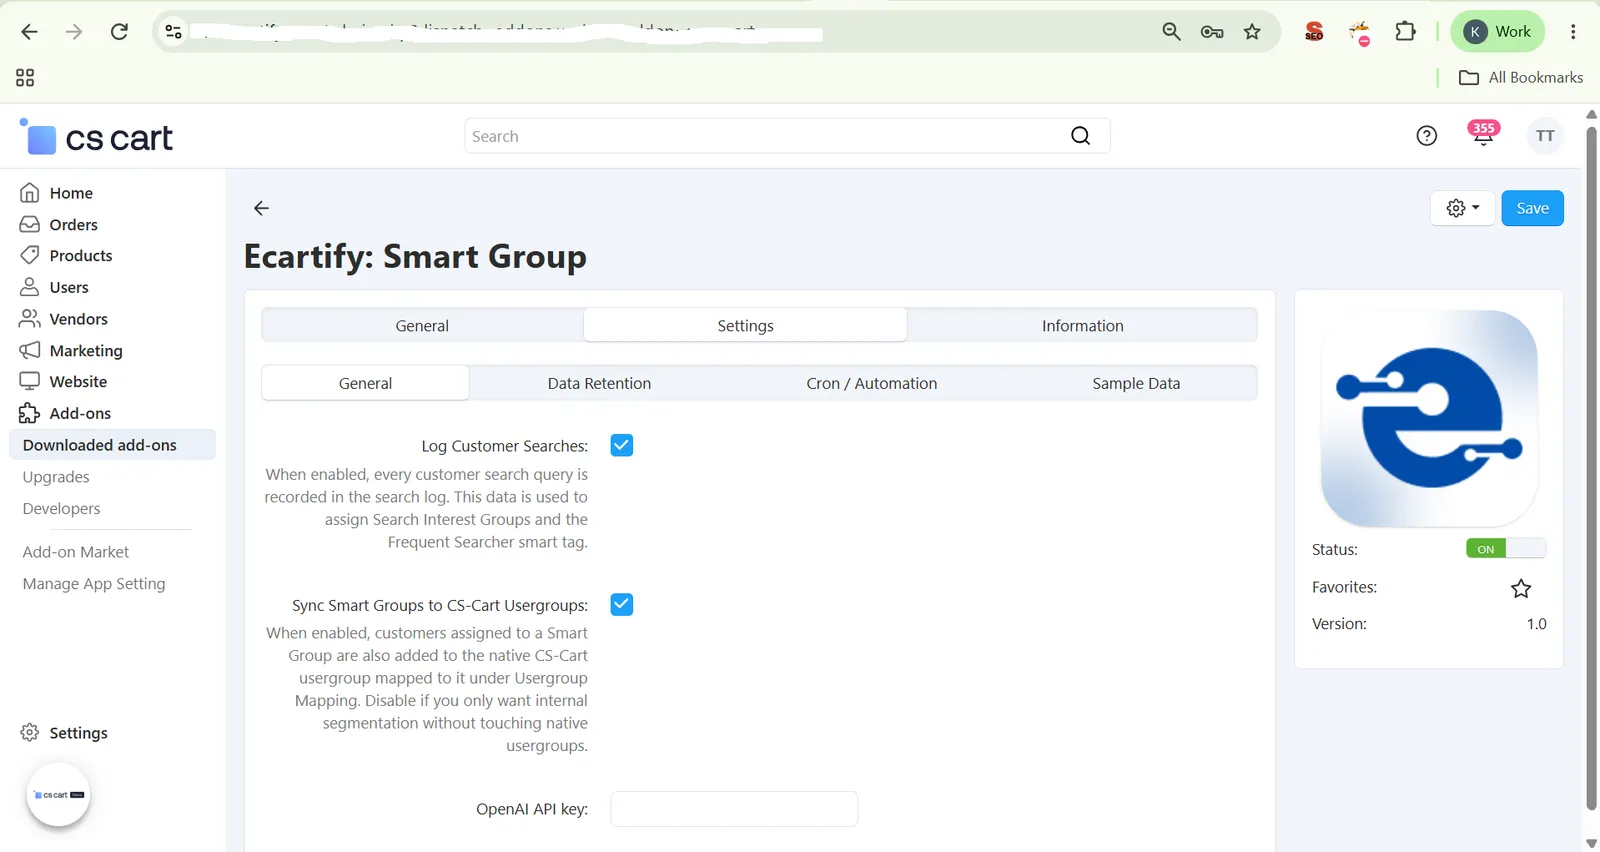
Inside the Settings tab, open the General sub-tab to configure customer search logging, CS-Cart usergroup syncing, and optional AI-powered recommendations:
- Enable Customer Search Logging – When enabled, every customer search query is recorded in the search log. This data powers Search Interest Groups and the Frequent Searcher smart tag.
- Enable CS-Cart Usergroup Sync – When enabled, customers assigned to a Smart Group are also added to the native CS-Cart usergroup mapped to it under Usergroup Mapping. Disable this if you only want internal segmentation without touching native usergroups.
- Add OpenAI API Key (Optional) – Enter your OpenAI API key to unlock the "Get AI Take" recommendation button on every customer dashboard.
Step 3: Configure Data Retention
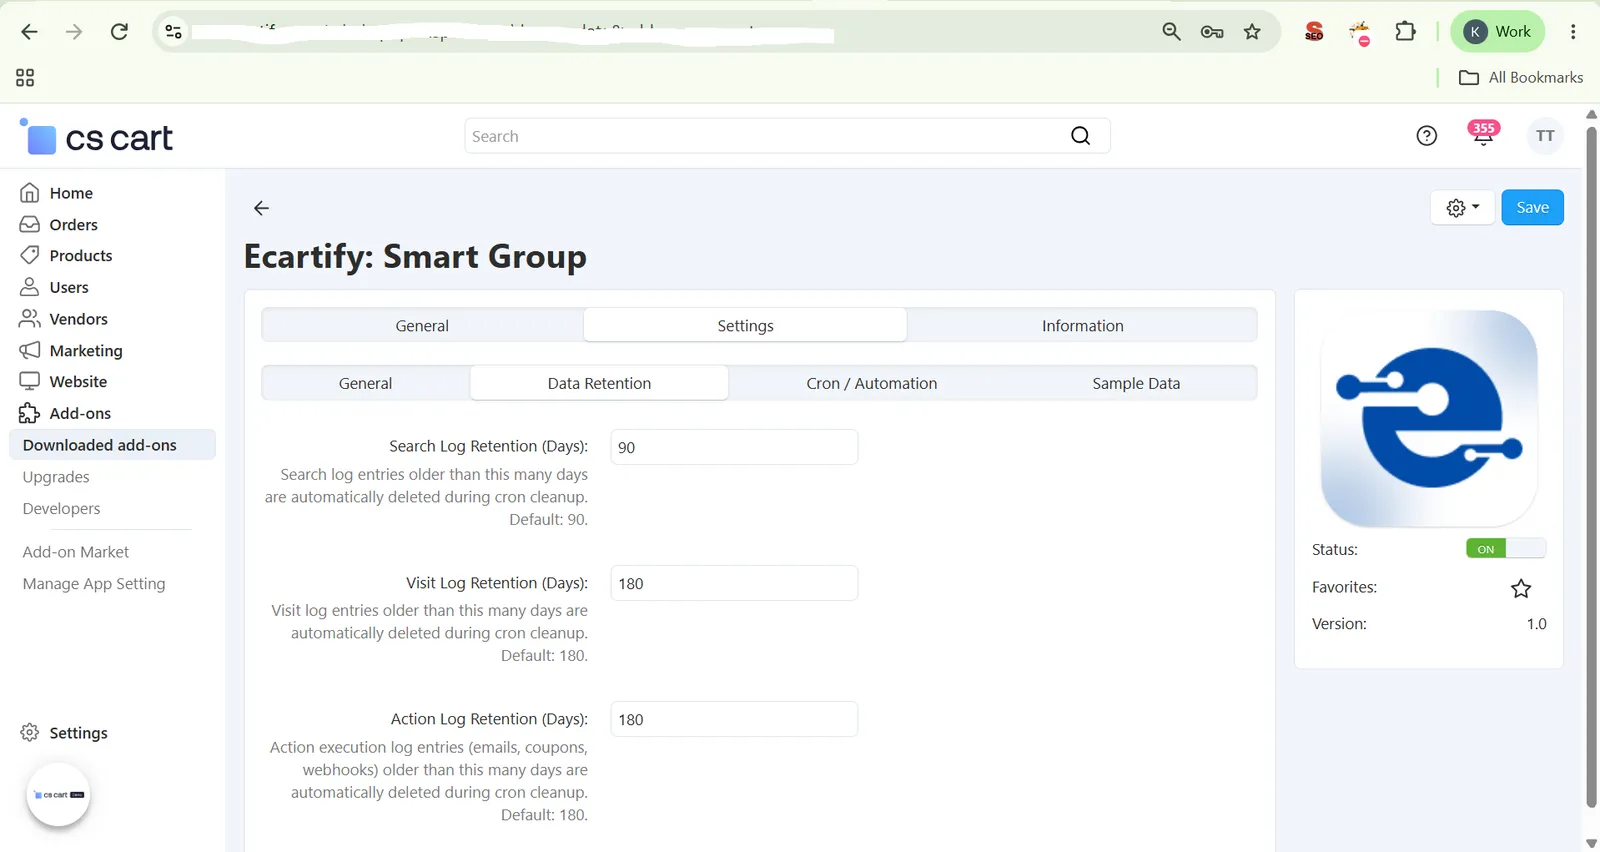
Set how long search, visit, and action logs are stored before they are automatically deleted during cron cleanup.
- Search Log Retention (Days):
Defines how long customer search logs are stored. Older records are automatically deleted during cron cleanup. Default: 90 days. - Visit Log Retention (Days):
Defines how long customer visit logs are stored. Older records are automatically deleted during cron cleanup. Default: 180 days. - Action Log Retention (Days):
Defines how long action logs such as emails, coupons, and webhooks are stored. Older records are automatically deleted during cron cleanup. Default: 180 days.
Step 4: Configure Cron / Automation
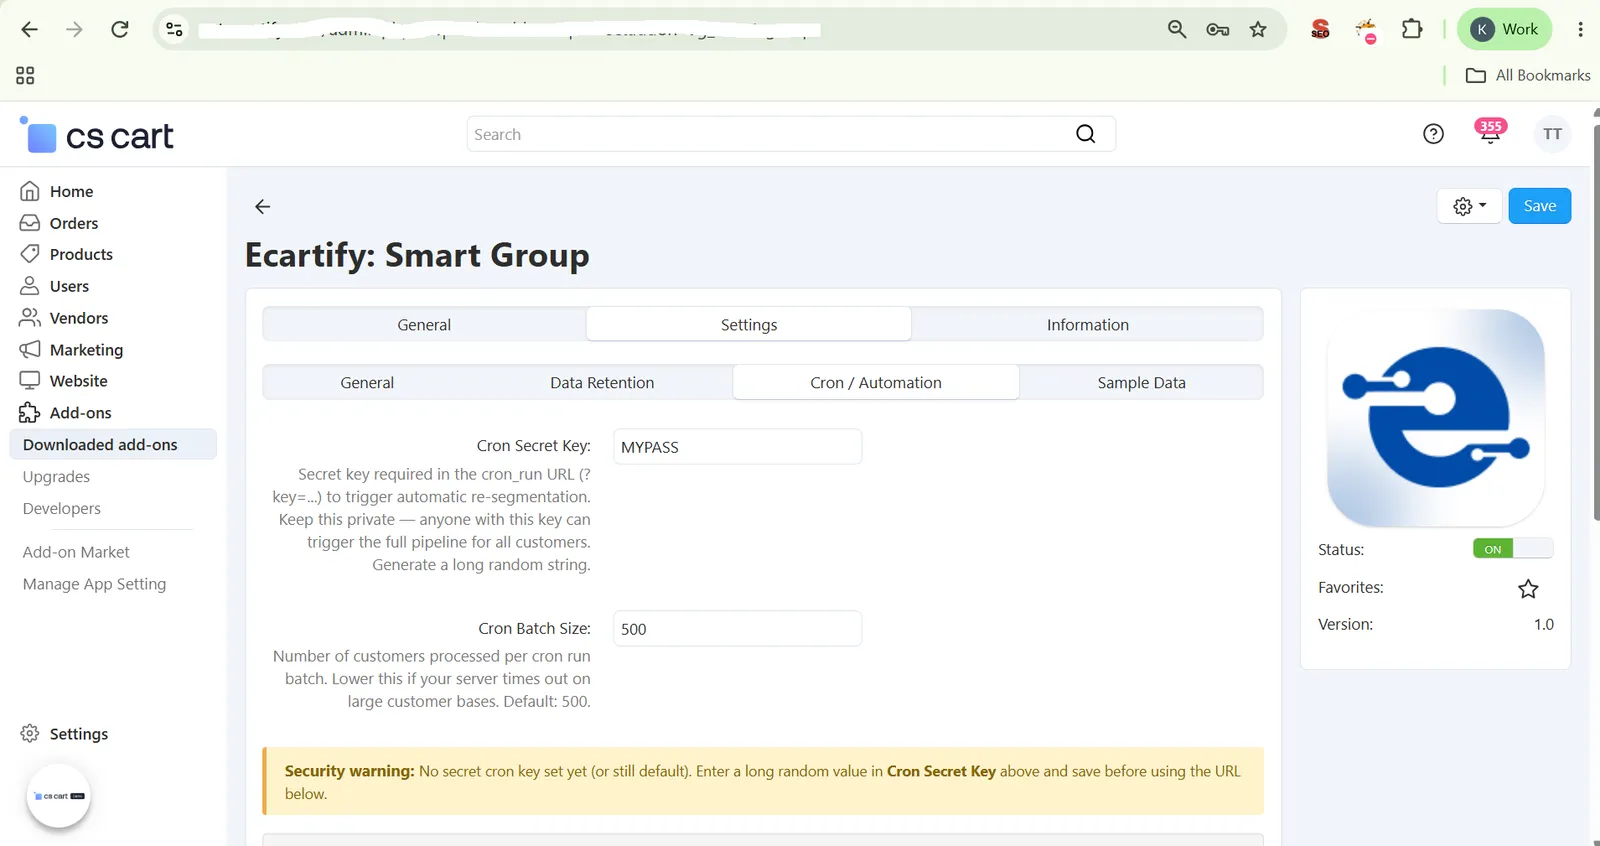
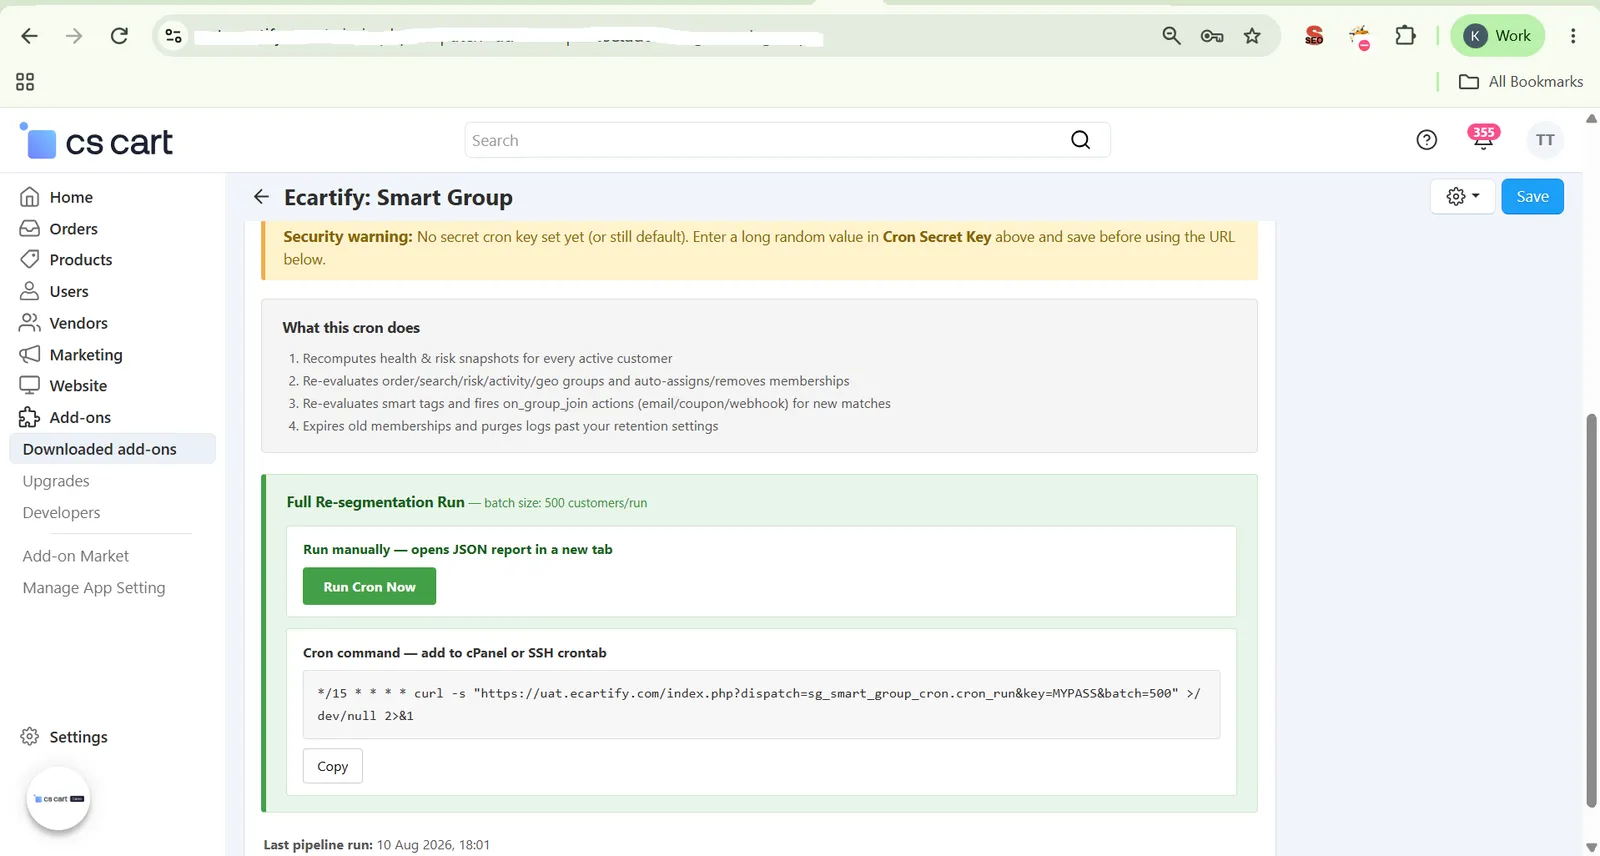
Open the Cron / Automation sub-tab to secure and schedule the re-segmentation pipeline that keeps every customer's groups and tags up to date:
- Cron Secret Key:
Required in the cron_run URL (?key=...) to trigger automatic re-segmentation. Keep this private — anyone with this key can trigger the full pipeline for all customers. Generate a long random string. - Cron Batch Size:
Number of customers processed per cron run batch. Lower this if your server times out on large customer bases. Default: 500. - What the Cron Does:
Recomputes health & risk snapshots, re-evaluates order/search/risk/activity/geo groups, re-evaluates smart tags and fires on_group_join actions, then expires old memberships and purges logs past your retention settings.
Run and Verify the Cron
After saving the Cron Secret Key, use Run Cron Now to test the pipeline manually. For automatic execution, copy the generated Cron Command and add it to your cPanel or SSH cron job. Check Last Pipeline Run to verify when the pipeline was last executed:
- Run Cron Now:
Click Run Cron Now to manually trigger the full segmentation pipeline on demand and open the JSON report in a new tab — the fastest way to test your configuration before scheduling it. - Cron Command:
Copy the auto-generated cron command and add it to your cPanel or SSH crontab so the pipeline runs automatically on schedule, without any manual trigger. - Last Pipeline Run:
Check this timestamp anytime to confirm exactly when the cron last executed — a quick way to verify your automation is actually running as scheduled.
Step 5: Install Sample Data (Optional)
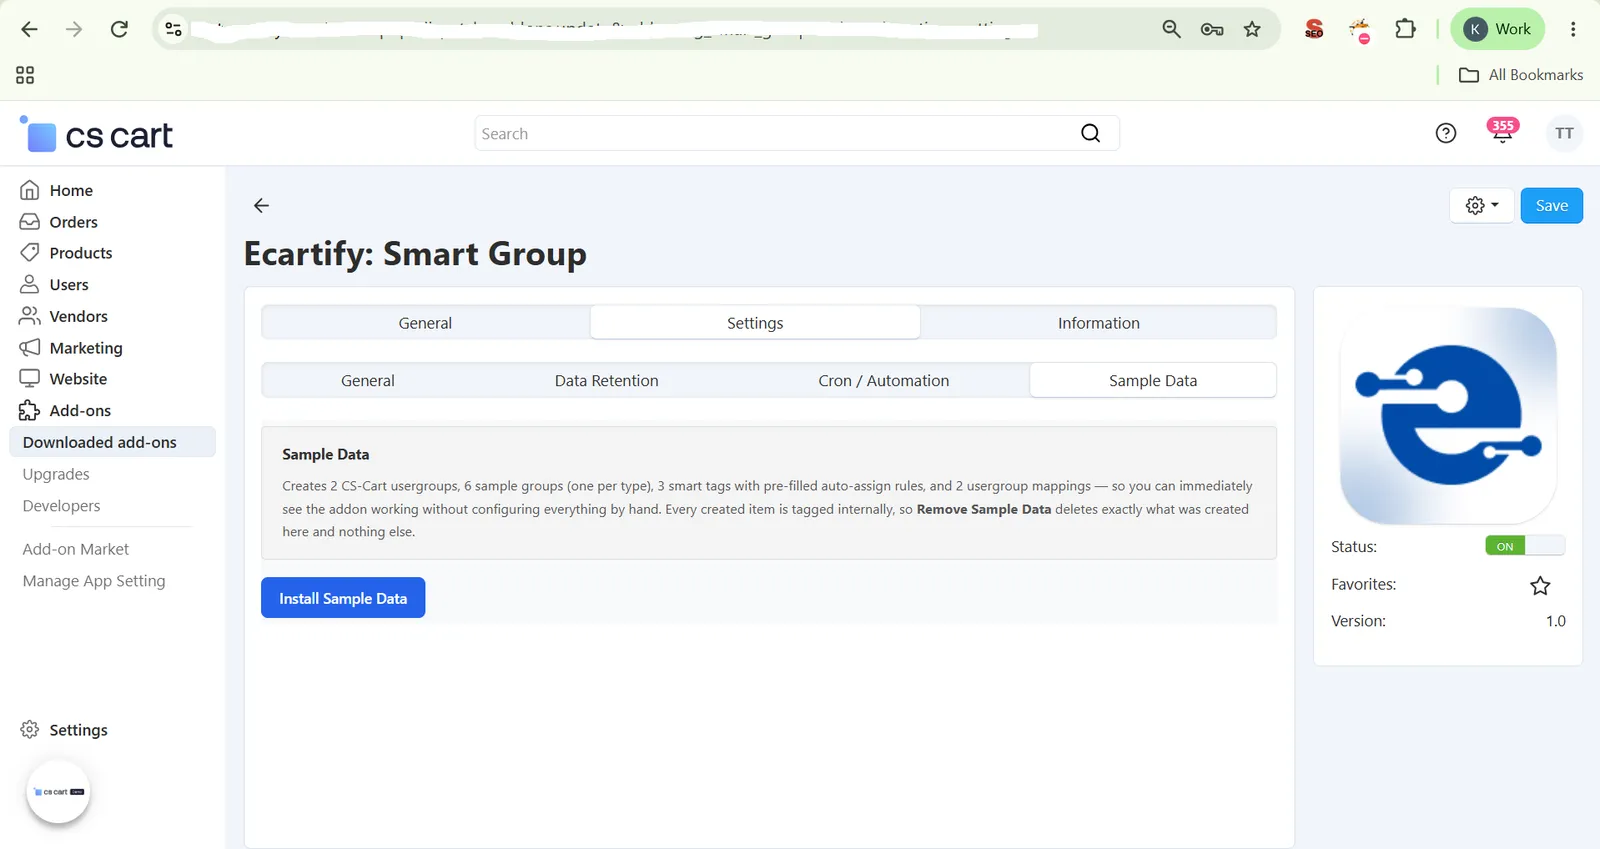
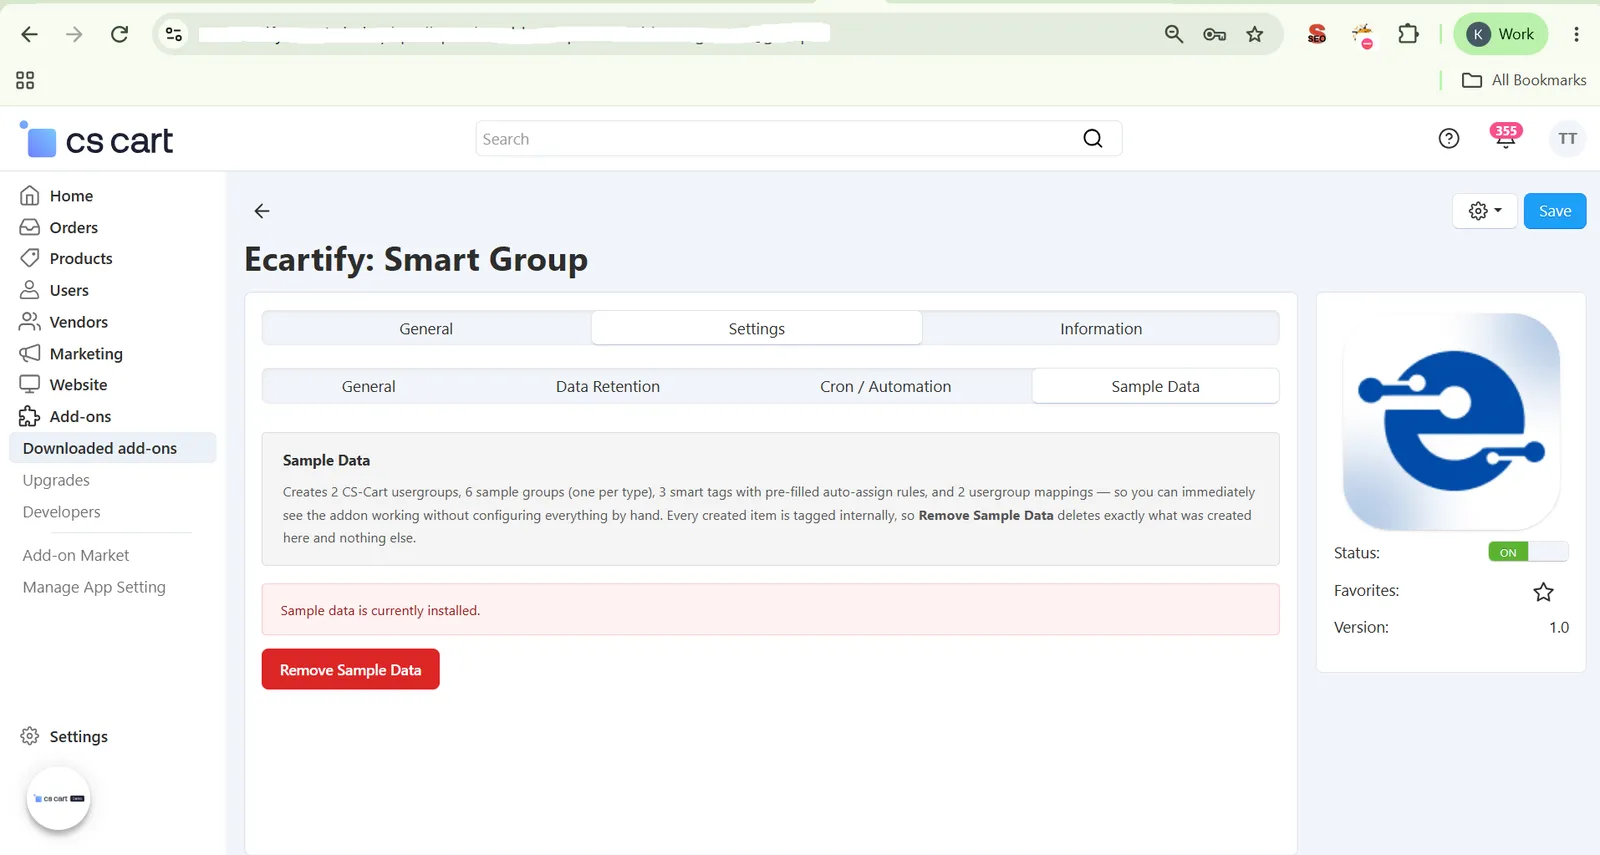
New to Smart Group? Switch to the Sample Data sub-tab to see the addon working immediately, without configuring anything by hand:
- One-Click Install:
Clicking Install Sample Data creates: 2 CS-Cart Usergroups, 6 Sample Smart Groups (one per type), 3 Smart Tags with pre-filled auto-assign rules, and 2 Usergroup Mappings — so you can see the whole addon working before configuring anything by hand. - Safe to Remove:
Remove Sample Data deletes only the data created by the sample-data setup. Existing store data will not be affected.
Step 6: Test the Segmentation Pipeline
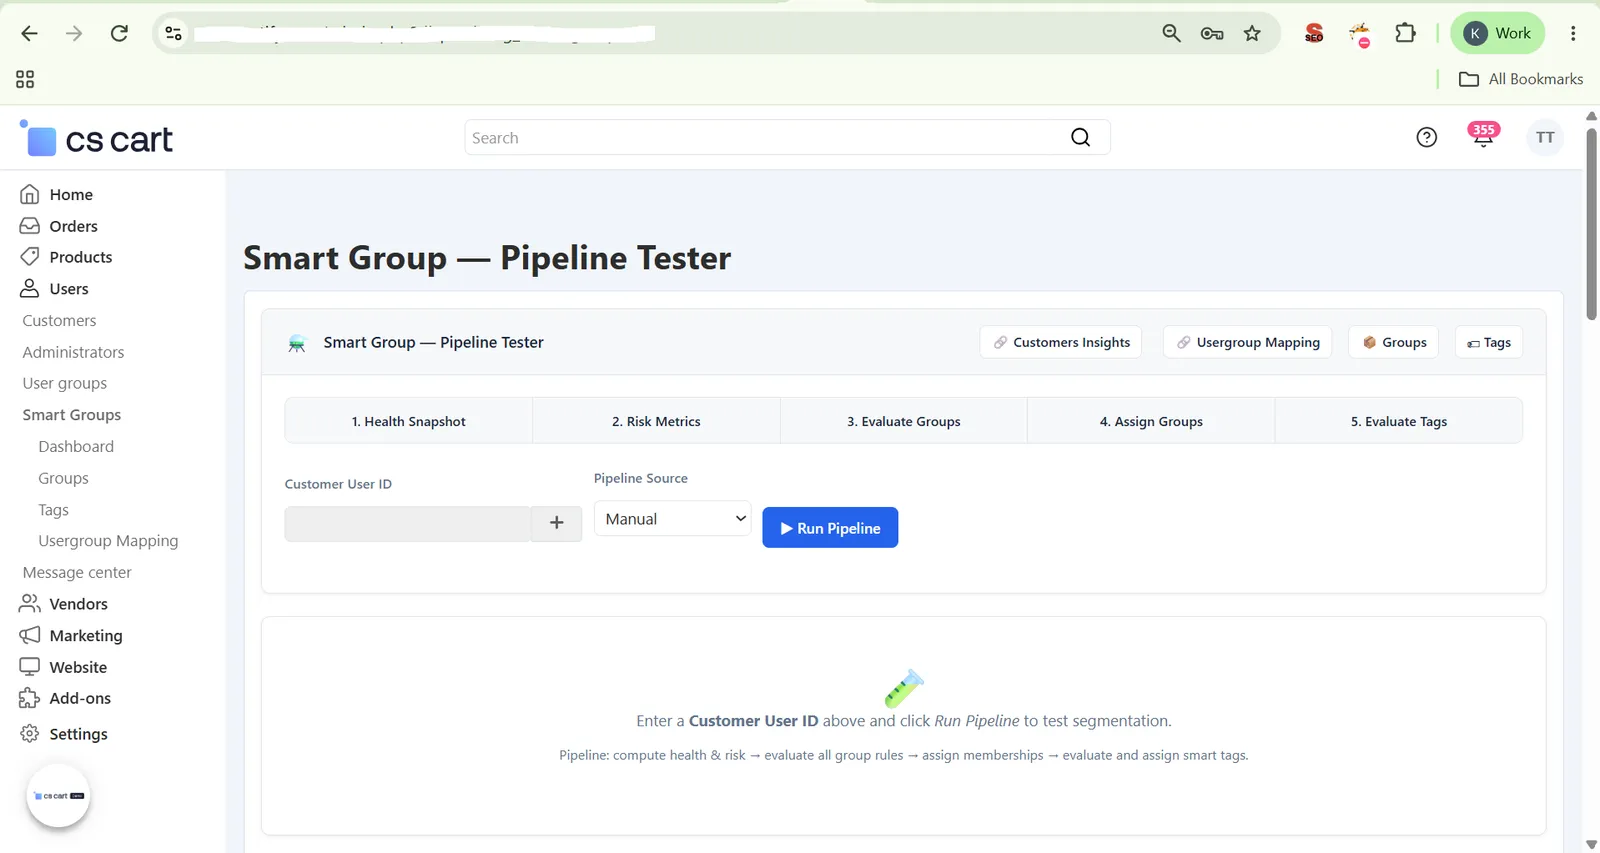
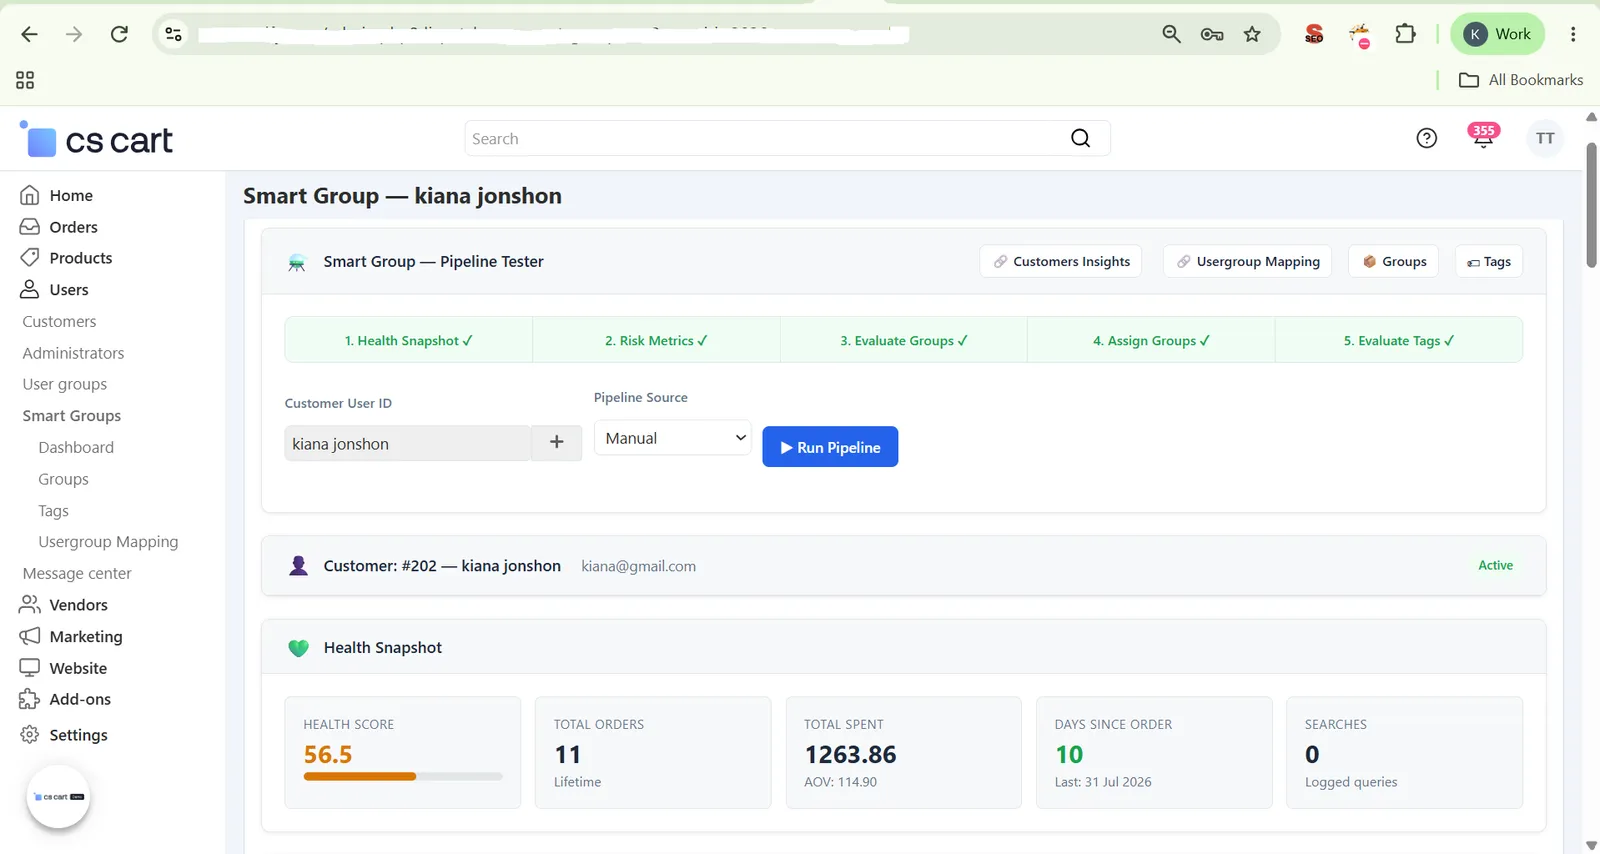
Use the Pipeline Tester to test how Smart Group evaluates a customer, assigns smart groups, and applies smart tags before running the automated cron process. Navigate to Users → Smart Groups → Dashboard:
- Select a Customer – Enter a customer User ID and select the Pipeline Source (Manual or scheduled).
- Run the Pipeline – Click Run Pipeline to evaluate the selected customer.
- Review Pipeline Results – Review the results across the five pipeline stages: 1. Health Snapshot → 2. Risk Metrics → 3. Evaluate Groups → 4. Assign Groups → 5. Evaluate Tags.
Step 7: Create & Manage Smart Groups
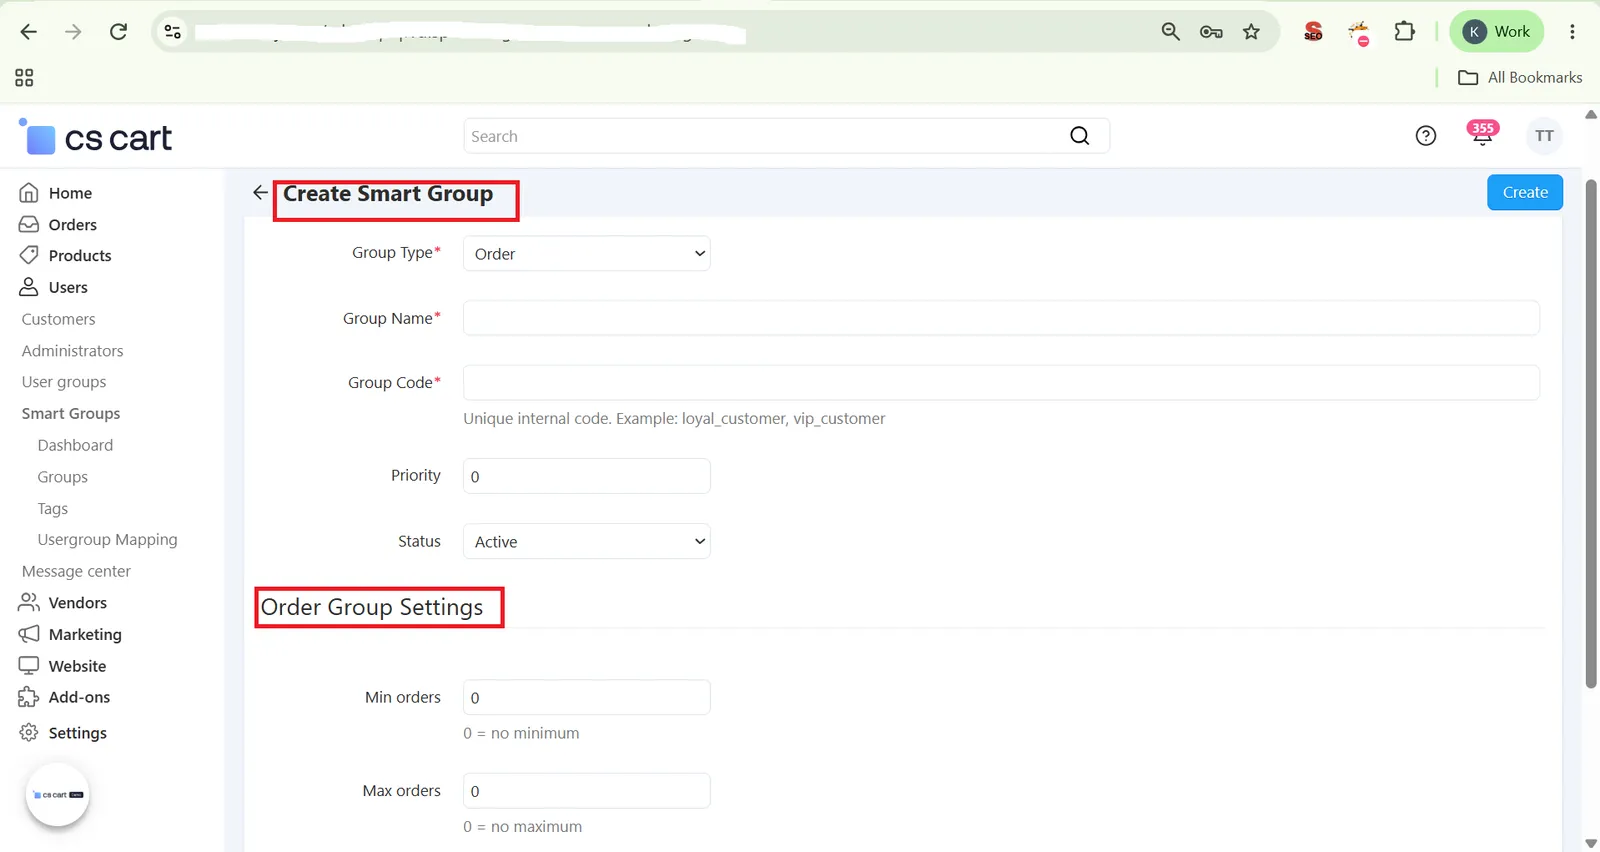
Create a Smart Group by selecting a group type, defining its conditions, and setting its priority. Once saved, the add-on automatically evaluates customers against the configured rules and assigns qualifying customers to the group. Go to Users → Smart Groups → Groups:
- Create a Smart Group – Click Create Group and select the group type: Order, Search, Risk, Activity, or Geo.
- Enter Group Details – Fill in the Group Type, Group Name, Group Code, Priority, and Status so the group is clearly identified and correctly ordered against other groups when a customer could qualify for more than one.
- Configure Group-Specific Conditions – Set the rules for the selected group type — for example, an Order Group lets you configure a Minimum Orders condition. The available conditions change depending on the group type you choose.
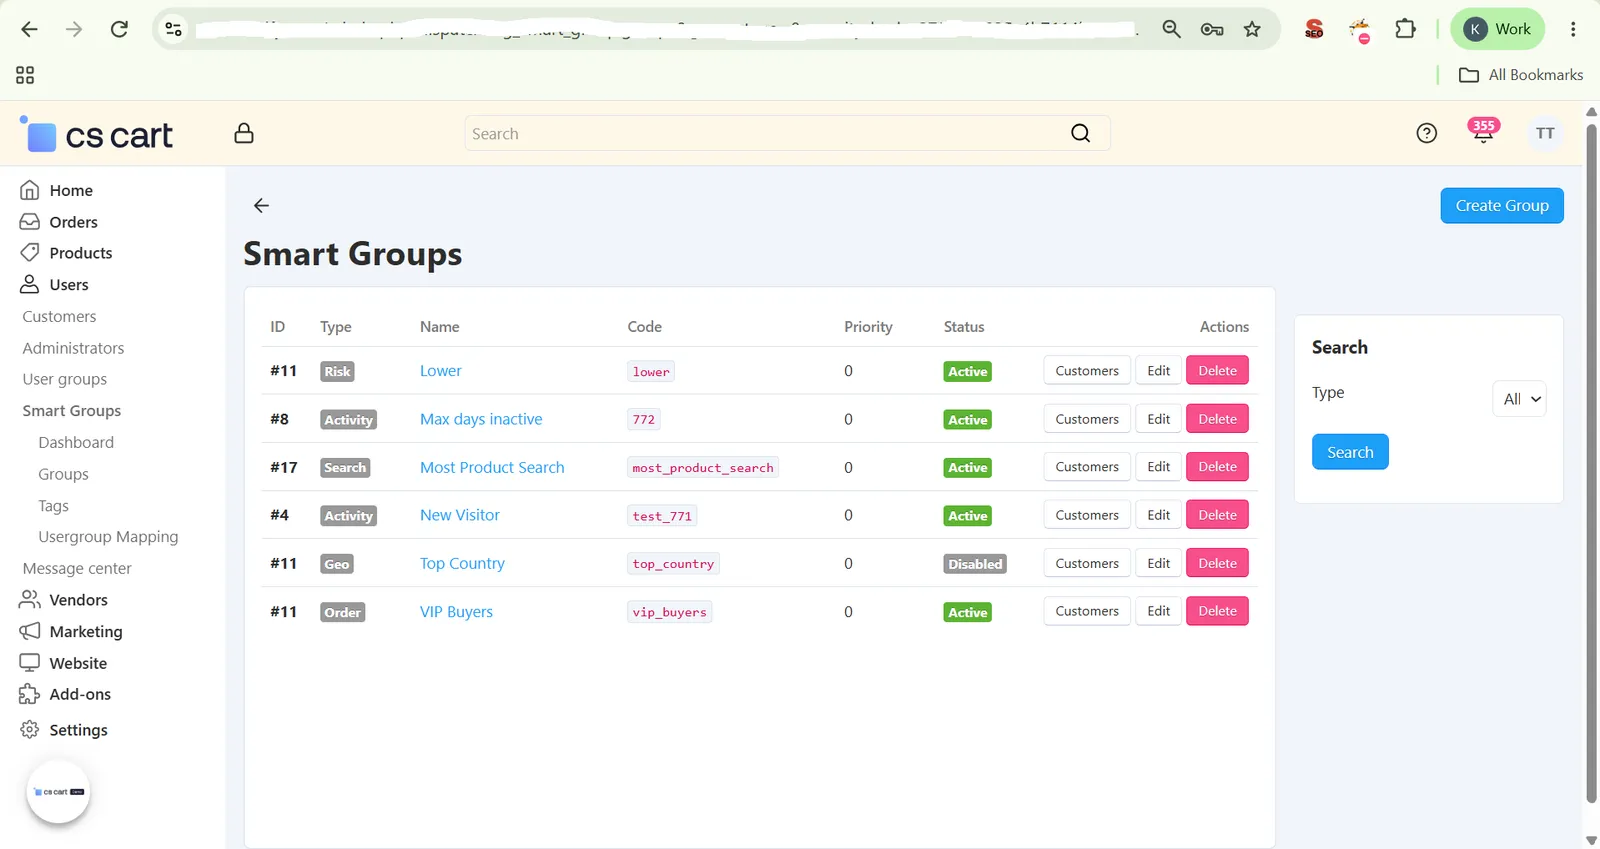
- Save and Verify the Group – Save the group to see it appear in the Smart Groups list, then use Customers to view every customer currently assigned to it, Edit to adjust its rules and status, or Delete to remove it.
Step 8: Create Smart Tags With Auto-Assign Rules
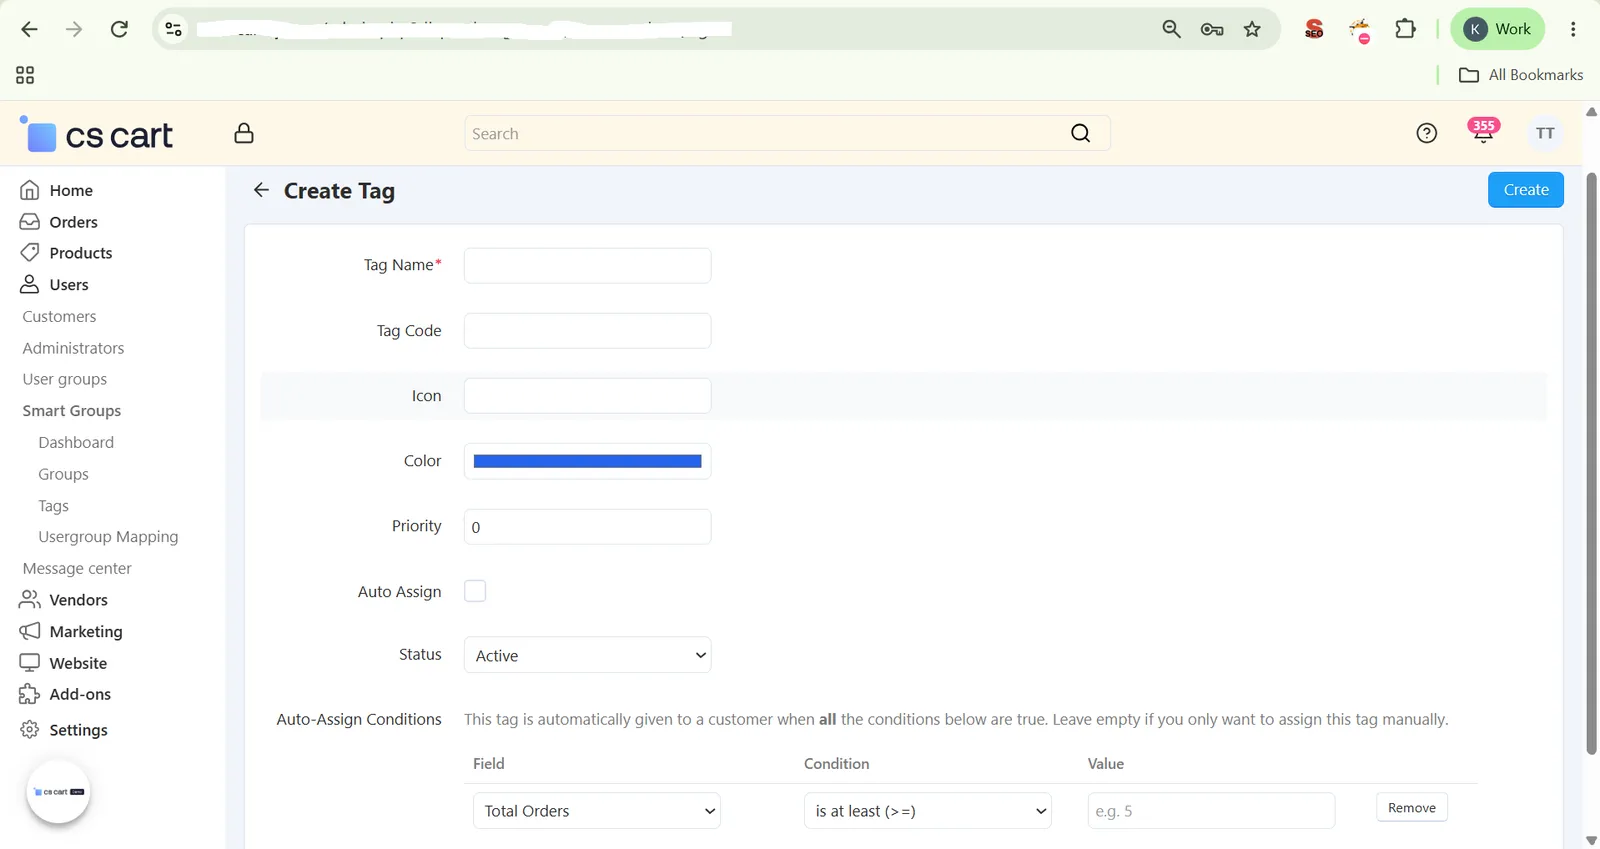
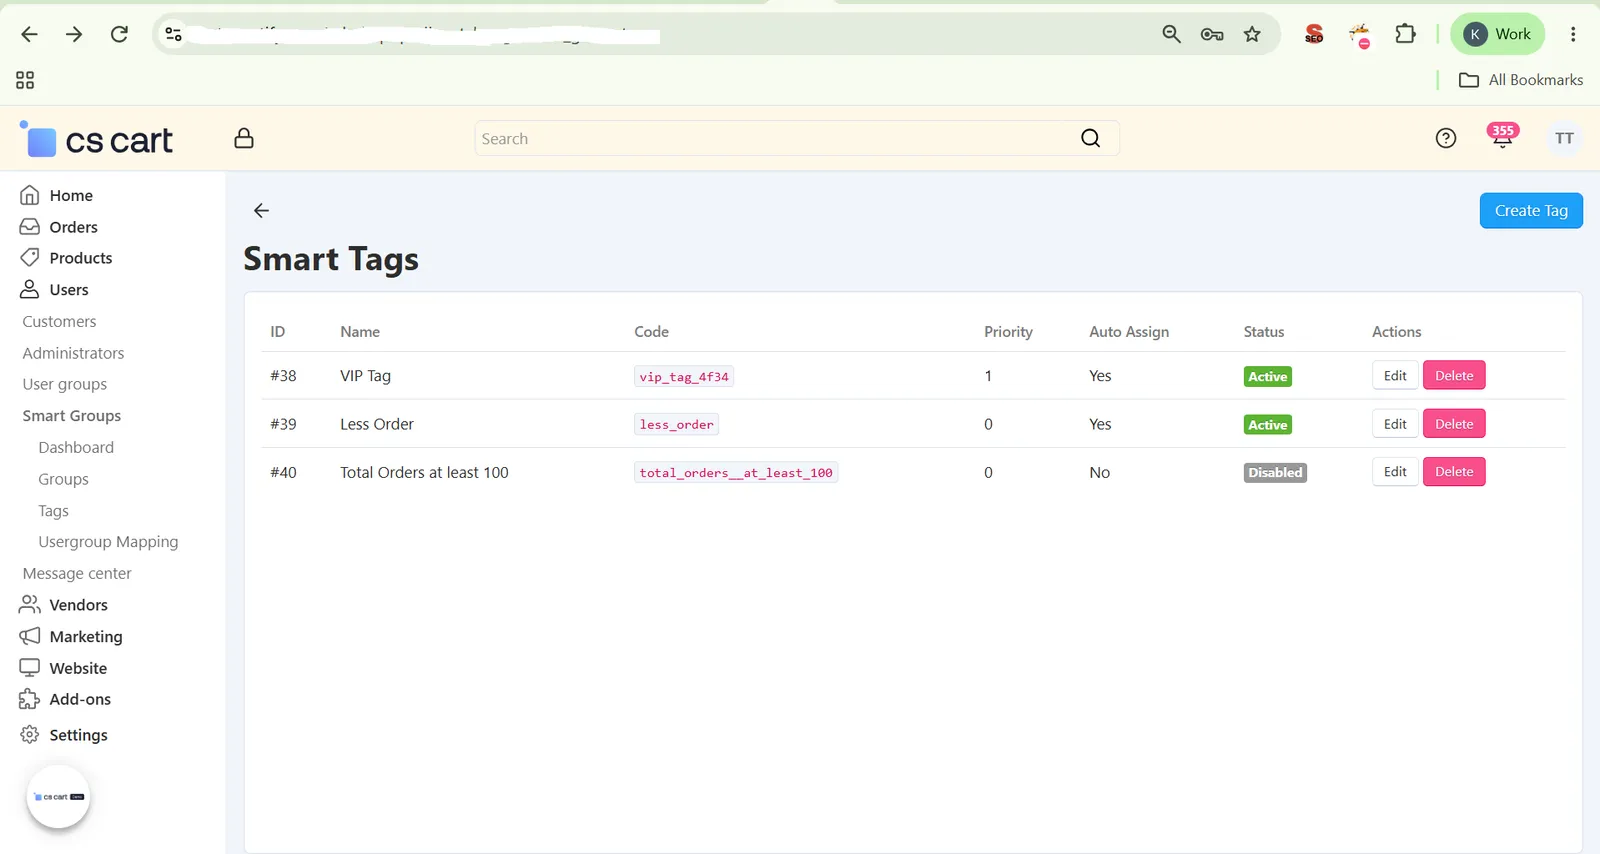
Go to Users → Smart Groups → Tags to create customer tags and automatically assign them based on customer behavior and activity.
- Create & Configure Smart Tags – Create a tag by defining its Name, Code, Icon, Color, Priority, Auto Assign, and Status. Enable Auto Assign when you want the system to automatically apply the tag when the customer meets the configured conditions.
- Set Auto-Assign Conditions – Choose a Field → Condition → Value to define the rule. For example, Total Orders → is at least (≥) → 5 automatically assigns the tag when a customer has 5 or more orders. You can create rules using metrics such as Total Orders, Total Spent, Average Order Value, Total Visits, Total Searches, Health Score, Refunds, Disputes, and Risk Score.
- Use Multiple Conditions – Click + Add Condition to create more specific customer segments. All configured conditions must be satisfied for the tag to be automatically assigned. Example — VIP Customer: Total Orders ≥ 5, Total Spent ≥ ₹10,000, Auto Assign → Enabled.
- Priority-Based Tags – Set a priority to control the evaluation order when a customer matches multiple tag rules.
- Automate Customer Actions – Use tags to trigger relevant marketing actions, such as emails, coupons, or webhooks, when customers qualify for a tag.
Step 9: Map Smart Groups to CS-Cart Usergroups
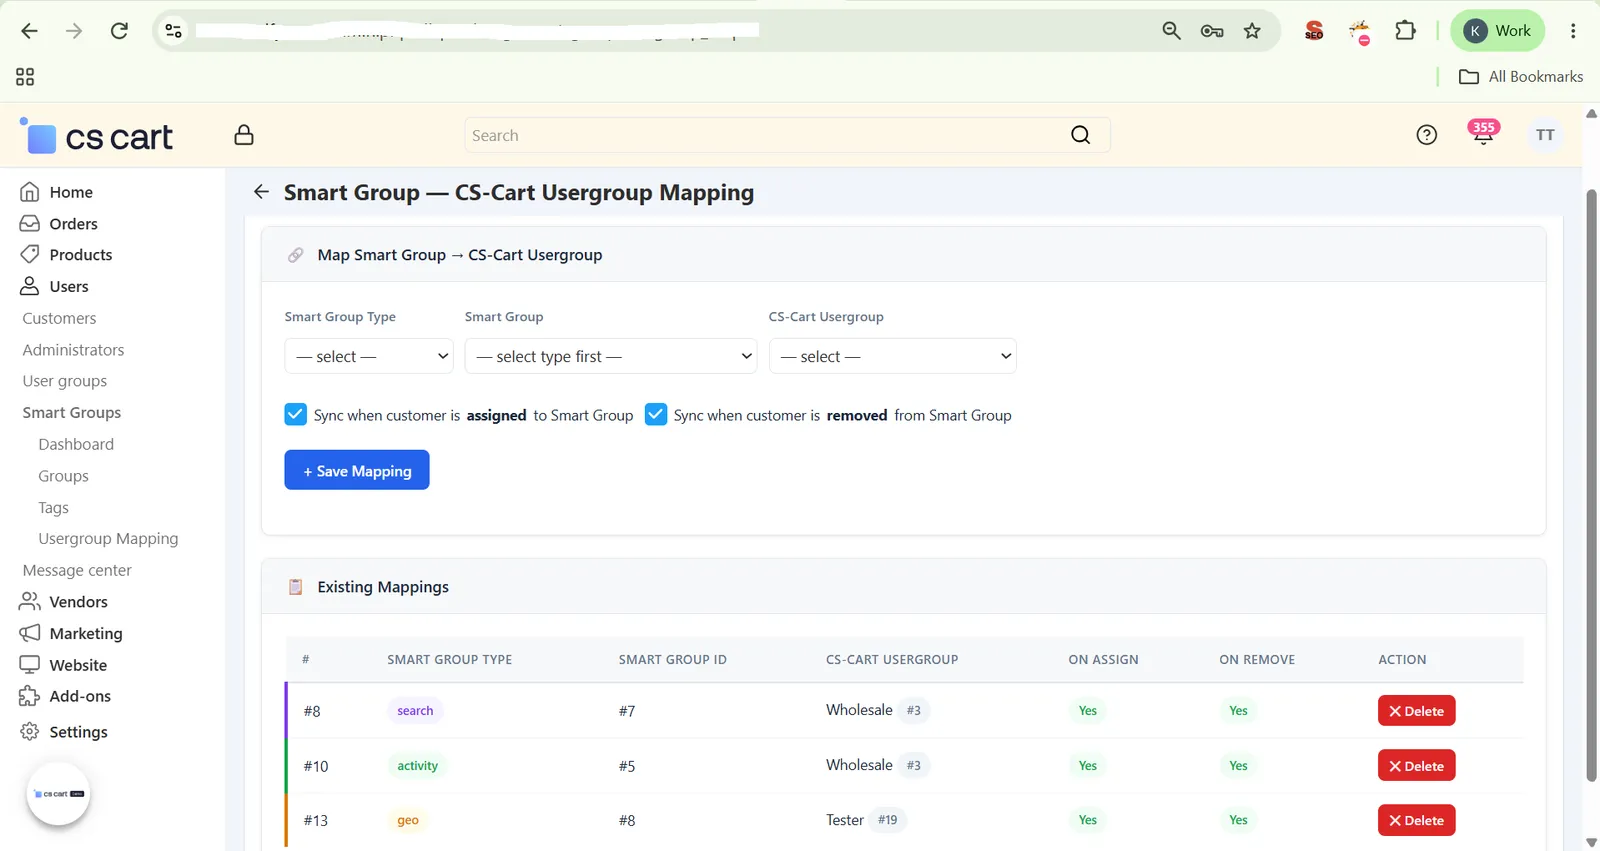
Go to Users → Smart Groups → Usergroup Mapping to connect your internal segments to native CS-Cart pricing and permission rules:
- Select Smart Group Type & Group:
Choose the Smart Group Type first, then pick the specific Smart Group you want to map to a native CS-Cart Usergroup. - Sync On Assign / Remove:
Independently choose whether the usergroup should sync when a customer is assigned to the Smart Group, removed from it, or both. - View & Manage Existing Mappings:
The Existing Mappings table shows every active mapping with its type, Smart Group ID, target CS-Cart usergroup, sync behavior, and a one-click Delete action.
Step 10: Explore Customer Insights
Open Customer Insights from the Pipeline Tester header to review customer-level segmentation, activity, spending, risk, groups, and tags in a single sortable table.
- Review Customer Metrics – Compare customers using Health (customer health score), Orders (total orders), Spent (total spending), Days Since Order (days since their last order), and Risk (customer risk score).
- Review Groups & Tags – The Groups and Tags columns show a customer's current Smart Group memberships and assigned Smart Tags without opening their profile.
- Sort & Identify Customer Segments – Use sorting to quickly spot high-spending customers, frequent buyers, inactive customers, and customers with higher risk scores.
- Open Customer Details – Click a customer's name to open their individual Customer Dashboard for detailed information and AI recommendations.
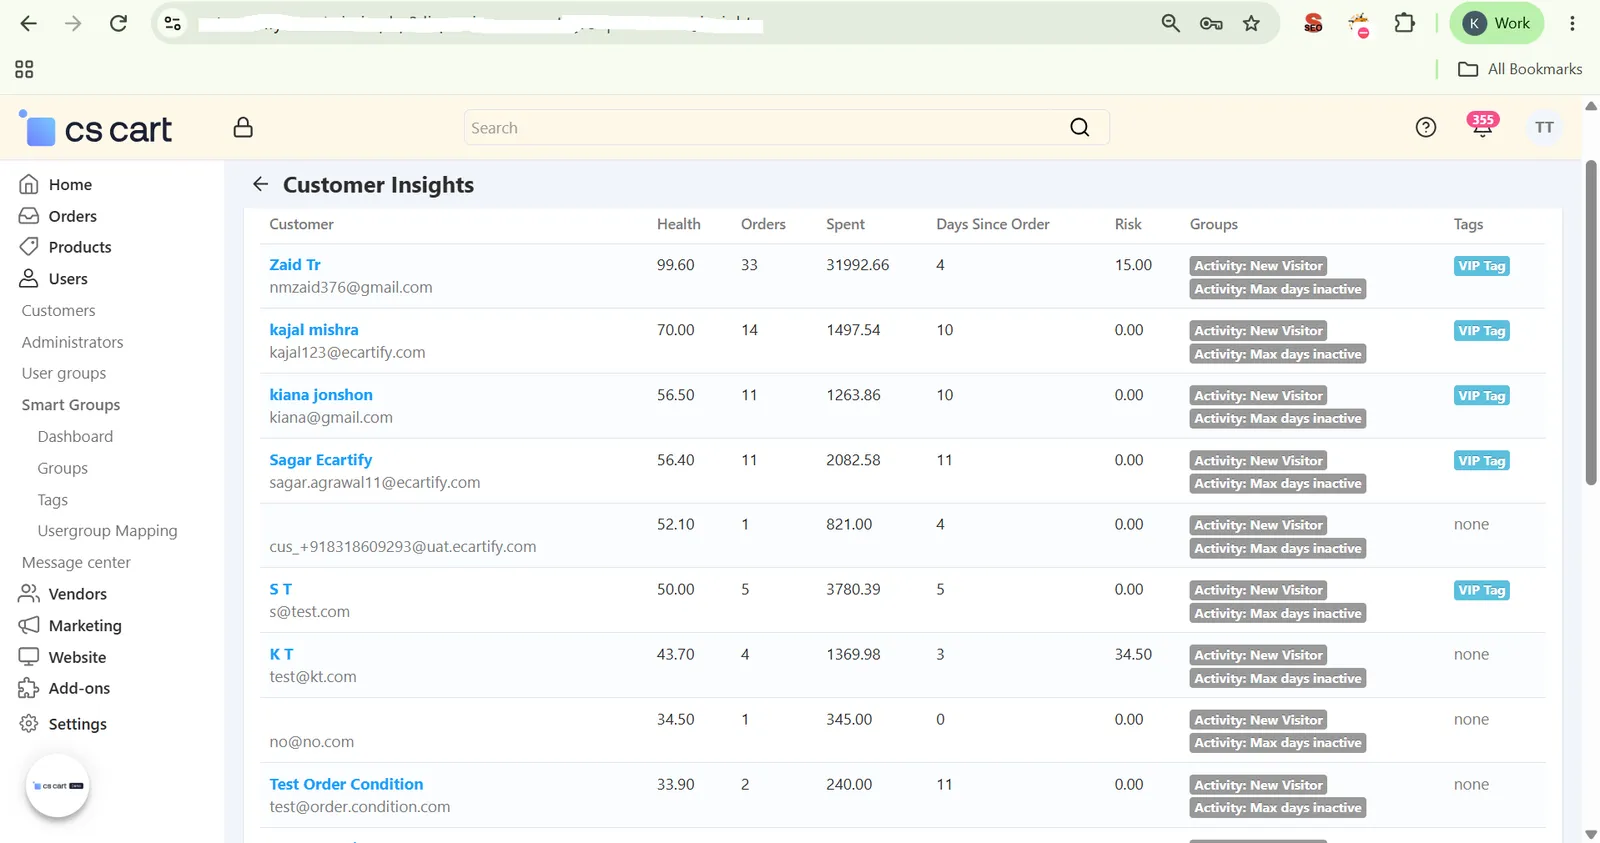
Example: a customer with high spending, multiple orders, and a low number of days since their last order can be identified as an active, high-value customer. A customer with many days since their last order can be reviewed for a possible re-engagement campaign.
Step 11: Get AI-Powered Customer Recommendations
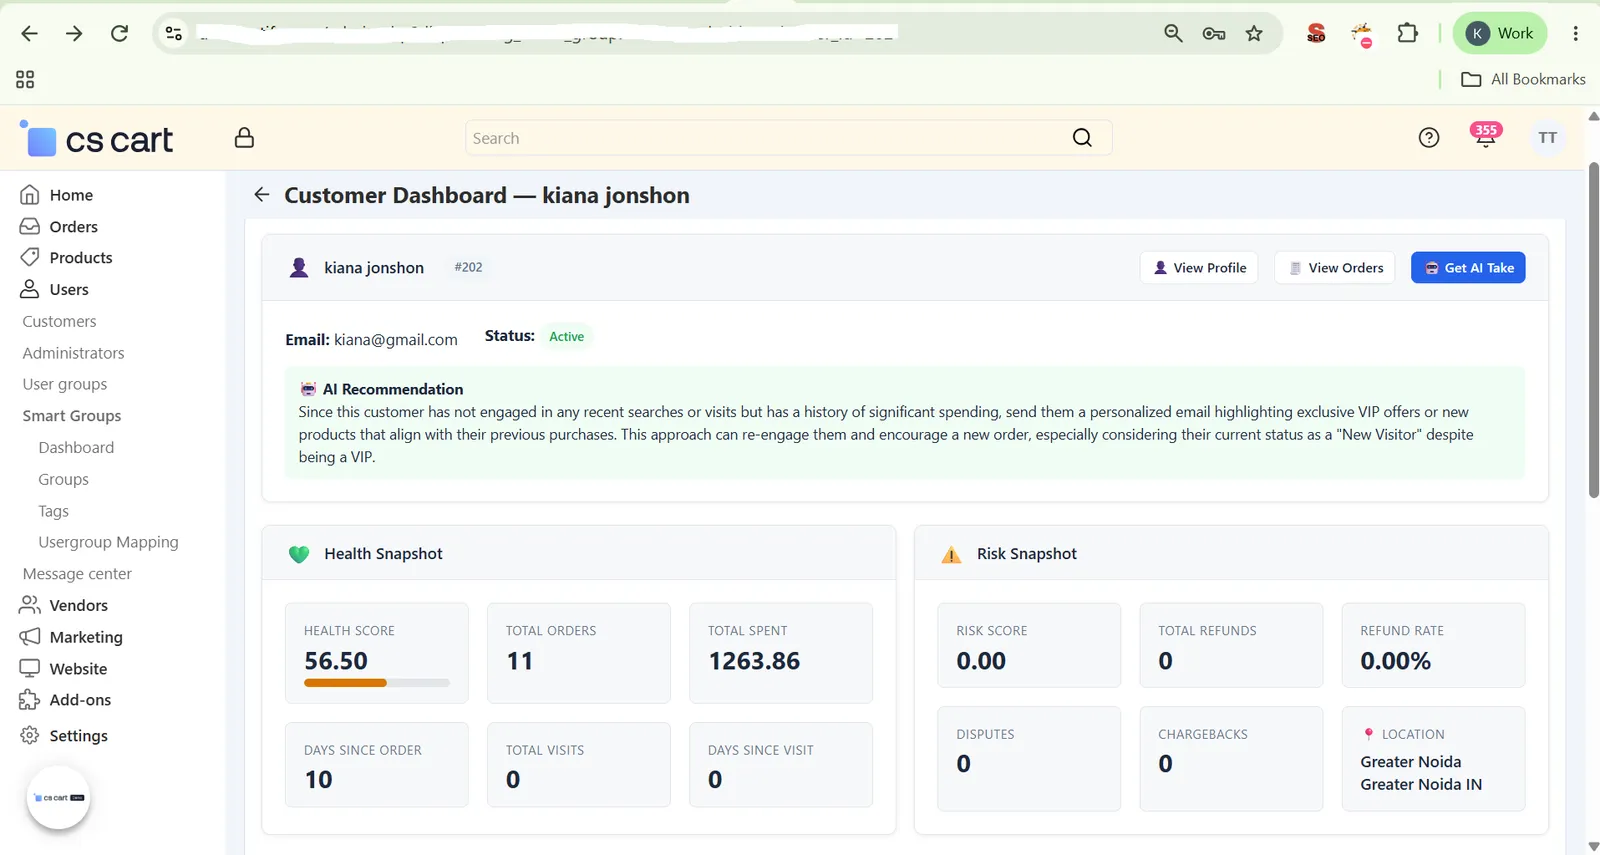
Open the Customer Dashboard for an individual customer from Users → Smart Groups → Dashboard, or access it through Customer Insights, to review the customer's complete profile and generate an AI-powered recommendation.
- Review Customer Health & Risk Snapshot – View key metrics: Health Score, Total Orders, Total Spent, Days Since Order, Total Visits, Days Since Visit, Risk Score, Refunds, Disputes, Chargebacks, and Location.
- Review Group Memberships & Recent Searches – See the customer's current Smart Group memberships (with source and assigned date) plus their Recent Searches log: search query, result count, and timestamp.
- Get an AI Take – Click Get AI Take to generate a plain-English recommendation based on the customer's health, risk, group memberships, recent searches, and purchase activity — use it to identify targeted promotions, re-engagement campaigns, or follow-up offers.
Real-World Benefits & Results
Understand Your Customers
Quickly identify loyal, engaged, and at-risk customers and take the right action for each.
Understand customer behavior and engagement patterns more clearly.
Make smarter, faster decisions using real customer data instead of guesswork.
Automate Customer Engagement
Automatically target customers based on their behavior.
Trigger emails, coupons, or webhooks the moment a customer qualifies.
Reduce repetitive manual segmentation so your team can focus on strategy.
Take Action Faster
Get AI-powered recommendations for individual customers.
Use customer insights to create offers that actually match what a customer wants.
Focus your efforts on customers who need attention instead of scanning your entire customer base.
Save Time & Reduce Manual Work
Keep customer groups and tags updated automatically, without lifting a finger.
Reduce the need for manual customer tracking.
Manage customer segmentation from one place.
Know Every Customer Better — Starting Today
Turn customer data into clear actions with Smart Group. Identify loyal, active, and at-risk customers, automate customer segmentation and engagement, and use AI-powered insights to make smarter decisions.
Identify loyal, active, and at-risk customers and target them with relevant offers.
Automatically trigger emails, coupons, or webhooks when customers meet specific conditions.
Automate customer segmentation, scoring, tagging, and updates to reduce manual work.
Use customer behavior and insights to create more personalized marketing campaigns.
Get actionable AI recommendations to understand customers and decide what to do next.
Use configurable data retention, automated cleanup, and reversible sample data without affecting existing store data.