

Xero Accounting Financial Control with Seamless Xero Integration
Sync invoices, payments, and reports automatically to eliminate errors and spend more time growing your business.Ecartify: Xero Accounting Integration
Transform your CS-Cart accounting workflow with the Xero Connector. This powerful addon automatically synchronizes orders, invoices, payments, products, and inventory between your CS-Cart store and Xero accounting software. Eliminate manual data entry, reduce errors, and maintain real-time financial visibility with secure, automated synchronization.
Key Features of Xero Connector
Orders instantly become Xero invoices with complete details, line items, and taxes.
Payments automatically sync to Xero for accurate cash flow monitoring.
Refunds and cancellations generate credit notes automatically in Xero.
Customer data syncs as Xero contacts, maintaining consistent records.
Products and stock levels stay synchronized across both platforms.
Map transactions to correct Xero accounts for accurate financial reporting.
Automatic tax calculation and recording for GST/VAT compliance.
Industry-standard secure authentication with encrypted data transmission.
Real-time connection status and comprehensive diagnostics dashboard.
Step-by-Step Setup Guide
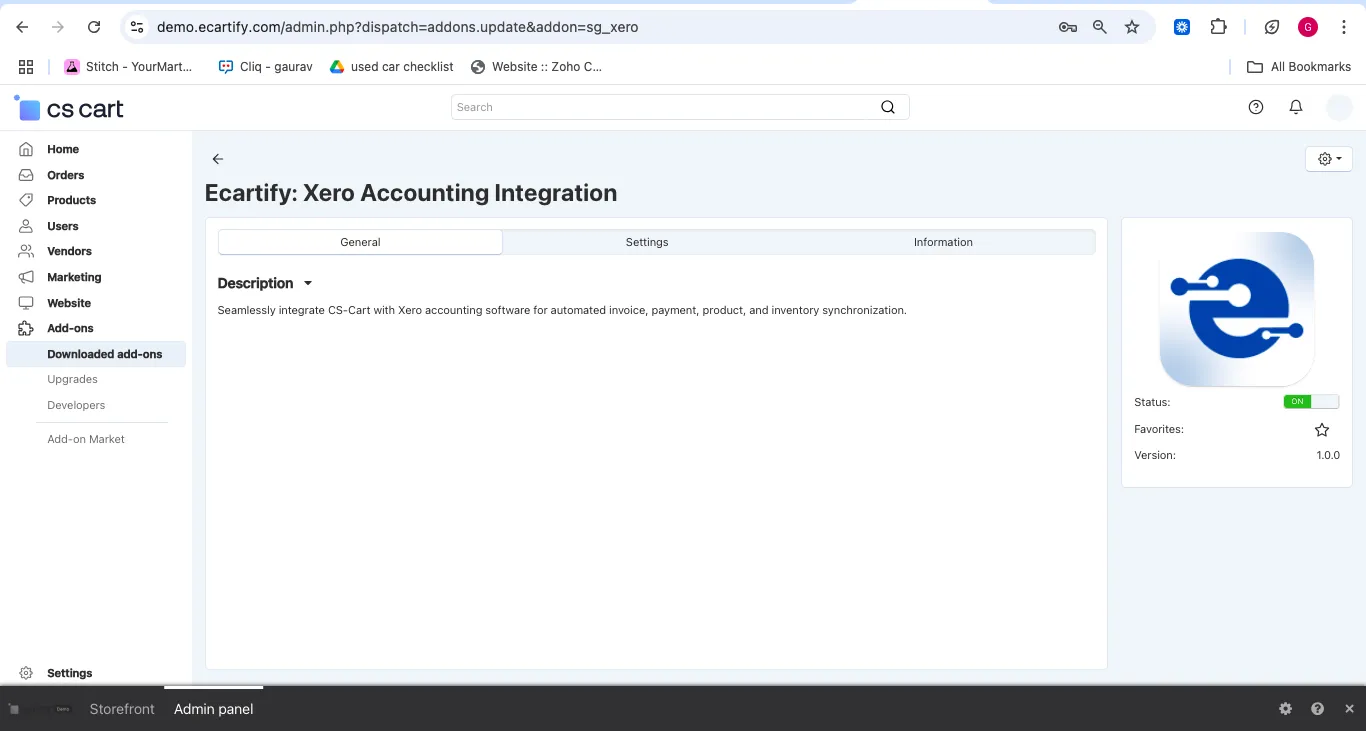
Step 1: Install the Addon
Installing the Xero Accounting Integration addon is simple and takes just a few minutes:
No coding knowledge required - the installation is fully automated!
Step 2: Create Xero Developer App
Before connecting, you need to create a Xero Developer App to obtain API credentials:
Go to developer.xero.com and log in with your Xero account
Click "New App" and fill in your application details (name, company URL, etc.)
Once created, you'll receive your Client ID and Client Secret
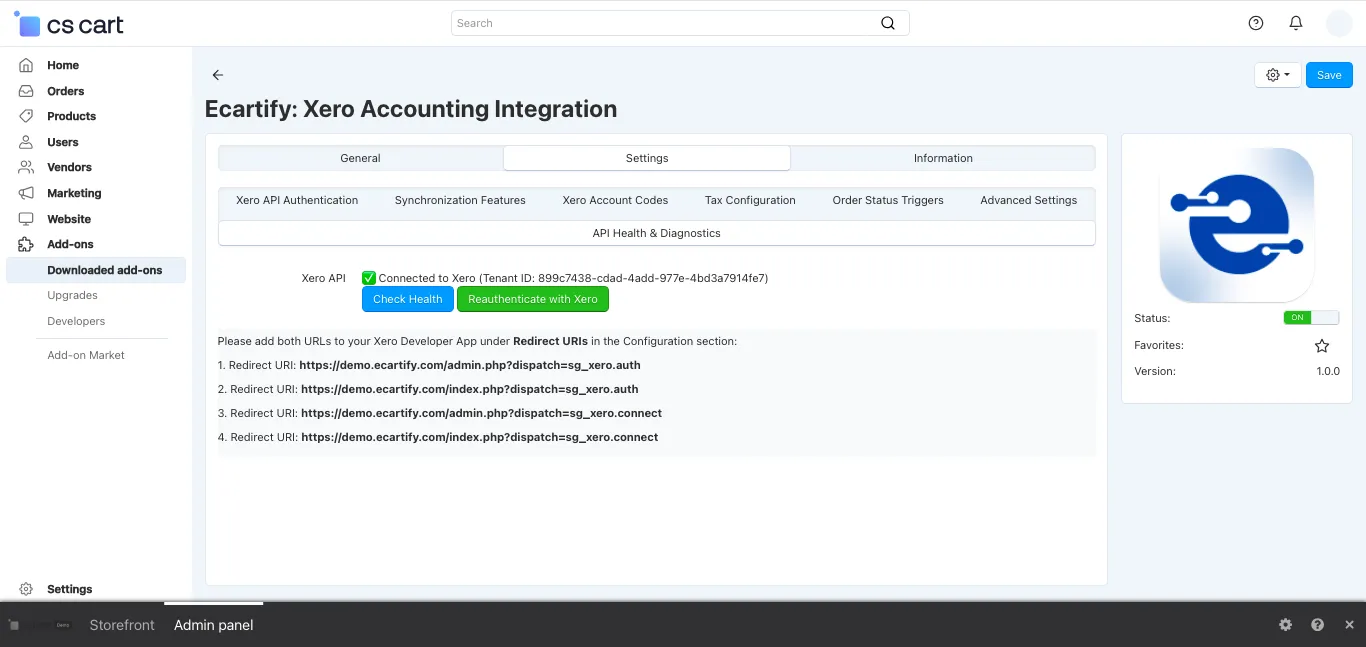
Add both redirect URLs provided in the addon settings to your Xero app configuration
Step 3: Connect to Xero
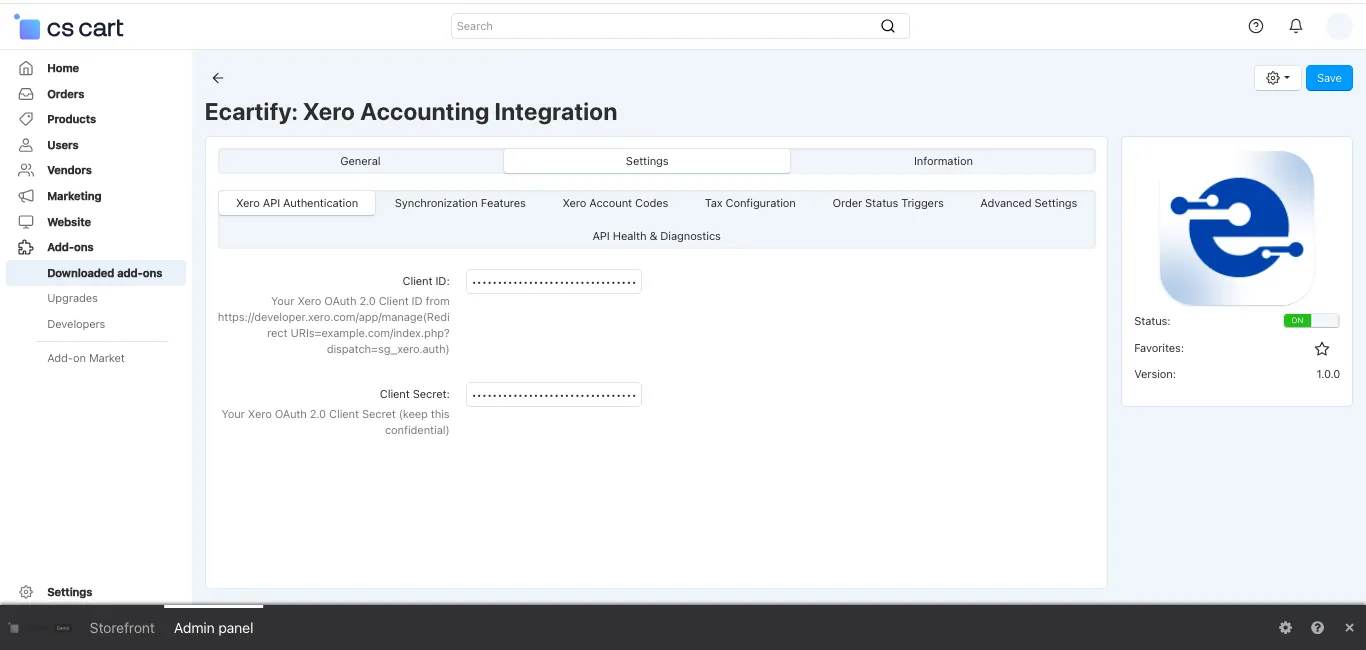
Configure the authentication settings to securely connect your store to Xero:
Paste your Xero OAuth 2.0 Client ID from the developer portal
Paste your Client Secret (keep this confidential)
Copy both provided URLs and add them to your Xero Developer App
Authenticate via OAuth 2.0 secure connection
Once connected, you'll see your organization details and connection status!
Step 4: Enable Synchronization Features
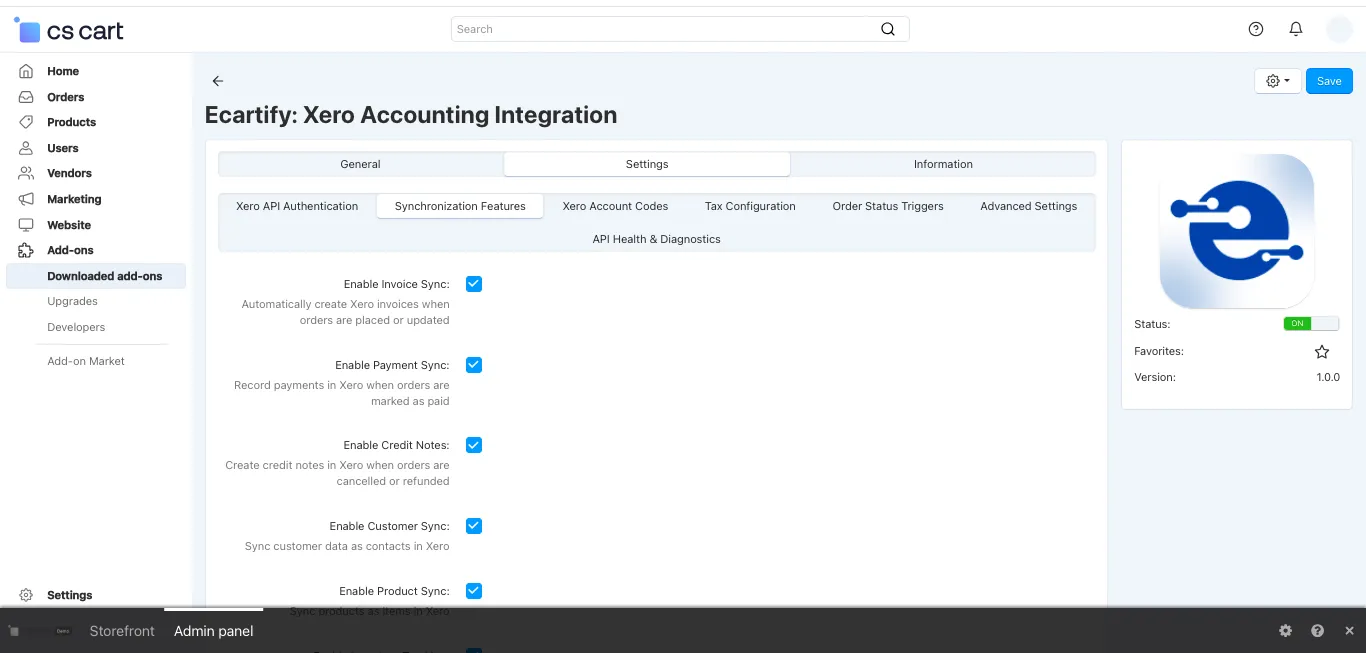
Choose which data you want to sync between CS-Cart and Xero:
Step 5: Configure Xero Account Codes
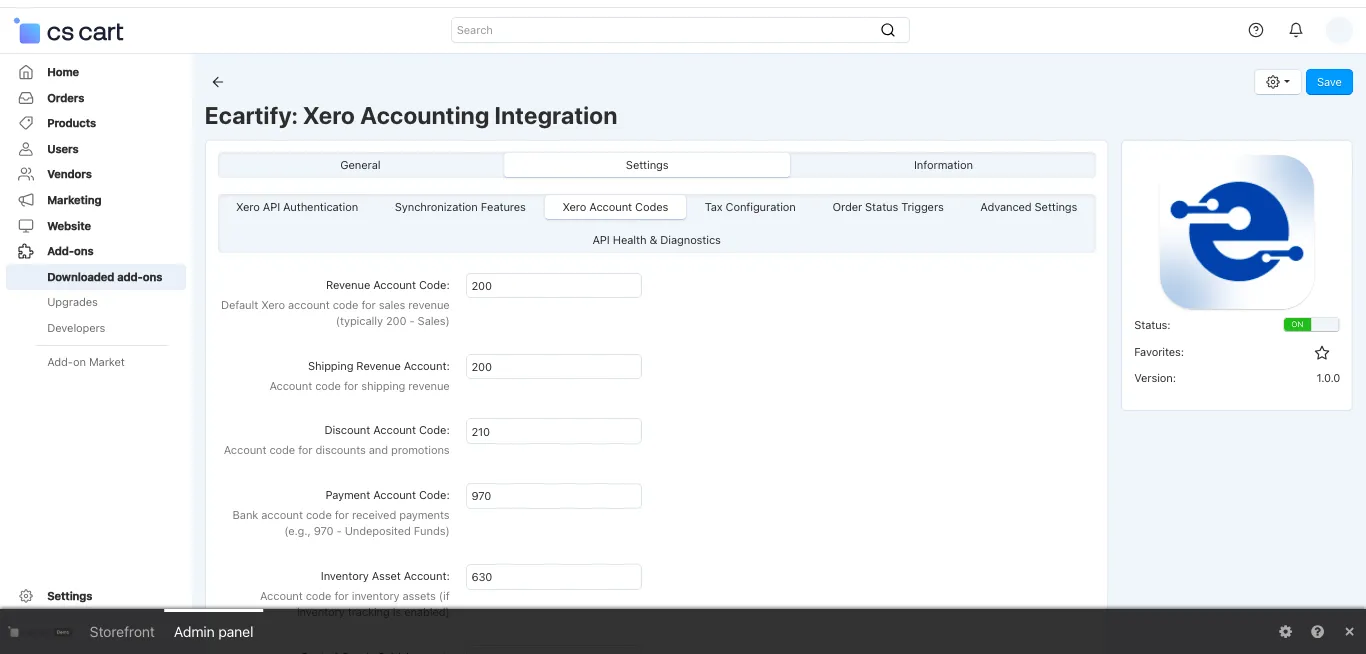
Map CS-Cart transactions to the correct Xero accounts for accurate financial reporting:
Flexible account mapping ensures proper financial categorization and simplified reporting!
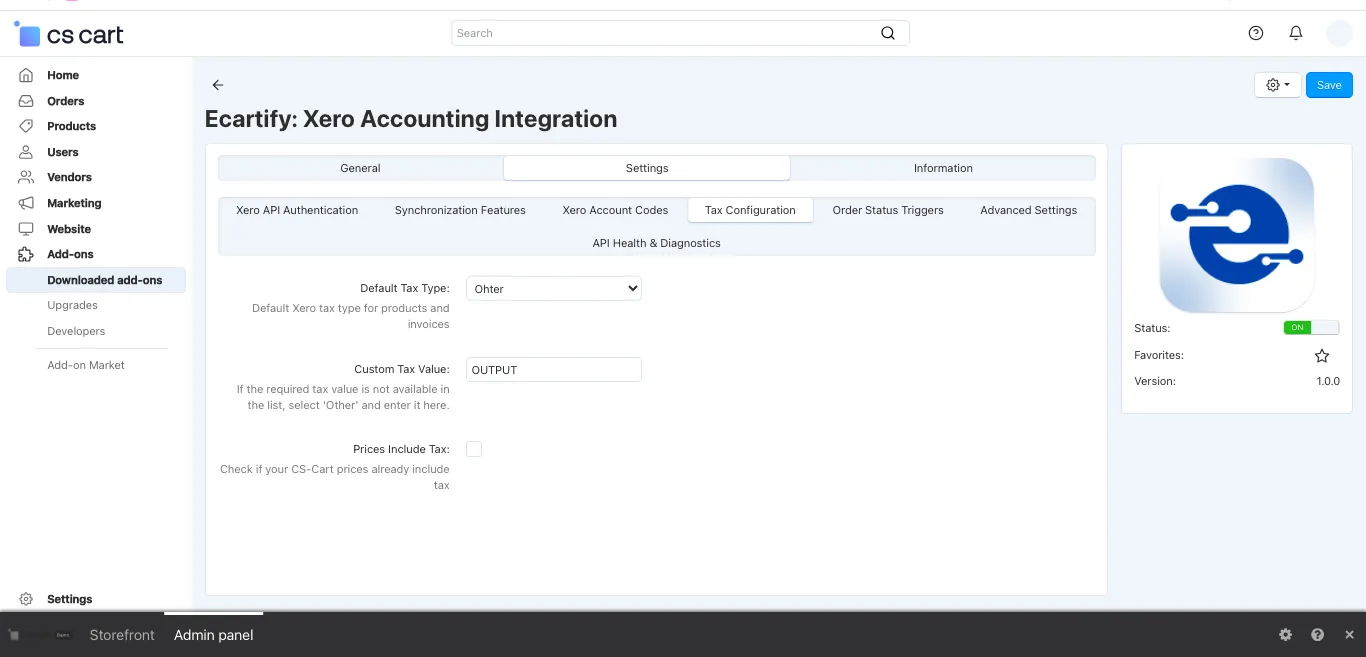
Step 6: Set Up Tax Configuration
Configure tax settings to ensure accurate tax handling and compliance:
Select from Xero's predefined tax types (Output, Input, None, or Other)
Enter custom tax codes if your required tax isn't in the standard list
Check this box if CS-Cart prices already include tax
Accurate tax handling ensures compliance and eliminates reconciliation issues during tax season!
Step 7: Configure Order Status Triggers
Choose which order statuses trigger automatic invoice and credit note creation:
Select: Processed, Complete, Open, All Status
Match synchronization to your specific business processes
This flexibility allows you to control exactly when financial data is synced to Xero!
Step 8: Enable Debug Logging (Optional)
For troubleshooting and monitoring synchronization activity:
Get detailed sync information for troubleshooting connection issues
Set automatic log cleanup with configurable retention period (default: 30 days)
Comprehensive logs help with technical support and diagnostics when needed!
Step 9: Verify API Health & Connection
Monitor your Xero connection status and view important integration details:
The API Health dashboard gives you complete visibility into your integration!
Step 10: Test & Start Syncing
Test the integration and begin automatic synchronization:
Select products or orders and use "Sync to Xero" option to test
Check your Xero account to confirm data appears correctly
Once tested, all future transactions sync automatically
Check API Health dashboard and logs to ensure smooth operation
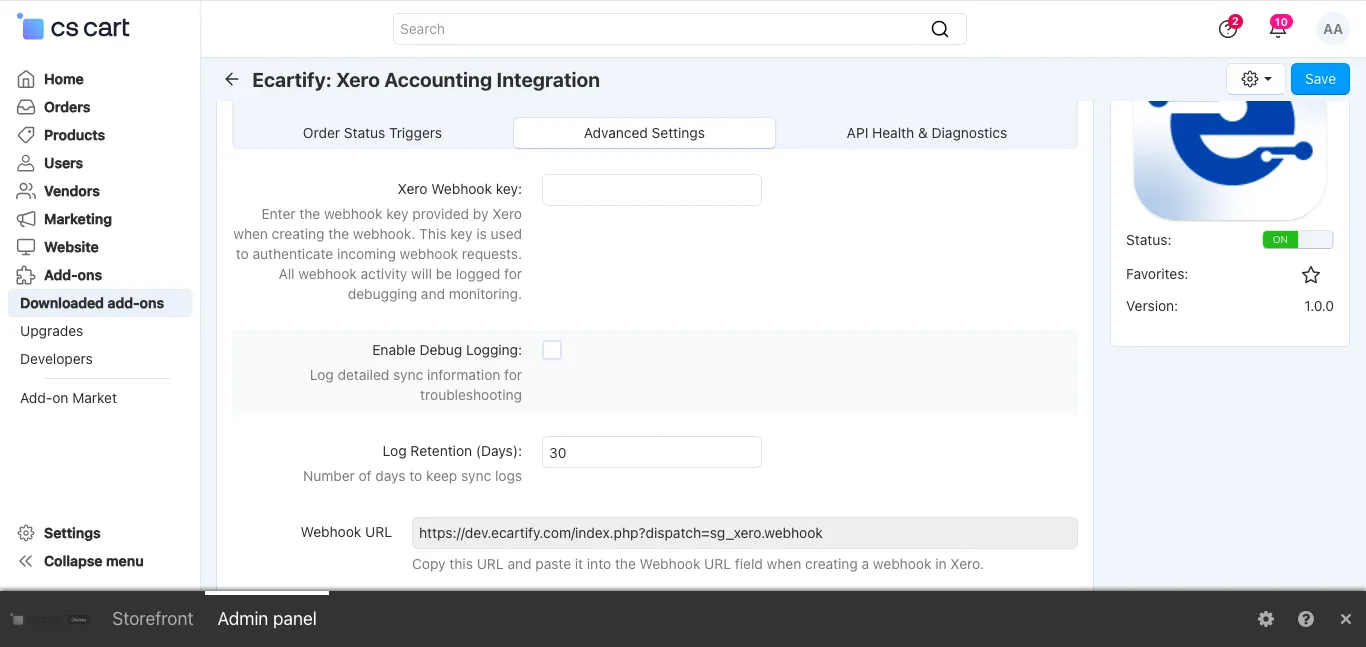
Navigate to Search Logs in the left sidebar to access all three log sections — Xero Webhook, CS-Cart → Xero Create, and CS-Cart → Xero Update. Each section shows a live count of logged entries and lets you filter by Order ID, Invoice ID, or Date.
Every time a new invoice is pushed from CS-Cart to Xero, an entry is recorded here. You can see exactly which order triggered the invoice, the payload sent, and the Invoice ID returned by Xero. If the count shows 0, no invoices have been created yet.
When an existing order is modified and the corresponding Xero invoice is updated, the event is captured here. This helps you trace whether an update was successfully pushed or failed silently.
Logs all incoming events from Xero back to CS-Cart. If you have set up a webhook in Xero, every trigger (such as a payment marked in Xero) will appear here for debugging and monitoring.
Found in Advanced Settings, this is the URL you paste into Xero when creating a webhook. It follows the format
https://yourstore.com/index.php?dispatch=sg_xero.webhook and must be
reachable publicly for Xero to send events to your store.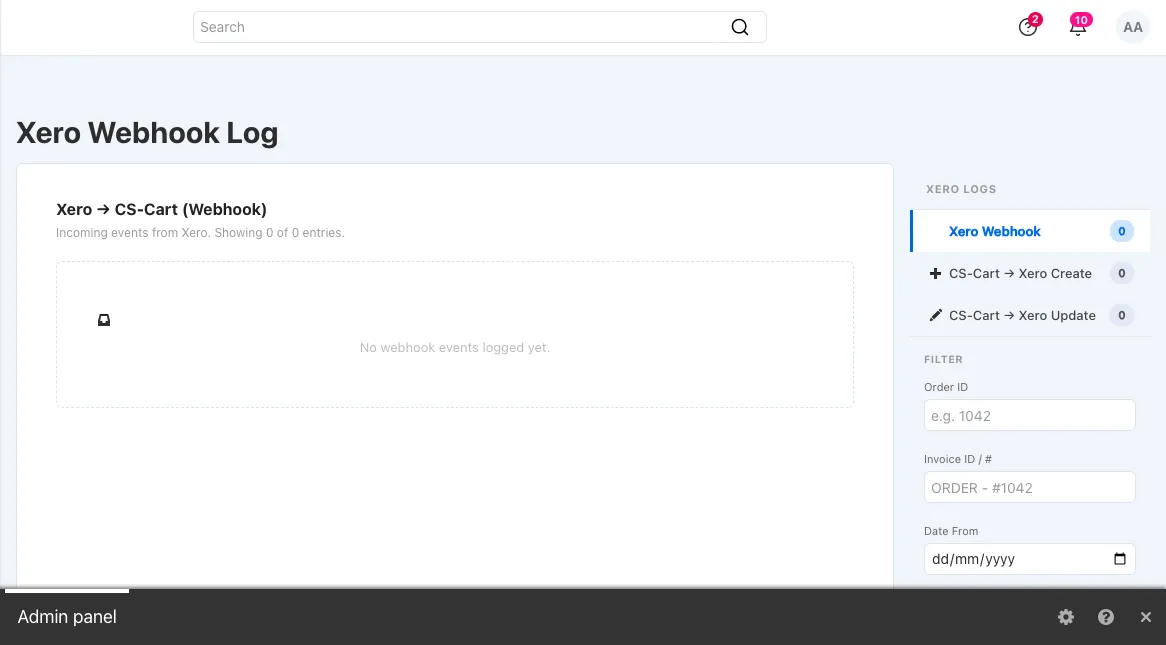
What Can You Sync?
The Xero Connector provides comprehensive synchronization across all major e-commerce and accounting entities:
Orders → Invoices
Payments → Bank Transactions
Refunds → Credit Notes
Customers → Contacts
Products → Inventory Items
Stock Levels → Inventory Tracking
Benefits for Your Business
Time Savings
Error Reduction
Real-Time Financial Visibility
Scalability
Transform Your Accounting Workflow Today
Your Xero Connector is now ready to revolutionize how you manage your CS-Cart store finances. Say goodbye to manual data entry, reconciliation headaches, and time-consuming bookkeeping tasks. With automated synchronization, you can:
Pro Tip: Start by syncing historical orders in batches to populate your Xero account, then enable automatic synchronization for all future transactions. Use the API Health dashboard to monitor your integration and ensure everything runs smoothly!
Ready to automate your accounting? Install Xero Connector today and experience error-free, real-time financial management!